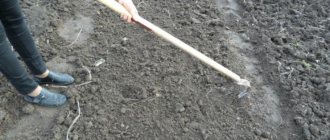
The Fokin flat cutter can be called a unique device: it simultaneously performs the functions of a shovel, a rake, a hoe, and a scythe. They alone can carry out most garden work. Its main advantage and, in fact, its purpose is a blade that plunges to a depth of 2–5 cm, which can cut or pull out weeds.
You can make this tool yourself. First you need to select the material and prepare everything necessary for the work. Then, based on the drawing, make a homemade product.
We make Fokina flat cutter
Modern functional garden tools allow you to effectively carry out work on your garden plots. One of these tools is a flat cutter, which is simple and easy to use, can significantly reduce the processing time of plots and optimize garden work. This device is very functional, so summer residents mainly use it for work in their garden.
How to work with a Fokin flat cutter
It was invented by V.V. Fokin, a journalist by training and a gardener by vocation. For many years, Fokin communicated with residents of rural areas, studied various garden tools, experimented with various methods and techniques at his summer cottage, until he invented the manual one, which now bears his name. Fokin’s unique invention has become an indispensable assistant for many gardeners; it significantly reduces the load on the spine and has a beneficial effect on soil cover and productivity.
Description
The Fokina flat cutter is a device that makes it possible to cultivate the land manually, applying a minimum amount of effort. The authorship and patent for this invention belongs to V.V. Fokin, a talented innovator who came up with an original tool that facilitates the hard work of a toiling farmer. The flat cutter has a positive effect on the condition of the soil and has several important functions:
- shovel;
- rake;
- hoe.
There are three types of flat cutters:
combination tool;
large flat cutter;
small manual flat cutter.
In total, this tool can do about 20 different types of work.
The soil is tilled without significant damage, and weeds die. Also, noticeably less effort is spent during the production process, and productivity increases significantly.
IMPROVING THE FOKIN FLAT CUTTER
The popular universal garden tool Fokina flat cutter is really very convenient. This tool is easy and convenient to perform many (up to 20) different operations. It can simultaneously perform the functions of a hoe, shovel, scythe and rake.
The Fokina flat cutter is designed for soil cultivation; functionally, it is a soil tool with which few other similar tools can compare.
But for those who are not satisfied with the 20 operations described in the instructions for the Fokin flat cutter, it is proposed to modify the shape of the large blade of the flat cutter.
The modification consists in making a V-shaped cut in the blade approximately 50 mm long and 12 mm wide along the short edge of the blade, followed by a special sharpening on the same side as the main sharpening. The cut is made to reliably pull out the rhizomes of perennial weeds from the soil at a depth equal to the length of the blade or more.
This is done as follows. The V-shaped cutter should be directed vertically into the ground at a distance of 2-5 cm from the weed. The handle lies horizontally in the direction of the weed stem. Next, you need to press the blade with your foot so that it goes into the soil to its full depth. Then lift the end of the handle and pull out the rhizome using the V-shaped notch.
IMPROVED FLAT CUTTER WITH YOUR HANDS
About the device
In the fields, cultivation is carried out using special equipment with the necessary equipment, but as for small farms and plots, for their cultivation you can use light motorized equipment, such as cultivators such as an electric cultivator for a summer residence, a mini cultivator, Loplosh or manual cultivators.
If we talk about a homemade manual cultivator for the garden with your own hands, it is quite possible to make it.
It can be made without the use of any special materials or tools, and this can be done in a day or a couple of hours, depending on what exactly the future product will be - a simple hedgehog with a handle, or a modification of an old bicycle.
But you will definitely get benefits from such a product. It will be a well-kept garden, where a variety of crops bear fruit equally well, free of weeds, with soil that is easy to cultivate.
All mechanical parts are extremely reliable due to their simplicity, and if they break down, it will be very easy to replace anything - you just need to make a new part from existing materials.
Also, the manufacture of homemade hand cultivators requires virtually no design or engineering experience, since they consist mainly of just a few movable joints.
What material was used.
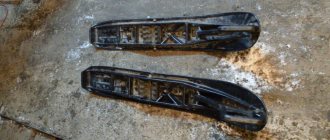
To make the flat cutter I used the same torsion bar sheets from the old Zaporozhets. For interested citizens, there is an address in Yekaterinburg for an enterprise (www.stenco.ru) that can send grade 65G metal.
The manufacturing process of a flat cutter.
The first stage was the tempering of the metal.
- He heated it in the flame of a blowtorch to cherry color and left it to cool in the air.
- I used a grinder to sharpen the edge of the blade for the cutting knife.
- Drilled holes for mounting to the handle. It’s a bit difficult, but at low drill speeds the process is easy.
- I drew lines with chalk where there should be bends, according to Fokin’s drawing.
- I secured the released torsion bar sheet in a vice slightly above the bend line and, heating the bend with a blowtorch, bent the sheet to the appropriate degree with an adjustable wrench. It is necessary to bend easily, without force, and it is necessary to ensure that cracks or splinters do not form. When heated, the metal becomes malleable.
- The following bends were made in a similar way.
- The most important moment comes during hardening. The burner flame from the blowtorch was directed along the blade of the flat cutter and heated to a cherry color. Don't overheat.
- Holding the edge with large carpenter's pliers, I lowered the hot blade into automobile oil for one or two seconds. I held it in the air for two or three seconds and lowered it into the oil again. Do this until the oil stops boiling on the canvas. Over-exposure will not do any good. The canvas breaks easily (tested).
All about the Fokina flat cutter
Despite the fact that the use of a manual Fokin flat cutter involves mechanical loosening, this tool, patented in the Russian Federation, has received worldwide recognition and is very widely used. This is explained quite simply, because with the help of this elementary design you can process impressive areas, being subjected to much less physical stress, and therefore not getting so tired even after many hours of work.
Purpose of the tool
The author of the instrument was Fokin, a well-known agronomist in Russia, hence the name, however, in some sources there may be an incorrect mention of it - Frolov, which is not true. His invention can become a full-fledged replacement for such universal agricultural implements as a hoe, rake and shovel, with the difference that the flat cutter has a lighter design and application, being as gentle as possible for the soil and the crops growing in it, with the exception of weeds, for the removal of which it also applies.
Naturally, the scope of application of the flat cutter is not limited to weeding alone, and its developer gives the following directions for the potential use of his multifunctional brainchild:
- Straightening between the beds, clearly separating them from each other. To complete this task, it will be enough to simply run the flat cutter along the ground without making any serious effort.
- Loosening. The use of the design allows you to cultivate areas at a distance that fully correspond to the size of the cultivated surface.
- Virgin soil processing.
- Working with complex soils containing large amounts of clay.
- Making planting furrows for seeds. In this case, the flat cutter is not driven along the surface, but is immersed in the soil to the depth that is necessary for proper planting. In this case, both large (relevant for planting seedlings with a formed root system) and small tools used for sowing small seeds, including sprouted grains and legumes, can be used.
- Breaking up clods and uprooting thick, coarse stems of weeds. To perform these manipulations, simply turn the tool with its “heel” forward and start hitting fossils in the soil or rhizomes densely embedded in it. It is noteworthy that you can damage the root system of weeds using a blade, and in this case the plant does not have to be uprooted at all, leaving it in the ground like humus.
- Correct use of a flat cutter will allow you to safely thin out and hill up plants, even if we are talking about very young seedlings.
Among other things, the device is ideal for garden work, used for cleaning soil in close proximity to trees and cleaning utility buildings, including cowsheds, pigsties and haylofts.
Fertilizing the soil will also not take much time, because with the help of a flat cutter you can quickly and easily distribute useful substances over its surface.
Advantages and disadvantages
Like any tool for agricultural work, a flat cutter has its advantages and disadvantages. Experts strongly recommend taking these factors into account before purchasing an original device, which does not cost much, or making a Fokin flat cutter according to the drawings with your own hands. So, the undeniable advantages of this design include:
Auxiliary equipment for walk-behind tractor
Among the necessary improvements to the walk-behind tractor in the form of attachments, it is recommended to make, in addition to all of the above, the following elements:
- wheels with lugs for working on loose soil;
- lift;
- mounted bucket-blade for snow removal.
For wheel designs used as movers for walk-behind tractors on arable land, wheels with rubber tires are used. Experience and ability to work with ready-made structures, for example, steel rims from car wheels, will tell you how to make wheels for a walk-behind tractor with lugs yourself.
To do this you need:
- 2 steel wheels from a car;
- corners 25x25 cm;
- electric welding;
- Bulgarian;
- tape measure and pencil.
The corner is cut into segments of 35-40 cm. The rims of the disk are marked into equal segments. It is best if there are 8 or 10 of them. Marks are made and corners are welded at the marks.
It is better to make a do-it-yourself lift for a walk-behind tractor from a piece of pipe with a diameter of 100 mm. The lift itself is made in the form of a roller on a bracket. If necessary, it changes its position and makes it possible to lift the walk-behind tractor onto a support. In its normal position, the lift shaft is located in front of the unit and is used as a support roller when overcoming ditches and ruts.
It is recommended to assemble a bucket for a walk-behind tractor with your own hands if you plan to use it as a snowblower.
The ladle can be made:
- made of sheet metal 1.5-2 mm thick;
- hard plastic with a knife at the bottom made of a metal strip;
- from plywood 8-10 mm thick or OSB board 10-12 mm.
The bucket is rigidly fixed to the walk-behind tractor frame. To make work easier, you can make a rotating device to change the angle of inclination of the cutting plane to the road surface.
You can improve your home motorcycle equipment to suit your requirements without high costs. After all, you can assemble attachments for a walk-behind tractor yourself, doing everything yourself.
Advantages and disadvantages
- replaces several tools at once;
- increases soil fertility;
- the flat handle prevents your hands from slipping, preventing the formation of calluses;
- speeds up the process of cultivating land while reducing labor costs.
The only disadvantages that can be noted are the need to adapt to the design and master the operating technique. Not everyone succeeds in this, as a result of which this unusual device turns out to be unclaimed in the arsenal of country tools.
How to make a Fokina flat cutter with your own hands
To make a Fokin flat cutter with your own hands, you must first look at its drawing. I offer you my version of the photo drawing, but you can create it yourself. Now he will move on to making the Fokin flat cutter with his own hands.
- We heat the metal with a blowtorch.
- Using a grinding machine, we sharpen the blade to fit the cutting knife.
- To secure the handle we make two holes.
- We attach the drawing to the iron and mark the places where it needs to be bent (4 bends).
- Next, we heat the marked areas with a lamp, bend them at the required angle, and cool them.
Share “Fokina’s flat cutter to help the summer resident”
Principle of operation
The Fokina flat cutter is an unusual tool used for non-traditional farming. The essence of the idea: the productivity and structure of the soil will become much higher if you stop disturbing its deep layers and thus destroying the worms.
In untouched soil, they successfully perform the function of loosening and fertilizing. The tool knocks down weeds to a depth of 5-7 cm, this is enough to stop feeding the roots. Plant remains rot and worms carry them underground. The shovel turns over the fertile layer along with the worms, disturbing the soil biosystem. The earth becomes vulnerable to wind and sun. For protection it is necessary to use mulching, but this is difficult to implement over large areas.
The device developed by Fokin does not turn over the soil. The blade cuts its top layer, cutting weeds, saturating it with oxygen, but without disturbing the natural structure.