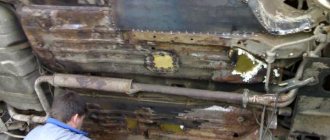
Repairing the underbody of a car is not a frequent task, but it is one of the most difficult types of body work that requires qualifications and experience. The bottom, sills, and wheel arches are subject to the greatest destruction from corrosion and mechanical damage.
Operating a car on bad roads, flying gravel, winter use of salt reagents on the streets, incorrect or minimal application of anti-gravel and anti-corrosion protection are the first reasons for the rapid destruction of metal. 70% of drivers are faced with the need to digest sills, change or repair the underbody 5-7 years after purchasing a new car.
Repair tools and materials
In half of the cases, the need for a full underbody repair is discovered by technicians at a service station during routine vehicle diagnostics. When the car is lifted onto an overpass, it is easier for a mechanic to see corrosion plaques on the metal, dents from impacts, etc. The cost of repairs depends on the degree of damage; in a workshop this is a justifiably high price of 10,000 rubles. only for overcooking the thresholds.
But in the case of a body, the degree of damage to the metal may be excessive and it will not be necessary to repair the bottom with patches, but to completely or partially replace the load-bearing elements. Many drivers choose garage repairs; it is 10-15 times cheaper; if the technician has skills in gas or electric welding, the cost of the work is minimal.
Before welding the underbody of a car with your own hands, you need to prepare the following tools and materials:
- calcium carbide, oxygen cylinder if gas welding is used;
- copper wire, carbon dioxide, if welding is performed semi-automatically;
- metal for patches;
- replacement wheels for a grinding machine;
- bitumen mastic, paraffin anticorrosive for treating the external and internal surface of the bottom;
- putty.
Equipment and tools that will be required for repairs:
- grinder (angle grinder);
- chisel with a wide blade;
- welding machine;
- metal scissors;
- straightening hammers;
- electric drill.
During the work, you may need a degreaser, a spot welding machine for tack, and R-80 sandpaper.
Preparatory activities
To repair the bottom with your own hands, you first need to prepare in a certain way. You will need a set of tools, premises, a lot of time, experience and desire to do such things.
Of the tools, it is especially important to prepare the following components:
- Welding machine. In the case of repairing the underbody of a car, it is better to use a semi-automatic machine with wire and carbon dioxide. It is better, more efficient and more reliable than gas and electrodes;
- Angle grinder. It will be useful, if necessary, to remove rust from the floor, to adjust elements and patches, to clean seams and surfaces;
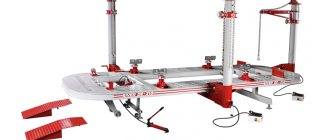
- Car stands. Here you can use various items. So look for what you have;
- The rest of the kit is standard and includes such components as anti-corrosion solution, mastic for seams, welding wire, sandpaper, primer, soundproofing sheets, paint, etc.
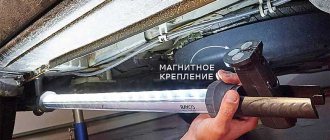
Now you need to drive the car into the garage or other equipment room and put it on stands.
The machine should be positioned in such a way that it is comfortable and safe to work under it.
Disconnect the battery, then remove the doors. In this case, experts advise providing spacers for doorways in order to maintain body rigidity and the necessary geometry.
Dismantling the interior
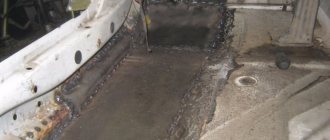
Since you need to repair the underbody not only under the car, but also from the inside, you will have to completely disassemble the interior. This is a difficult task that will take a lot of time. Be psychologically prepared for this. You will have to dismantle:
- Armchairs;
- Floor tunnel lining;
- Carpeting;
- Air ducts;
- Soundproofing layer.
Carefully collect all the wiring, combine it into bundles if they are not collected, so that later there will be no problems with assembly. Collect all fasteners, distribute them into boxes or bags, and label them. This is extremely important because you may face serious problems later.
If you plan to completely replace the bottom or weld a panel to the floor, then the dashboard and beard will have to be removed to create open access to the engine shield.
Lifting a car
Welding
So, you have disassembled your VAZ 2110, so now you can really assess the condition of the bottom, as well as analyze the required amount of work. The most optimal situation is one that does not require replacement of elements. The rust spots are cleaned until high-quality metal is obtained, after which they are strengthened by patches. But not everyone manages to face such a situation.
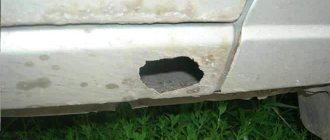
If the holes in the bottom turn out to be through, this will lead to a loss of body rigidity, therefore it is strongly recommended to replace the element completely. In the case of the VAZ 2110, the following body elements are distinguished:
- Floor panels;
- Support platforms;
- Threshold extensions;
- Spar extensions;
- Crossbar;
- Connectors.
Now let's discuss a few basic nuances of welding.
- To replace a part that has “slipped” due to corrosion, it must be drilled out at the welded points or simply cut off using a grinder.
- Do not forget that the brake and fuel system pipelines pass under the bottom. It is extremely difficult to dismantle them, so the easiest way is to cut them off and install new pipeline elements during reassembly.
- If the floor panels are in critical condition, the entire bottom assembly should be replaced. But in this case, be sure to dismantle the exhaust system.
- If it is necessary to change the thresholds, they are dismantled and new ones are installed one by one. It is important to control the geometry.
- If the floor and thresholds are being replaced at the same time, the thresholds are replaced first, and only then the floor panels.
- Carefully mark the elements for welding. The old components must strictly correspond to the new ones being cut out.
- You cannot do without an assistant, so agree in advance with someone who can help you.
- Always start the bottom from the bottom, then grab it.
- Do not make the main weld using a continuous weld. Maintain a step of approximately 4-5 centimeters.
What metal to use to weld the underbody of a car, its thickness
The thickness of the metal for over-welding the floor must be at least 2 mm. Technologists recommend using sheet steel, material st2, to save money. Stainless steel or alloy steel can be used if the repair is done by a professional welder. In 70% of cases, non-professionals experience welding joints bursting due to engine vibration when moving.
Stainless steel can be used as small patches for partial bottom replacements. Aluminum sheets are used to strengthen the bottom of the car without welding. Aluminum oxidizes the metal, causing rapid corrosion. If aluminum is used to strengthen the bottom, it is necessary to avoid its contact with the metal of the body through the use of rubber bushings or gaskets.
Let's sum it up
Many motorists make the same mistake. They begin to think about what is best to use for the car when the first spots of rust have already appeared. Anticorrosive treatment should be carried out even before this. This will be a kind of prevention that will significantly extend the life of the body. It is impossible to say for sure which anti-corrosion treatment is actually better than others for your car. A number of factors are taken into account here, from the current condition of the underbody to the financial capabilities of the car owner.
A large variety of products are offered on the market. The choice must be made based on the specific situation. What will be incredibly useful and effective in one situation will be completely useless in other circumstances. Some products help to further improve sound insulation and protect against vibrations. But at the same time, manufacturers themselves often forget that the main purpose of their product is protection against rust. Because of this, the main property loses its effectiveness.
It is not always possible to rely on cost. The most expensive product does not guarantee the highest effectiveness. Carefully read the ingredients, warnings and recommendations of the manufacturers. There are anticorrosive agents that are intended exclusively for the bottom, or are also used to treat parts of the body with paintwork. Some components of anti-corrosion agents have an aggressive effect on varnish and paint, which is why their use will only harm your vehicle.
It makes no sense to deny the fact of the need to use anti-corrosion and rust agents. This is truly an extremely important and useful way to extend the life of a car, since on modern cars it is the body that begins to deteriorate faster than the engine. If you are concerned about the condition of your car, want to extend its service life and protect it from metal-eating rust, try to carry out thorough anti-corrosion treatment once every 2-3 years. Based on our recommendations, ratings and understanding the properties of different anticorrosives, making the right choice will not be difficult.
Stages of work
Only in the video tutorial does it take a short period of time to independently overcook the bottom. In fact, repair work takes from 3 days and goes through the following stages:
- dismantling the interior, interior lining;
- bottom preparation;
- welding work;
- anti-corrosion treatment;
- interior installation, electrical connections.
Dismantling the interior involves disconnecting most of the electrical cables that go to power windows, batteries, sensors, also removing seats, carpet, sound insulation, dismantling doors, installing the car on an overpass or lift. Be sure to drain the fuel from the tank.
Some drivers turn the car on its side if the bottom and sills are partially overcooked.
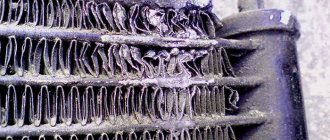
After dismantling the attachments and panels, it is necessary to check the quality of the metal on the sills and wheel arches. These elements are the first to be damaged by corrosion.
How to treat the bottom after welding
Before applying corrosion protection, primers are first used. They are applied to clean surfaces according to the instructions and dried. The primer ensures reliable adhesion of steel to anti-corrosion. Manufacturers offer various compositions:
- Tectyl is produced in three modifications: a) classic creates an organic microfilm; b) Tectyl zinc provides an additional zinc coating that protects the metal from the action of salts; c) Tectyl NT zinc is intended for intensive use in urban environments;
- Movil is an economical product that has proven itself for half a century;
- bitumen mastic is produced on a rubber, polymer, mineral-shale and polymer basis;
- Dinitrol based on polymer rubber.
Operating principle and theory of semi-automatic electric welding
Welding with a semi-automatic inverter using carbon dioxide is today the most common type for self-repair of the bottom. Using gas welding is quite problematic, since it is difficult to make a high-quality seam.
The carbon dioxide semi-automatic machine allows you to weld metal with a thickness of 0.8 to 6 mm, has compact dimensions, and is convenient for welding difficult areas. The machine uses carbon dioxide; it enters the welding zone under pressure and displaces air, preventing oxidation of the metal, which does not burn, but melts. The welded sections are connected, forming an even, narrow seam.
Preparation of the welding machine takes place in the following stages:
- Check the garage electrical system for the required voltage.
- Remove all flammable materials from the vehicle and within a radius of 1 meter from the work site, remove the battery, and drain the fuel.
- Insert welding wire into the inverter.
- Set the required polarity for ordinary wire used for welding metal. The minus is placed on the clamp and the plus on the burner.
- Connect the carbon dioxide cylinder.
- Check the inverter for functionality. First, the gas is supplied, then the wire is turned on and the welding current is supplied.
It is recommended to use technical carbon dioxide for welding; the chemical has less water vapor than food-grade carbon dioxide.
What seam to weld the underbody of a car
There are several techniques for cooking the bottom of a car. Professional tinsmiths recommend using step welding, welding in stitches: 2 cm of welded metal, 5 cm gap. This type of welding increases the rigidity of the body and enhances the tensile safety of the structure. During vibration during movement, the bottom does not deform, as with welding with a continuous seam, and does not tear, as with spot welding.
The final stages when working with the bottom
After welding the car body with a semi-automatic machine, you will need to clean the seams with a grinder, treat them with anticorrosive, and prime them. After welding, the main vulnerable spots remain the weld seams, since the process of digesting the metal has damaged its structure. It is necessary to process the seam both from the outside of the bottom and from the inside.
If an aluminum patch is welded to a metal body, then it is necessary to apply anticorrosive in two layers and regularly check and tap the seam. Aluminum oxidizes and upon contact with sheet metal, pockets of corrosion form on steel sheets. Craftsmen do not recommend welding aluminum to the tin bottom of the machine; it is better to use bolt mounting with a safety gasket.
What it is
First, you need to understand the concept of anti-corrosion agents for a car before voicing a rating or classification of solutions. Responsible car manufacturers use fairly effective means at the car manufacturing stage to prevent the early development of corrosion on metal surfaces. A galvanized layer and anti-corrosion agents are used. But often they last exactly for the duration of the warranty. After just 2–3 years, a car can easily surprise its owner with the appearance of the first spots of rust.
Factories mainly use anti-corrosion mastic for cars. And then the manufacturer himself decides which is better. They can only be applied if the metal itself is thoroughly prepared, otherwise there will be no proper adhesion between the materials. Bonding with metal is called adhesion. Under the influence of aggressive substances, bad weather conditions and other factors, adhesion is reduced, and therefore the factory anticorrosive agent loses its properties.
To prevent the destruction of metal, anticorrosives were invented. These are special substances that are applied to the most vulnerable surfaces. They contain special solvents that allow the anticorrosives to have a liquid structure. When the product is applied, the solvents evaporate, creating a strong and hard film that is resistant to destructive processes. Protective components form a kind of barrier that protects the metal of the machine from the external environment. This helps to significantly slow down the ongoing oxidative processes. This prevents any traces of rust from appearing.
It is important to understand that anticorrosion agents are not intended to repair metal or remove already formed rust. Therefore, before application, it is recommended to clean the damaged areas, remove dangerous orange spots, and only then apply the anticorrosive agent itself. If we talk about the best and most effective anticorrosion agents, then you should pay attention to the following brands:
Many motorists opt for trains from these manufacturers. They were able to prove their effectiveness in practice, therefore they are deservedly included in the rating of the best anticorrosion agents. It is worth considering that the quality of the compounds used plays a large role in the effectiveness of the anti-corrosion treatment of the bottom. If it is a good anticorrosive agent, it will really be able to significantly slow down the process of rust spreading. If this is a low-grade composition, then do not expect any special results.
How to save money
The only way to save on auto body work is to do it yourself. You cannot skimp on either anti-corrosion treatment material or metal. If you are not an experienced welder and doubt the quality of the repair, it will be cheaper to invite a specialist than to redo broken seams a year later.
The cost of underbody repair in a specialized car service starts from 22-25,000 rubles. And this price is justified. Included in the price:
- interior dismantling;
- full body diagnostics;
- use of spot and electric welding;
- bottom treatment with anticorrosive agent;
- interior installation, electrical equipment connection.
Drivers prefer to do their own repairs because the stereotype is that service stations increase prices and invent defects that do not exist. To avoid deception, it is recommended to tap the bottom of the car yourself on an overpass; if there is minor damage that does not require complete overcooking of the bottom, then opt for independent repairs.
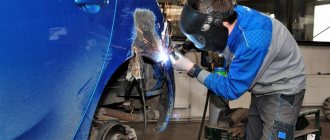
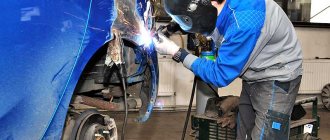
Welding process
Before hot work, for safety reasons, the gas tank must be dismantled. The patch is first grabbed at 3-4 points, then completely scalded. Small defects are filled with short seams up to 3 cm long. Welding the bottom is difficult to do alone. When a partner holds the patch, the repair speeds up.
It is important that the patch fits tightly to the repair site. Gaps increase the risk of corrosion damage. The seams are hammered for strength. In good lighting, all repair areas are checked. If necessary, boil the connection again. Only after inspection do they begin to clean the seam rollers.
Cold methods of sealing holes in metal
Cold methods of auto body repair include:
- Metal extraction. If there is a dent on the threshold, fender without breaking the part. Use a reverse hammer or pulling hooks. Spot welding is required for repairs.
- Applying metal patches. The method is suitable for repairing the bottom, sills, and less often wings. The patch is installed in place of a rupture or hole after corrosion by welding, less often on bolts with reinforcements.
- Restoration by alternative methods using epoxy resin and fiberglass. This method is not suitable for repairing the bottom because it does not solve the main problem. If a corrosion hole appears, the body begins to deform and all power units are displaced. What is required is not just filling the hole, but restoring the rigidity of the structure, welding the bottom with the obligatory strengthening of the jacks and side members. It is allowed to install patches on rivets only in those areas of the body that do not bear a force load.
Description of design
The bottom of the VAZ 2110 has the same design for all cars in the line and is made of rolled steel with additional stiffening ribs. The metal frame of the car is a type of frameless body; the entire load from the mounted units falls on the floor and side members, which act as a frame and ensure the massiveness of the entire structure.
Repairing the underbody of a VAZ 2110 in 90% of cases begins with checking the side members and involves the use of welding. The welding points that hold the body structures together are torn apart by vibrations, bolted connections become loose, and the solidity of the structure weakens.