In a private house or cottage, especially when the main building does not have a storage room, it is difficult to do without a shed on the site. This small outbuilding saves a lot of space and allows you to store various items and food inside. Today we will talk about how to install a shed from a profile pipe with your own hands. This is a lightweight frame structure that can be installed at home in a couple of days. It will also talk about its advantages and disadvantages, as well as installation.
Metal profile pipe as the main frame material
Advantages and disadvantages of metal sheds
A shed made of corrugated sheets is compact, inexpensive and durable.
The metal building is assembled from profiled pipes and sheet iron. Corrugated sheets are used more often because, thanks to their textured surface, they are stronger and better able to withstand wind loads.
Advantages of a utility unit made of metal profiles:
- Galvanized sheet iron is used for construction, so the shed does not need to be painted, primed or protected in any other way.
- The building is durable and can withstand high snow and wind loads.
- The barn will last for several decades.
- The utility unit comes in the form of a box; it does not have a bottom, so it can be moved to another place at any time.
- No foundation is needed for construction.
- Prefabricated metal structures cost even less than plastic cottages.
The disadvantages are the following:
- Metal does not retain heat, so the shed must be insulated if it is used in winter.
- The lack of gender can be a disadvantage.
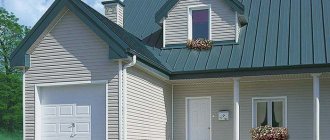
The appearance of the barn is inferior to that of wood. However, the strict utilitarian design of modern structures fits well into the landscape of a summer cottage.
How to cook metal without causing any problems
Let's consider the solution to this problem:
Sequential passage of welding seams. If you need to weld thin sheet metal, then in order to avoid its deformation, it would be advisable to use a reverse-step weld, no more than 300 mm. After the metal has cooled, you can weld the remaining cracks. Thus, thin sheet metal will not lead.
More precisely, there will be deformations, but the previously made, “short” seams will compensate for them. In addition, in some cases, when welding thin metal, it is best to use tacks first, and only then weld the seam.
Preliminary bending of workpieces to be welded. Another method that will reduce the deformation of thin metal involves bending the workpiece in the opposite direction from the stresses during welding. Thus, after the welding is completed, the metal workpiece will return to the desired position under the influence of deformation.
Technologies for constructing sheds from profiles
Capital construction with a concrete floor.
A utility block made of corrugated sheets is constructed using 2 main technologies.
- Capital - with floor. They make a platform under the barn and fill it with concrete, which serves as the floor. Vertical posts are deepened into the ground and welded to the lower frame. If you wish, you can make a wooden floor in such a building. To do this, angles or thick-walled pipes are used as the bottom trim. Metal or wooden slats are attached to the frame and sheathed with boards.
- In a mobile structure there is no floor. The lower frame only serves as a base for the frame. Most often, the frame is divided into several sections, which are bolted together. Then the walls of the box are sheathed with corrugated sheets. This option can be disassembled and moved to another place or stored in a disassembled state.
Ready-made utility units of various sizes are classified as prefabricated structures.
How to make a roof for a cabin out of foam block
After the walls have been built and the mortar has hardened, you can begin building the roof. A layer of roofing material is laid on top of the walls to create proper waterproofing. Next, the mauerlat is laid out - timber, which is the basis of the future roof. For the Mauerlat, a beam with a cross-section of 15x15 cm is usually used. The step between adjacent elements is about 30 cm. The Mauerlat is fixed using bolts.
When starting the roofing, choose the appropriate material and create a single-pitch or gable roof.
Next, the rafter legs are assembled. Each pair of rafter legs represents a corner, each assembled corner is fixed on a transverse strip. The step between the rafter legs should be 30 cm. The finished structure is installed on the Mauerlat. In the upper part, a ridge board is additionally attached to the rafter legs to create a strong and reliable structure. Next, the rafter legs are sheathed and plywood is installed (as a leveling base for the roof) or the selected roofing material.
Choosing a site for construction and marking the territory
A shed can be attached to a house.
A shed made of corrugated sheets does not have a foundation, which means it does not belong to permanent buildings. SNiP norms are not applicable to it. And since metal is not flammable, the fire safety rules for it are extremely simple.
Requirements for choosing a location are limited to the convenience of the inhabitants of the dacha and common sense.
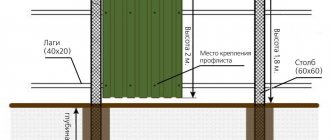
- You can install a metal block close to the house. But if the box serves as a car repair shop, the noise will disturb the residents. Therefore, it is better to move the building 4 m.
- The distance from the fence is regulated - 1 m. A shed can be built close to the fence by reaching an agreement with the neighbor.
- The area for the shed must be level. The metal structure does not compensate for uneven ground in any way.
- Elevated areas are preferable to avoid flooding.
- The metal box gets very hot in the sun. It is better to install it in the shade of trees.
The barn should not interfere with the free movement of people and vehicles.
Making the foundation
The selected area must be cleared, the remains of old buildings, debris, and roots of cut plants must be removed. On the prepared ground, the place for the foundation is measured. The foundation can be made of blocks, strip or monolithic. Since the weight of the building is light, it can be placed on blocks or a shallow strip foundation. In accordance with the chosen method, holes are dug for the foundation. The monolithic one will then become the floor of the barn, otherwise the floorboard is laid on the foundation supports.
Formwork must be constructed around the hole or holes created during excavation. Reinforcement and pouring for a columnar foundation is carried out in the corners, and then along the walls every 2 meters. Tape is poured around the perimeter, and monolithic is poured over the entire area of the foundation. After pouring, you should wait 3-4 days to allow the concrete to harden.
Required tools and materials
To build a shed with your own hands, you will need a welding machine.
To make a country shed from a profile pipe with your own hands, you will need the following materials and tools:
- profile pipe with a cross section of 60*60 or 60*40 mm;
- corner 4–5 mm;
- profiled sheet - universal, 0.4–0.8 mm thick;
- crushed stone, sand, cement and sand for concrete;
- boards for finishing the floor, if any;
- welding machine;
- hacksaw, grinder;
- screwdriver and drill;
- shovel and trough;
- plumb line, square, tape measure, building level.
If the shed needs to be insulated, the list includes polystyrene foam or penoplex, waterproofing, as well as finishing material, such as lining.
From project to implementation
So, the first thing you need to do is calculate the angle of inclination of the future roof, the thickness of the rafters and the pitch of the future sheathing.
Determining the angle of inclination
According to modern Building Codes and Rules II-26-76, each roofing material has its own minimum slope angle. But it still makes sense to also pay attention to exactly what angle was indicated by the manufacturer of a particular brand of corrugated sheeting - usually the minimum value is greater.
But what does the minimum angle of inclination mean in itself? This is the slope at which water overflow between the corrugations will not occur, and, therefore, puddles will not form. True, in this case, snow loads are also not taken into account, and the fact that strong winds can push water and snow into individual roof elements.
Here is a good example of a fairly dense lathing for corrugated sheeting:
Also take into account that the higher the rib, the better for the roof itself, and the less often you can do lathing.
We calculate the loads
When choosing the angle of inclination of a corrugated roof, the weather conditions of a particular area must be taken into account. Thus, corrugated sheeting as a roofing material has a particularly high windage capacity, and therefore in windy regions, roofs with such a coating cannot be made too steep.
On the other hand, even 1.5 meters of snow on a house can bend such a fairly thin material, and therefore the corrugated sheeting on this side is also fragile. That is why you will have to calculate the angle carefully, with all the calculations and responsibility. But the lower the slope of a pitched roof, the better the waterproofing should be and the tighter the joints should be.
In addition to wind load, shed roofs are subject to a number of natural and physical forces that come from both the external environment and the building itself. These are humidity, precipitation and water vapor, wind, sun, temperature changes and aggressive chemicals that are in the air. What does the air have to do with it? Let's say there is a huge difference for a roof covering that is on a house in a quiet region and near the sea.
We design ventilation
Now let's look at the issue of ventilation. Shed roofs without an attic, which are called combined, are built when the slope is minimal. Their ventilation occurs due to outside air, which passes through air gaps in the roofing pie or through special channels in the top panels. This is the only way to prevent condensation from collecting on the roof:
Upon closer examination, these same processes look like this:
Another task when building a pitched roof under corrugated sheets is to protect the under-roof space from heat. The fact is that any roofing made of metal gets very hot in direct sunlight on summer days. And modern waterproofing films with metallized coating on the outside provide good protection from such heat, because they work as reflectors of invisible heat rays.
Shed roofs can be built with or without an attic. If the presence of an attic is not planned, then both the roof and the ceiling are combined into one whole. Those. simply the attic space itself disappears, turning into a small ventilation opening, or no ventilation at all. Unventilated shed roofs are constructed from sandwich or solid panels, or in very simple designs:
Technology for self-construction of a metal shed
Drawing of a shed with a pitched roof
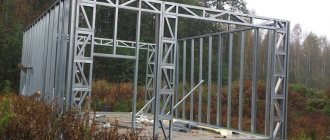
Assembling a shed from corrugated sheets and metal profiles with your own hands is not so difficult, especially if you have a drawing. However, if the block is completed independently, the ability to work with a welding machine is required.
- Mark the area using wooden pegs. The earth on the site is compacted.
- Recesses are made along the perimeter of the site in the corners and along future walls in increments of 1.5 m. The stands for the future entrance are placed closer - at a distance of 1.2 m, respectively, and the holes are dug at this distance. Depth – up to 60 cm.
- Vertical posts are installed in the recesses and concreted. After the concrete has set, the bottom trim is welded.
- If the structure is not permanent, the lower frame is first assembled, and vertical posts are welded to it. In this case, the main load falls on the lower trim.
- The upper ends of the racks are tied together with the upper strapping. Weld the cross members in pre-marked places.
- If a floor is provided, transverse joists are placed on the lower frame: iron ones are welded, wooden ones are bolted.
- Usually the barn is equipped with a pitched roof. To achieve this, walls are built at different heights. Then the logs are welded from the highest wall to the lowest. If they make a gable roof, it is assembled on the ground. First, the trusses are welded. Then they are placed on horizontal crossbars, and then the entire structure is lifted and installed on the top frame.
- After welding work, the metal structure is primed.
The walls are sheathed with corrugated sheets. Install the sheet so that the relief strips are placed vertically - this facilitates water drainage. Screw the sheets with self-tapping screws to the vertical and horizontal crossbars. The flooring is laid out according to the wave.
The roof is laid in the same way.
If you want to insulate a barn for your dacha using metal profiles, do it from the inside. Insulation is attached between the joints of the frame, waterproofed, and then sheathed with clapboard, boards, and plywood.
Fastening corrugated sheets
Fastening is carried out with special self-tapping screws with a drill at the end (for passing metal) and a rubber gasket. Their length must be at least 35 mm longer than the wave of the sheet
You should definitely pay attention to the purpose of the self-tapping screws, as they are available for fastening to both metal and wood. The self-tapping screw is usually screwed into the bottom of the wave of sheets that are installed with an overlap
The amount of overlap formed and the distance between the screws is equal to one wave.
Installation is carried out from the long sides of the shed using wall sheets. If the building has a pitched roof, each sheet must be trimmed with a grinder to obtain a wedge-shaped shape.
After fixing them on the walls of the shed, waterproofing and, if desired, thermal insulation material, usually mineral wool, are laid between the support posts.
The door frame is assembled from timber and sheathed with wall sheeting. An insulator can also be placed inside. If you plan to have windows in the barn, they can be made of glass or polycarbonate.
The easiest way to cover the inside of the room is with plywood or OSB boards. But if desired, you can also use inexpensive plastic for the walls.
Useful tips and tricks
Roofing corrugated sheeting
In order for the utility unit to last a long time, you need to take into account the recommendations of specialists:
- For the roof, special roofing sheeting is purchased. It's a little thinner so it's easier to install.
- To fasten the profiled sheet, special fasteners are used: self-tapping screws with a rubber gasket that prevent leakage.
- The first sheet is fixed by placing self-tapping screws into the protrusion of the wave.
- If a gable roof is being made, the joint of the sheets is covered with a ridge.
- When joining, cracks often appear at the corners of the building. They are covered with a metal corner. It can serve as a decorative frame.
A metal shed is easy to assemble, durable and does not require special care. Its main disadvantage - high thermal conductivity - can be easily compensated for by insulating the structure.
Household frame
After arranging the foundation, it’s time to build the foundation for the walls. For the frame, the required number of timber elements is cut, calculated according to the drawing. First, the vertical racks are made. The step between them is a maximum of 70 cm. Cross members are attached to the posts with self-tapping screws at a distance of no more than 40 cm. To give stability, the structure is secured with metal corners, which are again fixed with self-tapping screws. All verticals must be controlled using a plumb line or level. The frame is sheathed with any materials you choose. Boards, plywood, and chipboard sheets are suitable for cladding. The elements are fastened with self-tapping screws, ensuring tight joining of the fragments.
Please note: the frame can also be built from pipes. But usually home craftsmen avoid such a step due to a significant increase in the estimate. In addition, when using lightweight corrugated sheeting, there is simply no need for a reinforced pipe frame. Unless you have an abundance of them on your site, and there is simply nowhere else to use metal stands.
Sheathing with corrugated sheets
Construction of complex structures
Sometimes pitched roofs may not be so simple in design. This option, for example, has become increasingly popular lately:
Here, shed roofs are built side by side, forming together a kind of gable roof, but still this is not it. There is a very tricky point here: due to the absence of a common ridge, there is no such bursting load on the walls of the building, especially from snow. But in terms of building such roofs, the same principles that we have revealed in this article remain.