In practice, it has long been proven that installation of profiled sheets is a simple process.
The technology for installing corrugated sheets is one of its main advantages, which can be distinguished from the huge number of advantages of this material.
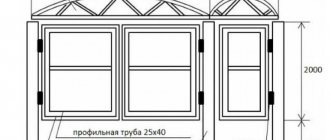
Scheme for covering a wall with corrugated sheets
Thanks to the ease of installation work, corrugated sheets have become a material that not only professional builders, but also amateurs especially like to use. And if we add in the variety of colors of corrugated sheeting, then it’s immediately clear why it has become so in demand and popular today.
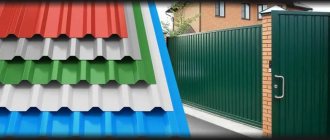
Choosing corrugated sheets for walls
First of all, you need to decide on the entire range of products available on the market and choose the material that is best suited for facade work. Manufacturers produce three types of profiled sheets:
- Corrugated sheeting marked “C” is intended for finishing facades, walls and creating small fences
- Corrugated sheeting marked “H” is used for roofing work
- Corrugated sheeting marked “NS” is mixed in purpose and can be used for different types of finishing work
The best option for finishing the facade of a building is profiled sheets marked “C”. Accordingly, you can choose several subtypes of this material on the market - C8, C10, C15, etc. The materials do not have significant differences, but from the point of view of a professional, you can notice some important nuances:
- C8 sheets are light, strong and thin. Its main advantage is its light weight, which allows finishing work to be carried out simply and quickly.
- C10 corrugated sheeting has a relatively wide wave, and the thickness of the sheet is greater than that of corrugated sheeting marked C8. This material is perfect for finishing the facade of a building. Due to their weight and strength, C10 profiled sheets can be used in all types of work where vertical installation of finishing material is necessary
- C15 corrugated sheeting is also successfully used in finishing work due to the characteristics of the wave, the thickness of the material and the size of the sheets. Like other facade materials, C15 profiled sheets are galvanized and polymer coated
It is worth noting that other markings are also suitable for cladding a house - profiled sheets C13, C18, C20, etc. are found on the market. The further choice of material depends on the builder himself - the sheets differ in the height of the wave, its width and the thickness of the material itself.
Useful tips
After completing the marking stage, you should move on to arranging communications that are planned to be masked with finishing material (electrical wiring, for example). Thanks to the markings, the networks are laid so that they are not damaged in the future during the assembly of the frame.
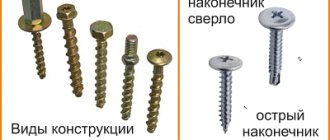
If the profile is not long enough, it is built up end-to-end or overlapping. In the first case, you will need an additional piece or end part of the guide profile. The connection area is worked out on the sides with self-tapping screws; as a result, the latter will not become an obstacle to a tight fit of the sheet finishing to the frame.
A paper plan for the installation of profiles and communications with exact adherence to scale should be kept: after finishing, the joints of the sheet material will not be visible, and if you need to hang something on the wall, it is better to know in advance where the frame or wiring is located.
How to calculate the required amount of corrugated sheets for wall cladding?
Has the material been chosen? In this case, it is necessary to calculate how much it will be needed for the walls of the building. First of all, you need to know the length of the profiled sheets. Based on this value, the volume of material is calculated. Let's look at this process in more detail:
- It is necessary to determine the area of the surface to be covered. Let's say one of the walls of the house is 6 meters long and 2.8 meters high. The length of the other wall is 8 meters, and the height is similar - 2.8 meters. Thus, we calculate the total area of the surface to be covered: (6X2.8) + (8X2.8) = 39.2 square meters of the area of two perpendicular walls. Since the house has four walls, we double the figure - it turns out 78.4 sq.m.
- Since there are door and window openings, it is necessary to calculate their area and subtract it from the total surface area that was calculated earlier. Let's assume that there is one door (width - 1.4 m, height - 1.9 m) and six window openings, each of which has parameters of 1.5X1.3 m. Total, the total surface area that does not need to be covered with corrugated sheets is will be equal to the sum of the areas of all openings - 14.36 square meters. m. This indicator is subtracted from the total area of the surface to be covered. As a result, it turns out that the ideal finishing area is 64.04 sq.m.
- The next step is to calculate the area of one profiled sheet. Next, you need to divide the total surface area by the area of one sheet - this way the builder will know how many sheets are needed to finish the house
- The area of the pediment is calculated. Using the standard formula, the area of the pediment is calculated, which will need to be covered with corrugated sheets, after which the result obtained is multiplied by two and summed with the total area
It must be remembered that additional material may be needed during the work process. Therefore, the master, having carried out all the calculations, should increase the result obtained by 10-15% - the final number will mean the amount of material with a reserve.
How to cover a house with corrugated sheets?
After preparing the required amount of profiled sheet, you can begin installation work. Typically, the façade of a building consists of the following “layers”:
- Vapor barrier material
- Thermal insulation
- Wind barrier
- Metal or wooden frame
- Corrugated sheet
The installation process then looks like this:
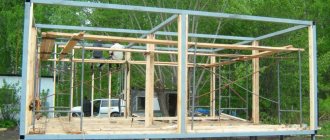
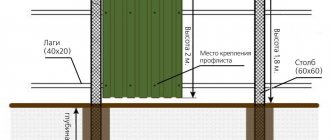
- A metal or wooden frame is installed. If wooden blocks are installed, it is necessary to pre-treat them with antiseptics. If it is metal, then for its installation you will need brackets and U-, L- and T-shaped profiles. Initially, brackets are attached to the wall, to which U-shaped profiles are then attached. Accordingly, other profiles are required for fastening at internal and external corners
- The insulation material is being laid. First, insulation boards are installed and secured using disc-shaped dowels. A vapor barrier is lined on top, after which a wind barrier is additionally lined
- Corrugated sheeting is being installed. The sheets are mounted on the installed profiles using self-tapping screws, while maintaining a step of 30-40 cm. The self-tapping screws must be galvanized and have a special rubber gasket in order to avoid moisture getting under the profiled sheets
- The corners of the house are finished using special corner elements, which are installed in the same way as corrugated sheets.
Sheathing the pediment with corrugated sheets
The procedure is no different from standard house cladding. Initially, the pediment is subjected to reliable waterproofing, after which a metal or wooden frame is installed using the technology described above, and then insulation sheets are laid out and sheathed with corrugated sheets.
The only difficulty lies in the correct cutting of the material for the pediment. But if you have the correct markings and the necessary tools, you don’t have to worry about this nuance.
Where else is corrugated sheeting used?
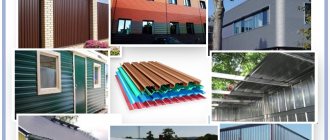
The material is often used for cladding hangars, garages, storage facilities and other buildings. Thus, the hangar can be used as a storage or warehouse, parking lot or other utility room. And the best cladding option for this building is corrugated sheeting - installation is carried out in a matter of hours, immediately on the frame structure, the features of the material allow cladding of both arched and standard structures.
Corrugated sheeting can also be used in the construction of any other buildings on your own site. For example, you can build a full-fledged garage from corrugated sheets with your own hands. Speed of installation, reliability, strength and excellent performance properties allow us to make lightweight and durable structures.
Corrugated sheeting is quite often used as a roofing material. Corrugated roofing is of high quality and reliable. But the roof will not be considered complete without one very important element, namely the wind strip. The wind strip for corrugated sheeting helps protect the roof from moisture and gusts of wind. It also provides an ideal connection to the spotlights.
There are other nuances in laying corrugated sheeting on the roof. We recommend that you familiarize yourself with the installation of corrugated sheets yourself in this article. It contains step-by-step instructions, as well as installation diagrams for corrugated sheeting.
Video about covering a house with corrugated sheets with your own hands
Training film on installation of corrugated sheets. How to cover the walls of a house with corrugated sheets.
If you choose a finish for the facade solely for reasons of practicality, you should pay attention to corrugated sheeting. Strong, durable, not too expensive, this material is widely used in private construction. And if earlier it was used more for fences and roofs, now it is actively used for external walls. Sheathing a house with corrugated sheets does not require special skills, and if you know how to handle construction tools, the installation will not be difficult.
Sheathing a house with corrugated sheets
The corrugated sheet can have not only a colored decorative coating, but also imitate wood, stone
Basic properties of the material
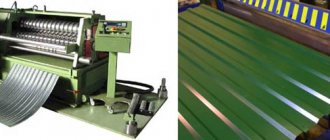
To make corrugated sheets, thin sheet steel is used, protected from corrosion by a zinc coating. After rolling in machines, flexible metal turns into corrugated profiles with waves of different configurations and sizes, and acquires additional characteristics. To enhance the protective properties, the sheets are coated with a polymer composition, and a decorative layer is applied to the front side. Stiffening ribs give the product high strength with low weight, which helps reduce the load on the base. And the greater the height of these ribs, the more resistant the corrugated sheet is to mechanical loads.
The service life of the cladding depends on the type of protective coating: simple galvanized corrugated sheeting lasts about 30 years, and polymer-coated corrugated sheeting lasts up to 45 years or more. The material can be machined and is easy to drill and cut, making installation of sheets effortless. If necessary, corrugated sheeting can be dismantled and reused without deteriorating performance characteristics.
Coatings for agricultural buildings
In the premises where animals are kept, an aggressive environment prevails. Gases released from animal waste (methane, hydrogen sulfide, ammonia, etc.). In combination with water vapor they form highly corrosive solutions. Therefore, it is necessary to provide ventilation in such rooms. Neglecting this problem significantly reduces the service life of the roofing covering (by about half).
In an aggressive environment, it is necessary to use a special coating selected in accordance with the purpose and characteristics of the object.
The most common type of coating for agricultural buildings is aluzinc.
Choosing corrugated sheeting for cladding
Covering the walls of a house with corrugated sheets
According to GOST 24045-2010, corrugated sheeting is divided according to purpose into several types - load-bearing, roofing, wall and mixed type.
GOST 24045-2010
Bent steel sheet profiles with trapezoidal corrugations for construction. File for download
GOST 24045-2010
Each type is marked accordingly. For cladding facades, wall corrugated sheeting (C) is intended, characterized by a trapezoidal corrugated shape. The profile height varies between 8-44 mm, the decorative coating can be either plain or with a pattern.
Seeing the letter “C” standing in front of the numerical marking combination, there is no doubt that this is wall corrugated sheeting.
Wall corrugated sheeting
If you need to sheathe the frame of a garage or some other non-residential building, it is recommended to choose load-bearing (N) corrugated sheeting, or a mixed type, which is designated by the letters NS.
Load-bearing corrugated sheet
When marking sheets, numbers are placed next to the letter designation that indicate the height of the corrugation - C-8, C-10, C-20 and so on. When cladding private houses, the most popular is C-8 corrugated sheeting: it is the most inexpensive, lightweight, but at the same time has good strength.
Profiled sheet S-8
If the façade is subject to high wind loads, it would be more appropriate to use profiles C-15, C-20 or C-21, which are more rigid and not prone to bending.
Profiled sheet S-15
Profiled sheet S-20
No less important when choosing are the decorative qualities of the material. An ordinary galvanized sheet is not suitable for a residential building; such cladding is more appropriate for industrial buildings or domestic buildings. Therefore, preference should be given to colored corrugated sheets with a high-quality polymer coating.
Corrugated sheeting with a stone pattern
The decorative layer can be matte or glossy, plain, with a texture like stone, wood, brick and other materials. Sheets with a pattern are much more expensive than plain ones, but they look just great. From a distance, the wavy relief of the cladding is not noticeable, and it seems that the house is really made of stone or brick.
Brick imitation
Imitation of torn stone
Stonework, drawing
Volumetric drawing
Advice. When choosing a material, pay attention to the back side of the sheet. There are options with double-sided decorative coating designed for fences and partitions. Of course, they can also be used for cladding a house, but why overpay for something that won’t be visible anyway?
It is more economical to use corrugated sheets painted on one side
Material calculation
To avoid unnecessary costs, you need to correctly calculate the amount of material before purchasing. First, measure the walls and calculate the total area.
Area of walls and pediment
Next, take away the area of window and door openings, as well as those areas that will not be sheathed (if any). The area of the gables is added if they are also planned to be sheathed. Now the resulting value remains to be divided by the area of one sheet.
When calculating, you should take into account not the overall, but the usable width of the sheet, since the corrugated sheet is laid overlapping. The standard sheet length is 2 m, although it can vary from 0.5 to 14 meters among different manufacturers.
Standard sizes of corrugated sheets
For example, let's take a rectangular house: the height of the walls is 3 m, the length is 4 and 6 m, there are 4 windows measuring 1.5x1.1 m and a doorway 2x1.4 m. By multiplying the height by the length and adding up the area of the walls, we find out the total area future cladding – 60 m2. Using the same formula, we calculate the area of the openings:
1.5 x 1.1 x 4 = 6.6 + 2.8 = 9.4 m2;
60 – 9.4 = 50.6 m2.
That is, the working area of the walls is 50.6 m2.
The area of the gables is calculated differently, depending on their shape. If the pediment has the shape of a trapezoid, you need to sum up both bases, divide in half and multiply by the height. If the pediment is an isosceles triangle, you need to multiply half its height by the base. For example, the height of the pediment is 2 m, the base is 4 m. 0.5 x 2 x 4 = 4 m2.
Since there are two gables, we add another 8 m2 to the total cladding area, and as a result we get 58.6 m2. The standard dimensions of a sheet of corrugated sheet C-8 are 2000x1150 mm, which means its area is 2.3 m2. We divide the sheathing area by the sheet area - 58.6: 2.3 = 25.48. Rounding, we get 26 sheets, but you need to take 2-3 more in reserve, since additional material may be needed when cutting.
Additional elements for corrugated sheets
In addition to the sheets themselves, additional elements will be needed for finishing. Each of them performs specific functions and is an integral part of the house’s cladding.
| Item name | Purpose |
| Outside corner External corner | Used for framing external corners. Gives the skin a finished look and at the same time protects the joints from precipitation, dust, and small debris. Mounted on top of the corrugated sheet, as a result of which the screw heads remain visible |
| Internal corner Internal corner | It is attached to the inner corners of the building and performs protective and decorative functions. Mounted on top of profiled sheets, fasteners remain visible |
| External corner difficult | Performs the same functions as a regular corner, but it is attached to the sheathing before installing the sheets. This installation allows you to make hidden fasteners |
| Inner corner difficult | Installed in the internal corners of the facade before installing corrugated sheets, it performs protective and decorative functions |
The docking strip is complex | Intended for protecting and finishing sheathing joints on the wall plane. Attached to the sheathing before installing the corrugated board |
End strip | It is used to frame the ends of the sheathing, protects them from the effects of precipitation, and gives a neat appearance. Attached to the sheathing before installing the sheets |
Sloping strip | Used for framing door and window openings. Protects against precipitation and debris, attaches to the sheathing before installing the sheathing |
| Docking strip | Performs the same functions as a complex docking strip, but is attached after installation of the sheathing, as a result of which the fastener heads remain visible |
| Molding | It is used to finish the joint between the facade of the house and the lining of the eaves overhang. Attached to the sheathing before installing corrugated sheets |
Window ebb | Used to protect window sills from rain flows. Installed at the bottom of the window slopes before installing the casing |
| Platband | Used to decorate door and window openings, giving them a finished look |
Base strip | It is used to protect the upper part of the base from rain and snow, thereby extending its service life. Attached to the bottom of the sheathing before installing corrugated sheets |
As a rule, these products are produced in lengths of 3.2 and 1.25 m, although each manufacturer may have its own parameters. It is much easier to calculate their number than sheathing sheets, since here everything is measured in linear meters, and not in square meters.
How to do the cladding yourself
Covering walls with corrugated sheets includes three main stages: preparing the surface, installing the frame, installing additional elements and sheets. If you plan to insulate the walls, laying the insulation is done after installing the frame.
Sheathing a house made of corrugated sheets
The diagram shows wall cladding with corrugated sheets
Corrugated sheeting can be mounted horizontally and vertically; this does not affect the protective functions of the cladding. There must be an air gap between the sheathing and the load-bearing wall, which allows vapors to escape through the walls of the house. When covering a wooden facade, the frame can be mounted from wooden beams, but for brick and concrete walls a metal profile is more suitable.
Preparatory work
Under the metal sheathing, minor defects are not visible, so there is no need to carefully level the walls. But it is imperative to eliminate cracks, through gaps, and fungus, otherwise the destructive effect will continue, and the walls will soon require major repairs.
Gutters, platbands, ebbs, lighting fixtures and other items that interfere with finishing are removed from the façade. Clean dust and dirt, check the integrity of the walls. Cement mortar is used to seal cracks. Where the masonry is heavily crumbled, you need to knock out the remaining bricks and lay new ones on fresh mortar. This applies not only to the walls, but also to the basement of the house.
How to repair a crack in a brick wall at home
The areas affected by the fungus are cleaned with a scraper and thoroughly treated with products containing chlorine.
Fungus on the facade
Mold protection
Apply the product with a roller
If these are wooden walls, you need to treat them with an antiseptic primer 2-3 times. After this, the surface should dry completely.
Primer antiseptic
Installation of frame and sheathing
The frame for the sheathing must be perfectly flat, that is, all the guides must be located strictly in the same vertical plane. Fastening “by eye” is not allowed here, because even small deviations lead to deformation of the skin and a decrease in the strength of the structure. It is recommended to mount the guides on brackets, this makes it much more convenient to align them vertically.
Step 1. On the prepared surface, make markings for adjustable brackets. They start marking from the corner: determine the vertical using a level or plumb line, and put chalk points on this line every 50-60 cm. Then step back 40 cm and repeat the steps.
Marking
Step 2. Having completed the marking, drill holes for all fasteners, insert dowels, and screw the brackets. It is recommended to insert paronite gaskets between the bracket and the wall.
Drilling
Bracket Attachment
Brackets
Advice. If the walls are brick, the holes for the dowels should not fall on the masonry joints. Also, you cannot use a hammer drill for drilling if the load-bearing walls are made of hollow brick.
Step 3. Next, take the first guide profile, apply it to the brackets and attach it with self-tapping screws. Using a level, check the horizontal position of the profile, correct it if necessary, and tighten the screws. The design of the brackets allows for alignment of the sheathing elements within 30 mm. All other frame profiles are installed and screwed one by one. Additional jumpers are attached around the openings so that the sheathing is continuous.
Brackets and fastening the supporting profile to them
Example of vertical lathing
Vertical frame posts
Step 4. Slab insulation is attached between the guides. Most often, mineral wool is used for insulation under corrugated sheeting: it retains heat well, is easy to install, and has vapor permeability. The slabs are fastened from the bottom up, with the obligatory displacement of the vertical seams in each subsequent row. The insulation layer must be continuous, so be careful to ensure that there are no gaps between the plates.
Installation and fixation of insulation boards
To fix the insulation, disc-shaped dowels are used. Holes in the wall are drilled directly through the material, to a depth of 4-5 cm. There should be at least 5 dowels per slab - one in the center, four in the corners.
Step 5. Water and wind protection is required on top of the thermal insulation layer. The windproof membrane sheets are attached perpendicular to the guides, that is, they are mounted horizontally on a vertical frame, from bottom to top, and mounted vertically on a horizontal frame. To do this, the upper edge of the canvas is fixed with self-tapping screws to the upper guide, the material is rolled down, slightly stretched, and secured with self-tapping screws to the lower profile.
Fastening the wind barrier
Adjacent canvases are installed with an overlap of 10-15 cm. At the overlap line, the material is also fixed along the entire height to the guide profiles. Near the openings, the membrane is cut around the perimeter of the frame and also secured to the sheathing. Sometimes the waterproofing film is attached using double-sided tape and fixed to the wooden frame using a stapler.
Step 6. Screw the base ebb along the bottom edge of the frame with self-tapping screws. If the frame is vertical, you first need to beat the horizontal level, otherwise the ebb will be uneven. In the case of horizontal lathing, this element is screwed to the lower profile. The drip strips are overlapped by 20-30 mm.
Attaching the plinth strip
Step 7. Next is the doorway. Take the slope strip, cut it to the height of the door frame, apply it to the outer edge of the frame and level it. Screw it with self-tapping screws in increments of 30 cm through the sighting shelf. I install the bar in the same way on the other side and above the opening.
Measurements and installation of the starting slope strip
Cutting and installing the starting strip over the opening
Step 8. Start designing window openings. The window sill is cut to the width of the opening, applied to the bottom of the frame and adjusted to size. Screw the element to the sheathing guides. Next, the side slope strips are cut and fastened, and the top strip is mounted last. At the ends of the planks, two neat cuts are made and the resulting “ears” are folded onto the side profiles.
Step 9. Next, install the external and internal corners, as well as the connecting strip if elements of complex shape are used. The profile is placed on the outer corner, screwed on top with a self-tapping screw and leveled. The lower edge of the corner profile should overlap the bottom of the sheathing by 5-6 mm. Having aligned the element, screw it to the sheathing along its entire length. The internal corners are secured in the same way. If simple profiles are used, they are attached on top of the sheathing, so that after finishing the openings, you can immediately begin installing the sheets.
Advice. Experts recommend starting installation of the sheathing from the back of the house towards the front of the facade. When laying sheets horizontally, the starting line of fastening is the corner of the building or the doorway; when laying vertically, installation begins from the base or blind area from the bottom up.
Step 10. Remove the protective film from the finishing material. Take the first sheet, place it against the sheathing from the corner and attach it with a self-tapping screw at the bottom along the edge. Next, level it and, holding it in one position, screw the screws into the deflections of the wave. The fastening step is about 30 cm, or every 2 waves.
Fastening the corrugated sheet
Step 11. The next sheet is overlapped by 15 cm, aligned along the bottom cut, and screwed with self-tapping screws.
Fastening sheets
Along the joint line, fasteners are placed in increments of 50 cm. When sheathing, vertical deviations are allowed no more than 6 mm.
Fixation of corrugated sheets and platbands
Advice. When tightening the screws, avoid excessive tension on the sheathing sheets. They should fit snugly against each other, especially at the joints, but at the same time have a minimum gap of 0.8-1 mm at the fixation points to compensate for thermal expansion.
Opening design
Step 12. When finishing the openings, the sheets are pre-cut according to measurements. To cut corrugated sheets, use metal scissors, a fine-toothed hacksaw, or a jigsaw.
Cutting corrugated sheets with a saw
Cutting profiled sheets with a grinder
After installing the sheathing, the remaining additional elements are installed - platbands, simple corners and joining strips, and the joints between the walls and the cornice are covered with moldings.
The profiled sheet on the facade can be laid both vertically and horizontally
Facade made of corrugated sheets (horizontal arrangement)
An example of finishing a building with corrugated sheets
Warehouse with corrugated sheet lining
Covering the façade of a country house with corrugated sheets
Finishing the house with corrugated sheets
Gable trim
The final stage is covering the gables of the house. As on the walls, here the sheets can be placed both horizontally and vertically, depending on the preferences of the homeowner. Before sheathing, the gables should be treated with a waterproofing compound and wait until the surface dries. After this, install a sheathing made of 50x50 mm timber or aluminum profile. The sheathing pitch is 30-40 cm. If the attic is planned to be insulated, the sheathing cells are filled with slabs of mineral wool or polystyrene foam, and reinforced with disc dowels.
Next, the insulation is covered with a waterproofing membrane, and a counter-lattice is mounted on top, which provides a ventilation gap. Along the lower edge of the pediment, a flashing is screwed to the sheathing, and end strips are mounted on the sides, at the junction with the roof overhangs. Now all that remains is to correctly cut the sheets and install them on the pediment. For convenience, you can make a simple template from scrap materials and cut corrugated sheets according to it. When installing, the edges of the material are inserted into the end strips, adjusted tightly so that there are no gaps left, and the position is checked with a level. Fixation is carried out as standard with self-tapping screws or rivets in increments of 30 cm.
Pediment made of corrugated board
Finishing the pediment with corrugated sheets
The size of the roof overhang is selected so as to cover the sandwich of insulation and corrugated sheets
The apparent simplicity of corrugated sheeting can be used in the most unusual way
>Wall corrugated sheet – select the material and install it on the walls
Installation of partitions
Corrugated sheeting is lightweight and is usually installed on a metal frame. This facilitates the rapid construction of garages, hangars or redevelopment within them. When creating partitions from wall corrugated sheets, it is possible to install heat-insulating material inside; the wall will look like a sandwich panel. It is easy to hide communications inside, for example electrical cables, packaged in special casings or corrugated tubes.
The sheet profile in false walls is made in various directions: horizontal, diagonal, vertical. In the first case, the partition will be stiffer and more stable.
In order to mount a partition structure made of corrugated sheets, you will need a set of tools. It includes:
- level;
- electric screwdriver;
- drill or hammer drill;
- hammer;
- roulette;
- chalk, cord;
- metal scissors;
- cutting machine.
All these tools are usually available in a home workshop, and self-construction is possible even for an inexperienced builder.
Light weight and decent profile dimensions are the advantages of using corrugated sheeting. This saves money on transportation and unloading, facilitates the construction process, and reduces the installation period.
Types of corrugated sheets for wall insulation
There are two types of corrugated sheeting: wall and roofing. Wall corrugated sheeting, as a rule, has a lower wave height.
Corrugated sheeting, due to its availability, is in demand everywhere. They cover the roofs and facades of residential buildings. For the manufacture of wall profiles, rolled steel is used with a polymer coating placed on it. Wall cladding can be carried out both inside the building and on its outside. The C8 wall profile sheet has different profile wave heights. Due to insignificant loads on the walls, the profile height is: 8 mm, 10 mm, 20 mm, 35 mm. The color scheme for sheets corresponds to the European RAL scale. Weight ranges from 5 to 8 kg per m2.
For profiled sheet KS-81180, the profile height is 8 mm, thickness is 0.8 mm; It is an excellent material, airtight, provides strength and lightness of the coating. Corrugated sheet C - 21 has an overall sheet width of 1051 mm, with a profile height of 21 mm; provides the walls with a certain rigidity. When installing corrugated sheets with your own hands, inexpensive brands NS - 441045, N - 60916, N - 75802, which are easy to install, environmentally friendly, and easy to transport, have proven themselves well. To cover the walls, a load-bearing profile sheet of the NS35 brand is used (despite the fact that it is classified as a roofing sheet, it is suitable for external and internal decoration of the room), NS44.
Insulation of external walls of a building with corrugated sheets
In old buildings, you can line the walls with sheets of corrugated sheets with your own hands and change not only the appearance of the facade, but also insulate the entire living space. Sheets of corrugated sheets are mounted on wooden, brick, concrete walls.
Before starting facing work, it is necessary to prepare the following materials:
Corrugated sheet installation diagram.
- wall corrugated sheeting grades C8, C10, C13, C20 C8;
- leveling brackets;
- thermal break gaskets;
- U-shaped guide profiles;
- façade anchor dowels;
- insulation (mineral or polymer), with a density of at least 8 kg/m³;
- disc-type polyamide dowels;
- film (for protection from wind and rain);
- rivets;
- galvanized self-tapping screws, with EPDM gasket.
First of all, the brackets are secured using facade dowels. To eliminate the possibility of cold bridges appearing, the brackets are placed on spacers. The brackets can be secured in a vertical or horizontal position. In the horizontal plane they lag behind each other by 500-750 mm, in the vertical plane - by 1000 mm. Insulation boards are installed with your own hands by stringing them onto brackets. Insulation boards are placed vertically in a checkerboard pattern. Fastening between the slab and the wall is carried out using disc-shaped dowels made of polyamide. The insulation is covered with a special film on top, providing protection from atmospheric influences. The protective film is positioned so that in a vertical position there is an overlap of at least 100 mm. The fastening between the insulation and the film is carried out with disc-shaped dowels. The insulation is installed in dry, windless weather. Water and snow are not allowed to get inside the mounted structure.
Attaching vertical guides to brackets
Approximate diagram of installation of corrugated sheeting on a brick wall.
At the next stage of work, it is necessary to fasten the vertical guides and brackets. Fastening is provided by rivets. During installation, the guides are positioned in such a way as to create a gap for ventilation between the corrugated sheet and the insulation. Its size is strictly defined and ranges from 40 mm to 10 mm. When installing with your own hands, pay close attention to the coincidence of the level of all guides. Installation of horizontal guides is carried out to similar ones, but located in the vertical direction. The frequency of their repetition during installation makes it possible to ensure close contact between corrugated sheets and profiles. The overlap goes into one corrugation. The corrugated sheet is attached to the profile in a horizontal position in sheets on the inner edges using self-tapping screws. At the joints, the connection is ensured with rivets, the pitch is 300 mm.
Corrugated sheeting as a facing material for insulated wall panels
When constructing residential buildings and industrial premises, a method is used in which insulated panels or sandwich panels are used. The method of their use is economically justified and simple to implement. To install sandwich panels with your own hands, you need to prepare the tools for work in advance.
It is best to stock up on necessary materials such as:
Self-tapping screws: approximate dimensions.
- roofing felt;
- universal screws (anchor);
- guide profiles;
- vapor barrier film;
- thermal profiles;
- insulation (mineral or polymer);
- hat profile;
- screws for metal;
- self-tapping screws with EPDM gasket;
- Protective film.
Two-layer waterproofing of the foundation is performed primarily with roofing felt. Laying is carried out along the perimeter of the constructed foundation. It is necessary to secure the guide profiles on top. They are secured with anchor screws. Thermal profiles are fixed directly into the guide profiles. Place them vertically. Next, they move on to connecting the thermal profile and guides using self-tapping screws. A vapor barrier gasket is attached from the inside; place it horizontally. Work is carried out in the direction from the bottom edge to the top. The overlap is about 100 mm. The insulation is inserted inside the frame. It is placed in a checkerboard pattern. The top is covered with a film to protect it from atmospheric influences. Sheets of corrugated sheets and thermal profiles are connected to each other by guides located horizontally.
Fastening guides for fixing corrugated sheets
All guides for fixing sheets are attached so that the step ensures their strong fixation. Adjacent profiles are attached to the insulated panel to the thermal profile and connected with self-tapping screws, which firmly press the film to the panels. From the outside, the entire panel is covered with corrugated sheeting. You can fix the sheets using self-tapping screws with an EPDM gasket. In vertical joints, fastening is ensured using rivets. The pitch will be 300 mm.
When constructing a wall from corrugated sheets, installation can be done at the bottom of the wave, the layout diagram is in the wave, through the wave; fastening is done using metal screws. Fastening at the joints is done with rivets, with a step of 30 cm.
All methods of installing walls made of corrugated sheets can be done with your own hands, using the necessary technological developments and having sufficient experience in working with this type of building material.
The procedure for performing installation work
Fastening profiled sheets to the wall can be divided into three ways:
The instructions for installing corrugated sheeting to a wall using the first method differ in that the material will play a dual function, where wall cladding is the first, and protecting the thermal insulation material is the second. That is, installing a profiled sheet on a wall requires its initial insulation using sheet or roll insulation materials. The process of installing corrugated sheets first begins with mounting the brackets, by attaching them to the wall with self-tapping screws or dowels. After this, insulation boards are attached to the walls using special screws (fungi) or ordinary self-tapping screws with wide washers. Next, a polyethylene film is laid over the slabs; it will act as a protection for the insulation from moisture penetration into it. Next, the frame for attaching the corrugated sheets is installed.
As a rule, a metal guide profile (U-shaped) is used for this purpose. First of all, vertical profiles are mounted, which need to be secured to pre-installed brackets, after which horizontal jumpers are installed between them. When installing transverse profiles, it should be taken into account that their location should be convenient for fastening corrugated sheets. After the frame structure for the corrugated sheeting is ready, the wall corrugated sheeting can be attached. The material must be fastened to the profiles with metal screws, which have a lining under the head.
The second method of installing profiled sheets
This installation method is usually used in frame construction, where the role of the frame is played by a metal profile as the base of the wall. The instructions for installing corrugated sheets to the wall using the second method require preliminary waterproofing of the foundation. To do this, it is necessary to install a roofing material folded in half on the upper surface of the foundation. This will be quite enough. After which the profile is mounted on the foundation, it must be secured to the foundation using universal self-tapping screws. Then racks are mounted into the installed profile, which can also be secured with self-tapping screws. Thus, you will get a kind of frame of the building in the form of panels. After this, a vapor barrier material must be laid on the inside of the panels, fastening it using self-tapping screws with a countersunk head. Next, you can lay insulating material, which must be covered on the outside with plastic film.
That's all, the wall is ready, you can begin installing the wall corrugated sheeting. Before installing the profiled sheets, a hat profile is installed along the entire length of the wall, which will be the place where the profiled sheets are fixed. In the same way as in the first method, the material must be fastened to the frame with metal screws, which have a lining under the head. The joints of corrugated sheets are secured with rivets. In order to complete the appearance of the building, you need to apply additional elements. For example, ebbs and corners are used to frame the windows of a house, and corners are also used to cover the corners of a building. All additional elements are made of galvanized steel and have the same colors as the sheets of the main material.
The third method of installing profiled sheets
This method is the simplest, as it does not have any complexity in the approach to performing the entire installation process. In this method, the fastening of corrugated sheets is carried out exactly according to the fence installation technology. But the instructions for this method have certain differences in fastening the material. Everything else is the precise installation of corrugated sheeting on the fence. The sheets of material must be fastened to the lower part of the wave, and through the wave, in other words, very often. The joints of the sheets are fastened with rivets every 30 cm.
Source