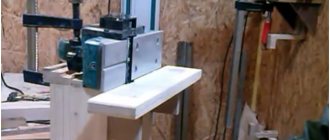
Wood planing is an indispensable stage of woodworking. Planing can be done either with a hand plane or with an electric one, but for more professional work, a planer is better suited. An industrial design costs a lot of money, so here we will try to figure out how to make a jointing machine with our own hands, using a household electric hammer.
Various designs of jointing machines
Structurally, jointing equipment manufactured in industrial conditions is very different from machines made independently. They differ in the materials used, technologies, auxiliary equipment, etc. But this does not mean that a homemade jointing machine made from a simple electric planer will not be in demand for home use. It is quite suitable for processing small parts in small quantities.
There are two main types of wood planing machines:
- Single-sided machines (the production of this option will be discussed). With such equipment, only one surface can be processed in one pass. Structurally, these are the simplest devices;
- Double-sided or two-spindle. Such a device can simultaneously process two adjacent surfaces of a part. It is quite difficult to make such equipment yourself.
In addition to the above types, you can also add that machines can be both stationary and mobile.
Do-it-yourself jointer from an electric planer
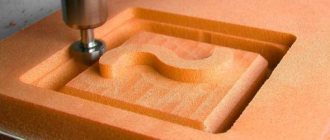
Today, jointers have become quite widespread. They are used for planing wood. The planing procedure involves removing the top layer of material, giving the workpiece a certain shape and size.
The cost of the industrial version is quite high, which is why professionals decide to create a jointer from an electric planer. Such modernization can be carried out by a master solely taking into account the features of such instruments.
Let's take a closer look at them.
Making a homemade jointing machine from an electric planer
You can make a jointer from an electric planer with your own hands, even if you do not have the required skills. In this case, attention should be paid to all components, since the main operational characteristics largely depend on the quality of each. You can make a jointer from an electric planer with your own hands, taking into account the following points:
- The project is downloaded on the Internet or created independently, it all depends on the specific case.
- The next step is to choose a suitable electric planer. It is characterized by a large number of features, for example, power or type of blade installed.
- When creating a machine from a plane, you need to pay attention to ensuring that it is stable. Otherwise, the quality of processing is significantly different.
You also often make a stand for a plane with your own hands. It significantly improves the quality of the processing performed.
How to properly adjust the tool being manufactured?
Adjusting the plane allows you to obtain a product with the required parameters. Among the features we note:
- The required power is set.
- Attention is paid to the degree of protrusion of the knives.
- The appropriate position of the tool is established.
Only after correct adjustment of the tool can you obtain a product with the required parameters. In addition, it is necessary to provide for the possibility of replacing the main elements in case of severe wear.
main idea
Yes, such a homemade jointing machine, unlike serious industrial designs, has a number of disadvantages, namely:
- Cannot boast of high processing accuracy;
- The width of the workpiece is very small - only 110 mm;
- Lightweight is a disadvantage, since a heavy massive base always gives the device stability and, as a result, ease of use, which ultimately improves the quality of the result.
- Low power, limited by the power of a household electric planer;
- The body material is wood, that is, not durable;
However, it also has undeniable advantages that make it very useful for achieving certain goals and performing a number of tasks, since it has the following advantages:
- Low cost - serious jointing machines cost tens and hundreds of thousands of rubles, and the cost of this homemade jointing machine consists of the cost of the plane and materials;
- Compact and portable - it can easily be stored anywhere in the workshop and can be deployed for work in a matter of minutes.
- The simplicity of the design affects its reliability and maintainability.
- The ability to make the necessary dimensions of the machine “to suit you”, for example, you can increase the length of the work table or change the height.
Clamps for circular saws
In terms of handicrafts, the year has gotten off to a great start! Unfortunately, as has become customary lately, according to the principle “I take one berry, look at another, notice the third, and crush the fourth...”.
In the sense that work is going on simultaneously on several projects, none of which have yet been brought to a demonstrable state. But - give it time! In the meantime, here I have something from the instrumental series.
I had to build myself some accessories that were vital in the current work.
- * * *
- Some time ago, one of my current projects required me to create a feeder for a circular saw. This is a tray with sides rolling on the table:
- Needed for neat and precise sawing of small pieces of material or for all sorts of tricks with plywood, such as bending it (for which, in fact, the feeder was made):
The idea, I think, is clear: many non-through cuts are made in a strip of plywood, which makes it quite easy to bend. When the shape is simple, this method is much faster and simpler than gluing veneer onto a blank, steaming, etc.
But it is obvious that without the feeder mentioned above, making such cutting is very difficult. It is also obvious that the scope of application of the feeder is not limited to this. I've wanted to build it for a long time, but there was no reason. The reason appeared - I did it.
The design is simple as hell. A sheet of plywood with two sides set exactly at 90 degrees:
- Rolls on the table due to the guides fixed on the bottom side:
I simply milled two T-shaped profiles from oak, which fit exactly into the grooves of the circular table.
All this is too simple and does not carry any special adventures. All woodwalkers sooner or later build themselves a similar feeder for a circular saw. This is inevitable.
This was all, like, an introduction. Now, to the point of the post...
* * *
The feeder, made when it was necessary to cut plywood, suddenly became needed almost constantly. It's amazing how quickly these types of accessories are integrated into the workshop.
As a result, problems arose that you didn’t initially think about when making adjustments for a specific task. In particular, it turned out that beyond this specific task, the feeder ceases to be convenient without the ability to reliably fix the material in it.
Preparing the necessary accessories for work
To make a jointing machine with your own hands, you will need materials, equipment and tools, namely:
- Manual electric planer. Will be used as a woodworking tool. It is best to use high-quality, branded Makita or Bosh power tools - this is an additional guarantee of productive, long-term work;
- Jigsaw with files. Alternatively, you can use a regular hand jigsaw, since we will only need it once to make one part;
- Drilling machine with drills or drill;
- Circular saw or any other sawing machine. Alternatively, you can use a simple handsaw;
- Electric screwdriver;
- Wood screws (3.5x40 or 3.5x45);
- Plywood 10-15mm, for tables and other small parts, 18-20mm - for the side wall of the bed. Alternatively, you can use chipboard or OSB, but this is an extremely undesirable option;
- Solid wood for making a side support, approximately 15-20mm thick.
This is an indicative set of what you might need to make a homemade jointing machine.
Additional Assembly Tips
The metal for the stove is cut with a grinder or jigsaw. To cut a groove, it is convenient to use an electric jigsaw, having previously drilled a hole for its file in the slab, or an electric drill with an appropriate attachment. The edges of the slot are processed with a file so as not to get injured by them later.
You can secure the metal base plate with flat head screws (so that they do not interfere with work) or by welding it. The first option is preferable because, if necessary, the electric plane is easy to disassemble.
Before installing the drum, it is recommended to check the sharpness of its knives. If it is bad, then it is better to sharpen the blades immediately, using, for example, a regular whetstone. It is necessary to constantly ensure that the cutting attachments are well secured without distortion.
The basis for making your own knives are steel plates or hacksaw blades for metal, sharpened at an angle of 30 degrees.
The sequence of making an electric plane from a grinder with the working drum placed in a vertical position is demonstrated in the videos below. It also shows possible errors when assembling a homemade product.
https://youtube.com/watch?v=SY6xchF8VzU
Another option for creating a homemade electric planer from an old, non-working model is shown step by step in the video below.
Using the made power tool, you can process boards, beams and other workpieces. An electric planer assembled with your own hands must be used in compliance with safety requirements. The parts must be fed correctly to avoid getting your fingers caught in the drum.
There are many options for homemade electric planes. They have varying degrees of complexity, as well as different functionality. In this regard, the limitations are mainly related to the technical thinking of the inventors and the parts and materials available “at hand”. If necessary, the manufactured equipment can also be equipped with automation equipment.
Machine parts
Let's look at the main structural elements:
| Name | Description and purpose |
| Machine base | The bottom part of the machine where everything is mounted. |
| Side wall | The supporting structure of the machine, which serves to mount the electric planer and both tables. |
| Rear table (fixed) | Together with the front table it forms the plane of movement of the workpiece. Attached to the side wall. |
| Front table (adjustable height) | Together with the back table it forms the plane of movement of the workpiece. Attached to the side wall. |
| Side stop | Fixed on the back table. Used to give direction to the movement of the workpiece. |
| Spacer corners (stiffening ribs) | They serve for general strengthening of the structure, as well as to support a given 90-degree angle. |
| Electric planer | The main element of workpiece processing. |
Review and comparison of factory models
| Model | UP-2000 | UP-05 | UP-2200 | UP-2500 |
| Processing width, mm | 230 | 200 | 250 | 270 |
| Workpiece thickness, mm | 8-63 | 8-63 | 8-63 | 8-63 |
| Weight, kg | 3 | 2,5 | 3,2 | 5,6 |
| Dimensions, mm | 293*304*113 | 255x270x105 | 293*324*113 | 293*344*113 |
| Price, rub | 2871 | 2871 | 3133 | 3393 |
UP-2000 UP-05
UP-2200
UP-2500
Making a homemade jointing machine
Side wall
First of all, we will make a side wall, for this we use plywood 18-20mm thick with dimensions 150x480mm. By cutting out a place in the workpiece in which the electric planer will be fixed. This should be done using an electric or manual jigsaw, since the sample shape has a complex configuration.
Using a drilling machine, two grooves should be made in the side panel at a distance of 70 mm, with their help, in the future, the base of the front table will be attached.
Machine base
We make the base. This is a simple rectangle that needs to be cut on a circular saw or other sawing machine from the same plywood 18-20mm thick with dimensions 180x480mm. Everything is simple here - we connect the base and side wall at an angle of 90 degrees with self-tapping screws into the end of the wall.
In the future, the plane will be installed as follows.
Back table
The back table is also made of 18-20mm plywood with dimensions of 150x600mm; a technological opening is cut out to get this shape.
The end edge of the opening must be cut at an angle. This can be done on a circular saw or jigsaw.
Next, unscrewing 4 screws, remove the fixed “sole” from the electric planer and mark the table of the future machine.
Having drilled the necessary technological holes, they need to be countersunk a little so that the standard screws are recessed “flush” and do not interfere with the movement of the workpiece.
We install our homemade back table in place of the removed sole of the electric planer using standard screws. After this, you need to fix this table on the side wall with self-tapping screws into the end of this wall.
Front movable table
The front table, which must be adjustable in height, is made of two rectangular pieces fastened at an angle of 90 degrees. For greater structural strength, you need to make triangular stops between them. In this example, everything is attached with self-tapping screws; however, for greater strength, it is recommended to coat the joints with wood glue. The end result should be a design like this.
At a distance of 70 mm from each other, you need to make two through holes with a diameter of 8-10 mm and hammer furniture drive nuts into them. It is better to do this before assembling the base.
Installation of the movable table is done using two screws on the back of the side wall. For convenience, you can use bandages with a winged head or make homemade holder mounts. The installation should be carried out so that the plane of the moving part of the “sole” of the electric planer is in the same plane as the movable table of the jointer.
Side stop
The side stop is needed to ensure smooth and parallel movement of the workpiece, as well as to establish an exact 90-degree angle between the work table and the stop plane. The stop is made simply - from two parts, which can be made from either plywood or solid wood. In this case, an array is used.
Two rectangular blanks are fastened at an angle of 90 degrees, forming a “corner”. After which it is rigidly attached to the stationary part of the table.
A do-it-yourself jointing machine made from an electric planer is ready for use.
Making a jointer from an electric planer at home
[hide]
- Machine design
- How to make a jointer tool
- Step-by-step instruction
- Alternative option
- Professional homemade jointer
Planing is one of the methods for finishing wood. Boards and beams acquire a smooth, polished surface. The jointer has a simpler design than its thicknesser counterpart. The installation is easy to assemble yourself using available equipment.
Machine design
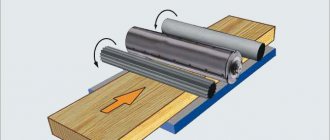
The jointing machine is equipped with a table. The table has a technological hole; a knife shaft operating from an electric drive is placed in it. During the planing process, lumber is fed onto the shaft using a roller mechanism. The support elements for the workpiece can be tilted at the required angle. The thickness of the board is adjusted by the tabletop by feeding it up and down.
The knife shaft can have a single-sided or double-sided design . In the first case, one plane of the board is processed. The double-sided shaft allows you to joint wood from both sides at the same time.
There is equipment with four knives that provide four-sided grinding. These samples are most often installed at large woodworking enterprises. The cleanliness of the processing depends on the diameter of the knife shaft.
The larger it is, the higher the quality of grinding.
Two types of knives can be installed on a homemade jointing machine:
- Single-edged. Subject to periodic sharpening.
- Double-edged, disposable. When worn out, replace them with new ones.
Planers differ in shaft rotation speed, tabletop length, and planing width of lumber. The surface of the tabletop is divided into two transverse segments, with the front part located lower than the back to regulate the thickness of the removed layer of wood. The optimal cutting thickness is 0.5 cm. If more removal is necessary, several cycles must be performed.
For stability and improved load-bearing characteristics, the jointer frame is made of cast iron, and the frame is supplemented with steel plates. The knife shaft is fixed between the two halves of the tabletop. For convenience, the table is equipped with guide rulers.
How to make a jointer tool
The jointer has a simple design, it can be made in a few hours: the process does not require special skills and knowledge. A power planer is useful in carpentry, but the quality of wood processing is inferior to a jointer. Therefore, it is necessary to improve the existing sample to achieve a better result.
An electric planer with a sliding blade guard that can be retracted during jointing is well suited as the main element of future equipment. It is better if the plane is equipped with a fastening with knives facing upwards.
During the assembly process you will need:
- boards,
- plywood sheet,
- fasteners.
Step-by-step instruction
First you need to make a base of boards. It should have the shape of a box without a bottom or lid. The length of the frame will correspond to the length of the working surface.
At the next stage, a sheet of plywood must be laid on top of the box, a technological hole must be formed, and the plane platform will be installed in it.
Two more similar sheets are laid on top of the plywood, serving as the back and front plates. The sheet that the tree will accept when planing should be 2 mm thicker. It is necessary to maintain parallel placement of plywood sheets. This can be verified with a sliver probe. Before fixing the panel to the frame, the edge of the material is processed .
The hand-held electric planer fits onto a mount mounted with the knives facing up on the bottom sheet of plywood.
You will need wood to cut out the mounting lugs. Adjusting bolts will be threaded through these elements, setting the machine knife to a given height relative to its base.
You need to install a side stop made of the remaining plywood on the jointer . After this, you can begin processing lumber.
Alternative option
If you don’t plan to work with long workpieces, you can make a compact household device. This circular saw can be easily equipped with special supports and turns into a full-fledged machine.
First you need to form a box from thick plywood, wood or MDF. The structure is fixed with wood glue or reinforced with self-tapping screws. The role of the countertop is performed by the electric planer platform.
The most complex element that a jointer is equipped with is a side stop . It will move on special grooves.
Its fixation is ensured by two screws and wing nuts. The cutting tool is held in the box by side fasteners.
For convenience, a home electric jointer can be improved by forming in its design an outlet for connecting an industrial vacuum cleaner.
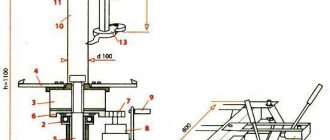
Professional homemade jointer
The figure shows drawings with detailed explanations. You will need a 1.5 kW electric motor connected to the shaft using a drive belt. You can make the knife shaft yourself or order it from a turner.
During the work, it is necessary to weld a frame from a metal profile or angle. Then the base plate and the base for the screw are welded to the frame. The side strips are attached to ensure free movement of the guides. To do this, you need to create technological gaps.
The lead screw is welded to the machine after it is installed on the support . The equipment must be provided with a front plate, consisting of a top part and a guide rail. They are connected to each other by side elements. The end parts of the surfaces must be made parallel, after which they are carefully ground.
To ensure that the dimensions of the sidewalls installed on a homemade jointer are the same, they are processed and provided with holes for studs. After welding the sidewalls and guide elements, the temporary studs are removed.
At the last stage, the knife shaft is installed. At the same time, raise the front tabletop to its level so that the edge of the panel is parallel to the axis of the shaft. The back of the tabletop must be fixed in a stationary position. The center of gravity of this woodworking unit is high. To reduce vibration, it is recommended to additionally strengthen the jointers.
Safety when working with homemade equipment
When working with any tool, you must follow safety precautions, as ignoring them can cause various injuries. We will briefly list the recommended measures to ensure the safety of the master’s work on this machine.
- It is recommended to remove sharp chamfers and sand all manufactured parts to eliminate the possibility of hand injury (splinters, etc.)
- When working, it is necessary to use a chip extractor or a special vacuum cleaner, for example, a cyclone type, to remove sawdust and dust from the sawing area, which can cause the following harm:
| To the Master | Respiratory and eye contact |
| Tool | Getting inside the instrument and:
|
| Process | Chips and sawdust getting between the workpiece and the table, resulting in poor fit and misalignment - the result is uneven processing. |
- When working, it is necessary to use pushers, since when working with small parts, it is possible that the master’s hands will get into the cutting zone, which will lead to injury.
Additional Assembly Tips
The metal for the stove is cut with a grinder or jigsaw. To cut a groove, it is convenient to use an electric jigsaw, having previously drilled a hole for its file in the slab, or an electric drill with an appropriate attachment. The edges of the slot are processed with a file so as not to get injured by them later.
You can secure the metal base plate with flat head screws (so that they do not interfere with work) or by welding it. The first option is preferable because, if necessary, the electric plane is easy to disassemble.
Before installing the drum, it is recommended to check the sharpness of its knives. If it is bad, then it is better to sharpen the blades immediately, using, for example, a regular whetstone. It is necessary to constantly ensure that the cutting attachments are well secured without distortion.
The basis for making your own knives are steel plates or hacksaw blades for metal, sharpened at an angle of 30 degrees.
Hacksaw blade
The sequence of making an electric plane from a grinder with the working drum placed in a vertical position is demonstrated in the videos below. It also shows possible errors when assembling a homemade product.
Another option for creating a homemade electric planer from an old, non-working model is shown step by step in the video below.
Using the made power tool, you can process boards, beams and other workpieces. An electric planer assembled with your own hands must be used in compliance with safety requirements. The parts must be fed correctly to avoid getting your fingers caught in the drum.
There are many options for homemade electric planes. They have varying degrees of complexity, as well as different functionality. In this regard, the limitations are mainly related to the technical thinking of the inventors and the parts and materials available “at hand”. If necessary, the manufactured equipment can also be equipped with automation equipment.
Video works Electric room Interskol
The parts are connected together in such a way that the bed in which the tool is fixed during operation has protrusions and recesses due to its shape.
To accurately determine the configuration of the rack components, you must first make a template from a poster plate that will fit snugly on the body planner, and then cut it from half of the rack, adjust the Edge cutting tool, which is attached to an electric drill.
The remaining parts are fixed together with screws and duralumin corners and screwed onto the substrate.
The height of the stand is selected by calculation, so the center of gravity should be as low as possible, so the structure will be more stable. The distance between the tool body and its base is 20mm, and to ensure that the posts do not become detached, they can be fixed with a metal bracket.
We recommend that you familiarize yourself with
- A set of power tools for wall repair. Power tools always need repairs on walls or hanging shelves, images.
When working on a wall surface, you need a range of power tools that every home should have.
Airplane: the invention continues. Making airplanes is quite simple. The shoes consist of three parts of oak. The midsection of the shoe is 1.5mm wider than the gland to allow for lateral adjustment. On it, at the desired angle, Garden Tools presents a new brand - luxury garden and parking tools Manor of the British company - manufacturer of hand tools RemoColor Tools Limited.
The yard tool is beneficial. Simple grinding system. At the first stage of tool grinding, the grinding wheel usually has a profile groove (Fig.
1). On the second, the edge of the blade is sharpened and filled. Leftovers and decks. In rotation
Universal tongue and groove Shpuntubel is a carpentry tool that brings a narrow rectangular groove - a handle on the edge or on plates, processed construction furniture Data at some distance from its edge. In progress
Methods for sharpening knives
Today, two main methods are used for tool dressing: machine processing and manual dressing. For the first method, an electric sharpening machine or a manual sharpener is used. For the manual method, abrasive stones of different grain sizes or sandpaper are used.
For knives with a straight edge, this is most often done in two stages - first sharpening on an electric sharpener, and then finishing on a stone by hand. And for curly or semicircular blades, the shape is first edited with a file or on a thin abrasive wheel of an electric sharpener. The second step is checking the shape - the blade is inserted into the plane and the correct shape of the cutting edge is checked. At the very end, finishing is done on a sharpening machine with a vulcanite wheel.
For critical work, in addition to an electric sharpening machine with abrasive wheels of different grain sizes and hand stones, a technique such as finishing on a leather belt using polishing pastes is also used. In this case, the edge turns out to be perfectly sharp.
Planer device
During the evolution of the plane, quite a lot of its varieties have appeared, which can not only process the planes of wood, but also be used for figured cutting. To enjoy manual labor, you need to be able to choose the right plane, and then you will get real works of art from an ordinary piece of wood.
Modern planes can be divided into wooden and metal models. Each of them has its own advantages and disadvantages, but in terms of design, the instruments are similar, like twin brothers.
A standard plane consists of the following parts:
- sole, also known as body;
- cutter;
- wedge;
- slot for chip exit;
- cutter clamp;
- cutting depth regulator;
- horn - front handle;
- emphasis - rear handle.
The key element of the design is the cutter - this is a cutting tool made in the form of a pointed plate.
The blade is positioned at a given angle to the surface being processed. Thanks to the regulator, the knife extends to a certain distance, which allows you to finely adjust the depth of cut and the thickness of chip removal. In factory models, the blade sharpening angle is standard, but professional carpenters change it depending on the type of wood being processed.
The handles also play a certain role. The front one, called the horn, performs a guiding function and usually has a curved shape that provides a better grip on the hand. The rear one is a stop, thanks to which the force necessary for work is created.
With the sole, which can be wooden or metal, everything is not so simple. The main criterion for this structural element is a perfectly flat surface.
If this requirement is not met, it will be difficult to use a hand plane, and you can simply forget about planing accuracy. Taking these nuances into account, a metal sole looks preferable: it is made according to a template, so a priori it has the correct geometry. However, mistakes made by the manufacturer during casting reduce these advantages to zero. Moreover, the metal is susceptible to corrosive changes.
A wooden sole is lighter, and if deformed, you can straighten it yourself, breathing a second life into the plane. However, wood is not a durable material; it is subject to mechanical wear and loses its original properties when exposed to moisture or high temperatures for a long time.
Despite the standard design, there are more than 10 types of planes, and each tool performs a specific function when processing parts. Let's take a closer look at these products.