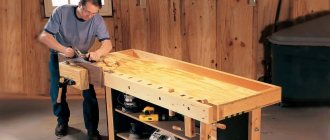
A workbench is a special “work table” with special holes, trays, drawers and a vice. Next, we’ll look at how to make a workbench for plumbing and carpentry so that all the necessary materials and equipment are at hand.
A homemade workbench should be strong and comfortable Source amazon.com
About the workbench
A workbench is a special table that is used for manual, mechanical and other processing of various parts and products. The design of such a device provides for a convenient working surface, a vice, clamps, cavities and drawers for storing tools and small parts. Thus, an ordinary classic carpentry workbench is intended for working with wood and other materials up to 3-3.5 meters in length.
The upper, horizontal part of a carpentry workbench is called a workbench cover or board. Under it there is a bench (bed - for carpentry workbenches), which is a supporting frame. Holes are made in the lid: they are used to install stops and clamps that will fix the workpieces. Also, a convenient workbench is equipped with shelves, trays, nests, and sometimes also an apron for hanging tools.
The workbench can be:
- metalworking (used for turning, grinding and other processing of metal parts);
The workbench can be metal Source ad-cd.net
- carpentry (mainly needed for working with wood, most often the carpentry workbench is longer, unlike the previous option);
- universal (has the combined qualities of a metalworking and carpentry workbench, that is, it has a durable surface and a sufficiently long length);
- carpenter's (the size of a construction or carpenter's workbench can reach six meters, because it is used for the manufacture or processing of various building materials).
The height of a carpentry workbench is usually 85-95 cm. To select this parameter correctly, they are guided by the height of the craftsman: when he stands next to the device, his palms should rest freely on the lid.
How to calculate the dimensions of a workbench for a garage: recommended dimensions
The dimensions of the structure are selected individually depending on the preferences of the owner, as well as taking into account the expected types of work. The width of typical structures is in the range of 0.7-1.2 m, and the length is from 1.5 to 2 m. Workbenches are single and double. The differences between these designs are the length and number of nightstands with drawers. If the desktop is single, in this case the optimal dimensions of the tabletop will be 0.8 x 0.8 x 1.5 m. In double designs, the length is increased to 2.8 m.
Drawing of a simple carpentry workbench with dimensions for a garage
The height of the carpentry workbench is selected taking into account the height of the craftsman who will work at it. Typically this figure varies from 85 to 95 cm. It is quite easy to check the correctness of the calculations. If, standing at the table, the master can freely rest his palms on its lid, then the height is chosen correctly. It is very important not to make a mistake with this indicator, since frequent stretching and bending is harmful to a person’s back and can lead to rapid fatigue.
The same applies to metal structures, which can also be used for plumbing work. In any case, the desktop must be stable and very durable. The minimum thickness of the lid is 5 cm. Textolite or linoleum is used as upholstery, which will protect the tabletop from damage. In metalworking workbenches, the wooden surface of the workplace is covered with a steel lid. The minimum thickness of this coating is 5 mm.
Construction and materials
A simple homemade workbench for a summer house or home has a top cover, a shelf that strengthens the entire product, and four corner legs. A “desktop” with a length of 120 cm (this parameter is selected individually), namely its shelf and lid, must have two transverse bridges (intermediate support beams).
Jumpers on the workbench are visible during the assembly stage Source ad-cd.net
When making such a workbench, you can use wooden boards 12 cm wide and 4 cm thick. In this case, the product will be able to withstand a static load of 150 kgf, and a dynamic load (if applied vertically downwards for one second) - 600 kgf.
To assemble the corner legs, you will need 6 * 70 mm screws and two boards folded together. The fasteners must be screwed in “zigzag” with a distance of 3 mm from the edge and a distance between two adjacent ones (in steps) of 10-12 cm. After the boards for the legs are fastened on one side, the same actions must be performed on the other.
If you have wooden beams with a thickness of 5-6 cm and a width of 15-20 cm, this will simplify the task. This way you won't have to fasten two boards together to make the legs of the workbench. The ability to withstand loads of such a workbench will increase to 200-750 kgf (depending on the thickness and width of the beams). If you take wooden beams 6-15 cm thick for work, the workbench will be able to withstand up to 450 kgf from static load and 120 kgf from dynamic load.
A wooden workbench is ideal for carpentry work, but if you need to assemble a product for metal processing, that is, for metalwork, it is better to use welded or prefabricated metal.
A simple workbench can be small but spacious Source pinimg.com
On a note! To make a workbench that can withstand a load of 300 kgf, you will need metal corners with dimensions of 35*35*3 mm and 20*20*2 mm, a metal sheet and galvanized boxes.
Electrical equipment, light, lighting
0 votes
+
Vote for!
—
Vote against!
For quality work, carpenters, joiners and mechanics are advised to properly organize their workplace, and for this purpose, a homemade carpentry workbench with a special vice and a protective device attached to it is best suited. Workbenches are the basis of large enterprises, small industrial production and home workshops. You will find out what this equipment is and how you can assemble the machine yourself by reading the information below.
The purpose of a metalworking workbench
Every owner knows that when working with any material, there is a need for its high-quality fastening, because otherwise it can be easily damaged during direct processing. Workbenches are intended for these purposes for equipping workplaces for processing various materials, in particular wood and wood derivatives, which are secured using a vice placed on the lid of the device.
A workbench is a special table that is intended for manual processing of products from different materials, therefore it is the main workplace of the master. Workbenches are carpentry and metalworking. In addition, there are also carpentry workbenches, the work table of which is 6 meters long and 1 meter wide, as well as stops for the workpieces being processed.
Workbenches in production differ in that they come in metal and wood. If you are a carpenter, then you should install a wooden workbench, and if you are a mechanic or auto mechanic, then only a metal structure will suit you. The design of wooden and metal workbenches is often collapsible, which makes them easy to transport.
Mechanical workbenches are intended for metalworking and assembly, finishing, straightening, adjustment, installation, adjustment and other work. The scope of application of this equipment is quite wide - from small utility rooms and the private sector to large industrial enterprises, car services and car service stations. The reliable design of the bench can be additionally equipped with a vice, various devices and lighting units for processing and repairing products.
This equipment is intended for more efficient use of the workplace, therefore, during its manufacture, the peculiarities of the layout of the premises and the specifics of production are taken into account. If there is not enough space to install a large workbench, you should give preference to a single-pedestal bench, which, by the way, can fit even in a small garage and even on a balcony.
Construction of a metal workbench
The design of a carpenter's workbench is highly durable and functional: workpieces can be secured on the tabletop of the machine, tools can be kept in special drawers, the height of the carpenter's workbench can be adjusted in accordance with a person's height.
The main elements of a carpentry workbench are a board-tabletop and a base, which is called a bench. The tabletop is made of hardwood (beech, ash and oak), and the underbench is mainly made of pine. The width of the tabletop of carpentry workbenches reaches 500 millimeters, and the thickness can vary from 60 to 80 millimeters, depending on the purpose of the machine. The base can be stationary or collapsible.
The collapsible design of metalworking workbenches allows you to minimize transportation costs, ensuring the convenience of transporting equipment over long distances, and the possibility of on-site installation allows you to choose the most optimal workbench configuration. Workbenches are usually made with steel, cast iron, welded or tubular legs.
Boards are attached to the metal frame, and to protect the workbench from wear and damage, and to prevent small tools and parts from falling into the cracks, its surface is usually covered with roofing iron, plywood, aluminum or linoleum. On the sides and front of the cover, according to the drawing of the mechanic's workbench, sides are installed so that the parts do not roll off it.
Under the table cover there are drawers containing metalworking tools, diagrams and parts to be processed. Each workbench has at least two drawers, which are separated by partitions. Also an important detail is the protective screen, which is usually used when it is necessary to isolate the workplace from the accidental emission of chips during metalwork, for example, when cutting metal.
To connect power tools to the workbench, a power electrical line is installed and sockets are installed. To carry out plumbing work in production near objects, workbenches are used that are equipped with rollers, thanks to which they move freely and easily from place to place.
Vise for securing workpieces
Carpentry workbenches have a vice for securing workpieces. For ease of processing, there are also several grooves on the tabletop into which special wedges are inserted, allowing the beams to be secured. Before you make a bench, you need to find out what kind of vices there are for them.
Depending on the nature of the work, a chair or hand vice is used, as well as with parallel jaws. Chair vices got their name from the method of attaching them to a wooden base in the shape of a chair; they were later adapted for mounting on workbenches. Chair vices are rarely used and only for rough heavy work that involves the use of shock loads - when bending, chopping or riveting.
Vises with manual drive or parallel jaws come in three types: fixed, rotary and instrumental with free-running front jaws. The rotary vice can be rotated through an angle of at least 60 degrees. To increase the useful service life of such a vice, it is customary to attach steel plates with mesh notches to the working part of the jaws with screws. The sizes of the sponges are 80 and 140 millimeters.
Fixed vices have a base with which they are secured to the workbench cover with bolts, a movable and a fixed jaw. To increase the service life, the working parts of the jaws are made replaceable in the form of prismatic plates with a notch made of tool steel. The width of the jaws installed on the fixed vice is 80 and 140 millimeters.
Special or universal vices are used for clamping small workpieces or parts. Tools of this type are secured to the working surface using bolts, the heads of which are inserted into the grooves of the table. Special vices are capable of rotating in horizontal and vertical planes, which allows you to install the workpiece in almost any position. One disadvantage of universal vices is the lack of rigidity of fixation.
Types of vice jaws
Vise jaws are usually made of hard steel with a special notch, due to which they are able to firmly hold the part while it is being processed. To prevent the workpiece surface from being damaged by the jaws of the vice, replaceable jaws are attached to them, which are made of soft metal.
There are different types of sponges:
- smooth, which ensures precise fixation of processed parts and does not damage the surface;
- jaws with notches - fix unprocessed workpieces rigidly;
- special jaws - fix any specific parts optimally;
- elastic jaws - provide the maximum possible clamping area, evenly distributing the load on fragile parts.
According to the degree of freedom, sponges are:
- standard - always parallel to the workbench or table;
- rotary - parallel to the workbench, but can be rotated in the working plane;
- inclined - rotate in one of the planes;
- globe - tilt and turn in any direction.
Classification of metalwork benches
Mechanical workbenches can be single- and double-seater, single- and double-pedestal. A single bench is the most convenient to use and, as a rule, has a length of 1200-1500 millimeters, a width of 700-800 millimeters, and a height of 800-900 millimeters.
Multi-seat workbenches are usually installed in metalwork shops and large metalworking areas. The length of a two-seater table reaches 2800-3500 millimeters. The distance between the vices on multi-place workbenches reaches 1250-1500 millimeters. Thus, the dimensions of a multi-place locksmith workbench differ only in length.
Single- and double-pedestal, non-pedestal and reinforced versions of metalworking workbenches are also produced. The single-pedestal workbench is made of high-quality steel with a thickness of 0.9 - 1.5 millimeters. Such tables are equipped with a galvanized or wooden tabletop, hinged tool holders and a protective perforated panel.
The difference between a single- and double-pedestal metalworking workbench is small. Thanks to two cabinets, the placement of materials and tools becomes more convenient. Today you can also purchase a reinforced workbench, which has a metal tabletop 5 millimeters thick. All components of the workbench are connected to each other using bolted connections.
Making a DIY bench
Every craftsman dreams of making a workbench with his own hands, surprising all his friends and organizing a workspace ideally for himself. Some craftsmen neglect creating a drawing, do everything “by eye”, and then adjust the parts to each other during the work. This approach is not professional, because the drawing allows you to imagine a workbench, cut materials economically, slightly modify the design if necessary, and round the corners of the tabletop.
Preparatory work
Problems with finding material to create a workbench usually do not arise, because this type of furniture is made of wood - a very simple and easy-to-work material. For the tabletop, it is recommended to use dry boards with a thickness of no more than 50 millimeters and a width of no more than 150 millimeters. The same boards will be useful for niches with tools. Treat the material with a fire-retardant compound to prevent it from catching fire.
You also need to prepare stainless metal in sheets 2 millimeters thick, which will later cover the wood of the working surface. Three more strips of this metal are needed: 1 in length along the table and 2 in width. They are used to make sides that protect against sparks. To protect the bench from corrosion, it is necessary to coat the metal parts of the structure with special paint.
Dimensions of a metalworking workbench
After this, determine the placement of the workbench. The best solution would be to have a light source and an outlet in this place. If the metalworking area is poorly lit, install the metalworking bench near the windows so that natural light falls through them directly or to the left of the workplace at an angle.
Before making a metalworking workbench, it is recommended to draw up a detailed drawing of a metalworking workbench or carpentry workbench with the locations of all the necessary elements on it. First of all, think about the placement of the vice. For a right-handed person, the vice must be installed on the left; if you are left-handed, then on the opposite side. In addition, you can plan the placement of several wedges that help in processing workpieces.
Then you need to decide on the main size of the bench - height. To find out its height, you need to do simple steps: stand on the floor with your arms down along your body, and then bend them at the elbows so that your palms look “at the floor,” as if leaning on a table. The length to the palms from the floor is the height of the mechanic's workbench.
After this, you should choose the dimensions of the tabletop - width and height. The longer the table top, the more convenient it is to work on a metalwork bench. Therefore, if materials and space allow, there is no need to save. Since a workbench is most often made for one work area, 1.5 meters in length is sufficient.
The width of the mechanic's workbench must be chosen so that it is possible to reach the tools that lie at the opposite end from the worker. Every time it is not safe to lean your whole body on the table top with tools, parts and nails placed in order to reach a screwdriver. For a table top, a width of 50-60 centimeters will be enough.
If you often use a jigsaw in your work, then it is worth considering the location of the sawing board, which should protrude 20 centimeters beyond the edge of the workbench, which allows you to comfortably saw plywood. A board is used for such a table, which has a length of 250 millimeters and a width of 120 millimeters. Cut a wedge-shaped cutout on one of the edges. Its distance at its widest point should be 50 millimeters. Make a hole with a diameter of 1 centimeter in the corner of the cutout. Secure the board with screws or make it removable, while connecting it with a clamp.
Modernizing an old table
If you decide that you cannot do without a workbench, you need to decide what to make it from and find out the price of a homemade metalworking workbench. For work, you can use lumber to make a structure from scratch, which will be more expensive, or you can take a table as a basis and make an upgrade. This budget option is convenient, but you must understand that not all tables can be easily converted into a workspace. For example, a kitchen table can become loose very quickly and therefore requires numerous alterations.
To make a workbench with your own hands without much labor, it is recommended to use a desk, preferably made of solid wood. The best solution is a table with cabinets. If its tabletop is not very durable, then you can replace it with a more reliable one. For this you can use planed bars, which have a cross-section of 30 by 60 millimeters and a length of one and a half meters. You will need about 30 bars for the countertop. Sand all the bars and glue them into a shield.
After the glue has dried, clean the shield again and fasten it with transverse slats for reliability. Next, place the tabletop on the table base and secure with corners. Naturally, this is only a workbench preparation. Next, at your discretion, make additional tool boxes, prepare a place for fastening a vice and install a thrust beam for planing workpieces.
Mechanic's workbench "from scratch"
If there are no tables available that you can use as a basis, you can make a DIY workbench from scratch. The average height of a person is 180 centimeters, so the height of the workbench should be approximately 95 centimeters. But when it comes to table height, it is recommended to focus on your own height.
The layout frame can be welded from a profile pipe and metal corners, or put together from wooden beams. Make the frame dimensions larger by 15-20 centimeters than the dimensions of the tabletop itself. It is worth additionally providing spacers between the legs for reliability. This function can also be performed by the shelf below, where large-sized tools, parts, varnishes and paints will subsequently be placed. Since a good metal workbench should not wobble, you need to think about the method of attaching the legs of the machine to the floor.
Make the base of the tabletop as follows. Use bars that have a cross section of 10 by 10 centimeters as material for the legs. Connect them together with crossbars in two tiers: make the first tier at a height of 10 centimeters above the floor level, secure the second at the tops of the legs. Remember, the tabletop must be fastened in such a way that its edges protrude 10 centimeters to allow for attaching a vice.
To construct drawers, install the kind of runners under the upper crossbars, such as those used for drawers in computer desks. You can store nails, screws and drill bits in these drawers. For greater stability, reinforce the structure with transverse slopes.
Thus, you have taken a closer look at the structure of a metalworking workbench and know that a high-quality metalworking workbench can withstand loads of up to 200 kilograms. The most popular are professional workbenches, which are large in size and have space for storing tools - various shelves and fixtures, bedside tables and drawers that can be locked. But such installations will cost you dearly. Therefore, pay attention to the instructions for making a homemade bench.
Plywood workbench
To make a workbench from plywood, you need to prepare:
- two-meter rule;
- electric circular saw;
- special glue for plywood (you can use plywood glue from the “Moment” line);
- clamps;
- spatula with teeth;
- wooden beam (section size 4 cm by 6 cm);
- glue brush;
- screwdriver;
- plywood (sheets 1.8 cm thick);
- a tool for cutting plywood and wooden beams (for example, a grinder or saw);
- fastening elements (screws 8 * 12 mm);
- drill;
- a strip of plywood 15 cm thick.
Let's consider an example of manufacturing a rectangular workbench with dimensions of 1.5 m by 60 cm and a cover thickness of 7.2 cm.
Instructions “How to make a carpentry workbench from plywood”:
- cut four rectangular pieces of plywood with dimensions 150 * 60 mm;
- if there is a suspicion that the plywood is not flat, you need to check this fact: fold the sheets together or use a rule;
- fold the plywood sheets together so that the convex side of each piece “looks” down;
- apply glue to one sheet and glue it to the second, repeat with all four pieces of material;
One of the options for a wooden plywood workbench (dimensions - in centimeters) Source pinimg.com
By the way! When gluing plywood sheets, for convenience, they can be compressed with clamps. The evenness of the tabletop plane when tightening the clamps must be constantly monitored using a rule.
Materials for making the frame and cover of a carpentry table
In the process of processing wooden workpieces, the working surface is subjected to serious loads, so increased demands are placed on it. Regardless of whether a regular or folding carpentry workbench is made with your own hands, its structure must be strong and rigid.
A high-quality frame must withstand all types of loads:
The workbench must be made of rigid and durable materials
- Static. They occur under the influence of heavy weight if a massive workpiece is processed on the table.
- Dynamic. They are a side effect of processes such as drilling, sawing, impacts, etc.
The strength characteristics of the frame depend on factors such as the reliability of the fastening elements (nails, bolts, nuts, screws) and the type of material from which it is made. The underframe is made from softwood, such as pine. Although linden or maple are also suitable for these purposes.
The workbench tabletop is made of wood with a high strength index:
Most often, the workbench top is made of wood.
- beech;
- oak;
- maple;
- ash, etc.
To create a carpentry table cover with your own hands, experts recommend using a glued board. In this case, you will not have to spend a lot of time and effort on adjusting the wood. A complete blank in the form of a laminated board will eliminate the need to cut the material, process its edge part, and then glue and level it. The finished shield will cost a little more, but it's worth it.
Helpful advice! When working with wooden workpieces, you can accidentally damage the cover with a power tool. To prevent this, additional flooring can be made for the workbench top made of plywood or fiberboard. It is cut according to the shape and dimensions of the lid. It is better if the protective flooring is made together with the workbench.
The frame of a carpentry workbench is made of wood, less often of metal
Wood-metal workbench
Let's figure out how to make a bench with dimensions of 2.2 m * 0.75 m * 0.95 m and six drawers (three on each side). For work, in addition to tools and sheets of plywood, you will need a two-millimeter profile pipe with dimensions 6 cm * 4 cm:
- 3 pieces of 2.2 m for both sides of the table top and the lower rear stiffener of the workbench;
- 6 pieces of 0.75 m each for the other two sides of the tabletop (end), as well as to form a frame for retractable drawers;
- 4 pieces of 0.95 m each for the legs of the workbench table;
- 5 pieces of 0.7 m each for assembling frames intended for drawers, as well as for the jumper (foot rest).
To make a workbench out of wood and metal, you need to start by assembling the basic structure. To do this, you will need to weld the future tabletop from two long corrugated pipes and two 75-centimeter ones. At the second stage, four legs are attached to the corners of the structure in the same way (in this example they are 95 cm long). At the next stage, you need to weld the third long pipe at the bottom, in the back of the product so that it is parallel to the floor, 25 centimeters above it.
Technology for creating a carpentry workbench with your own hands: drawings, dimensions and procedure
The most convenient option for a private home or garage is a design with a hinged lid. Unlike a folding workbench, its working surface rotates rather than unfolds. This design option has a completely different structure, although it is no less functional and compact.
Drawing of a wooden carpentry workbench with dimensions
Mobility is achieved due to the presence of wheels installed on the bottom. To prevent arbitrary movement of the structure, it is advisable to use rollers with a locking function. As a last resort, you can install a wedge under the wheels, but this option is not so convenient and practical.
On the right side of the design there are pull-out drawers for convenient storage of small items. If the table will be used by a left-handed master, they should be placed on the other side so that everything you need is at hand. In addition, the workbench is equipped with a special holder. It is made of perforated plywood and mounted on the back of the cabinet. Thus, it becomes possible to make maximum use of the surface of the workbench and organize additional space for storing small tools for carpentry.
On the left or right (for left-handers) there is an open compartment in the design. It is suitable for placing narrow, tall equipment such as a drilling machine. Thanks to the roller mounted on the edge of the tabletop, the process of processing long lumber is greatly simplified, and due to the multi-socket outlet, you can simultaneously connect several tools to the network.
Drawing of a wooden workbench with your own hands and materials for work
Based on the design drawing, you need to make all the parts necessary for its assembly. The overall dimensions of the workbench in this case are 175 cm (length) and 76 cm (width). A distinctive feature of this table is its three-layer lid, which has an increased margin of rigidity and strength. The upper and lower levels are made of plywood sheet with a smooth surface. The middle layer of the table top is stacked, it is formed from boards.
Important! It is imperative to leave a gap between the boards in the middle layer of the tabletop. This space is necessary to allow the threaded rod to rotate freely.
A table containing a list of materials needed to create a wooden carpentry workbench:
| Material type | Quantity, pcs. | Dimensions, mm |
| plywood sheet | 1 | 1.2x1.2 (8 mm) |
| 2 | 0.2x2.5 (8 mm) | |
| 3 | 1.2x2.5 (18-20 mm) | |
| 4 | 0.9x2.5 (25 mm) | |
| 3 | 1.2x2.5 (25 mm) | |
| Perforated plywood | 1 | 1.2x1.2 (8 mm) |
| Threaded rod (stud) | 1 | M20 (180-200 mm) |
| Lock-nut | 2 | M20 |
| Washer | 4 | 20 mm |
| Latch with mate | 4 | — |
| Handle for drawers and folding tabletop | 8 | — |
| Furniture wheel with flat support for fixation | 4 | — |
| Self-tapping screws or wood screws | 0.5 kg | M8-M24 |
| Self-tapping screws or wood screws | 0.5 kg | M50 |
Do-it-yourself carpentry workbench: assembling the base
Before making a workbench from wood, it is better to estimate the amount of work in advance and outline the procedure. Most of the table parts are fixed using screw connections. To facilitate the assembly process, it is advisable to make holes for them in the plywood in advance in the appropriate places. For these purposes, you need to use a drill whose diameter is approximately 1/2 or 1/3 smaller than the diameter of the fastener itself.
Having prepared all the necessary tools and materials, as well as carefully studying the drawings of the carpentry workbench, you need to make all the structural parts. A circular saw is suitable for cutting wood and plywood. After this, the end part must be sanded so that the edges of all elements are smooth. This will not only simplify the assembly process, but will also avoid problems with joining parts.
To assemble the workbench base, you need to secure the frame and base plate
First of all, the base is assembled. It consists of a base plate where a cabinet with drawers will be installed, an open area for equipment and stiffening ribs to strengthen the structure. To do this, you need to assemble the frame and fix the plate on it. For fixation, M50 fasteners should be used.
Important! Only dry lumber can be used for work. The optimal wood moisture content is 12%.
How to make a workbench out of wood with your own hands: installing a cabinet and tabletop
The next step is to install the side tables. In the process of assembling these elements, it is necessary to take into account that the plywood, which is attached to the back of the structure, must be fixed precisely to the frame.
Installation of the workbench tabletop must be done on a finished frame
It is also worth paying attention to the fact that the outer plane for the left cabinet, used as a support, is longer than its inner part. To make a workbench made by yourself more rigid, this element must be fixed not to the base plate, but fixed to the frame. The cabinets themselves are installed on a base plate. For this, two types of fasteners are used. The lower plane is fixed with screws size M20-M24. For the inner sides, corners should be used.
After the cabinets are installed, you need to accurately determine the middle on their inner sides. This marking is necessary in order to cut U-shaped holes for the turning rod. This must be done so that the center of these holes is located at a distance of 2.2 cm from the bottom plane of the top cover on the cabinet.
Once everything is ready, you can thread the threaded rod through the holes in the four uprights. In this case, its ends should protrude beyond the workbench by about 4-5 cm. They are fixed (without tightening) with locknuts and washers.
Using clamps or screws, you need to install the support strips for the tabletop. They will be placed here temporarily - only so that the position of the tabletop and its horizontal plane can be aligned. Next, three layers of the cover are assembled, which are fixed with screws and adhesive. After this, the bars are removed and the result is checked. The table top should rotate freely.
Then the side surface of the lid (both rotary and stationary) is reinforced with slats. Finally, you need to install the turning handles and locking latches.
Video description
This video shows the process of making a carpentry workbench:
At the last stage of assembly, you need to sew up the back and sides of the workbench table with plywood, and also make a tabletop. If you decide to make the top from wood materials, you can use several sheets of plywood securely glued together. To obtain a more reliable, durable bench, you can install a two-millimeter metal sheet as a tabletop. To store tools and various materials that may be useful to a craftsman in his work, it is worth making shelves or drawers for the workbench.
Types of metalworking workbenches
Mechanical workbenches differ in several ways. The following characteristics are used for classification
:
- number of workplaces;
- availability of storage space;
- tabletop material;
- installation method.
When choosing equipment, you also need to pay attention to the dimensions and weight.
Availability of storage space
Another criterion for classification is the number of cabinets in the structure. Manufacturers offer the following types of workbenches
:
- without pedestals;
- single-pedestal;
- double-pedestal;
The first type is represented by a simple tabletop on metal stands. They do not provide storage space for tools or workpieces. But such products are light in weight and can be moved, so they are used in home workshops or garages. As additional places for placing tools, you can use a protective screen on which everything necessary for work is hung.
Single-pedestal designs have one place for storing tools, located at the edge of the table. These can be pull-out drawers or a cabinet with hinged doors. The remaining free space under the tabletop is used to organize shelves. Compact dimensions allow you to install single-pedestal workbenches in small spaces.
The third type of workbenches is equipped with two cabinets on the sides of the tabletop. Storage areas are equipped with drawers in which you can place a large number of tools or fasteners.
Drawers in bedside tables must slide out completely to provide access to parts and tools. Durable guides will allow maximum loading of storage spaces.
Tabletop material
Types of metal workbench differ in the material used to make the table tops, which can be
:
- wooden;
- sheathed in metal.
In the first case, the countertops are made of durable wood or thick MDF. They are applicable when performing simple plumbing work. The surface is covered with a galvanized metal sheet, which prevents damage to the countertop by aggressive substances.
Structures with a metal tabletop are considered the most durable and stable. A workbench with a metal-covered table top is heavy, so it does not move under heavy loads, but it is more expensive.
Installation method
According to the method of installation, workbenches are
:
- stationary;
- mobile.
Stationary ones are installed in a permanent place using fasteners. The equipment is used in industrial production. This is a full-scale design with storage areas and a protective screen.
Mobile models have appeared recently. They are small but durable workbenches with drawers equipped with wheels. Some products have a perforated screen for protection. The equipment is easy to move not only around the workshop, but also outside the room.
Carpentry workbench with inclined vice
This workbench serves as Ryan D. Chaney's The Mountain Top Joiner's Shop . Its distinctive feature from classic models is the inclined position of the front vice. As shown in the photo, this design solution allows you to comfortably work with already glued volumetric parts.
As Ryan writes: “I forgot to cut the slot halves on the tops of some of these legs before gluing them to this assembly. Oops... Luckily, I have this ingenious and very versatile tool called a workbench that can help correct this oversight. Once again, the sloping leg vise worked great.”
Shaker Workbench by Mark Davis
Mark Davis from Glendora (California, USA) made an oak workbench for his workshop using classic American technology.
Shaker Workbench: This is a purely American version of the workbench. It was invented by members of the religious sect of the Shakers, who became famous for their skills in making high-quality and beautiful furniture. Their workbenches were massive, and for tools at the bottom of the workbench there was an enclosed space, like a box. The vices on the workbenches were unsupported, and when working with long products, anchor pegs were used to support the workpieces, which could be moved as needed.
Based on the article: thewoodwhisperer.com/viewer-projects/marks-shaker-workbench/
Drawings and dimensions
To assemble a high-quality workbench for the garage, you must first decide on its dimensions. When drawing up a drawing, special attention should be paid to the height of the table top . The optimal option for this indicator is the distance from the elbow of a standing person to the floor.
The width should not be too large. This is due to the limited size of the garage and the need to often work when a car is parked inside the room. Space will be required for people to pass through, so the optimal width of the structure varies from 50 to 80 cm.
Workbench with high vice
David Traversi made an additional vice for his workbench for ease of working with volumetric elements.
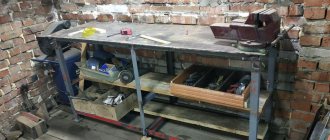
Workshop installation
After the frame has dried, we bring it into the workshop and attach the OSB sheet to the screws.
Making a countertop
I used 12mm plywood for the tabletop; it suited my needs perfectly. I did not cover it with metal, since next to it there is a table entirely made of metal with a vice.
I attached the plywood with metal self-tapping screws straight into the profile, the only thing I did was make holes with a countersink to recess the caps. I secured a polished strip between the table top and the panel to remove the gap between them.
Making lower shelves
I made the bottom shelves from leftover chipboard, adjusted everything to size and sawed it out using a jigsaw.
Making the top shelf
I also made an upper shelf from the remains of plywood, which I secured to the panel using furniture corners. In the future I will install lighting on this shelf.
Varnishing the tabletop
I also coated the tabletop and shelves in two layers of varnish.
Ready workbench
In my opinion, the table turned out great! Write in the comments how you like this manufacturing option?
And finally, I added LED lamps to the top shelf and hung the instrument a little.