Rednasty
3581 0 0
Rednasty January 18, 2018I'm not a wizard, I'm just learning. But I know everything about interior styles, comfortable home improvement and the transformation of Khrushchev’s apartments into luxury apartments. Hobbies: I like to give good advice.
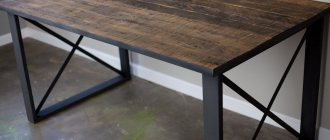
From materials left over after construction or renovation work, you can create unique and unusual interior items. For example, you can build an interesting chair from square steel pipes.
To create it you will need:
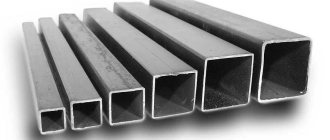
- steel square pipes;
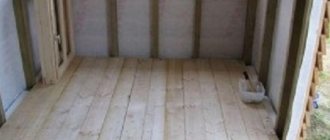
- wooden plank;
- primer and putty for metal;
- drill, grinder, hammer;
- dye;
- glue and wax for wood;
- plastic plugs for chair legs;
- welding;
- screwdriver and spatula;
- clamps;
- sandpaper with different grain sizes;
- jigsaw (if you want to make the chair seat round).
Making a chair in Loft style
Source youtu.be
First you need to cut a 20x20 mm profile. The list of materials indicates how much of this material will be used in millimeters, but now we need 8 blanks for frames, 330 mm each. Now they need to cut the corners at 45° in order to fold two squares - one under the seat, the second on the horizontal support of the legs. To make the cut exactly 45°, you need to place one profile on the edge of the other at an angle of 90°, then connect the corner of the workpiece with the previously drawn diagonal mark and you will get the desired 45°.
Source youtu.be
Now position the workpieces so that all angles correspond to 90° - they can be checked with a plumber's square or a tape measure. First, just grab the assembly without welding the joints completely, and check both diagonals with a tape measure - there should be no differences, perhaps ± 1 mm. Then weld all the joints, remove the scale and sand the seams. Fold another frame and, in order not to play with the corners, simply take the finished frame as a template. Weld the joints and sand them.
Source youtu.be
Now let's work on the back of the chair. Here you will need 2 profiles 20x20x270 mm and one 20x20x330. First we make the letter “P”, but for this you need to make three blanks with angles of 45° - mark them in the same way as you did for the seat frames and legs. Weld the seams, first checking for 90°. It is better to choose the backrest angle for yourself, individually, and if my lower back feels comfortable when resting on a plane with a slope of 100°, then you may need 115°. Cut the U-shaped post at the angle that suits you best and weld it to the frame.
Source youtu.be
Now you need to make two oblique legs. To do this, take two profiles 20x40x530 mm each and cut 45° angles at their edges, only the cut lines should be in the same plane. You weld them first to one frame, then to another, and you get a frame like the one in the top photo. Now you need to make four scarves from a metal strip and weld them in the inner corners of the upper frame - this will be a support for the seat. On the back, also weld strips, but now rectangular, so that you can screw plywood to them for support. Drill two holes on each side on the back support strips and one on the saddle gussets.
I advise: to ensure that the back and seat are flush with the frame, weld the support strips and gussets in the middle of the profile.
Wipe the metal frame with white spirit to remove grease and dust from the surface of the profiles. Then sand with a wire brush or sandpaper. Paint it any color you like.
Source youtu.be
Cut two pieces of plywood or OSB 10x285x285 mm and 10x285x200 mm. Cover them with some kind of leatherette, leatherette or oilcloth (it is best to fix the material with a stapler). Screw the backrest and seat with self-tapping screws. Such short screws (10 mm) are sold in any hardware or construction store (head with a press washer). It is best to trim the back from the ends: this way you can cover it completely, and the staples will not be visible.
Other options
To make the seat and backrest, you can also use sheets of plywood of the required thickness - one that can support the weight of the people sitting on it. To assemble the frame, you can follow the scheme described above. The base is cut out of plywood. It must be made soft and comfortable to sit on. To do this, nail a piece of foam rubber of the desired shape with a stapler, and cover it with furniture fabric on top. When the seat is ready, screw it to the legs with a screwdriver. Also use fasteners.
Metal chairs
Metal chairs 2 Metal chairs 3
If you like to work with metal and have the necessary equipment, then you can try making forged chairs. Graceful curls and curves will make the furniture unique.
Stylish chair made of black pipes
This chair has an S-shaped design. Only one type of fitting is used to create it. The sinuous design gives the foldable model a unique industrial look. Pipes and fittings create the frame, and wooden planks placed across the frame will become the seat. The model, painted black, goes well with darker colored wood.
As with the previously described models, start by assembling each of the two sides of the frame, after which they are combined. The 90-degree elbow is placed on the top of the pipe and the set screw is tightened. Then push the second half of the pipe into the fitting. Continue to repeat this process until an S shape is achieved. Once one side is ready, repeat the same for the other side. Then the frames are connected to each other by two pipes. The seat can be sewn from fabric or simply put a board.
High chair
This beach bar folding chair has a simple design that only uses two different types of fittings: tee and tie down fittings. These chairs can be easily thrown into the trunk and assembled at the seashore.
Fittings and pipes create the frame, and a wooden board is attached to the frame to form a seat. The size of the screws will depend on the type and thickness of the material chosen. First, the two sides of the structure are assembled, and then they are fastened together. The fittings are placed on the pipes, spaced evenly, and the set screw is tightened to secure the connection.
The wooden seat is attached to rails at the top of the frame.
Kinds
Folding models
- Spare parts for them can be purchased or ordered separately. You can assemble such furniture yourself. The collapsible design is good for a summer house or small kitchen. If there is no need, the chair can be disassembled and it will take up minimal space, and reassembled when guests arrive.
Stackable chairs
- Such models have long been successfully used by famous designers around the world. They fit on top of each other, like a children's pyramid, and significantly save space. An example of stackable models can be seen in outdoor cafes.
photos
Wooden folding stools
We will need:
- 4 blocks for legs, each 47cm. in length; 4 cm wide; 2cm thick.
- 4 bars for a seat 32 cm long; 4 cm wide; 2cm thick.
- Seat: 2 bars 35 cm long; 9 cm wide; 2cm thick. Two bars 32 cm long; 6 cm wide; 2cm thick.
- 2 bars of overhead legs 320mm long; 40mm wide; 20mm thick.
- For fasteners, stock up on 6 bolts with a diameter of 6 mm, no longer than 40 mm (including the head!) and short self-tapping screws.
Let's move on to the collection. First, let's make legs for our stool. To do this, make small holes along the diameter of the bolts at the top of the future legs. Make sure that the bolts are screwed in completely and that their heads do not protrude. The axis must be placed as high as possible, otherwise the stool will be unstable.
Using bolts, rigidly connect the upper end parts of the legs with the crossbars, which will be located under the seat. Install two bars on the outer legs, and two on the inner legs.
Now we have two elements that act as hinges. Let's move on to installing the seat. Let's start with wide blocks. The overhang will be 15-20mm.
Let's move on to securing the crossbars; for this, use wide bars. One of them needs to be fixed on the outer legs, one is fixed on the end of the inner legs.
Next, stepping back 10 cm from the bottom of the legs, use self-tapping screws to secure the overhead legs. After this, we fix the narrow internal blocks, which make it convenient and generally possible to unfold and fold the future folding chair made of wood. The principle is the same as what we used when working with wide blocks.
Now you need to be a little more careful, the height and overall performance of the entire structure depends on this. Within this scheme, the height of our creation can be 35-45 cm. Choose the height that will be convenient for you, and in accordance with this, install the second narrow parts of the seat.
Progress
Making a chair with your own hands includes the following steps:
- Using a circular saw, cut 2 pieces of pipe up to 2 m long (frame), 2 - about 0.5 m (crossbars), 2 - 0.53 m (rear legs).
- Clean these parts with sandpaper until their surface is smooth.
- Bend the tubes to give them the desired shape. Attach a template to avoid errors.
- Drill holes at the fastening points with a drill.
- Assemble the frame using bushings to connect the tubes. Thread metal pins through the bushings.
- Take a thick fabric and cut two pieces out of it - for the seat and back. Double stitch them and place them on the frame.
- Attach the legs with screws from the back.
Here are your handmade metal chairs!
Caring for metal chairs
Regular cleaning is necessary to remove dirt that tends to collect on the surface. Use a piece of sponge to clean chairs. Fabric and pillows are cleaned with special products or washed. Aluminum chairs do not rust, but they are vulnerable to oxidation.
Attention! Aluminum surfaces can be cleaned using non-greasy detergents and should not contain bleaches or industrial oil additives.
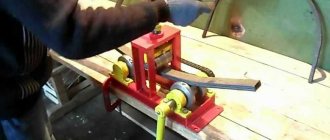
How to make metal chairs yourself
To assemble metal chairs you will need a pipe bender. You can assemble it yourself. Why in the workshop fix two bars on the workbench. Between them you need to leave a gap where the metal pipe is inserted. Fill it with sand, insert wooden plugs at the ends and then you can give the blanks the required shape.
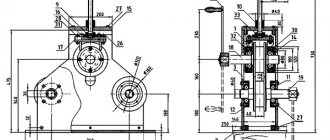
Attention! Before starting work, you need to draw up a detailed drawing. Draw the required chair model. Indicate the dimensions of all furniture elements. According to the drawing, make a life-size stencil from a plywood sheet, against which you can later check the accuracy of the blanks made.
Which metal to choose
Metal is the most durable material for making furniture. When properly processed, it is not afraid of either moisture or sunlight. There are 3 types of metals suitable for making chairs:
- Aluminum. This is a lightweight material and is used to make small items. The main advantage: resistance to corrosion, so the furniture can be used in high humidity. But aluminum is quite fragile and cannot withstand significant loads.
- Steel. Large-sized furniture is made from this material, which must be frequently rearranged while maintaining strength. The metal is subject to corrosion, but this problem can be solved by priming and painting.
- Cast iron. This is a strong and durable metal. The disadvantages include its heaviness, which is why chairs for the garden are most often made from it, which do not need to be rearranged often. Subject to corrosion - the surface must be coated with an anti-corrosion compound. It is very difficult to make cast iron chairs yourself.
Required tools and materials
To work you will need:
- Metal profile with a cross section of 19-25 mm.
- Studs and bushings.
- Electric drill with metal drill.
- Plywood sheet for stencil.
- Screws.
- Facing material.
- Pipe bender
- Scissors.
- Roulette, marker.
- Varnish, paint.
- Sandpaper.
- Sewing machine.
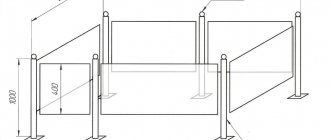
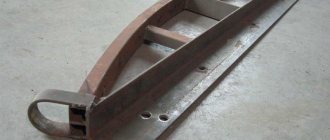
Fisherman's lounge chair
For one sun lounger you will need 2 sections of profile 1.5 meters and 2 sections of profile 1 m each. After the profiles are cut, holes are marked and drilled. The edge holes can be made at your discretion, it is important to correctly measure to the junction of the profiles it should be 40 cm, from the “top” - 36 cm. To strengthen the structure and to ensure that the bolts do not break the edges of the profile, they hammer into the places where the holes are made PCB bars. This can be done using a strong iron rod, which is hit with a hammer.
For lintels, thin-walled pipes from old cornices are used. If the chaise longue is 60 cm wide, then you will need 2 pieces of 60 cm and two pieces of 64 cm, these dimensions are calculated taking into account the thickness of the profile. If dimensions accurate to the millimeter are needed, the thickness of the nuts is also taken into account.
From these same pipes, 2 pieces of 67 cm are then cut off, washers are welded to their ends, which will serve for fastening. Sliders are made from sheet aluminum. To do this, a strip 5 cm wide is cut off. Then, it is upholstered around the profile. After this, a hole is drilled in the sliders and the edges are rounded. At this stage we have the chaise longue disassembled. Next, the structure is assembled.
Attention! When cutting metal, you must follow safety precautions.
Travel chair
The easiest way to create a fishing stool is from flexible pipes. When folded, such a chair is easy to transport; you can take it with you on hikes. A stool will also come in handy when visiting a guest’s house.
The assembly diagram for a simple folding chair, consisting of two rectangular parts with rounded edges, is made by analogy with existing commercially available models. First, pipes of the required size are cut. Four of them form the height of the chair, and four more form its width. You should get two frames, one of them will be narrower. The frames are connected with bolts, providing mobility to the structure. Stool height – 300-400 mm. Width – 300-350mm.