Metal drills, like any other cutting tool, wear out during use, which makes them unsuitable for use. Meanwhile, in most cases, the cutting and other angles of a metal drill can be restored by selecting their values using a special table and sharpening.
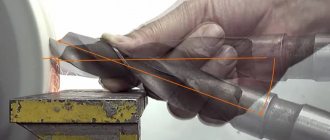
Manual sharpening of drill bits for metal
When is it necessary to sharpen drills?
Drills for metal work have to be sharpened more often than analogues intended for processing wooden workpieces. It is necessary to monitor the condition of such drills to prevent serious wear and tear.
If the drill is dull, you will know about it by the following signs:
- a worn instrument makes strange sounds;
- the drill gets very hot during operation;
- the resulting holes have uneven edges;
- drilling time increases;
- the cutting edge becomes rounded;
- Chips and burrs appear on the cutting surfaces.
What is a Victory Drill?
The Pobedite drill bit for hard stones is designed for impact drills and is optimal for drilling concrete.
To drill through hard materials, drills are used, on the tips of which plates made of carbide materials are soldered. Such materials include the victor, which gave the name to the working element.
The winner is an alloy of tungsten and cobalt in a ratio of 9:1. It was first received in 1929. During its existence it was modernized more than once. But all materials obtained in one way or another also bear the name will win and differ by brand.
A distinctive feature of Pobedit drills is that they do not cut the material, but crumble it. This is why the element cannot be used for processing wood, plastic and steel. When processing the first 2 materials, the hole turns out uneven and ugly. But it is not possible to drill steel in this way. As a rule, pobedite elements are used to process materials such as concrete, brick, paving slabs, stone, etc.
Due to the peculiarity of working with a Pobedit drill, it becomes clear that no chips are formed during the process. Due to the destruction of the material, small crumbs and dust will only form. Therefore, such drills have special helical grooves through which dust is removed from the hole. As a result, processing efficiency is significantly improved.
A pobedite drill bit sharpens quite quickly, so it is necessary to sharpen it with short and smooth touches.
Another feature of the pobedit tool is the ability to use different grades of material. They differ in their hardness and area of use. So, to work with materials of great hardness (for example, granite), a drill with a tip made of hard pobedite (or medium) is used. For softer materials, a tip made of a medium or soft alloy is used.
When choosing a pobedit drill, you should pay attention to the manufacturer. The cheapest components are from unknown manufacturers from China
Their quality matches the price, and such drills can break the first time. Pobedit drills from foreign companies are quite expensive. And if it is a well-known brand, then not everyone will be able to afford such a tool. The best option is a domestic product. Its quality is not inferior to foreign analogues. Therefore, it is worth giving preference to Russian Pobedit drills.
Parameters of drills that need to be restored when sharpening
Proper sharpening of a metal drill allows you to restore the following operating parameters.
The main parameters that are restored when sharpening a drill
- Apex angle. Formed by the cutting edges when crossing the bridge. This parameter should be 116–118°. The exact numbers depend on the hardness and viscosity of the material being processed and in particular cases can be equal to either 60 or 180°.
- The angle between the cutting edge and the axis. Equal to half the apex angle, that is, approximately 58–59°. It must be identical for each of the cutting edges, since with asymmetry only one of them will work and the drill will wear unevenly.
- Shape and length of cutting edges. The lengths of the cutting edges must match, otherwise there may be runout during drilling, and the hole diameter will exceed the nominal one indicated on the drill.
- Rear cutting angle. Should be 7–17° depending on the material being processed. The clearance angle of cutting is one of the main parameters when sharpening a drill for metal; if it is not observed, the work productivity can decrease several times.
Tools for facilitating sharpening
Here we will no longer talk about machines, but about useful and convenient devices that simplify work and help maintain the correct angle.
These can be purchased products, for example, this conductor comes from AliExpress. The sharpening disk is very small; rotation is transmitted to it from a drill chuck connected using a special adapter. The user only needs to insert the drill into the groove and turn on the drill. An overview of the use of such a conductor is described in this video.
For those who do not respect Chinese products, there are these racks.
There are also a number of homemade conductor devices designed for convenient sharpening. For example, here are two of them.
There is also an original door hinge fixture.
Selecting a drill sharpening angle depending on the material being processed
The apex angle is selected based on the hardness of the material being processed. The harder the material, the greater this value.
For convenience, we provide a table that shows the sharpening angles for metal drills recommended when working with different materials.
| Processed material | Vertex angles, ° | Rear cutting angle, ° |
| Malleable cast iron, bakelite | 90 | 12–15 |
| Heat-resistant steels and their alloys, stainless steel | 127 | 12–14 |
| Tool steel | 118–150 | 7–15 |
| Copper | 100–118 | 12–15 |
| Copper alloys | 118–150 | 12–15 |
| Aluminum alloys | 90–140 | 12–17 |
| Magnesium alloys | 70–118 | 12 |
| Titanium alloys | 135–140 | 12 |
An apex angle of 118–120° with a clearance angle of 7–12° is considered universal. This is what they mean when they talk about a twist drill for metal without reference to the processing material. And it is these degrees that we will consider as standard when talking about sharpening drills for metal.
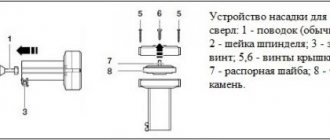
Basic equipment elements
The tool consists of the following parts:
- Working. This is a screw cylinder with several turns (approaches). They form grooves and teeth and are also called feathers. Their task is to ensure the cutting process itself.
- Calibrating. She is responsible for removing metal shavings from the metalworking area. It is formed by a tape, which is directed along the main stroke of the drill.
- Connective. It is also called the neck. It is used for two purposes - to exit the grinding zone, and also to mark a fragment that is not erased or covered by a vice.
- Tail. This part is briefly called the “shank”. It can be made in the form of a smooth cylinder or a Morse cone type. It is completed with a leash or paw. The task is to fix the equipment in special clamps.
This is interesting: Features and advantages of the Fubag IN 163 inverter
Sharpening methods for removing the rear plane
There are several types of sharpening drills for metal, which differ in the method of bringing out the back plane. These are single-plane, two-plane and conical sharpening. The last method is the most common, so we will focus on its description.
Methods for removing the rear plane when sharpening a drill
With conical sharpening, the relief angle gradually increases from the cutting edge and along the entire rear surface. In this case, the rear surface acquires a curved shape. The cutting edge angle should be 7–17°. Conical sharpening is more difficult to perform. During operation, the drill shank must be slightly twisted from top to bottom, as a result of which the rear surface takes on the appearance of a cone.
Sharpening at home
When sharpening drills with your own hands, the user is advised to adhere to safety rules. When working on sanding wheels, safety glasses must be worn. This will protect your eyes from abrasives and pieces of scale. Glasses must be used even if there is a protective screen on the sandpaper.
It is strictly forbidden to carry out work wearing gloves. The drill may get caught in the thread, causing hand injury. It is recommended to carry out work in tight-fitting clothing, the buttons of which are pre-fastened. It is recommended to adjust the support so that the gap between it and the stone is small.
Sharpening drills can be carried out in various ways, which allows a person to choose the most suitable option for himself. To avoid injury, you must adhere to safety precautions during work.
Sharpening methods according to the number of bevels on the cutting edge
They differ in the number of cutting edges formed. The angle at the apex changes in steps from greater at the central apex to smaller at the side apexes. This method of sharpening reduces the heating of the tool as the diameter increases, since the cutting edge in the center heats up less than at the edges.
There are single and double sharpening. Since the first one is used more often, we will only talk about it. During normal sharpening, the geometry of the cutting edge remains smooth throughout.
Types of sharpening according to the number of angles at the tip
Methods
When drilling into hard materials, only the edges should come into contact with them. That is why the back surface is sharpened at a certain angle. As a result of this operation, a gap appears between the edge and the bottom of the hole.
Sharpening is carried out using conical, two-plane or cone methods.
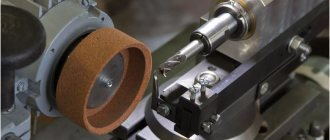
Using a conical sharpener
The drill is inserted into a special prism of the sharpening machine, which moves around its axis. The prism is positioned at a certain angle in relation to the grinding wheel. The back of the drill is shaped like a cone. It is located in the place where the working surface of the grinding wheel intersects with the swing axis.
In order to properly sharpen the drill, you need to first configure the parameters. The axis of the sharpening cone should be located at an angle of 45 degrees relative to the axis of the drill itself. Cone sharpening can be performed using two methods:
- The top of the cone that will be sharpened should be located below the top of the sharpening cone. It is first recommended to carry out the adjustment in accordance with the specified parameters: a - 45 degrees, b - from 13 to 15 degrees, n - 1.9d. the drill axis and the cone must intersect at an angle that is less than the angle of the grinding wheel and drill. If we sharpen using this method, we need to make sure that the tip of the drill is located above the top of the sharpening cone. The tip and the drill should be 1.06 in apart. The axis of the drill and the axis of the cone should intersect at an angle of 90 degrees.
- In order to ensure the rear angle for the peripheral point, it is necessary to provide indicators - a-5-7 degrees, angle 2f - from 116 to 118 degrees. the cutting transverse edge should be at an angle of 55 degrees.
The use of the conical method is recommended to create a sharper increase in the back angle of the drill. This method can be used if the drill has a large diameter - more than 3 millimeters.
Using screw sharpening
If there is a need to automate the process of sharpening drills, then the use of the screw method is recommended. It lies in the fact that translational movements are coordinated with the rotations of the grinding wheel. With its help, you can simultaneously sharpen the front and rear corners.
When screw sharpening, the rear angles of the working part increase as they approach the center. When using this method, there is a decrease in the strength of the transverse edge of the drills, which leads to their breakage when drilling excessively hard materials.
Two-plane sharpening
Using this method, it is recommended to sharpen drills that are intended for drilling non-hard materials. If the diameter of the drill is less than 3 mm, then the use of this sharpening method is recommended. Using this method, drills are sharpened at an angle of 60 degrees. Thanks to this method, products are improved rather than errors are corrected.
Jumper point
In parallel with the main sharpening of the metal drill, you can sharpen the jumper at home. This measure has a beneficial effect on the quality of drilling, since the processed bridge does not create resistance to the drill when moving deeper into the material. The jumper is undermined on both sides, but not completely. Complete grinding is unacceptable.
There are several ways to sharpen the jumper edge:
- with a groove for chip removal;
- with increasing rake angles at the edge of the bridge;
- with an increase in the front angles on the edge of the bridge and trimming the back of the tooth;
- with grinding down part of the lintel;
- with grinding off part of the lintel and sharpening the cutting edges;
- with a cutting lintel.
Useful tips
We can talk a lot about the nuances of sharpening, but it is important not only to sharpen the tool correctly, but also to do it safely and then store the products correctly. So, the rules for the safety and maintenance of drills:
So, the rules for the safety and maintenance of drills:
- When sharpening, the tool gets very hot. This not only requires careful handling and – very desirable – wearing protective gloves. This also affects the properties of the metal. Therefore, the tool should be fed to the sharpening device in short periods, 2...3 seconds, and cooled after each period in water or other cutting fluid (cutting fluid);
- During work, sparks fly from the drill and grinding wheel. You need to protect not only your hands, but also your face. A transparent shield or glasses will be very useful;
- For delicate work you need to see very well what exactly is being done. Accordingly, a magnifying glass may well play the role of a protective shield;
- Additional lighting is necessary, but the lamp must be positioned so that the fragile bulb cannot be damaged by random fragments of metal or abrasive.
Regarding storage, the rules are simple: sharpened drills should not touch each other and should not be in a damp or aggressive environment. Special organizers – industrial or homemade – are very convenient for permanent storage. If there are inscriptions about the diameter, the search for the desired tool occurs almost instantly.
Scheme of sharpening a drill for metal on a grinding machine (sharpener)
To sharpen twist drills for metal, household grinding and grinding machines, otherwise called a sharpener, are most often used. To work, you will need a straight profile abrasive wheel of grade 14A (A) or 25A (WA). They are suitable for grinding products and tools made of carbon, alloy, high-speed and stainless steels.
Machine for sharpening drills for metal with accessories
The working surface of the abrasive wheel must be smooth, without potholes or depressions. If you find any defects on the surface, correct them before work. During dressing, the grinding wheel must acquire the required flat shape. To edit grinding wheels, diamond and CBN pencils, diamond dressing combs, and, less commonly, cutters and improvised materials are used.
A tool rest must be installed on the machine; it is necessary for high-quality sharpening of a metal drill. The tool rest is a metal adjustable platform that is installed in front of the disk and is used as a support and guide when working with sandpaper.
The tool rest is positioned horizontally so that its upper plane is flush with the axis of rotation of the abrasive wheel. The gap between the circle and the tool rest is kept minimal, 1 mm is enough.
As an example, let's look at a single conical sharpening with a cutting edge, since it is one of the most common and is used to restore the sharpness of drills with a diameter of 3 mm or more.
Important!
For safety reasons, it is prohibited to work with a grinding machine while wearing gloves, as the rotating parts pose a risk of material being wound and body parts being pulled in.
Progress
- Check that the abrasive wheel is installed on the sharpener, and the tool rest is flush with the axis of rotation of the abrasive wheel, at a distance of 1 mm from its surface.
- Work through all the steps with the machine turned off. Draw a line on the tool rest at an angle of 60° to the plane of the end of the sanding wheel. This will allow the vertex angle to be 120°.
Draw a line on the tool rest at an angle of 60°
- Take the drill with both hands: fix the working part with one, and the shank with the other. Then place the drill on the tool rest so that the side edge, when viewed from above, coincides with the line on the tool rest.
Take the drill in your hands and place it on the tool rest
- Place your index finger between the tool rest and the drill; it will act as a swing when sharpening conically. When the drill rests on your finger, an angle of 7–12° is formed between it and the emery wheel. This value must be maintained at the cutting edge.
- Practice the movements you will use for conical sharpening. Lightly press the leading edge against the sandpaper, making sure that the edge is in a horizontal plane. Slowly lower the shank without releasing pressure until the back of the back surface is on the plane of the circle. The circle should turn around.
We practice the movements for sharpening with the sharpener turned off.
- Move the drill back from the circle, turn it over with the other cutting edge forward and again attach it to the circle in a similar position. Repeat the oscillating motion with the shank so that the sandpaper rotates again. Practice this movement of turning the sandpaper several times to sharpen the metal drill automatically.
- Turn on the sharpener and start sharpening. Follow the same sequence:
- align the drill with the mark on the tool rest;
- attach the leading edge to the sharpener, making sure that it maintains a horizontal position;
- lower the shank to completely machine the back edge;
- retract and turn the shank 180° around the axis;
- repeat the whole process.
Features of drills and what the sharpening angle depends on
Of course, when choosing a cutting tool, a master must take into account many factors, because there are a large number of design options and standard sizes. Based on the features, not only the cutter is selected, but also the type of metalworking. Each process has its own special characteristics.
They depend on:
- The material you are working on. Some steels have increased hardness, others can be brittle, and others can be malleable and soft.
- The qualities of the drill itself - similar rules apply here.
- The turner’s task is what size, as well as the accuracy class, must be ensured.
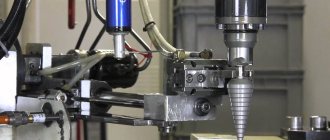
Based on this and some other factors, the drilling mode is selected - when the optimal pressure and speed are selected, in other words, the feed and rotation speed of the tool. If we are talking about drilling with an electric drill, then such indicators are quite difficult to calculate. But in the case of working with machines (drilling, turning), this indicator is very important. It is most convenient to work with CNC equipment, since the control panel automates many processes, including the calculation and setting of the above parameters. You can buy devices for CNC milling and turning of metal on the company’s website.
At what angle to sharpen the drill also depends on what purpose the turner is pursuing, as well as what material he is working with. Let's give an example. If the workpiece being processed is made of a very hard alloy, and the cutter has an excessively sharp edge, then there is a high probability that it will simply break when pressed. There are two ways to get out of this situation:
- change the sharpening angle to a more blunt one;
- do preliminary roughing - drill a small hole in this place.
Below we will tell you in more detail about the selection recommendations.
How to sharpen a drill using a drill?
If a sharpening machine is not available, you can use a drill with an abrasive wheel to sharpen a step or other metal drill. You can sharpen cutting edges in one of two ways:
- hold the drill in a vice and bring the drill to the circle with your hands;
- Clamp the drill in a vice and manually bring a drill with a sharpening wheel to it.
The progress of work will look like this.
- Secure the cutting tool vertically in a vice.
- Using a wheel mounted on a drill, remove the trailing edge to remove any signs of wear.
- Sharpen the drill at an angle of 120°.
Important!
To prevent the edge from overheating, while sharpening the metal drill should be held at the wheel for no more than two seconds.
Drill attachments for sharpening metal drills
To make sharpening a metal drill easier, you can use a special attachment. It is installed on a drill, a drill is inserted into the end hole and the power tool is turned on. Then the drill is pulled out, rotated 180°, inserted back into the fixture and the second plane of the cutting edge is sharpened.
Drill attachment for sharpening Sparta drills
What to pay attention to when working?
- Attachments for sharpening metal drills can be purchased at any hardware store. However, such devices are only suitable for drills with a diameter of 4–10 mm.
- The attachment can only be used to sharpen drills that are slightly dull. If there are serious nicks on the cutting edges, the attachment will not help.
- The sharpening angle when using the attachment will be standard, so after work the tool will need to be modified with a file or needle file.
Technology
To properly sharpen a drill, you need certain devices.
Whether it is a small or large drill does not matter - the technology is the same: the main work is performed by the cutting edges at the end, and the side spiral edges align the hole being drilled, diverting chips into the spiral channels. The simplest way to sharpen a drill is to use a sleeve; its internal diameter is equal in diameter to the cross-section of the drill itself. The sleeve is fixed rigidly at the desired angle. It is selected as follows - the drill must clearly and forcefully enter the template, without deviating even a degree. If the drill deviates, the cutting edges will not be restored accurately, and as a result it will “walk” during operation. The bushing can be equipped with tubes made of non-ferrous metal, the internal diameter of which is equal to the most common diameter values of the product.
The template includes a tool that makes it easier to feed the drill to the grinding wheel for sharpening and prevents the product from moving in the opposite direction. The harder the type of wood from which the block is made, the more accurately the angle is set: for example, the master uses an oak block to feed the drill, and the swing of the drill in it during sharpening is eliminated. A machine - for example, the same sharpening machine - can be homemade: the main thing is that the sharpening stone is not misaligned and does not vibrate during operation.
Correct angle
The size of the angle is determined by the type of steel or other metal (or alloy) in which the holes are drilled. The lower the hardness of the metal or alloy, the greater the sharpening angle. So, for steel, cast iron and bronze, workpieces from which need to be drilled, the sharpening angle reaches 120°, for plastic and soft alkali metals such as magnesium - 85°.
Any type of tree requires 130°. For stainless steel, 115° is sufficient. The fact is that easily yielded metal produces more chips in a short time, excessive friction occurs, and the tip of the drill heats up stronger and faster. And excessive heat dulls it - even the hardened steel from which the drill is made is released when heated. The steel of the product loses its hardness and begins to dull more quickly.
Finishing
You can polish a restored drill at home using special grinding wheels that combine coarse grinding of high-speed steel with fine-grained steel. These wheels contain a relatively soft filler that eliminates rough scratches, nicks and gouges that form during work. They are eliminated without changing the outline of the cutting edges. These discs are placed on a grinder or drill, and the drill is clamped on a separate clamp or in a vice. If the processing using wheels turns out to be rough, the product itself is sanded using a rotating emery wheel.
Examination
A quick check of correct sharpening is achieved using a special template that measures the length of the cutting edges, the location of the tip, the bevel angle of the outlet channels on the drill and the angle of the longitudinal edge.
Point
If a craftsman’s 10mm drill becomes dull, the product is sharpened from the front edge. The goal is to increase the angle of the cutting edge and reduce the bevel of the front tip and the narrowing of the transverse edge.
This prevents the accelerated breakdown of the smallest grains of steel from the tip, which means it extends the life of the drill and makes it possible to drill faster and more. The product is additionally ground at a slight back angle, which reduces the friction force in the holes being cut.
Checking the sharpness of the drill
After a visual inspection shows that the cutting edges are smooth and sharp, check whether the correct sharpening angle of the metal drill is maintained and whether the length of the working edges meets the standards. To evaluate, you will need a special template, a protractor or protractor, and a caliper.
Checking the length of the cutting edges with a caliper
What parameters need to be checked?
- Is the angle of the cutting edge tilted forward? The presence of such an error makes the cutting edge not the highest point of the tooth and forms a hill on the back surface. This causes the drill bit to rub against the back surface of the material and not drill. The error is corrected by sharpening the drill again.
- Are the lengths of the cutting edges consistent from the center point on the web to the side apexes of the cutting edges? This distance must be the same on both sides, otherwise the diameter of the final hole will be larger than the nominal value.
- Check that the apex angle is 120°. You can determine the sharpening angle of a metal drill using a purchased or homemade template. It is important to ensure that the apex angles match for both teeth, otherwise only one side will work.
Correct and incorrect sharpening of a drill
After checking the basic parameters, drill into any metal workpiece. If the sharpening is done correctly, the drill will smoothly enter the metal, and the chips will evenly exit the grooves on both sides. And the finished hole will exceed the nominal diameter by no more than 0.05–0.1 cm.
After drilling the workpiece, sharpen the jumper to reduce the force applied during operation and reduce tool wear.
How to make a template for checking drill sharpness?
A template for checking the sharpening of a metal drill can be made independently from sheet steel or tin. You can take a template from the store as a guide. The simplest template can be made from two or three nuts. Nuts are ideal for these purposes, as they are regular hexagons with internal angles of 120°. If the nuts are connected, the angle between their faces will also be 120°. The nuts can be welded or glued to each other using hot glue.
Sharpening quality control
To restore the original parameters of the tool, it is necessary to select a grinding wheel, the hardness of which allows you to qualitatively obtain the original parameters. At the initial stage, the rear surface is restored. The main task is the correct choice of feed angle to the surface of the grinding wheel. After completing this work, they begin to bring the leading edge to normal condition.
Failure to comply with these requirements will lead to deterioration in the quality of drilled holes and disruption of cutting technology. After the operation is completed, the quality of the obtained parameters is checked. If certain deviations from the requirements were made, the drill is adjusted to the required condition. In enterprises where drills are used to produce a large number of holes, finishing is mandatory.
After completing all technological operations to restore the tool, it is recommended to check its basic geometric parameters. To solve this problem, the following devices are used:
- manufactured templates;
- device developed by V.A. Slepnin.
In the first case, ready-made templates are used, which are made according to a pre-calculated method. Such templates can be purchased ready-made through a retail chain or made independently. Methods for their manufacture are given in specialized literature or on Internet portals.
The basis of the device developed by Slepnin is made up of two disks. They rotate relative to each other. Its main advantage is the variability of possible measurements. This versatility eliminates the need to create a large number of individual templates. Therefore, the time required to check multiple products is significantly reduced.
When checking each tool after completing the sharpening operation, it is necessary to check not only the obtained parameters, but also the equality of the lengths of the opposite cutting edges. If they differ in length, this will lead to an increase in the diameter of the resulting hole. Next, you need to check the change in the clearance angle of the cutting edge. It should gradually increase towards the center of the instrument.
How to extend the life of a drill
To ensure less wear on the drill, you must follow some operating rules.
- Do not overheat the drill. To do this, work at intervals and use coolant.
- Set the correct rotation speed. It is set taking into account the type and diameter of the drill, as well as the material.
- Remove the chips. Periodically remove the drill from the hole and remove the chips so that it does not get stuck in the workpiece.
- Drill holes in several approaches. If you need to make a hole with a diameter of more than 6 mm, use drills of different sizes (from larger to smaller), this will guarantee higher accuracy.
Recommendations
Conventional drills are sharpened with your own hands on a simple sharpener, a saw with a large grinding disc, an angle grinder or a drill with an attachment. But crown molding may require a special machine. The fact is that the crown has an axis - the main drill, which is a regular product. And if it is sharpened in a simple way, then the toothed, saw-like edge of the crown will require machine conditions. The same is true for cone-step drills.
In the worst case, due to the intoxication of the steel rusting in the salty environment, a person will easily lose it. Be careful not to drill into the ceiling without a helmet - falling chips will also get into your unprotected eyes.
Choose the correct point angle. A drill that is too “flat” will not drill through steel; a drill that is too “steep” will not drill through wood, aluminum, bronze, magnesium, or plastic. An incorrect angle will either cause the drill to wobble and the hole to move, or it will jam and break.
Do not drill with ordinary high-speed steel in glass, porcelain tiles, granite, ceramics, or high-strength clay. For these materials there is a so-called win. Pobedit alloy significantly exceeds high-speed steel in strength. Do not try to drill into tempered glass - it will immediately crumble.
Do not sharpen pobedit drills with simple sandpaper and stone-vitrified wheels - for these products there is a diamond, like those wheels that are used to cut stone, brick and hardened steel. Grind pobedit drills at low speeds.
Do not overheat the drill when turning - overheated steel will experience tempering and become noticeably worse. It will no longer be hardened or high-speed (tool-based).
Do not cool a red-hot turned drill in water or other cold liquids - sudden cooling will cause it to become riddled with microcracks. The first time you try to drill into a workpiece, the product will immediately break.
Do not deflect the drill while turning. The slightest care - even by a degree - will lead to uneven grinding, vibration will arise, breaking the drill itself and loosening the gearbox and motor of the drill.
The length of the working part should not be less than a centimeter. If the drill is broken in half and part of the cutting area is thrown away, then do not grind the drill, whose working part is now less than a centimeter.
Drills tipped with carbide (for example, with a pobedit tip, diamond coating) are sharpened using the same means as solid drills made from the same materials.
How to easily sharpen a drill, see below.
Questions and answers
Is it possible to sharpen a metal drill with a grinder?
Yes, sharpening a drill for metal with a grinder is done in almost the same way as with a drill. A vice will be required for this work. First, part of the trailing edge is removed with a grinding wheel to completely eliminate wear marks, then the cutting edge is sharpened at an angle of 120°.
How to sharpen a step drill for metal?
Sharpening a step drill for metal with your own hands is done using a regular file. If only a separate area is dull, the drill is processed pointwise, without going beyond the damaged area.
Is it possible to sharpen a core drill for metal yourself?
Due to the complexity of the configuration, it is better to entrust sharpening of core drills for metal to professionals.
Signs of dullness
Equipment for working with wood can last for a long time without deforming. Metal drills fail faster. There are a number of points by which you can determine that the equipment is dull:
- There are chips, irregularities, and microcracks at the top of the drill.
- Visual deviations from the original state.
- When drilling, an uncharacteristic whistle or noise occurs.
- Burrs and irregularities remain on the inside of the hole.
- The chips accumulate in the hole and are not discharged out.
These deviations indicate equipment failure. It is necessary to stop the work process, correct inaccuracies or replace equipment.
Restoring a pobedite drill
A drill bit with a pobedite tip may become dull over time and will require a diamond wheel to sharpen it. Before starting the sharpening process, you need to make sure that the height of the remaining cutting part is at least 10 mm in order for sharpening to be possible. Work should be carried out at low grinding wheel speeds.
A tipped drill is sharpened in the same way as a conventional drill of small diameter - sharpening the back surface. In this case, the surface should be ground down to the soldering. It is also advisable to sharpen the front surface, especially if the plate has worn down to the drill. The front surface is processed in such a way that the soldering thickness in the center becomes thinner. You should work carefully to avoid unnecessary cutting of the working surface.
Care must be taken to ensure that the drill does not overheat during processing, as this can cause the plate to crack or even break at the soldering site. To cool an overheated tip, any coolant, such as plain water, will do. However, if the metal is red-hot, then under no circumstances should you dip it in water - the drill will instantly crack.
The process of restoring the geometric surface of drilling tools for metal and concrete is necessary, since these materials quickly kill the factory sharpening of the tool. Theoretical material on the question of how to properly sharpen drills for metal is not enough, but everything is not so complicated and comes with experience.
Using a special attachment for a drill allows you to preserve all the geometric surfaces of the tool and is ideal for those who do not have experience in manual sharpening and are afraid of damaging the drilling tool.
The type of metal that will be drilled affects the angle of sharpening required, and for working with stone and durable alloys, a drilling tool with pobedite bits is suitable.
We should not forget that in addition to correct and timely sharpening, its proper storage in special cases and stands will help extend the life of the tool.
Originally posted 2018-03-28 15:14:38.
How to drill metal correctly?
- Even the most expensive and durable drill bits will only last a few holes if not used correctly.
- It is better to apply less pressure on the drill and use a lower rotation speed. The speed must be adapted to the hardness of the material and the size of the hole. In general, the larger the diameter of the drill, the lower its rotation speed should be, and vice versa, the smaller the drill, the higher the speed can be. Drills from 1.5 to 4.5 mm can drill metal at a rotation speed of 3000 rpm. For larger diameter drills, RPMs of 350 to 1000 are recommended. While drilling, if you begin to see smoke or the metal you are working with begins to discolor and darken, you are drilling too fast. The rotation speed affects the heating of the drill. A hot drill becomes dull faster. There is no single drilling speed for all types of metals. As a general rule when drilling metal: the larger the drill and the stiffer the metal, the slower the rotation speed. If the drill bit is sharp, it doesn't take a lot of pressure to drill the hole. Breakage often occurs when you try to push hard on a dull drill bit to make it drill faster. This doesn't work, it just overheats the metal.
- Since metals have smooth surfaces, it is useful to use a punch to center the drill bit. When drilling large holes, you can pre-drill the metal with a smaller diameter drill bit. This will guide your drill and prevent it from moving or slipping as it rotates. It is better to not drill through with a drill of a smaller diameter. It will also serve as a reservoir for special coolant and lubricant.
- Try to hold the drill steadily. If it is not kept perpendicular while drilling, it may bend and break.
- When drilling into sheet metal, be careful when the drill bit begins to pass through the metal to the other side. The drill bit may get stuck as it comes out the other side and snag material at the bottom of the hole. Ideally, you need to place a block of wood under the metal so that it does not bend at the end of drilling. With experience you will feel changes in sound and resistance to reduce the pressure at the end of drilling.
- Depending on the material and size of the hole, cooling the drill bit may be helpful or even necessary. When drilling, the metal heats up significantly, which can lead to overheating of the drill. This reduces its hardness and sharpness. While working, pause to allow the drill to cool. For hard metals, large diameters and deep holes, it is best to also use a special cutting and drilling fluid. Immediately before starting drilling, it is necessary to add some lubricant to ensure a reduction in heat generation.
- When drilling a small workpiece, do not hold it in your hand. It needs to be securely fastened. Otherwise, the workpiece may be torn out and your hand may be injured. This is not required when drilling heavy or stationary objects.
- The drilling process will inevitably create sharp edges. These are small, jagged pieces of metal that may be around the edge of the hole that need to be removed. You can simply smooth out the rough edges with a file. Another little trick is to use a drill bit that is larger than the hole that has the burrs. Place the tip of a larger drill bit into the hole and twist it. The result will be a completely smooth and even hole.
Drilling hard metals
Obviously, hard metals are more difficult to drill. For example, stainless steel is difficult to cut and drill. Let's look at what you need to consider when drilling hard metals.
The speed of drilling hard metals should be slow. Ideally, you should use a harder drill bit, such as cobalt, titanium nitride coated, or tungsten carbide. The third point concerns cooling. When drilling hard metals, it is recommended to use a special oil for cutting and drilling metals.
Ideally, drilling into hard metals should be done using a drill press as it will give more control and generate more force.
Sheet metal drilling
When drilling sheet metal with a regular drill, the hole is uneven. This happens because the tip of the drill, coming out of the sheet from the back side, ceases to be centered, and the drill strips do not yet center the drill, since they are not yet in contact with the surface of the metal.
At a certain point, the drill jams and begins to tear the metal or slip in the drill chuck. A regular twist drill is made to drill through thick and hard materials. Special sheet metal drills drill a straight hole.
A special drill bit for sheet metal has a sharp protrusion in the center and cutting tips on the sides. This drill has the following advantages: good alignment, minimal burr formation during through drilling, accurate drilling in thin sheets and pipes. Such a drill can be made from a regular metal drill. It is sharpened in the same way as a spot welding drill bit.
Drilling starts from the tip, then the cutting edges immediately drill a hole of a certain diameter.
When drilling into sheet metal, it is also a good idea to place a flat piece of wood underneath it.
Compare the two holes in the photo, drilled in 1.2 mm thick aluminum. Both holes were drilled with a 1.25 cm drill at 150 rpm. per minute with a wooden backing placed under a metal sheet. The hole on the left was drilled with a standard twist drill and the hole on the right with a modified tip drill. None of the holes were machined to remove burrs.
If you want to drill through thin sheet metal, never hold the sheet of metal in your hands. When a drill cuts through a sheet of metal and comes out the other side, there is a danger that it may unexpectedly get stuck in the sheet of metal and the sheet will injure your hand. It is better to secure the sheet firmly between two plywood. Then drilling will be safe. This also reduces the number of burrs, making the workpiece easier to finish. In this way, you can get a smooth hole with a regular metal drill with an angle at the tip of 118 degrees.
A little about repairing concrete drills
The listed methods for sharpening drills can be applied to drills for wood and metal. But Victory drills can also easily become unusable. The signs of a Pobedit drill being unusable are the same as those of a metal drill - it starts whistling, drills worse, heats up wildly, and a terrible whistling sound occurs. The principles of sharpening a Pobedit drill are the same as for metal drills, but there are some peculiarities that need to be considered.
It all starts with measuring the height of the cutting surface of the drill. Sharpen the drill only when its height is at least 8-10 mm. If the height of the working part is lower, you will not be able to get a good result - purchase a new tool. To perform the next step, buy a disc with diamond abrasive. At the same time, the special tip of the Pobedit drill does not withstand critical high temperatures. To avoid damaging the drill, adjust it at low speeds.
When sharpening a pobedite tool according to the rules, first remove the side edges of the cutting tool. They wear off first of all when you work on concrete. Please note that the soldering must be adjusted at ninety degrees. Secondly, work on the back edges, right up to the soldering. If the soldering has already been worn down to the steel, then it is necessary to sharpen the front part of the drill.
When sharpening a drill from Pobedit, in order not to overheat the tool, cool it with water or machine oil.
When sharpening Pobedit drills, it is important to maintain symmetry of the edges. It is important that the cutting sides are the same size
If the center of the axis is shifted, the efficiency of the drill may decrease, not to mention the holes will be ragged. It is important to remember: the sharper the angle at the apex, the harder the material of the tip. The recommended sharpening angle for pobedit soldering is 170 degrees.
To work with drills you need to be able to process the jumper. It is difficult to achieve the desired level of processing on a grinding machine. Therefore, this should be done as follows: the jumper and rear edges are drawn out at the edge of the circle, using a slow speed. The tool is in contact with the sharpener for a short period of time. Then it is taken to the side, turned 180 degrees and again pressed against the abrasive. After heating the metal, the drill should be dipped in water, otherwise the tool will lose its properties.
After sharpening is complete, check how symmetrical it is. To do this, you can conduct such a test. A machined drill is inserted into the drill, and a felt-tip pen is brought to the machined edge. The drill is turned on at low speed, the drill is covered with a marker line. If there is a larger line from the felt-tip pen on one side than on the other, then it needs to be sharpened.
How to optimally grind the back surfaces with your own hands and straighten the drill in 3 steps
Let me remind you of two requirements for the condition of the peripheral surface of the emery wheel:
- the width must exceed the length of the RC by a margin in order to process it in one go;
- and the grinding surface of the stone should have a perfectly straight line.
Next, we will need to consistently ensure the three conditions for correct sharpening discussed above.
Step #1. How to easily form a clearance cutting angle
The drill axis must be directed at 60 degrees to the generatrix of the circle’s periphery.
To do this, it is enough to mark a clearly visible line at 60° on the tool rest with a marker.
An alternative to this method is to mark lines on the glass of the protective shield with a marker.
The drill is placed on the index finger or fingers, which rest on the side surface of the tool rest so that its side surface (axis) is parallel to the marked line.
It is pressed from above with the thumb, and the fingers of the other hand hold the shank and ensure its movement up and down, movement to the right and left, rotation along the axis and fixation in the desired position.
In the initial position, the drill body is located strictly along the horizontal plane. If you look at the sandpaper from the side in this position, you can see that the circle is ready to give the back surface the desired slope.
The cutting edge must remain stable relative to the rotating stone throughout the entire period of processing the back surface. This is ensured by maintaining the axial position of the drill relative to the line and plane drawn by the marker.
The movements of the drill when sharpening are as follows:
- Carefully bring the cutting edge to the abrasive wheel until it touches, lightly press it and immediately begin to smoothly change the inclination of the drill. We lower the shank a little down, maintaining the same pressure until the end of the passage.
- Next, you should return the drill to its starting position and rotate it 180 degrees to machine the second cutting edge. In this case, it is important to maintain the stability of the position of the center line relative to the control line on the tool rest.
The hands and fingers should not change their position. It is necessary to ensure uniformity of the clamping force of the RC when turning both rear surfaces. The shank is held freely in its original position, without tension, and the elbows of the hands are pressed to the belt.
The horizontally aligned cutting edge is brought to the surface of the circle until it touches lightly (the same pressure is ensured), and then the drill is moved up and retracted back to its original position.
To change the sharpening of the drill bit, keep the drill motionless with your right hand, and rotate it 180 degrees with your left fingers, maintaining the axial position along the marker line.
If you notice that one side needs to be ground off more, then it should be processed several rows in a row, without changing the amount of pressing force.
Do not forget to periodically cool the entry tip by lowering it into a jar of water, and then check the created geometry visually using the prepared template.
Step #2. Features of the formation of symmetrical angles at the apex
A homemade device made from a piece of corner provides uniform symmetry of the corners.
It is attached to the sandpaper rest with a clamp and placed parallel to the line drawn with a marker. It allows you to maintain the set rear cutting angle.
The drill is placed on the index finger located on the tool rest and pressed along its length to the reference plane of the angle.
Please note that at least two contact points on the side strips must be in contact with the surface of the base.
Any of the cutting edges is always set strictly horizontally when sharpening in the starting position of either side.
Next, the back surfaces are ground down according to the same rules as described above. Pay attention to the uniform force of pressing the drill against the corner and stone.
The second RC is processed similarly after rotating the tip 180 degrees. In this case, the symmetry of the angle is ensured automatically.
Step #3. How to easily ensure equality of cutting edge lengths
First, you will need to visually evaluate the created geometry and location of the RC. Reflections of light that interfere with observation can be blocked with the palm of your hand.
A more accurate assessment of the equality of lengths allows them to be measured with a caliper.
The most accurate measurement method is based on the use of a special device.
Its rotary ruler is set along the square perpendicular to the fixed ruler so that the indentation of the control tip is spaced from it by the radius of the drill.
After this, the sharpened sample is placed on the device and the position of the cutting center formed on it is compared.
The shorter cutting side is subject to additional sharpening. Moreover, at this final stage you should not process the entire back surface. It is enough to form a thin ribbon of the cutting edge at a slight angle.
It is created by lightly touching the rotating circle with the drill axis in a horizontal position.