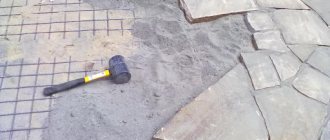
Natural stone is often used to design garden paths. Another, more popular name for this material is “plastic” (see photo).
The stone has the appearance of untreated tiles, which can be of various shapes. Folding like a mosaic, these tiles make the design of the path in the garden unique.
The advantages of plasterboard include its availability, strength and ease of installation.
Material Information
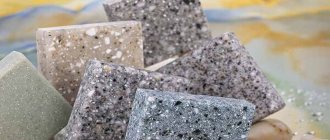
Before laying down the sheet, let’s find out all the information about the material. This natural stone consists mainly of sandstone with the addition of slate, dolomite and quartzite. The average thickness of the tiles is from 5-8 cm. As a rule, the stone has a pleasant neutral gray-green color (see photo). In the rain, the tiles will take on a dark gray hue.
The plastic can be polished or untreated, depending on the needs and preferences of the buyer. In any case, just a little work with the grinder is enough and you can become the owner of a neat, durable and reliable garden path.
When to start finishing the basement
It is best to finish the base after the blind area around the house has been made. In this case, the finishing material will hang over the path. As a result, even the most slanting rain or streams of water flowing down the walls will not be able to get between the wall and the blind area - the water hits the path at a distance of several centimeters from the joint. It is through this joint that water penetrates to the foundation, bringing dampness and other problems.
You need to start cladding the basement of the house after the blind area around the house has been made
One more thing. Many people are thinking about whether to insulate the basement or not. If you want to save on heating, the answer is to insulate it, just like the blind area. The unit for insulation and cladding of the base - one of the options - is shown in the photo below.
When installing an insulated base, EPS boards are laid under the finishing
When using the basement as a residential floor, there are no questions regarding insulation, since the answer is clear - insulate it, of course. But even if you don’t have a subfloor, heating costs will be much lower, and the floor in the house will become much warmer.
Plastushka in the courtyard of a private house photo
How to install plastic (PVC) plinth panels
This type of finishing is called differently: basement or facade panels, basement siding. They have a varied appearance: to match different types of stone, tile, brick.
To install PVC panels on the base, you need to assemble a frame. It is made from wooden beams 50*50 mm. Since the finishing will be outdoors, the wood must be protected with impregnations that prevent rotting and protect against pests.
The sequence of actions is as follows:
- Using a level (laser or hydraulic level), the required finishing height is marked at all corners of the house.
- Nails are nailed in these places (screws are screwed in), a marker (string) is pulled between them, which marks the height of the base finish.
- A beam is nailed along this cord around the entire perimeter of the house. Its top edge should be precisely directed along the cord.
- If the height of one panel is not enough, you will need to make another row of timber on which two sheets will be joined, and you will also need the same strapping for the lower end of the panel.
Another finishing material for the plinth is PVC panels, which are also called “basement siding”
- After about 50-60 cm, short transverse bars are packed in - they will prevent the PVC panels from sagging.
- Start installation from one of the corners. There are special elements to decorate the corner. They are secured to the sheathing with wood screws.
- The edges of the sheets of plastic facade panels are uneven - with protrusions. The edge of the first from the corner must be cut off evenly. This can be done with a jigsaw or grinder, a hand saw with a metal blade (fewer teeth, you get a smoother edge).
- The cut edge is inserted into the corner element. At the top and bottom of each panel there is perforation for fasteners. This is where the self-tapping screws are secured. But they don’t need to be tightened all the way: there needs to be some play for thermal changes in size. That's why the perforation is made of an oblong shape, and it is better to install the self-tapping screw in the middle: when changing sizes, the panel will move freely and will not burst.
- The next element is joined with a special lock and secured in exactly the same way.
Assembly is easy. Only after fastening will it be necessary to make ebbs on top: the sheathing and panels have a fairly decent volume and a gap remains at the top. You can cover it with roofing iron, as in this video. Immediately look at the technology of finishing the base with plastic panels.
In the same way, the base can be finished with corrugated board. There is only one note: it is advisable to lay insulation in the voids between the sheathing. The house will be much warmer.
Tools for self-installation of plasters
To properly lay a stone plaster, you need to prepare some tools.
The arsenal should include:
- shovel;
- rubber hammer;
- mason's pick;
- roulette;
- rule;
- cords and pegs to create markings;
- putty knife;
- stone cutting wheels;
- hard glue brush.
It will be necessary to cut with a grinder, which means that it also needs to be prepared. In addition, you will need to purchase cement, sand and glue.
Facing with boulders or small cobblestones
It is not necessary to buy a boulder or cobblestone. You can collect it on a river or on a pebble beach at sea. Rolled stones are chosen to be flatter - round ones are more difficult to “mount”. The procedure and all other subtleties are almost the same as in the case of finishing with natural stone. The only difference is that these stones must be washed in water and detergent before use. Firstly, the water in our ponds may have oils in it and need to be removed, and secondly, there may be clay or algae in it which can cause the finish to fall off.
To make everything look organic, you can first lay out a “picture” of cobblestone cladding on the path next to the place where you will cladding the base. They have different shades and their random combinations are not always attractive. By laying everything out side by side you will have an idea of what the end result will be.
Watch the video about the features of finishing the plinth with cobblestones.
Laying the base of the garden path
Before you begin installing a garden path, you need to decide on its shape and location on the site. Straight classic paths made of plastic will add rigor to the landscape design of the garden. Straight paths intersecting each other can divide a plot of land (or garden) into several zones. Winding paths look more interesting than straight paths and suit almost any landscape design style. In order to make a garden path strong and durable, you will need to lay a solid base underneath it.
Construction tools and materials that you need to have to create and lay a garden path: pegs, a shovel, a tape measure, an axe, a cord or twine (along the length of the path), a level, a garden roller and a tamper.
The construction of a path in a garden plot can be divided into the following several stages:
- Lay a mark along the ground with a long cord in the place where you plan to build the path. Walk along the cord to see what places will be visible while walking along the path - this should reveal the most attractive places in your garden or plot of land. In addition to the beautiful view while walking along the path, you also need to take into account that the garden path should lead to some place (to a gazebo, to a barbecue, to a barn, to a bathhouse, to a swimming pool, etc.). If you are satisfied with the location of the future path made of plastic, then we move on to the next stage of construction, but if not, we move the cord to different places on the land until we determine a place suitable for the path.
Pegs for marking the path
- Set markings along the cord using pegs. Pull the marking cord over the pegs. The more bends the path has, the more pegs will be needed to mark the area.
- Determine the width of the track. The width should be at least 70-100 cm, so that two people walking along the path towards each other can separate without any problems. If you plan to carry a wheelbarrow along the path, then the width should be at least 140 cm. After this, we drive in the second row of pegs.
- Remove stones and plants along the guide lines. Remove the top layer of soil. If the path runs along a long-established lawn, then it must be planned in such a way that the road surface is located 2 cm lower than the soil level. If the path is placed higher, then the lawn mower will constantly hit its edges.
- Walking paths made of plastic in the garden do not require a solid foundation, so it is enough just to carefully compact the exposed lower layer of soil using a garden roller or tamper.
- Check with a level, placed on a long wooden strip, that the base is even (its clear horizontality). If the territory has a complex topography, then you need to ensure that the bottom follows the unevenness of the land.
After all the above steps, you need to remove all the guide pegs. Now the base is completely ready and the actual paving of the road material can begin.
Preparatory work
Before laying the flat stone, you need to decide on the location. It is advisable to draw a plan diagram in accordance with scale. This is necessary in order to correctly calculate the required amount of consumables. Plus, the drawing will help to evenly distribute the tracks into pieces.
Before actual installation, you need to sort the stones, that is, clean them from dirt, dust and sand. If you need to form a certain shape of a tile, use a grinder. The board must be thoroughly dried before installation.
The next stage of preparatory work is to create a trench on the site of the future garden path. You need to dig a hole at least 30 cm deep. Then mix a solution from cement and sand and pour it there.
The process of laying plasterboard
Before placing the plaster, it needs to be sorted and prepared. You should get rid of clay, sand, debris, and dry the stone. Individual parts will need to be cut or grooved with a grinder. This will allow the tiles to fit together.
Next, we choose the most successful (beautiful) stone and install it right in the center of the future path. It is from this that all other elements of the mosaic path will diverge. Make sure that the gap between them is as small as possible.
To make the task easier, write on each tile with chalk its number and the number of the adjacent stone. Then there will be no confusion at the gluing stage.
Painting, plastering and “fur coat”
In principle, if the plaster is well leveled, after the solution has dried, the surface can be painted and stop there. This is an inexpensive but viable option. If you used façade paint that is intended for outdoor use, the base will look good for a couple of years. Then you will have to remove the old paint and paint it again to maintain the appearance.
The next method is to apply a layer of decorative plaster on top of ordinary plaster. And again, choose those formulations that are intended for external use. They can be tinted in the desired color or taken colored ones. The only negative is that plasters are often porous and splashes of dirt that fall on the walls during bad weather have to be cleaned off with a brush and sometimes with detergent.
Types of decorative plaster for finishing the base: beautiful and relatively inexpensive
The method of finishing the base “like a fur coat” is still popular in some areas. This is when the solution is not applied in an even layer, but in small fragments. Previously, they did this with a broom made of twigs. They dipped it into a liquid solution and hit the stick with the handle so that the splashes flew onto the wall. This is how they made “fur coat” - a finish with a torn surface. Today there are special devices for applying plaster, powered by a compressor. With their help, it is easier to make such a finish.
Finishing the basement of a house using materials in the form of slabs or tiles is technologically more difficult. To prevent it from falling off, you need to know some subtleties.
With concrete base
To properly lay the sheet, you can use a special glue designed for natural stone. But first, we need to thoroughly clean our concrete driveway base. It must be perfectly clean.
The glue should be applied to the sheet using a trowel, making sure that there are no air bubbles. You can start laying track elements on top of the glue. Press them carefully to release excess glue. You can remove the excess with a spatula. All tiles must be on the same level. You can adjust the height using the same glue (see video).
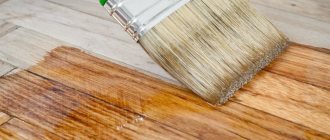
The path should be given at least a day to dry. Then you should rinse it with plenty of water. The edges of the path can be emphasized using borders made of the same material. To do this, you need to shape them with a grinder. And in order to make the stone look more neat, you can coat it with polyurethane varnish.
So, laying the path yourself is not at all difficult. The main thing is to have the necessary tools, patience and the desire to create.
Drainage layer arrangement
The drainage layer of garden paths is necessary to remove moisture coming from rain, melt and groundwater. To install it, a trench 30-35 cm deep is dug across the entire width of the future covering. The bottom of the trench must be compacted and lined with geotextiles. This is necessary in order to prevent the germination of weeds and to ensure the possibility of reliable drainage of moisture into the soil.
Scheme of a plastic track.
On top of the canvas is sprinkled with a small amount of sand and a layer of crushed stone 15-20 cm thick. The crushed stone is covered with another layer of non-woven textile so that the concrete does not mix with the drainage layer when pouring.
What to plant on
In order to obtain sufficient adhesion to the base, and after several cycles the cladding does not crumble, it is better not to skimp on the solution. An ordinary sand-cement mixture will not hold the stone; glue is specially produced for it. Different manufacturers have their own numbering, but the general category of such tile adhesive is “Granite”. It is designed for increased load, frost-resistant, and has greater permeability. It is more convenient to work with glue: the layer is thinner, the solution is more elastic and does not shrink for a long time. During the time before setting, it is possible to adjust the position of the stone.
However, you should prepare in advance for high consumption, the plastic literally sucks up the composition. The consumption indicated on the bags can be safely multiplied by two, or even three, depending on the basis. This is confirmed by forum users.
TatianaCherFORUMHOUSE participant
The glue consumption was monstrous; 15 bags were needed for 30 squares. But the result pleased me more than the costs upset me. Everything is fine, not a single stone has fallen off in two winters. I don’t regret that we didn’t mix the glue with the cement.
Finishing the base of a pile foundation
As you know, a pile foundation does not have a base. But if you don’t block off the space, there will be drafts under the house, the floor will always be cold, and all kinds of living creatures like to live under the house. Therefore, the base, although decorative, is necessary. It can be done in two ways.
- A trench is dug along the perimeter between the supports, removing the fertile layer of soil and going 10 cm deep into the soil, the bottom of the trench is compacted, gravel is laid, and compacted again if possible. Then 2-3 rods of longitudinal reinforcement (10-12 mm) are placed and everything is filled with concrete. After 10-14 days, a half-brick wall is placed on the concrete base. You can use finishing bricks right away, or you can make them from used ones, and then finish them using any of the methods described above.
- This method is suitable for finishing the base with facade panels (basement siding) or corrugated sheeting. A frame made of impregnated timber is attached to the piles. The rest of the finishing process is no different from the standard. Except that it is very desirable to insulate this option.
The easiest way to finish a pile foundation is to attach some slab finishing material to the frame.
There is one subtlety if the house is installed on screw piles or TISE piles. Such foundations are often placed on highly heaving soils. To prevent the finishing from being destroyed when the soil is raised, it is not brought to a certain distance to the ground. To prevent animals from crawling into the gap, a metal mesh is fixed at the bottom.
Sandstone tiles
Flat stone tiles are gray-green in color and dark gray when wet. Sometimes you can find yellow and red tints.
Today, several varieties of plastushka are used. The most famous of them is sandstone. Its thickness varies from 1 to 5 cm, it consists of a mixture of sandstone, quartzite, dolomite, slate and shungite. It is better to lay paths in the garden with stones 3 to 5 cm thick.
Flat stone tiles are gray-green in color and dark gray when wet. Sometimes you can find yellow and red tints.
Savage is sold both raw and polished. The technology for laying it is a little more complicated than paving slabs or concrete. But the result is worth it. In addition, plastic sheeting is more durable than other types of coatings and will serve for several generations.
Cost of stone - paving services
Manufacturers set the price for material per 1 m2. However, the final figure depends on the thickness of the slab. So, 10 mm yellow sandstone will cost from 496 rubles/1 m2, 18–25 mm thick – 595 rubles/m2, from 25 to 35 mm – 728 rubles/m2, more than 36 mm – 860 rubles/m2.
The popular breed lemezite or burgundy slate costs 330 rubles/m2 for a slab thickness of 10–18 mm, 25–35 mm – 550 rubles/m2, over 45 mm – 760 rubles/m2.
The average price of goldite is from 240 rubles/m2.
When ordering the services of craftsmen for the construction of a turnkey garden alley, the price list will be approximately as follows:
- leveling, trench digging, other earthworks – 250 rubles/m2;
- backfilling with sand and crushed stone cushion – 150 rubles/m2;
- creating formwork, pouring concrete mortar – 400 rubles/m2;
- preparation from scratch of a sand base – 600 rubles/m2, gravel-sand base – 1100 rubles/m2, concrete – 1500 rubles/m2;
- washing of stones – 150 RUB/m2;
- trimming the edges of the material – 300 RUR/m2;
- laying flagstone by selection - 800 rub./m2, chipping - 900 rub./m2.
If the entire scope of work is carried out by specialists, then the average price of a flagstone path will be 2,400 rubles/m2.