- home
- Car suspension
- …
I already wrote about the design of the ball joint, you can read it here . In that article, I briefly touched on the problem of repair, but many of my readers began to write - is it possible to restore it yourself. At first I thought that this was not the right saving, but after understanding the problem, it turns out that sometimes it is much more profitable to repair. Once again I emphasize much! The thing is that the supports are currently installed in the levers and cannot be removed! This is not the same structure as it used to be on our VAZs...
That is, the ball joint used to be removed in 95% of cases, it was physically unscrewed from the suspension arm (in our VAZs they were called “burdocks”), and in many foreign cars of the 90s - 2000s they were often removable. Now many manufacturers weld supports into the lever or into the steering rack. They are not removable. Thus, you not only need to change the “ball” but also the entire lever! And this can be very expensive in terms of money. For example, on Mitsubishi the cost of one can reach up to 20 - 25,000 rubles for the original, for BMW - up to 50,000! Therefore, whether willingly or not, the question of restoration arises. Moreover, this can sometimes be done with your own hands.
About the device
If you didn’t click on the link above and didn’t read it, here I’ll remind you a little about the structure. You need to understand that the ball joint serves for a movable joint that can rotate, that is, movement in several planes at once. In cars it is mainly used in the front suspension to turn the front wheels.
SO:
- There is a cylindrical body.
- A polymer liner that is immersed in it.
- Metal finger or “ball” or rod, there are many names. On one side it has a spherical element, on the other side there is a threaded rod.
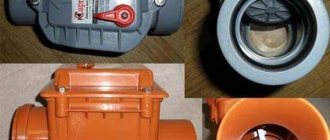
- The boot protects the structure from the penetration of dust and dirt.
- Pressure spring or even the bottom. By the way, sometimes it is not there if the support is not collapsible.
Just like that, but we need this in order to understand how to restore.
Collapsible method
Before starting work, it is necessary to dismantle the ball joint.
To do this, follow these steps:
- raise the car using a jack;
- unscrew the wheel;
- turn the steering wheel all the way;
- pull out the cotter pin from the nut using pliers;
- unscrew the nut, press out the axle with a puller;
- unscrew the hinge fastening;
- Use a pry bar to press down the lower arm and remove the support.
After this, you can proceed to disassembling this element. The technology of this process depends on its design.
In the case when the body consists of two cups connected to each other by spot welding, the sequence of actions will be as follows:
- drill the joints;
- separate the two halves using a chisel;
- change the finger and liners;
- boil the cups together.
During welding work, it is important to ensure that the internal parts do not overheat.
If the bottom is inserted inside the ball joint housing, then proceed as follows:
- the rolled edges of the body can be cut off using a grinder or emery;
- knock out the bottom with a hammer;
- a steel ring 10 mm high with a plug and thread is cut to size;
- weld it to the body so that it presses the inserted pin, liner.
At the end, the ball joint is installed in the opposite order of removal. This will be much easier to do.
What goes wrong
The design of the ball joint is quite durable and can last for thousands of kilometers. However, over time, the polymer liner wears out. This is the only weak point. It is he who takes on the main load from uneven roads.
A torn boot aggravates the situation; when it tears, dirt, dust, sand, etc. get inside. All this begins to work like “sandpaper”, a metal ball (finger), begins to erase the polymer insert.
That is, only two main parts are subject to wear - the polymer insert and the rubber (silicone) boot - they are the ones that need to be restored.
I would like to note that in very advanced moments, when the liner is worn down to the ground, the “metal ball” itself suffers, because it begins to rub against the metal of the case walls. But this is a completely neglected case.
When is ball restoration justified?
Typically, the ball joint is pressed into the body of the suspension arm and steering rod, being one with them. Therefore, complete replacement of hinges is an expensive procedure due to the replacement of an entire structure.
To save money, you can try to restore the ball joint, although this part is considered unrepairable:
- To repair this unit, you can dismantle it, disassemble it and replace worn polymer inserts and anther. In this case, a grinder is used for disassembly, and welding is used for restoration.
- Another option would be a method where a special polymer composition is poured into the part under pressure. With its help, gaps between parts resulting from wear are leveled.
Many experienced repairmen recommend disassembling this element in any case to grind the ball of the pin axis. This approach will ensure the durability of the repaired part. In addition, in this case, you can evaluate the condition of the finger itself and replace it if necessary.
Restoration does not make sense in the case when the finger dangles inside the body and is even removed from the hinge without disassembly and special effort.
How does recovery happen?
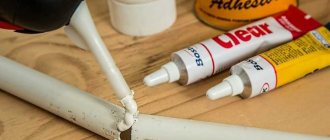
There are several ways to restore or repair a ball joint. If the boot changes easily enough, just throw it out and install a new one. But with the polymer composition it’s not so simple. There are only two main repair methods:
- Physical repair, usually used for dismountable support. When you disassemble the “ball” and change the polymer filling.
- Repair of non-removable support. Here the principle is different; liquid polymers are used, which are pumped into the housing.
Now in more detail about each method.
Physical repair
This is the easiest way - when the ball joint is disassembled. The bottom is unscrewed, we take out the worn polymer insert and replace it. Previously, such repairs were carried out on many cars, including those sold for our rear-wheel drive VAZs. Repair kits were also sold that could be purchased and replaced.
Therefore, the supports lasted a very long time, although the “inserts” were changed quite often. A little later, they stopped producing such balls, either it was not profitable, or it was a “conspiracy of the manufacturers.” Now in 95% of cases they are non-separable.
Repair of a non-removable ball joint
Not only can you not take them apart, but sometimes you won’t even be able to remove them using the lever! It’s simply absurd - in order to change the “ball”, we completely change the lever! But there can be two of them in the lever.
There are also two ways:
The first is to physically cut off the bottom - say, with a grinder, select an insert and weld the bottom. The method is not one of the best, but possible. Personally, I don't recommend it to you.
The second is pouring liquid polymer inside under pressure, that is, non-separable restoration. Fluoroplastic is usually used. It's worth going into more detail.
Repair work
It should be immediately noted that after the repair is completed, the ball joint will not be completely restored and its service life will be shorter. However, if everything was done correctly, then you don’t have to worry about the safety of the unit’s operation. There are several ways to restore the ball's functionality. At home, two technologies are most often used:
- Repair of ball joints with polymer using SJR technology.
- Collapsible - the body is converted from a non-separable one into a collapsible one, after which the ball surface of the pin is polished and the liners are changed.
Using polymer
The essence of this method is to inject heated polymer material into the housing. In this case, the support does not need to be disassembled, but an extruder must be manufactured. It is worth noting the main advantages of this method:
- Since the housing structure is not destroyed, high reliability of the factory connection is ensured.
- The polymer fills all the voids and wear-out areas that caused the support to fail.
- When the material hardens, it forms a solid liner, the characteristics of which are at least as good as the factory part, and sometimes even superior.
- The polymer contains special ingredients that provide high-quality dry lubrication of the finger.
- High strength under impact loads is achieved.
To use this technology, a hole must be drilled in the lower part of the body, the diameter of which is selected in accordance with the extruder used. It is necessary to thoroughly clean the gap between the liners and the ball surface of the pin from dirt, and also blow the assembly with air to remove chips and grains of sand.
The polymer is injected into the housing using an extruder through a pre-drilled hole. Once the plastic composition has hardened, the repair work can be considered complete. The only drawback of this technology is the inability to check the geometry of the spherical surface of the finger.
Collapsible method
After the support is removed, it is necessary to disassemble the housing. To do this, you will need to drill out all the welding points in one half, then divide the part into two parts using a hammer and chisel. Then the flared edges are ground down and a blow is applied to the end of the pin to separate the bottom of the body. After measuring the inner and outer diameters of the body, a ring with similar dimensions and internal threads is made, as well as a plug that is screwed into this part. The height of the ring should be about 10 cm.
After this, a new liner and the restored finger are placed in the body. Having connected the two parts of the body, they should be secured by welding. Care must be taken to avoid overheating the liner.
Then the previously made ring must be welded to the body. After this, all that remains is to screw the plug into the body to tighten the liner and drill a small hole in it (diameter about 2 mm) for the cotter pin.
Do-it-yourself restoration with liquid fluoroplastic
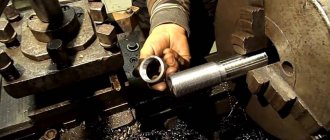
This can be done, but it is difficult. You will need special equipment and polymer (fluoroplastic). The principle is this: we simply drill a hole in the bottom of the ball, then cut a thread so that we can screw in a special metal “receiver”.
A “receiver tube” from a special press (extruder) is screwed into this thread, which supplies molten fluoroplastic under pressure. It should be noted that it melts at temperatures of 170 - 200 degrees Celsius.
Then we heat the tube, usually the press itself with the “liquid mass”. Inside the spherical fluoroplastic also melts + mixes with the mass that enters through the tube, the process occurs under a pressure of 2 atmospheres.
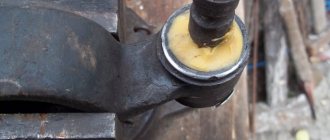
After filling, the tube is disconnected and the press with the polymer is removed. The polymer hardens and forms a monolith that envelops the “ball”; all knocks and vibrations pass - after all, the broken place is filled with polymer. A special valve or “grease fitting” is screwed into the hole that has been drilled.
After such a repair, the ball joint can run for a very long time, sometimes even no less than a new one. Let's watch a detailed video.
However, it is worth noting that if the boot is broken and a lot of dirt gets inside the “ball”, then you should first clean it, otherwise the wear will be very great. Cleaning should be up to the mirror.
Also useful video.
That's all. In conclusion, I would like to say that if it is possible to change and install a new original support, it is better to do it. After all, a new one, I emphasize ORIGINAL (not China), will always be better than a restored one. It will last you for many thousands of kilometers.
Read our website, sincerely your AUTOBLOGGER.
Similar news
- Power steering (hydraulic power steering) or EUR (electric power steering). What's better …
- Front or rear wheel drive. Which is better and more reliable, the main differences…
- Types (types) of steering racks. How they work, review article