The front wheels retain their mobility due to the fact that the ball joint provides a reliable connection between the suspension arm and the wheel hub. This element of the car chassis consists of a metal body with thick walls, inside of which there is a ball with a finger extending from it with a thread at the end and special liners.
The body is non-separable. At its end there is a small hole in the center, and on the opposite side there is a rubber boot that protects its internal space. The main thing is to control the condition of the finger. In some cases, the structure can be restored, in others only replacement will save it.
Device and purpose
The ball joint allows for a reliable movable connection between the wheel hub and the suspension arm. The assembly includes a housing, a ball pin , and an insert made of plastic. The body most often has a welded structure - two parts with a stamped spherical recess for the finger are connected using spot welding.
Essentially, this element is a thick-walled glass made of metal into which an insert with a finger is then inserted. To make the housing structure non-separable, its edges are flared. Often the liner is not manufactured separately, but the area between the walls of the housing and the ball surface of the finger is filled with a special polymer material. To protect the unit from dirt and water, a boot is placed on top.
It should be noted that active wear of the ball joint begins after the boot is damaged . Until this happens, the unit is practically not subject to wear. Thus, if you monitor the condition of this element and replace it in a timely manner, you can significantly increase the life of the unit.
However, it is worth remembering that the weld joints do not have sufficient tightness and even with an intact boot, water can get inside. To avoid this, the case should be filled with lithol.
The most vulnerable element of the hinge
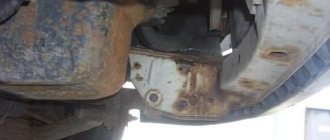
The car enthusiast should keep in mind that cracks and tears on the surface of the boot are formed with one hundred percent probability. They are an inevitable consequence of long-term use of the machine, its chronic overloads and destructive atmospheric and climatic factors.
In a number of cases, driving style that is merciless to the suspension contributes to the destruction of the boot.
If signs of damage to the integrity of the boot appear, you should stop using the vehicle as soon as possible. Otherwise, the likelihood of debris and dirt penetrating into the support will increase, causing abrasive deformation of the components.
Node diagnostics
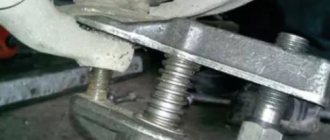
You can find out about the need for restoration work on ball joints through diagnostics. As soon as you hear a creaking and knocking sound from the suspension while driving on an uneven road, the unit is worn out and needs to be restored. To accurately determine the source of these sounds, it is better to carry out diagnostics together - one person enters the inspection hole and puts his hand on the ball joint, and the second begins to rock the car.
If the sound is felt by hand, then the support must be removed and checked for play in the hinge joint, securing it in a vice. It should be remembered that the finger should not move under the influence of light forces, but at the same time it should not bite. It is also recommended to carry out a similar check in the following situations:
- A squeaking sound is heard when turning the steering wheel.
- When driving in a straight line, the car spontaneously wobbles.
- To turn the steering wheel you have to apply quite a lot of force.
The main purpose of the ball joint
To understand exactly what functions a rubber joint performs, it is enough to study the design of the steering knuckle, which is a component of the front suspension that ensures the wheels are connected to the body.
- The task of the ball joint is to provide the necessary mobility of the fist, thanks to which the machine is able to turn quickly and smoothly at any speed.
- An additional guarantee of comfortable steering is the use of a trouble-free steering system.
Removal and installation
If after carrying out diagnostic measures it becomes clear that the unit is worn out, it must be repaired. Many novice car owners cope with all the work and restore the ball joints with their own hands. To remove and install the support after repair, you will need several tools:
- Special puller for supports.
- Car stand.
- Jack.
- Mount.
- Pliers.
- A set of keys.
Most often, ball joint pullers are not universal. If you cannot find the required tool, you can solve the problem using a hammer. Moreover, its weight should be about 600 grams. In addition, you need to know the place where you should strike so as not to damage the node.
There is no need to try to knock your finger out of the seat. The blow should be directed perpendicular to the finger along the eyelet. To remove the ball joint, you first need to loosen the front wheels and jack up the car. After this, the wheel is removed.
If the nut on the pin has a cotter pin, it should be removed using pliers. This will allow you to unscrew the nut and use a puller or hammer to squeeze out the pin. After this, you should unscrew the housing mount and, using a pry bar, press the lower lever to remove the support.
To install the unit after repair, you first need to attach the housing to the lower arm. After tightening the fasteners, use a pry bar to release the lever and return the pin to the socket. Then the nut is screwed onto it and tightened. If after this the finger rotates, then the lower lever must be pulled up. The last step will be to install the cotter pin on the nut or replace the old one with a self-locking one.
Recovery
- Emery or grinder.
- Extruder.
- An electric drill with a large chuck (so you can hold your finger in it to sand the ball with sandpaper).
- Metalwork yews.
- Welding machine (preferably semi-automatic).
- Compressor.
Restoration of supports can occur in two ways:
- Converting a non-separable hinge into a collapsible one, grinding the pin ball and replacing the liners.
- Repair by injecting softened plastic into the gap between the ball and the body using an extruder.
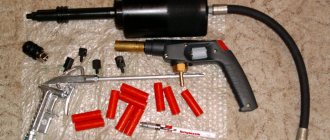
Of course, you shouldn’t buy equipment for a one-time repair, but you can quickly make a simple extruder with your own hands from an old brake master cylinder by attaching a lever to it to press the piston. You can heat it to soften the plastic with a torch or blowtorch.
Carrying out work
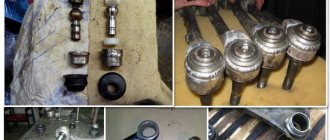
Repair and restoration in the first way begins with dismantling the supports. To disassemble a body welded from two cups, you need to drill out welding points on one of the cups and separate the cups using a chisel and hammer. On a body with an inserted bottom, grind off the flared edges using emery or a grinder, and knock out the bottom with a hammer to the end of the finger. An insert with a finger is inserted into the body of two cups, the halves are pressed against each other and several tack welds are made, trying not to overheat the insert. For a case with the bottom removed, measure the outer and inner diameters and make a steel ring in accordance with these dimensions, about 10 mm high with a thread inside and a plug screwed into it. Weld the ring to the body, cool, insert the insert with the pin into the body, screw in the plug, press the liner with it, drill a Ø 2 mm hole in the ring close to the plug and secure it with a cotter pin.
Do-it-yourself repair and restoration using the second method usually takes place without disassembling the unit.
A hole with a diameter of about 6 mm is drilled in the bottom of the body, its size depends on which extruder is available to you. The gap between the ball and the liners is cleared of dirt and blown with compressed air to remove sand and chips. Through a hole drilled in the bottom, using an extruder, softened plastic is injected into the gap between the pin ball and the body. Let it cool and the repair is ready. The disadvantage of this method is that you cannot see whether the geometry of the ball has been preserved and you cannot polish it to remove traces of corrosion, so the restoration results will be short-lived.
Repair work
It should be immediately noted that after the repair is completed, the ball joint will not be completely restored and its service life will be shorter. However, if everything was done correctly, then you don’t have to worry about the safety of the unit’s operation. There are several ways to restore the ball's functionality. At home, two technologies are most often used:
- Repair of ball joints with polymer using SJR technology.
- Collapsible - the body is converted from a non-separable one into a collapsible one, after which the ball surface of the pin is polished and the liners are changed.
Using polymer
The essence of this method is to inject heated polymer material into the housing. In this case, the support does not need to be disassembled, but an extruder must be manufactured. It is worth noting the main advantages of this method:
- Since the housing structure is not destroyed, high reliability of the factory connection is ensured.
- The polymer fills all the voids and wear-out areas that caused the support to fail.
- When the material hardens, it forms a solid liner, the characteristics of which are at least as good as the factory part, and sometimes even superior.
- The polymer contains special ingredients that provide high-quality dry lubrication of the finger.
- High strength under impact loads is achieved.
To use this technology, a hole must be drilled in the lower part of the body, the diameter of which is selected in accordance with the extruder used. It is necessary to thoroughly clean the gap between the liners and the ball surface of the pin from dirt, and also blow the assembly with air to remove chips and grains of sand.
The polymer is injected into the housing using an extruder through a pre-drilled hole. Once the plastic composition has hardened, the repair work can be considered complete. The only drawback of this technology is the inability to check the geometry of the spherical surface of the finger.
Collapsible method
After the support is removed, it is necessary to disassemble the housing. To do this, you will need to drill out all the welding points in one half, then divide the part into two parts using a hammer and chisel. Then the flared edges are ground down and a blow is applied to the end of the pin to separate the bottom of the body. After measuring the inner and outer diameters of the body, a ring with similar dimensions and internal threads is made, as well as a plug that is screwed into this part. The height of the ring should be about 10 cm.
After this, a new liner and the restored finger are placed in the body. Having connected the two parts of the body, they should be secured by welding. Care must be taken to avoid overheating the liner.
Then the previously made ring must be welded to the body. After this, all that remains is to screw the plug into the body to tighten the liner and drill a small hole in it (diameter about 2 mm) for the cotter pin.
How repairs are carried out
When repairing a ball or steering linkage, we use proprietary fast-hardening plastic, which liquefies at a temperature of 190 - 200C° and penetrates into the ball joint under high pressure.
While the plastic is fluid, it fills all the cavities and voids in the ball joint that caused knocking and discomfort when driving.
It is recommended to use repaired ball joints after 3 hours of plastic polymerization and restoration of its standard lubricating properties.
Plastic used in repairs
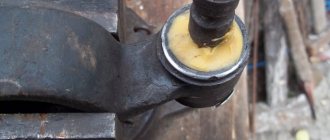
Steering rod after restoration
Warranty:
The use of branded equipment and high-quality materials allows us to provide a long-term guarantee for repaired ball joints and silent blocks up to 12 months
Useful tips
- Do not undertake restoration of the hinge if the pin is removed from it without disassembly; repair will not help such an assembly, but only replacement. The hole for the finger in the body must be smaller than the diameter of the ball in order to. If the liner wears out, the finger cannot fly out of the body, causing an accident.
- When restoring a hinge with your own hands, disassemble it completely and grind the ball of the finger, no matter how you intend to restore the assembly. Then the fruit of your work will not need replacement so soon. Even if you are planning to use an extruder for restoration, do not be too lazy to disassemble the hinge to see if the pin needs replacement. If you don't need it, then just polish his ball.
What determines the service life
First of all, from the driving style. The more aggressive the driving, the more the suspension components suffer. They bear more load and fail faster.
While working at a service station, I noticed that more often reckless drivers came to replace ball joints and drive according to the principle: “The higher the speed, the fewer potholes.” Older people and those who take care of their cars stopped by for repairs less often.
Bad roads. Everything is clear here; if a wheel falls into a hole, the load on the hinges increases. The higher the speed, the more forces act on the part. These forces want to tear the finger out of the support cage; it’s hard to argue with physics.
Low quality of spare parts . The desire to reduce the cost of parts leads to savings on materials. Cheap boots made of low-quality rubber are installed. A minimum of lubricant is placed between the ball and the polyurethane liner; in some cases it simply isn’t there.
This trend is observed not only among cheap manufacturers; expensive parts also suffer from this problem. The second principle works here - why make a durable spare part if you can shorten the service life and the buyer will come again in the near future for a new component.
The review “The Best Ball Joint Companies” looked at manufacturers of quality spare parts that you should pay attention to before purchasing a new joint. It is recommended that you carefully read the list presented, with the advantages and disadvantages of their products. The use of spare parts from these companies will guarantee long service life of the components.
To Contents...
Advertising: