Gate latch is a general name for a number of locking devices used by landowners to ensure basic security of access to the territory. Correctly installing a lock is a way to prevent intruders or simply strangers from entering the site whose visit is undesirable.
The term “valves” refers to a variety of devices purchased in a supermarket or at the construction market, special and cunning mechanisms that work on different principles. Although craftsmen often prefer to make gate valves with their own hands.
What types of gate locks are there?
There are a huge number of types of locks, which, in turn, are divided into subtypes.
For example, the latch can be mechanical (with a key) or manual. Additional manual installation is useful if the keys are lost.
According to the location of the direction, mounts are divided into horizontal and vertical.
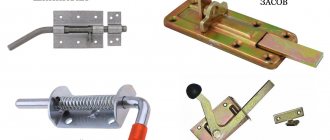
Depending on how the mechanism itself works, they can be screw, sliding overhead, rotary with grooves, spring-mounted, crossbar, electric mechanisms (operating in automatic mode).
You can make the constipation yourself or buy it.
Previously, ordinary valves were the most common. Now a large number of other types of locks have appeared, which are actively used for various doors.
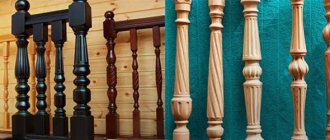
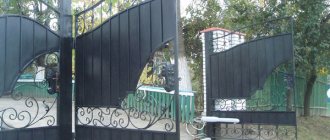
Good option for wooden fencing
When making a gate with your own hands, do not be too lazy to install a simple latch in the form of a turntable or latch.
Types of constipation
Before buying a deadbolt, you need to study its functionality and methods of attaching it to the gate. Locking mechanisms differ in appearance, fasteners and the device itself.
Homemade structures are fixed on the gate in different ways.
The following fastening methods are distinguished:
- Locks that are located in the center or bottom of the gate are called horizontal. They are most often used in garages. Usually this is a so-called latch with a locking loop, a shell and a movable metal rod. Locks in the form of steel rods, which serve as a moving part and are mainly located at the top or bottom of the gate. Sometimes they are installed centrally, as in horizontal locks. This type of fastening is called vertical and is used for swing gates and wickets.
- Some bolts are installed as additional fasteners to the main lock or deadbolt. Such modules have an average level of protection, so it is better to fix them in pairs with other, more durable ones.
All these locks can be modified and supplemented depending on the type and quality of the gate and the wishes of the owner of the private property. For example, it is better to install two horizontal fasteners at the top and bottom, rather than fixing one in the center. The first option will be much more reliable.
Regular gate valve
Pinwheel and latch
To make a turntable, it is enough to have a small block of wood. It is nailed to the gate support (which is secured with latches) with a nail or a bolt (through). The spinner has a rotating mechanism.
The latch was loved for its versatility and reliability. It is attached to the frame, the door itself or the leaf. Sometimes it is mounted in the place where the gate opens from the side of the yard (it is not noticeable, it is as hidden as possible).
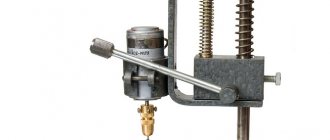
Making a latch
The shutter is constructed like this:
- It is necessary to fix the pipe (0.5 m length) in the ground.
- Mark the future location of fasteners and mechanisms.
- On the gate canvas, above the pipe, we fix a cable or rod with a through hole (for twine).
- We stretch the cable to a suitable convenient place. When it is tensioned (pressed), the latch rises and the gate opens. The main thing with a snap shutter is to treat it in a timely manner from the influence of the external environment (frost, rain, sun).
Pinwheel
Making a bracket with a hook
Installing the usual bracket with a hook will not cause any trouble. It is built like this:
- We need hardware, which we buy or make ourselves from wire (up to 5 mm).
- We process the wire with fire ourselves, holding it with pliers. We achieve full heat (red burning color) in the place of the future bend.
- We take another pliers and form a hook by bending a hot rod.
- We temper it with fire again.
- Quickly dip into cold water.
- We re-treat the tip of the hook with flame.
- Bend the working part to the desired angle.
- Final processing of the part by fire and subsequent placement in cool water.
- In this way you can make any part for a future latch (bracket, hook...).
- All that remains is to attach them to the gate leaf (usually with nails).
Simple circuit diagram
We treat metal products with a special anti-corrosion compound (if they are not galvanized).
Mortise
It is believed that mortise locks for gates are more advanced in design. They make it possible to reliably lock the gate, and opening it will not be very easy.
This lock is secured with 6-10 long bolts, so you should create a reliable gate structure before installation. To do this, sections of profile pipes should be welded onto the standard frame to enhance the rigidity of the structure.
If you want a secure lock installation, you should weld the lock directly to the frame. We recommend contacting an experienced specialist who is well versed in welding structures made of different alloys.
Gate valves by direction location
These types of latches will perfectly secure your gate, even your gate.
The horizontal type is most often installed. It consists of a rod, an ear for fixation and a holder.
Garage valve
The vertical version is usually used for gates.
But you can install it on a mortise gate. The size of the valves will be smaller than for gates. It is necessary to attach the clamps (by welding) to the latch mounting opening. The vertical type is more bulky than the horizontal type.
Electronic devices
Locks of this type are the most expensive and most reliable. The high technologies used in the mechanism make the electronic lock practically invulnerable. The operation of the locking device is coordinated by the control unit, which receives information and sends signals to open, close or block the lock.
Electronic locks from Samsung
The source of information is a scanner mounted on the outside of the gate, an infrared or radio signal receiver. The lock can be configured with the owner's and family members' fingerprints, iris or barcode.
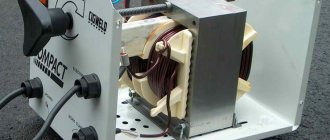
Screw and overhead valves
The screw type is perfect if you place it outside the yard. Installation will not be a hassle. This type is always easy to handle and operate.
A lock with a solid threaded rod and a strong base. Closing and opening occur with a special key.
There are some nuances and disadvantages: there must be free space in the gate opening where there will be a recess for the key rod; This lock is easy to open (just pick up the key).
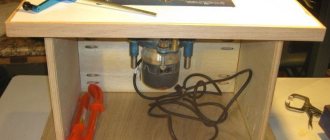
We assemble with our own hands
Overhead shutters are suitable for any wicket material. Installation is quick and easy. The shutter is mounted from inside the home area. In case of departure, most owners additionally attach a padlock from the outside.
Rotary lock with grooves
The slotted one has a fairly ordinary mechanism. The shutter protects against break-ins quite well.
Working principle: by turning the key, you engage the locking mechanism of the lock (due to which the gate opens/closes).
Spring lock
The latch is provided with a spring latch. It operates on a structure consisting of a spring. It is used as an additional valve to the main one. They are attached to the inside of the gate.
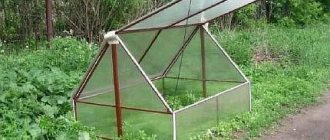
Deadbolt lock
The crossbar has a rack and pinion system. The lock has a special base and a key with unique recesses. It is easier to purchase it than to do it yourself (only a professional can handle the task).
Deadbolt lock
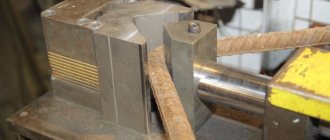
Installation
So, given: the gate for the fence made of corrugated sheets is welded, hung on awnings and sheathed with profiled sheets. Welding is at our disposal; There is also some three-millimeter steel sheet. In addition, it is worth getting out of your bins a drill, a grinder with a cutting wheel for metal, a square and a scriber (any sharpened object made of tool steel will do the job).
Factory-made metal scriber.
Overhead
How to install a padlock? The instructions are very simple if a cross member is welded at the height of the castle (usually 90 centimeters from the ground).
- Attach the lock from the inside so that one of the mounting holes rests on a horizontal profiled pipe, and the core and handle are below or above it. Mark future holes in the frame and a recess for the crossbar. If the post next to the gate is not wide enough or is made of a round pipe, you will have to weld a plate or corner under the lock mate.
- Drill holes - in the frame for fasteners, in the corrugated sheet for a key and, if necessary, for the handle. A hole in the profiled sheet is drilled along the contour and leveled with a roller cutter. In the same way, a groove is made for the crossbar in the column.
- All that remains is to secure the lock and install the core, handles and linings.
Another way is to drill holes of a smaller diameter and cut threads for the screws with a tap.
If the crossbar is located at an inappropriate height, installing a rim lock in a gate made of corrugated sheets will require welding an additional plate under it.
Mortise
How to embed a lock into a gate made of corrugated sheets?
If the frame of the gate is made of a thin pipe (for example, 20x40), the only way out is to weld a box made of steel sheet under the lock. Its dimensions should first of all leave minimal side gaps between the walls and the lock body. Material: three-millimeter steel.
From the end of the gate, a groove is selected for the crossbar and holes are drilled for the fastening screws. It is advisable that they be outside our box, otherwise we will again be faced with the impossibility of screwing the nut onto the screw thread. In the box, key grooves are selected on both sides (or for the entire core).
The counter part is mounted on a pole; as an option, a groove for the crossbar is selected directly in it.
Of course, it is also possible to install a lock in a gate made of corrugated sheets. However, you can’t call her neat; in addition, the mechanism will be exposed to rain and snow.
Finally, it is worth mentioning the most, so to speak, civilized scenario.
On sale for a long time you can find special mortise locks for gates made of corrugated sheets. They have a minimum width and are designed for installation in a profiled pipe measuring 40x40 millimeters.
This narrow-profile lock is designed for professional pipes measuring 40x50 mm.
Inserting the lock is simple and does not require welding.
- After marking, a groove for the body is selected at the end of the gate. Using a grinder, two vertical cuts are made and another one is made diagonally to the future rectangle; then the resulting triangles are bent outward and cut off. The edges are smoothed with a file.
- Holes for screws and a core are drilled in the side surfaces with a drill.
- To mark the mate of the lock, you can use a little trick. Coat the bolt with toothpaste, putty, or any other thick, colored substance. Then, with the gate closed, turn the key - and on the post there will be a clear imprint of the place where the groove should be.
Once all the holes have been selected, all that remains is to secure the lock with screws - and the job is finished. But how to install a fence from corrugated sheets? Read about this in other articles on our website.
The result of our work.
Electric strikes
In addition to conventional shutters, there are electric ones. They are more functional. Electric locks have increased security measures, a special access system, and operate without interruption. Today they are considered the most reliable. When choosing an electric strike, familiarize yourself with the existing types.
Types of electric locks:
- electromagnets;
- mechanical;
- latches;
- motor.
The first ones have a plate that controls the closing/opening of the gate. Everything happens under the influence of magnetic influence. They are highly resistant to adverse weather conditions and can withstand severe frosts.
Electronic lock
The most popular ones in installations on gates are mechanical ones. An electromechanical latch consists of a combination of mechanics and electricity. It uses a special key. The decent price is justified by the high degree of burglary protection.
Electric latches are the simplest among electric locks. If your yard is not a secret object, then this option is quite suitable.
Electromotor. The door will operate using a small motor (bolt) located directly in the lock. It is activated with a special key.
You can install such a lock yourself if you are familiar with electronics. Otherwise, entrust the installation to a specialist.
What else to pay attention to
A fence in the form of a wicket or gate cannot exist on its own, since it is initially designed for some type of lock.
Usually, at the request of the gate users, the lock is installed as a separate element that is in no way dependent on the gate.
Typical deadbolt model
The requirements for locking a gate must correspond to simple and practical solutions. In a word, it should open easily and without much effort. Also, all bolts, latches and latches on it must be combined with the general appearance of the fences, without violating the integrity of the architectural forms.
Gate valves made of corrugated sheets
If your fence is made of corrugated sheets, then the latch for the gate made of corrugated sheets is selected taking into account this material.
There are the following locks for corrugated sheets:
- code;
- cylindrical;
- suvaldnye.
The coded one has a sufficient degree of reliability. It opens from the outside by entering a code, and has a special latch from the inside. The only negative is that the code buttons wear out over time. Anyone can see the secret code.
Regular type
Cylindrical works on a mechanism for matching internal small parts. Advantages: neat small size, if it breaks, it’s easy to fix. But sensitive to moisture and dust.
The lever lock is perfect for corrugated sheets. It has keys with teeth of different sizes that perfectly match the internal parts of the lock. If something doesn't match, it can't be opened.
Mechanism selection
If this is your first homemade design, then it is better to start with the simplest elements. This experience will undoubtedly be useful for performing more complex deadbolts.
Simple deadbolt
This is the lightest device for mounting on gates. To secure it, you need to stock up on three metal staples, a latch and a base for it. Then the brackets must be welded to the inside of the gate and the latch must be secured to them. Next, for strength, a limiter is screwed to the brackets perpendicular to the floor. The main thing is that it is slightly higher than the staples.
Very easy to make
Locking lugs
This design will not take much time to assemble. Any amateur can easily cope with this task. You will need eyelets purchased in a store or made from metal plates.
DIY latch
If you decide to build a castle yourself, stick to a proven option. Homemade locks are more complicated; it is better to entrust them to a master or buy them.
Variety of options
Let's consider the popular and simple type that is most often made - a spring lock with horizontal placement.
To do this you need to stock up:
- metal plates of the required size;
- several rods (steel) with ears;
- vice;
- hammer;
- drill;
- screwdriver;
- hacksaw for metal materials;
- welding;
- screwdriver, wrench.
Circuit with a spring
Let's figure out how to make a latch for a gate with your own hands. First of all, we select the part of the gate where the mechanism will be located:
- Having measured the required distances with a tape measure, draw the markings with a pencil or marker.
- We determine the scheme of the future structure in detailed detail.
- Next we build the supporting frame. We weld the rod holders to the metal part. A handle is attached to the rod (bearing rod).
- We insert the spring into it along with the rod.
- We attach the shutter to the metal gate by welding. Mounting to wood is done using self-tapping screws.
- Strictly opposite the bolt rod we drill a cavity to secure the lock.
Deadbolt diagram
To open the gate on both sides, it would be useful to make an additional mechanism for the cable. Find a suitable thin cable and secure it in the bolt eye. Make a hole for it (bottom, side). Pull outward.
If you pull the cable, the bolt will move back.
A metal pocket is required to protect the lock from rain.
Modern market of locking mechanisms
Progressive methods for developing reliable models of locks for gates and gates allow owners of suburban areas to purchase electromechanical and electromagnetic locks.
The reliability of the second type is explained by the supply of voltage force, which actuates the gate leaves. A magnet has the property of literally sticking to a metal surface, and it is in principle impossible to open it without using a set of special tools.
This kit is expensive, but, according to experts in this field, the costs are completely justified. The latest models are opened after confirming the fingerprint of the owner of the estate. It is impossible to make such a mechanism with your own hands without special skills.
Conventional gate latch design
Installation of the mate
This is the most difficult and important part of inserting a lock into an interior door. It is an incorrectly installed or bad eye that is the most common cause of rattling and skewing of the door, jamming of the lock, loosening of the jamb and damage to the wall finish. To avoid this, a modern lock tongue eyelet consists of 2 parts (except for fastening hardware): the eyelet itself (lining on the jamb with a cutout for the tongue) and a tongue catcher - a plastic box (on sale for some reason it is called decorative, although it is not visible ), pressed by the eye. The box dampens dynamic loads on the tongue and protects the jamb material from direct contact with it. For the same purposes, the eyelet is made with an adjustable mustache, see below.
About markings under the tongue
Marking the tongue of the lock on the door jamb under the mate with a pencil
Installation of the eye begins with marking the end of the lock tongue on the jamb; everything else is not tied to. Usually the tongue on a joint is marked by marks and measurements, see fig. on right. But this can be done much more accurately in other ways, different for flat and round locks. In the first (“flat”) case, a lining with a thickness of approx. 2 mm is the size of the operational gap of a closed door. The simplest way is to fold a piece of paper into several layers, wet your finger, place it on the paper and immediately stick it on the door. Then washable paint is applied to the tongue of the lock (you can smear it thickly with a felt-tip pen). The door is now closed until it slams, i.e. until it stops at a quarter, and with a key push the tongue several times until it stops in the jamb. It will leave a mark clear enough to mark the full outline of the tongue.
Method for marking the center of the counter part of a round lock on an interior door
In the case of a round lock, the matter is simplified again. There is no need to coat its tongue with paint, especially since it is beveled and has a complex cross-section. But you need to take your time at the end of the door to drill a 23 mm hole (socket) for the lock body. They drill a 50 or 54 mm hole in the canvas for the sockets, and for now leave a pioneer hole with a diameter of 4 mm at the end. Then the door is closed until it slams (without lining), a 4 mm self-tapping screw is inserted from the cylinder side and the center of the tongue on the jamb is marked with it. For clarity, what it looks like with the door open is shown in Fig. on the right, but in reality the door should be closed. The tip of the screw will go 1-1.5 mm as the door opens, which will give the required operating clearance.
Installation of eye and catcher
Installation of the counterpart of the interior door lock after marking the tongue mark on the door jamb is carried out step by step. order (see also fig.):
Installing the counter part of the interior door lock
The lock must be fully assembled on site and securely fastened; The eyelet is turned over (it is symmetrical about the horizontal axis), placed in place so that the vertical axes of the tongue and eyelet coincide and its mounting holes are marked (marked with arrows). Do not bend or break off the adjusting tab (also marked with an arrow)! At the same step, a pocket with a depth of the thickness of the eye is selected; Apply the catcher in the same way and mark the outer contour of its tray with marks by hand; The outer contour of the catcher tray is beaten in place; Drill a socket for the catcher. Do this with a pen, as in pos. 5, actually it’s not necessary, especially if the jamb is made of MDF: a through hole from the guide tooth will weaken the jamb
It is better to drill in the corners with a twist drill; Using a chisel, select the catcher's nest; The catcher is already applied in the working position; Mark its outer contour; Choose a trap under the catcher; The catcher is put in place; Cover it with an eyelet already in the working position; Drill holes locally for small self-tapping screws, with a diameter 1.5-2 mm smaller than the standard ones; Temporarily secure the eyelet with small self-tapping screws; Check the movement of the tongue (whether it is stuck) and the play of the closed door - yes, no; The tight movement of the tongue and the play of the closed door are eliminated by removing the eye and carefully bending/bending its adjusting tab; The mating part is finally secured with standard fasteners.
Electromechanical devices
Secret lock on a gate or wicket
Overlay type lock for gates with a wicket
Automatic locking device These types of gate locks, in addition to mechanical elements, include electrical components. This combination increases reliability and makes wireless remote control possible. When leaving, they are opened by pressing a button protruding from the case, and when entering, they are opened with a key-tablet or an electronic card. During a power outage, you can exit by pressing a button and enter using a regular key. The advantages include convenient use, good security against burglary, the ability to connect an intercom, sound alarm and other security systems. The main disadvantages are the dependence on the availability of electricity and the possibility of failures at low temperatures and high humidity.
The recently introduced magnetic lock is recognized as the most reliable lock. Operates without keys or deadbolts. A powerful electronically controlled magnet holds the shutter firmly in place. It closes automatically and opens with a magnetic key.
Electromagnetic
Magnetic locks were in great demand about 5 years ago; they were installed in warehouses and garages.
Over time, their popularity waned due to their high cost and one important drawback. Its essence was that the lock functions as long as there is power to the device.
If the power is turned off, the lock will be open. You also need to take into account an important nuance when installing the lock - the tight fit of the main and mating parts. If a small gap forms, the magnetic one will not hold the door well.
In terms of safety, these models undoubtedly justify themselves, but their cost is quite daunting. Therefore, whether to choose this lock or not is up to you.