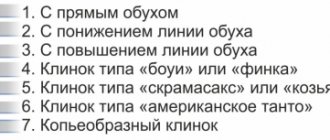
In order for the house and yard to be reliably protected from prying eyes and intruders, the fence must be high and reliable. A fence made of corrugated sheets fulfills both of these conditions. The cost of its installation is not high, considering that the installation can be done, without the use of a welding machine, with your own hands. In order for the metal fence to serve for a long time and not be scratched, it is better to use rubber linings for the washers for fastenings on the outer front side of the fence.
Shape selection
Metal fence posts are made from ordinary steel pipes, which can have different cross-sections:
- Circle;
- Rectangle;
- Square.
A pipe with a round cross-section is the most budget-friendly. The length of products sold from the manufacturer is 2.5...6.0 meters. Diameter of round bars – 57…108 mm. When choosing such supports, it is necessary to purchase stabilizing plates to make the process of attaching the fence to the post possible and convenient.
Square and rectangular pipes are more expensive, but also durable: their stiffeners provide the supports with stability under loads. The wall thickness of pipes for poles varies from 2 to 4 mm. Blanks, like round pipes, are produced in lengths of 2.5...6.0 meters with minor allowances.
Rectangular and square pipes can be used for different types of fences. To select the appropriate section size, select the appropriate span between the supports and calculate the approximate weight of the material (picket fence, corrugated sheet, etc.)
| Pipe cross-section, mm | Maximum permissible load on supports, kg | |||||
| 1 meter | 2 meters | 3 meters | 4 meters | 5 meters | 6 meters | |
| 40×40×2 | 709 | 173 | 72 | 35 | 16 | 5 |
| 40×40×3 | 949 | 231 | 96 | 46 | 21 | 6 |
| 50×50×2 | 1165 | 286 | 120 | 61 | 31 | 14 |
| 50×50×3 | 1615 | 396 | 167 | 84 | 43 | 19 |
| 60×60×2 | 1714 | 422 | 180 | 93 | 50 | 26 |
| 60×60×3 | 2393 | 589 | 250 | 129 | 69 | 35 |
| 80×80×3 | 4492 | 1110 | 478 | 252 | 144 | 82 |
| 100×100×3 | 7473 | 1851 | 803 | 430 | 253 | 152 |
| 100×100×4 | 9217 | 2283 | 990 | 529 | 310 | 185 |
| 120×120×4 | 13726 | 3339 | 1484 | 801 | 487 | 296 |
| 140×140×4 | 19062 | 4736 | 2069 | 1125 | 679 | 429 |
Method number 1. Crab elements
Universal fasteners designed for connecting rectangular/square profile pipes. Each “crab” consists of several parts, which are bolted together during installation. The parts of the “crab” are made of 1.5 mm metal with a durable polymer or zinc coating.
Crab fastening for profile pipe
There are these types of crab elements:
- volumetric (designed to connect three pipes in the corners or four inside);
- T-shaped (designed to connect three pipes);
- X-shaped (designed to fix four pipes);
- L-shaped (designed to connect two profiles).
Types of fastening profile pipes with a crab system
Home craftsmen use crab systems to assemble without welding:
- greenhouses, greenhouses;
- racks, benches;
- Summer shower;
- pet cages, aviaries;
- gazebos, canopies;
- supports for climbing plants, lightweight fencing.
Such fasteners are used in greenhouses and hotbeds
On a note! Crab systems are also used for temporary connection of parts when repairing welded structures. In general, this is a fairly reliable connection method, hardly inferior to welding in strength.
pros
- long service life (up to 50 years);
- structures can be assembled/disassembled many times;
- affordable cost of crab elements;
- Even an unskilled worker can handle the assembly;
- versatility.
Minuses
- pipes larger than 40x40 mm cannot be connected;
- joints must be protected from corrosion, as moisture accumulates in them;
- pipes can only be connected at an angle of 90 degrees;
- if a large tensile load occurs, pipes may be pulled out of the crab elements;
- The nuts need to be tightened regularly.
Prices for crab systems for profile pipes
crab systems for profile pipes
Video - Crab systems for profile pipes
Fence made of corrugated sheets with brick pillars
The corrugated sheet in combination with brick pillars looks solid
Of course, a fence with brick pillars looks more decorative. If you wish, you can do it, but it will take more time. There are two options:
- Make a full-fledged strip foundation. But it is long and expensive. On well-drained soils, you can make a shallow foundation; on heaving soils, you will have to dig below the freezing depth of the soil. And although the tape will not be wide, there is a lot of work - digging a trench along the entire length of the fence, installing formwork, tying reinforcement, pouring it and then finishing it. Place brick pillars on top. Durable, reliable, but expensive.
- Make according to the scheme described above: load-bearing pillars with a base. Bricks are laid around the pillars. This method is less expensive. Read about how to lay brick pillars here.
Schematic illustration of a fence structure with brick pillars
The whole technology is the same, only the reinforcement will be more rigid - two belts of two rods with a diameter of 10-12 mm. It will be necessary to install embedded elements in the pillars to which the guides will be attached. They (mortgages) can be welded to the pipe after it has been exposed and the solution has set.
Frame installation without welding
We’ll tell you how to install corrugated sheets yourself without welding, using the example of the simplest and fastest technology using holder plates. To implement this method, you will need logs made of a metal profile with a cross-section of 40×20 mm with walls 2 mm thick (ideally, the length of the fence span should match the length of the crossbars). As for the height of the fence, if it is no more than 2 meters, two rows of crossbars are enough, and if higher, then three.
To fasten the sheets to the frame and the frame elements themselves to each other, we will use holder plates, as well as bolts or roofing screws (the latter option is preferable since it does not require pre-drilling holes). However, the use of self-tapping screws is critical, first of all, for fastening sheets of corrugated sheets, and to connect the crossbars to the posts, ordinary bolts are sufficient.
After installing the pillars using classical technology, it’s time to start fixing the lags - crossbars. To do this, it is necessary to drill holes of the required diameter in advance at the joints of the profile, and then proceed with assembly, laying the crossbars so that their widest part rests on the support.
Here's how to install crossbars using X-shaped brackets:
Here are two basic rules for the location of the crossbars:
- The upper and lower crossbars should be positioned so that the distance between them and the upper and lower edges of the calculated position of the corrugated sheet is 20-30 cm
- If three crossbars are planned, then the central one should be located approximately in the middle of the support
If bolts rather than self-tapping screws were chosen to fasten the corrugated sheets, it is necessary to pre-drill holes of a suitable diameter in the corrugated sheet and crossbars. Self-tapping screws require a simpler installation procedure, using a low-speed screwdriver.
Pillar design
Before attaching the profiled sheet to the fence, carry out all the calculations. Calculate the length of the post depending on the height of the fence and the depth of the hole in which you will install it. If the ground freezes heavily in winter, craftsmen recommend fixing the pillars as deeply as possible. In other cases, the height of the underground and above-ground parts is calculated in a ratio of 2 to 1.
So, with a pipe height of 200 cm, immerse it 100 cm in the ground. At the same time, the length of the post itself is 300 cm. To install supports for fastening the gate, select powerful pipes, the cross-section of which is 60 x 60 mm, with a wall thickness of more than 3- x mm.
Once you have dug the recesses for the supports, proceed with the installation work:
- Clean the part of the pipe that will be immersed in the ground from dirt and rust, degrease it with a special compound, treat it with a primer for metal and cover it with bitumen mastic. After the layer has dried, begin installation.
- Lower the pipe into the hole, check the height of the part that is above the ground. If necessary, adjust the height, remove excess sand from the hole in the ground or add more.
- Fix the support in a vertical position (use supports for this). To do this work, you will need two workers: one of them will adjust the position of the pole, the second will monitor the actions of the first, checking whether the pipe is level.
- Securely fix the support pipe: to do this, weld pieces of angle at the base.
- Prepare a solution with cement and sand for the foundation (proportions 1 to 3). Since the master needs a little cement for his work, pour the solution into a small container.
- Pour the mixture into the cavity. To create stronger concrete, add crushed stone or pieces of bricks to the cement. Carefully compact the layers one by one and punch them with a metal rod: then no voids will appear inside.
- When you pour the solution, double-check how the post is positioned. If it tilts, set it straight.
How to fasten welded fencing profiles | Home Guides
Welded wire fencing sections are also known as livestock panels or livestock panels. They quickly install the fence without tension on the wire. This type of fencing is easier to master alone, without an assistant. The method of attaching the panels to the racks depends on the material from which they are made. Wooden posts require brackets, while metal T-posts require clamps. After installing the wood posts in the ground, allow the concrete to cure for 24 hours before installing the fence.
Wooden pillars
Wear heavy work gloves to protect your hands from sharp edges and safety glasses to protect your eyes.
Lean a welded wire fencing panel against two wood posts with each end in the center of each wood post. Stand in front of one stud and lift the panel until it is about 2 inches off the ground.
Place each sharp end of a fence bracket on each side of the top horizontal wire on the fence post. Use hammer head pliers to strike the center of the fence bracket to force it fully into the wood.
Install an additional guard bracket on the bottom horizontal cable and two additional equal pieces between the top and bottom.
Attach the other end of the fence panel in the same way and continue attaching the sections.
T-posts
Wear leather work gloves and safety glasses for protection.
Center the welded wire panel between the first two T-posts at the beginning of the fence line, with the edges centered on the posts. Place the second panel next to the first, with one edge centered on the second post and the other on the third post.
Go to the second post where the two fence panels meet in the center. Place a 2-by-4 piece of wood on the ground so that it touches the second pole with the 4-inch side on the ground. Lift both fence panel pieces onto the tree to raise them 2 inches off the ground.
Wrap the right curved side of the T-post clamp around the right top horizontal bar where it touches the T-post. Grip the left side of the curved clip with pliers. Wrap the clamp around the T-post and attach the curved end to the top left horizontal rail of the fence. Wrap the stop jaws around the clamp on each side and press the tip of each end firmly into the section around the post.
Add additional clamps at equal distances from the bottom, for a total of four or five clamps per T-post.
.
Tips and tricks
Incorrect welding can lead to problems during further operation; to prevent this from happening, you should listen to the following recommendations:
- Before starting work, make and study a schematic drawing; if all the details are taken into account in advance, then the risk of redoing the finished structure will be much less;
- straight hinges are welded to the gate laid on a flat surface;
- You can open gates with newly welded hinges after the seams have completely cooled;
- on round posts the loop extends 5 mm outward, on rectangular posts it is welded flush;
- the welding seam should go from bottom to top.
Which connection method should I choose?
When choosing a connection method, consider the type and purpose of the future structure:
- if you choose fittings, then remember that it is still better to strengthen the connections by welding due to insufficient strength;
- crab systems are more suitable for assembling small utility or garden structures;
- flanges are used for large-section profile pipes in structures that often have to be disassembled/assembled.
Rules for choosing a suitable connection
When purchasing fasteners, pay attention to the following points:
- the first stage of work is the creation of a sketch, according to which the amount of required materials will be calculated;
- do not buy crab elements whose walls are less than 1.5 mm thick (they will not provide the required strength);
- fasteners must not have dents, cracks, deviations in size or configuration;
- parts with rust stains or a scratched surface will not last long;
- The manufacturer is also very important; give preference to products from well-established companies.
For creating buildings with your own hands, crab systems are the best option. But it is not applicable in all cases when it is necessary to assemble a structure from a profile pipe. For example, a welded pipeline in a wall or a welded gate will be more reliable in operation.
Sometimes welding is still preferable
Features of material selection
The basis of the enclosing structure is a profiled steel sheet, onto which a special protective coating is applied. There are several types of corrugated sheets:
Existing types of corrugated sheets
- Wall, marked when marking with the letter “C”;
- Carrier marked “H”;
- Universal - “NS”.
For the fence you will need wall or universal material: it is installed in a vertical position. In addition to the marking in the form of the letter “C”, there is a number on it to indicate the height of the corrugation or wave; The number after the hyphen indicates the width of the sheet in mm. The last value is practical: it takes into account the overlap of sheets during installation.
Sheets whose height exceeds 3,000 mm are produced according to special orders and at a negotiated price. Modern profile sheets are painted in different shades. They are presented in the RAL table. The range of colors is complemented by a wide range of textures. You can choose a polymer coating that is smooth or textured.
The length of the material varies, which allows it to be widely used both in the construction of fences and in the cladding of facades.
An option for installing a continuous fence made of corrugated sheets. The composition is completed with a polymer layer 10-12 microns thick:
- PVDF;
- polyester.
This manufacturing method makes the products more resistant to damage. In addition, the aesthetic appearance of the sheets meets the strict requirements of consumers who value the use of natural materials in construction.
Advantages
U-shaped slats for production fences have a number of advantages:
- Corrosion protection . The steel sheet from which the slats are made has several layers of corrosion protection: galvanization, passivation layer, primer and polymer coating. Thanks to this, the products are reliably protected from rust.
- Wide choose . offers dozens of combinations of coatings and colors of U-shaped fence slats. The client will easily select the appropriate option.
- Frost resistance . The products will not crack in the cold and will not lose their performance characteristics.
- Color fastness . Thanks to polymer coatings, U-shaped fence slats do not fade even with significant exposure to sunlight. The products will delight owners with their unchanged color for many years.
- Economical . Metal products do not need to be tinted or coated with protective compounds, unlike wood.
- Official guarantee . provides an official guarantee for metal products with polymer coatings*.
Methods for attaching joists to poles
Metal logs are welded either between the pillars or in front. The first method is more labor-intensive, and produces more waste: you have to cut the pipes into pieces. But with this arrangement of the logs, the structure turns out to be more rigid: each post serves as a support for the sheet and it “walks” less; if desired, a couple of additional fasteners can be placed along it.
If you weld pipes in front of a pole (from the street side), there is less work, but you will still have to cut and there will be waste: it is necessary that the weld of two sections falls on the pole. Unless you adjust the distance so that they lie flat. Then you purchase materials in advance, and then calculate the installation step of the pillars.
There are two ways to weld metal logs to poles
To fasten wooden blocks, holders are welded in front or on the sides - metal corners or U-shaped guides. Holes are then drilled into them and fastened with bolts or self-tapping screws.
There is an option to assemble a fence from corrugated sheets without welding. For this there is a special fastening element called an X-bracket. This is a cross-shaped plate with curved edges, which is attached to self-tapping screws.
X-bracket for a fence made of corrugated sheets without welding
This is what everything looks like when installed
Fastening corrugated sheets
The sheets are fastened with self-tapping screws or bolts. In the second option, you will have to drill holes in the crossbars and profiled sheets. When installing it yourself without welding, it is recommended to use a low-speed screwdriver.
The covering starts from the corner. It is important to correctly install the first sheet, checking its horizontal and vertical position with a building level, since subsequent ones will be aligned with it. It will be difficult to perform this operation alone, so you will need an assistant. The properly aligned sheet is secured with clamps with rubber jaws. Fixation to the veins is carried out at several points where the waves meet. The following sheets are installed with an overlap, one wave each.
Having finished covering the entire perimeter, they begin to thoroughly fasten the sheets. To do this, self-tapping screws are screwed in in increments of two waves. If there are fewer attachment points, the corrugated sheet, bending under gusts of wind, will knock on the crossbars, shaking the structure. To ensure that the screws are positioned in an even line, a fishing line is stretched between the edges of the straight section at the level of the joists. If the polymer coating is scratched during operation, the damage must be painted over so that it does not rust.
Calculation of materials for the fence
Calculation of corrugated sheeting is necessary to determine the consumption of materials, their estimated cost, and the volume of work to be done. In addition to profiled sheets, you will need racks, logs, gates and a wicket.
The first stage is determining the length of the future fence. The area may be irregular in shape, so please measure it according to the actual size. Draw up a drawing indicating the dimensions, as well as the installation location of the wicket and gate.
The second stage is calculating the number of pillars. To do this, divide the perimeter of the site by the recommended step between supports of 2.5-3 m. Keep in mind that the posts will be installed in the corners of the site and in pairs for gates and gates.
The third stage is determining the amount of corrugated sheeting. To calculate, you will need to know the working width of the sheet. Please check with the seller in advance, as the size can vary from 1000 to 1150 mm.
Now divide the length of the fence by the working width of one sheet. This is the required amount of material. If the number is a fraction, round up.
The total length of the logs is calculated based on the height of the fence - in 2 rows if the height is up to 2.2 m, in 3 rows if the fence is higher. If you order pipes for veining with cutting, take into account the pitch of the posts.
Method number 3. Fitting
If profile pipes need to be connected to bends and branches, special fasteners - fittings - are placed at the ends. There are fittings for external and internal use, and according to their purpose they are divided into:
- crosses, tees (to create branches of different or identical sections);
- couplings (to join straight sections);
- squares (to create elbows and turns to change the direction of the pipe).
The pipe is installed inside the fitting
The fitting is installed inside the pipe.
The assembly algorithm is as follows:
- first you need to put crimp nuts on the ends;
- then you need to install rings - clamping/clamping/sealing;
- after this the fitting is put on;
- at the end you need to tighten the nuts at the ends to hold the parts together.
Fitting for connecting round pipes
Prices for connectors for profile pipes
connector for profile pipes
Fence made of corrugated sheets with brick pillars
Fences made of brick and natural stone, without a doubt, belong to the elite category of fencing. But even in the premium price segment it is easy to find a reasonable compromise between cost and quality.
While maintaining visual appeal and respectability, you can significantly reduce costs by building a fence from corrugated sheet metal with brick pillars. By choosing this solution, you will receive a reliable and beautiful fence, almost in no way inferior in appearance and quality to a fence made from natural materials.
If brick pillars for corrugated sheeting are installed when fencing a site, the price of the fence will be significantly higher than when using metal supports. But the result is worth it. Brick pillars play the role of a very presentable decoration of any site, emphasizing the good taste and high status of its owner.
In addition to the mentioned decorative properties, if corrugated fence posts are made of brick, this significantly increases the strength of the entire fence. They will never allow it to capsize in the strongest gusts of wind.
Brick posts for a fence made of corrugated sheets
A solid brick fence will look somewhat monotonous and dull. To avoid this, such fences are decorated with expensive decorative elements made of artistic forging. At the same time, a fence made of corrugated sheets with a beautiful protective and decorative coating will look no less attractive and have a significantly lower cost.
Brick posts in a combined fence should not be installed too often. Usually the distance between them is about 3 m, but for long fences it can be increased to 5 - 6 m.
For greater strength, the internal volume of the brickwork is reinforced with steel rods, filled with concrete and protected from moisture on top with metal caps or concrete covers.
Brick pillars can be installed either on individual foundations or on a strip foundation common to the entire fence. When constructing a separate foundation for each pillar, its depth must be no less than the freezing depth of the soil characteristic of the area. This will prevent the pillars from skewing due to swelling of the soil during winter frosts.
Sometimes not all fence supports are made of brick, but only gate posts made of corrugated sheets. In this case, not reinforcing bars are placed inside the masonry, but hollow metal profiles, channels, I-beams or round metal pipes of a sufficiently large cross-section. Mortgages for attaching gate hinges are welded to these metal structures and taken outside the brickwork.
Recommended Articles
- Colors of corrugated sheets for a fence Green, blue, red, brown, beige and other basic colors of corrugated sheets for a fence. An example of a fence made of corrugated board with a stone and wood pattern. Advantages of colored corrugated sheeting for a fence compared to galvanized sheeting.
- Corrugated sheet for a fence the color of wood. Corrugated sheet for a fence in the color of wood - advantages and use of the material. Why is a wooden fence made from corrugated sheets better than a regular wooden fence? Read in the article
- Dimensions of corrugated sheets for a fence What dimensions of corrugated sheets for a fence are optimal? How thick is corrugated sheeting for a fence? What width and length? The answers are in the article.
The site oprofnastile.ru - current and useful information about corrugated sheets, its installation and use, advice from professionals and step-by-step instructions for you.
All text materials posted on the site are REALLY protected in accordance with current legislation, for which there are all the necessary documents, including contracts.
However, if you would like to share any material with your readers, you are welcome to republish it. In this case, you are obliged to provide the article with a hyperlink that is not protected from indexing to the page of this site from which the material was copied. You can post no more than 5 articles copied from this site on one resource.
How to build a fence yourself
For the fence it is necessary to lay a foundation. There are special requirements for pillars that are used as racks. They must withstand strong winds. Holes are dug under the supports.
They are subsequently connected to each other by a trench having a depth of 30 to 40 cm. After this, a frame is laid from the reinforcement and formwork is installed, which rises 20 cm above the ground. When building a combined fence, summer residents strengthen the fencing structure by resorting to brick pillars.
Return to contents
Installation of logs
Various materials can be used for lags:
- Metal profile;
- Wooden supports.
Wooden crossbars are chosen for wooden posts. The ideal dimensions of the joists correspond to the span length. In this case, they are joined in the middle of the supports. When the length of the lag exceeds the span, then the crossbars must be cut. In this case, it is easier to work with wooden material. When building with metal, an alternative method is to use welding in the center of the span.
Professional experts do not recommend using welding: joining joists in this way weakens the structure. If such fastening is necessary, then the joint is reinforced with a metal plate in the form of a rectangle.
Return to contents
How to attach a fence without welding
When building a fencing structure without welding, a bracket with a clamp will be required.
An example of attaching a log to a fence post.
It is recommended to choose fastening elements that do not contain small parts that could damage the protective coating.
The profile is secured with an X-shaped bracket. Summer residents who like to make things with their own hands will be able to build the structure themselves. Attaching the logs to the posts is simple: a bracket and a clamp allow you to do without a welding machine. These fasteners have proven themselves well. Advantages of fastenings using brackets:
- To assemble the structure, you need a screwdriver, roofing screws 5.5 x 19, and rubber-metal washers.
Assembled fasteners for installing joists
- The connection is strong and resistant to negative environmental influences.
- Attackers will not be able to dismantle the fence if the heads of the screws are ground.
- High speed of fence construction compared to the construction of fences that require welding.
- The ability to “harness” the structure makes it possible to first align the fence horizontally and then tighten the fasteners.
The process of attaching corrugated sheets to the frame - The bracket has a low price.
Advantages of clamps as high-quality fasteners:
- Durable galvanized clamp - guarantee of durable fastening;
- A special part allows you to firmly fix the crossbar to the post, preventing distortions;
- The clamp has an optimal price-quality ratio.
Return to contents
Quantity calculation and material selection
To calculate the amount of metal, it is necessary to determine the length of the perimeter of the fence. Mark the area by driving stakes into its corners. If there are ledges on the site, the turning points should also be marked with pegs.
At a height of 15 cm from ground level, pull the rope over the stakes. You don't want it to be too tight, but you also don't want it to be loose. The length of the rope will indicate the length of the perimeter of the fence.
When calculating the amount of material, do not forget that the plates will overlap. The minimum thickness of profiled sheets is 0.5 mm, the height of the corrugation is from 20 mm. Products with such characteristics will not be able to deform even in strong winds.
In addition to the building materials themselves and fasteners, usually included in the kit, you will need:
- Cement, crushed stone, sand for concreting supports;
- U-shaped strip for imparting rigidity to the sheets (strengthened along their top);
- Plastic plugs to protect the supports from moisture;
- Profile pipe 40 by 40 by 2 mm. for the manufacture of crossbars and joists;
- Profile pipe 60 by 60 by 2 mm. for the production of supports.
Pipes can be round, but square ones are more convenient to use.
Preparatory work
To calculate how much material is required for a metal profile fence, you need to determine the length of its perimeter. To do this, wooden pegs are driven into its corners. If the perimeter has ledges, then pegs are also driven in at the turning points. Before marking, it is recommended to check the site plan so as not to inadvertently appropriate part of the neighbor’s territory.
At a height of 10 - 20 cm from the ground, string is pulled between the pegs. It should not sag, but also not be too tight. After measuring the string, the required length of the fence perimeter and straight sections is found.
We select reliable fasteners
There are several ways to fix sectional material to the fence frame:
- self-tapping screws;
- bolts and nuts;
- rivets;
- welding
Let's look at the features of each of them and determine the most reliable one.
Self-tapping screws
To secure fence sheets, roofing screws (hardware) are often used. They are made from steel type C1022, which is highly durable and has a protective anti-corrosion zinc coating 15 microns thick.
Photo: color scheme of roofing screws
They consist of 3 parts:
- Drill. Using it, the element is screwed into the corrugated sheet.
- Rubber gasket under the press washer. Located under the cap itself. Ensures the tightness of the fastener and prevents moisture from penetrating the sheets at the points of fixation.
- Heads (hats). It is covered with a durable layer of polymers, due to which the self-tapping screw becomes resistant to environmental influences. The colors are different and matched to the sectional material. This way the hats become almost invisible against the general background of the fence. Shapes – round, hexagonal, cylindrical, semicircular.
Hardware is produced with a diameter of 4–6.5 mm and a length from 19 to 250 mm.
It is most convenient to screw in the screws with a screwdriver.
Photo: the process of attaching corrugated sheets to joists using a screwdriver
The average consumption of self-tapping screws is considered to be 8–9 pieces per 1 square meter. m.
When screwed in, the fastening element must be strictly perpendicular to the sheet without distortion.
To assemble fence sections, it is allowed to use hardware for metal tiles.
Bolts
This fastening method is as strong as self-tapping screws.
Photo: securing sheets to the profile using bolts. You should first drill holes for the diameter of the bolt.
In addition, if the hardware can be easily unscrewed with a screwdriver and penetrated into the fenced estate, then the bolts can only be removed from the inside of the yard. But their price is several times higher than self-tapping screws, and the color range is limited to black and silver, which significantly sets them apart from the general sectional covering.
It will not be possible to do the fastening work using this method alone, since the sheet will have to be attached to the frame in advance, mark the hole for the bolt, drill it, and only then fix the corrugated sheet to the joists.
The average norm for 1 sheet is 4 pieces.
Rivets
Provide a strong connection between the corrugated sheet and the fence frame. Consist of two parts made of different metals:
- hats made of aluminum;
- legs made of steel.
Hats are:
- colored;
- unpainted.
Diameter – from 3.2 to 6.5 mm. Fastening is carried out using a rivet gun.
Photo: metal rivet for a manual rivet gun
The average consumption of elements is from 6 to 8 pieces per 1 sq. m.
When choosing rivets, it is important to consider the weight of the sectional material. The larger the diameter of the rivet, the stronger the fastener will be.
You also need to pay attention to the length of the purchased elements. It should be selected so that the tip of the rod is visible above the fixation site by at least 10 mm
It will not be possible to achieve this with a lower rigidity index.
Gate installation: step-by-step instructions
To make a gate without welding with bolts, you need to decide on the dimensions. The maximum width of the opening is chosen to be no more than 3.5 m. Any car can easily drive through these gates. The greatest height is up to two meters.
Bolting
Installation of supports begins with choosing a pipe. As a rule, a metal pipe with a cross section of 9–10 cm is used for this. Then you need to dig a pit where the support is installed. The pipe is leveled using a level and filled with cement mortar. While the cement hardens, the frames for the sashes are prepared.
Corrugated pipe sashes can be made without welding. What you need is a 45x45 mm profile pipe for the frame, M10 bolts, nuts and washers. It must be remembered that the use of spring washers will prevent spontaneous unscrewing and will increase the strength of bolted fasteners.
Frame drawing
First, the pipes are cleaned of corrosion and degreased, after which they are treated with a primer and painted.
For manufacturing you will need an electric drill with drills for the diameter of the bolts, as well as a wrench.
Hinges for sashes
The steps for assembling gates without welding are similar to the sequence described above for welded gates, except for a few points:
- connecting elements are used to fasten corrugated pipes;
- corner gussets are connected to all frame elements through pre-made holes;
- use pads for bolted connections in areas where profile elements are fastened;
- swivel hinges are secured with bolts and washers.
Installation diagram
During operation of gates on bolted connections, the fasteners weaken over time. To maintain rigidity, you need to regularly check the tightening of the bolts.
When the frame is assembled, they begin to line it with corrugated sheets. It is best to choose special bolts for fastening profiled sheets or self-tapping screws with a rubber gasket.
An important part is the locking rods, which bend in the shape of the letter “G”. These pins are installed at the bottom of both sashes at their junction. To fix closed doors under them in concrete, a wide profile with holes under the pins is first laid, teeth down. The optimal rod size is up to 50 cm.
Sketch with dimensions
If a structure is planned using hanging poles, then they are secured with anchors (4 pieces per support). After attaching the pillars, the prepared sashes are installed for fitting to determine the location of future hinges. The installation location is marked with a punch, holes are made for the bolts, threads are cut into them, after which the hinges are secured. The standard loops are 3–4 cm in diameter.
Selection and preparation of loops
For a relatively small sash weighing up to 200 kg, ordinary cylindrical hinges are suitable. Quantity per side – from 4 or more
It is important to correctly calculate the load. To rotate the pin, a bearing is provided in factory models
If it is not there, you need to install a steel ball.
The essence of the modernization is to increase the contact area of the hinge group with the plane of the gate and support pillars. To do this you need to do the following.
- Selection of plates. These are plates that ensure reliable fastening of the loop to the canvas.
- The size of the plates depends on the mass of the sash. The thickness must be at least 3 mm.
- The length of the plates should not interfere with the normal operation of the sash.
Once this process is complete, you can begin assembling the structure.
Manufacturing of sliding gates
The installation of these structures is a little more complicated, but by studying the technology, you can make durable sliding gates.
Sliding sash
To make a fence of this type, you need to additionally purchase some components. This set must certainly contain the following parts of the structure:
- The supporting beam is one and a half times larger than the width of the gate. The thickness is selected taking into account the width and total weight of the sash.
- Guide rollers – 2 pcs.
- Catcher (prevents the canvas from swinging).
- A board for reducing swing of the sash during closing or opening.
- An end roller is required for quiet operation and reduced weight of the blade when open.
Installation of supports
First, you will need corner supports, as well as supports in places where the direction of the fence changes. Then you can begin installing intermediate supports.
The order of installation of each support will be as follows:
- a pit is dug or drilled with a drill. The minimum installation depth for supports is considered to be 1 m, but the pit should be dug only 70-80 cm;
- the supports themselves are installed and driven in for the remaining 20-30 cm;
- the space between the support and the walls of the pit is filled with concrete mortar and crushed stone.
It is also worth remembering that one pair of supports will additionally play the role of supports for the gate. Therefore, its place should be determined in advance.
When performing the last operation, you should monitor the verticality of the support. This is done using a building level. Work can continue after three days, when the concrete has reached the required level of strength.
Method number 2. Clamps
To connect pipes to fences, clamps with bolts are used, consisting of 2 halves. One part is installed on the ceiling/wall. The pipe is inserted, its position is fixed by the second half by tightening the bolts. This connection method is called a clip.
Clamp for connecting square pipes
If you choose the right dimensions, the elements are assembled without sagging. Using adjustable clamps, you can connect pipes of any cross-section. But it is important to remember that steel profiles must be connected with steel clamps, and polymer profiles with plastic elements.
DIY corrugated fence: photo report
A fence from neighbors and a front fence were being built. The total length is 50 meters, height 2.5 m. Brown corrugated sheet is used on the front, galvanized sheet is used on the border, thickness 0.5 mm, grade C8.
In addition, the following materials were sent:
- for poles profiled pipe 60*60 mm, wall thickness 2 mm, pipes 3 m long;
- 80*80 mm with a 3 mm wall were installed on gate posts and gates;
- logs 30*30 mm;
- gate and wicket frame 40*40 mm;
One person built the finished fence from corrugated sheets with his own hands.
The fence is installed on metal posts, between which the base is then poured. The owners need it because they plan to plant a flower garden in front of the fence (you can see the fence made for it). It is also needed to prevent water from flooding the yard during heavy rainfalls. Metal sheets are not attached immediately from the ground, but slightly retreating. This gap is closed with a die-cut tape that remains in some industries. This was done on purpose so as not to block the access of air, so that the earth dries out faster.
Inside view of the finished fence
Metal preparation
The first stage is preparing the pipes. A rusty pipe arrives from a warehouse; in order for it to serve for a long time, you have to clean off the rust, then treat it with Anti-Rust and then paint it. It is more convenient to first prepare all the pipes, prime and paint, and then just start installation. The rust was removed with a metal brush mounted on an angle grinder.
Pipes need to be cleaned of rust.
There were only 6-meter pipes in the warehouse. Since the height of the fence is 2.5 meters, another 1.3 meters need to be buried, the total length of the post should be 3.8 meters. To save money, they cut it in half into 3-meter pieces, and the missing parts were welded with various scrap metal available on the farm: cuttings of corners, fittings, pieces of various pipes. Then everything was cleaned, primed and painted.
Installation of pillars
The two corner posts were installed first. The holes were drilled with a drill purchased from a store. The soil was normal; it took about 20 minutes to complete one hole 1.3 meters deep.
Post hole drill
The first pillar was placed horizontally and so that it rose above the ground to a height of 2.5 meters. To set the second one, it was necessary to recapture the height. A water level was used. You need to fill it in such a way that there are no bubbles - from a bucket, not from a tap, otherwise it will lie.
They placed the second post along the marked mark (they put it on a plank that was placed next to the hole) and concreted it. When the cement set, twine was pulled between the pillars, along which all the others were aligned.
The filling technology was standard: a double-folded roofing material was installed in the hole. A pipe was placed inside, filled with concrete (M250) and placed vertically. The level was controlled by a plumb line
Positioning the posts correctly is very important, otherwise the entire fence will warp
During the work, several times it turned out that the concrete was poured not inside the rolled up roofing material, but between it and the walls of the pit. It was a little pleasure to scoop it out from there, so the protruding part was cut into petals and nailed to the ground with large nails. Problem solved.
This is how the roofing material was fixed
After the concrete had set, we made portable formwork from boards covered with thick film. With their help, the basement was filled. To make it stronger, reinforcement bars are welded along the bottom to the pillars on both sides. Formwork was placed around them.
Formwork for plinth
Installing jumpers
Cleaned, primed and painted pipes for the crossbars were cut and welded. They cooked between the pillars. They also need to be leveled to make it easier to attach.
We cook jumpers
After the welding is completed, all welding areas are cleaned with a wire brush, treated with Anti-Rust and then painted.
Installation of corrugated sheets
Since the top lintel runs along the very top of the fence, and it is welded exactly level, there were no problems with leveling and installing the sheets. First they fastened along the edges, then installed intermediate screws. To make it easier to place them evenly, a thread was pulled between the outer ones.
Evenly installed fasteners are also beautiful
Afterwards the gates were welded and attached. As a final touch, additional elements were installed on top - a U-shaped profile covering the top of the fence and plugs for the pipes.
The final view of a fence made from corrugated sheets, made independently
As you understand, there is nothing particularly complicated
It is important to align the posts evenly and weld the frame. This is the main task
A lot of time - about 60% - is spent preparing pipes - cleaning, priming, painting.
Installation of the fence support part
Corrugated sheeting is a material made of profiled sheet steel with a protective coating. Anyone can install a fence from it. To do this, you do not need to have any special skills or abilities; it is enough to acquire the required amount of material and arm yourself with simple tools.
The process of installing the supporting part of a corrugated fence looks like this:
- First, mark the perimeter of the territory that will be fenced. To do this you will need a nylon thread, wooden pegs, and a tape measure. Drive the pegs into the ground in the places where the supports will stand. Stretch the thread between the pegs. It is important that the distance between the pegs is the same.
- In places where pegs are installed, dig or drill holes approximately 1-1.3 meters deep. For greater stability of the pillars, it is recommended to fill the bottom with 10-20 cm of crushed stone or gravel and compact it thoroughly.
- Next, install a metal pole in each hole. Supports can be made of metal pipes (round, square or rectangular), channels and even railway rails. The height of the supporting structures depends on the height of the future fence. Usually it is made from 2 to 2.5 m, and the pillars are made 1 m longer, since it will be concreted into the foundation. The installation of the pillars is carried out using a building level to ensure that they stand level.
The supporting pillars at the corners should be more stable, so it is recommended to make them larger in diameter.
Now you need to make a solution for concreting the supporting bases. For this you will need cement, sand and crushed stone or gravel. Mix the solution with a concrete mixer; if you don’t have one, then mix it manually in a bucket or any other container. Mixing proportions are usually indicated on the packaging of the cement mixture.
Fill the holes with supports with concrete to ground level and leave to dry. In order for the foundation to be reliable and strong, and the pillars to stand level, it is necessary to allow the concrete to harden well. This will take from 3 to 5 days.
Fence components
If the clamp is an important fastener element, then forged parts and special strips are components of a unique design. Decorative details will cover the sharp edges of the profiled sheets. With this addition, the fence will become safer and more attractive.
Forging elements fixed on top of the fence fabric not only perform a decorative role, but also effectively complement the protective function. Now the thief will not be able to easily climb over the fence.
Pole covers are a practical solution. Their use allows you to protect support pipes from water getting inside. If you miss such an important point, the metal will begin to deteriorate faster than the time stated by the manufacturer. Decorative covers fit harmoniously into the design of the fence. Plugs can be used instead.
You can build a fence with your own hands without expensive welding equipment or the services of professional specialists. All that is required for this is to choose the right materials and find free time.
What it is?
The fence frame is the elements on which the facing material (picket fence, siding or corrugated sheet) is attached. In addition, without a frame, the fence will not be able to function normally and protect your territory. The elements of the fence frame include:
- pillars;
- guides (logs);
- gates;
- gates;
- brackets;
- stubs.
Let's look at the purpose of each of these elements separately.
Fence accessories are metal elements that improve the functionality of the fence, extend its durability and complement its appearance. Let's figure out which products from the assortment are classified as fence components, what they are needed for and what their advantages are.
Related products
To simplify the installation and operation of U-shaped fence strips, you may need additional products:
- Repair enamel . It will be useful if you need to treat a damaged area of a polymer coating. It can also be used to process cut edges of products. Enamel protects the metal from corrosion.
- Self-tapping screws 4.8x19/4.8x28/5.5x19 mm with EPDM gasket . They will be needed to connect the elements of the fence frame to each other.
- Self-tapping screws 4.2x16 mm with press washer. They are used for a more aesthetically pleasing fence, since such screws are almost invisible against the general background. There are several options:
- with a drill (for working on metal up to 2 mm);
- sharp (for working on metal up to 0.9 mm).