How to make Damascus steel: a simple composition for forging with your own hands
The modern shade of Damascus steel is different from the original Damascus of the past. Historically, Damascus was considered crucible. It had a very high carbon content and had a distinctive surface due to its crystalline structure.
Damascus steel got its name because the Crusaders on their way to the Holy Land acquired new blades from this superior steel (superior to medieval European steel) in the city of Damascus. However, the modern version of steel has little in common with the past and looks more like acid-etched steel.
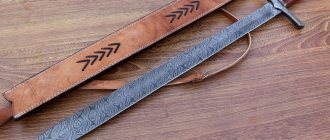
Damascus, shown here, is one of the more modern options. Cable damascus is perhaps one of the easiest ways to forge damascus with a complex pattern. Unlike other methods, this method does not require folding and essentially has a ready-made shape.
There are a lot of articles written about Damascus steel, but since you're about to make it, it's worth repeating some of the theoretical points. Damascus steel is made up of alternating layers of high and low carbon steel. The average carbon content in Damascus plays an important role. It can be calculated as follows. Suppose you welded a package of 30 grams of StZ and 70 grams of U8. So your Damascus is 30% steel with 0.3% carbon and 70% steel with 0.8% carbon. Using a simple proportion, we calculate that (0.3 x 0.003+0.7 x 0.008) x 100 = 0.65. Therefore, the average carbon content in the bag is 0.65%. Not enough. It is also necessary to take into account that when the package is first heated to welding temperature, about 0.3% of the carbon burns out, and with each subsequent heating, about another 0.03%. This means that it is necessary to use higher-carbon steel grades, or to increase the relative content of U8 in the package. Using this formula, you can calculate the average amount of carbon in the package and, accordingly, select the appropriate hardening mode.
An operation called carburization can increase the carbon content. It should also be remembered that a contrasting pattern is obtained when using steels whose difference in carbon is equal to or greater than 0.4%. The finished product is etched in one of the above reagents. In this case, the product must already be hardened (hardening increases the contrast of the pattern) and polished. The entire defatted product is placed in the etching solution, and the operation is continued until the pattern is clearly and completely visible.
Medium-carbon Damascus The main difficulty in obtaining Damascus steel is high-quality welding of the initial package. It is important that it has a sufficiently large number of layers (about 200 will be enough for a start) and the absence of defects. The main defects in Damascus forging are overburning and lack of penetration. Overburning is a defect in which a section of the workpiece is heated above 1200 degrees Celsius for a significant period of time (20-30 seconds). As a result, the steel reacts directly with oxygen in the air - in fact, the steel burns. The burnt section of the workpiece is not subject to further processing and is usually removed. Since Damascus welding occurs at temperatures close to the burnout temperature, this defect occurs frequently and can sometimes ruin the entire job. Lack of fusion is a defect in which layers of steel do not weld together due to unremoved scale, insufficient proximity or insufficient welding temperature. On the finished product, the lack of fusion looks like a crack in the damask pattern. Only experience will help you catch the moment when the steel is already heated to welding temperature, but has not yet ignited. Get ready for the fact that before you succeed, you will burn a lot of blanks. Remember: it’s better to be undercooked than overcooked!
Lack of penetration is eliminated, although it is difficult, and the burnt workpiece can only be thrown away. In the future, when describing forging processes, I will often determine the temperature of the workpiece not in degrees, but by indicating the color of the heated metal. I hope this will help reduce the number of incomplete welds and burnouts to a minimum. I know from my own experience that a beginner wants to quickly get a workpiece that has many layers. Etch it, and personally verify the presence of a mysterious pattern characteristic of Damascus.
Therefore, we will start with a technology that we will call “Damascus for Beginners.”
You will need 10 double-sided metal hacksaw blades. They are wider than single-sided ones and more convenient as a raw material. Such blades are made of U8 steel. When purchasing, try to find out how the blades are made - entirely from tool steel, or using hard coating on a soft base. For our purposes, only the first are suitable. In addition, stock up on enough soft iron tape to cover wooden boxes. Strips of any steel other than stainless steel will also be needed. U8 is still desirable. You can use old files with a thickness of about 2 mm, a length equal to half the length of the hacksaw blade and a width equal to the width of the iron strip. You will place these strips in the package as outer layers, which will prevent the thinner inner ones from completely turning into scale. You can also use a softer steel, such as StZ, as the outer layers, but this will lower the average carbon content of your Damascus. Use an electric sharpener or grinder to remove the teeth from the hacksaw blades. After this operation they will become equal in width to the iron strip. Each canvas must be cut into two equal parts in length. You will get 20 pieces of hacksaw blades. Cut 20 pieces of iron tape with metal scissors. Finally, it is advisable to use a pharmacy scale to weigh a piece of iron tape, a piece of hacksaw blade and a thick steel plate. You will need to know the weight when calculating the composition of the resulting steel. Now let's do an operation called assembling a package. This operation is thorough and long, so it is best to perform it while sitting. Place a piece of steel 2 mm thick on the table. Its surface does not need to be cleaned of rust, but if it is a file, it is necessary to grind off its working surface. Moisten it with plain water and apply a fairly thick layer of borax (about 2-3 mm). An iron strip is placed on the borax layer, moistened, and a layer of borax is applied. A piece of hacksaw blade is placed on it, moistened, and a layer of borax is applied. Thus, layers of iron, borax and steel alternate until 5 pieces of hacksaw blade are used. On the top section of the iron strip, place a piece of thick steel, the same as at the very beginning of the package. Now very carefully tighten the bag along the edges with clamps and, trying to prevent the borax from spilling out, electric weld its beginning and end. Then, to reduce the possibility of delamination, weld in several places along the length. In this case, pieces of steel wire or nails can be placed across the side surface of the bag and welded. This will serve as an additional guarantee against delamination. During the welding process, it is necessary to add borax powder to those places from which it spilled or leaked when heated by electric welding. The final stage of creating the package is welding the handle to one of its ends. This will be a piece of reinforcement about 20 cm long when using pliers, or 1 m when working without pliers. Try to keep the handle welding area as strong as possible. If the handle falls off when the bag is heated in the forge, getting it out of there will be very problematic. When you succeed, most likely, the package will no longer be usable due to burnout. It is even advisable to grind down one of the ends of the rod used as a handle to a small thickness, and wedge it between the layers of the bag, and then scald it. As one of the layers, you can use a rod, forged onto a plate at one end. Its long remainder forms a handle. This option is the most reliable. Be that as it may, you should get 4 bags of the same design. As an alternative to electric welding, the following technology can be used. The package is first assembled without borax, after which through holes are drilled at the beginning and end of the package using an electric drill. Next, using the technology described above, the package is assembled with borax and tightened with bolts through drilled holes. This technique is in some cases more effective, since it ensures reliable tightening of the package. And with the use of electric welding, the package may fall apart in a hot forge. Some authors of the literature on Damascus steel advise assembling the package without any borax, which plays the role of flux during welding, and sprinkle borax on the package already heated in the forge. I would not recommend this for beginners. There may be places in the middle of the bag that the molten borax cannot reach. Lack of penetration is formed in them. As you gain experience, you will reach the level of skill when you can flux and weld a package assembled without borax, but at first it is better to play it safe. In addition, the use of technology with preliminary insertion of borax allows steel with an uncleaned surface to be placed in the bag - with a layer of rust, scale, etc. And in the latter method, all layers of steel must be thoroughly cleaned.
So, you have collected four packages. Inspect them carefully - all the cracks between the layers should be tightly filled with borax. Make sure the long handles are welded to the bags as securely as possible. Light the forge. When the flame is steady and the forge is burning at full power, carefully place the first package into the mass of burning coals. It is very important that the bag heats evenly. It must be constantly monitored, rotated around the longitudinal axis and moved if the heating is uneven. Remember that the workpiece in the forge appears hotter in color than it actually is. It is very important to learn to catch that one moment when you need to pull out and forge the workpiece. Typically, the beginning of this moment is characterized by the appearance of small sparks, like sparklers, that emanate from the surface of the workpiece. Be on your guard - these sparks indicate that the maximum welding temperature is approaching and the metal is beginning to burn. Wait until sparks fly from the entire area of the workpiece, and not just from one section. At this point, quickly remove the workpiece (its color should be from lemon yellow to white, with an abundance of sparks). Place it on the anvil, and with frequent blows of a small sledge hammer, hammer it from end to beginning and back again. Turn over and forge again from end to beginning and back. If everything went well, the welding has already occurred. To be sure, forge the workpiece with even, flat blows until it reaches a red color. Forge welding is also possible at lower temperatures, for example, when the metal glows light orange, but the risk of cold lack of fusion increases. If the shape of the workpiece after this series of forging is not perfectly rectangular, heat it again, just until it turns orange. Adjust the shape of the workpiece so that it is as close to rectangular as possible, and both surfaces are as flat and even as possible.
The thickness of the workpiece after this first welding should be about 4-5 mm. Forge and weld all four bags in this way. After this, the four resulting plates can be collected again into a bag and boiled, but I recommend stopping, taking a break and at the same time examining the quality of the welding performed. When the forgings have cooled, grind off a small layer of metal from the side plane of the package with a grinder or electric sharpener. If you only see a shiny surface of the monolithic steel, the welding was successful.
When dark lines are visible - the boundaries between the layers, it means that there was a lack of penetration. If there are one or two small imperfections, the process can be continued. Most likely, delamination will not occur, and the lack of penetration will be eliminated during further welding. If the lack of penetration is large, then the package should be heated, cover the uncooked area with a layer of borax, continue heating to welding temperature, and forge the uncooked area across the entire width of the plate again.
And so, you have in your hands four plates of 13 alternating layers. By collecting them in a bag and boiling, we get a plate of 52 layers. While hot, cut it lengthwise with a chisel into 2 or, if width allows, 3 parts. While the process of cutting with a chisel scares you, you can cut the plate with a thin cutting wheel, however, in this case some metal will get into the sawdust. By assembling and welding the resulting plates, theoretically it is possible to obtain any number of layers. But it should be borne in mind that initially the package contained rather thin layers of metal, so with more than 200 layers, the pattern will be very thin and difficult to distinguish. Therefore, I recommend stopping at 150-200 layers. During final welding, try to ensure that the package takes on a shorter length and width, but a greater thickness than those that you have planned for the future product. This is necessary for the final metal forming process. So, you have your original piece of Damascus steel. It contains about 0.6% carbon - the Japanese consider this steel optimal. This is the so-called “wild” Damascus. When etching a product from it, you will get a pattern of almost parallel lines of different thicknesses. This Damascus is also called “striped”. You can be satisfied with it, or try to somehow complicate the pattern.
Option one: “PEACOCK EYE”.
This is a pattern in which concentric circles, ovals or squares occur. The pattern is achieved in the following way. Before molding the product from the resulting plate, shallow (1-2 mm) round or ellipse-shaped recesses are cut on its side surfaces with a drill or a grinding wheel in the right places. After this, the heated plate is subjected to forging, during which its surface becomes flat again. In this case, the lower layers come to the surface and form concentric figures. The use of this method gives quite wide possibilities when forming a pattern. A fundamentally different method - “TURKISH” or “TWISTED” Damascus
To obtain it, you must try to ensure that the starting material - a package with the required number of layers - takes the form of a round or square rod. To do this, you can chop a wide thick plate or cut it lengthwise into strips, the width of which is approximately equal to the thickness. The rods are heated to a light orange color, after which one end is clamped in a vice, and the other is grabbed with pliers with flat jaws. It is twisted along the longitudinal axis several turns, but so that the rod does not burst. The resulting spiral-shaped workpiece is forged into a plate at a temperature close to welding, with flux, in order to eliminate possible delaminations. The product formed from such a plate has a complex pattern in the form of concentric four-rayed repeating stars. When working with Damascus, there are a huge number of pattern options. There are no limits to artistic imagination here. Therefore, do not be afraid to experiment and look for new pattern shapes and ways to obtain them. We will touch on this topic in the section devoted to mosaic Damascus.
Welded damask steel This type of welded steel is characterized by a high carbon content, which brings this Damascus closer in strength and cutting properties to cast damask steel. This carbon content is achieved by using cast iron powder in forge welding. Cast iron contains up to 6% carbon. It is convenient to use cast iron from steam heating batteries, but its quality is not high. In any case, you should know the composition of the cast iron used, at least data on its carbon content. Cast iron is highly brittle, so it is quite easy to split it into small pieces with a sledgehammer. Then crush them on an anvil into a powder, the particles of which should be about the size of a grain of rice. Cast iron must be crushed carefully so that the particles do not fly away in different directions. For the required amount of welded damask steel you will need several glasses of crushed cast iron, so be patient. In addition to cast iron, this steel includes StZ in the form of water pipes and steel U8-U9 from files. The file steel must be ground into pieces about the size of a fingernail. It can be easily pricked with a hammer. Using the above formula, calculate the weight parts of all components. Finished steel, with all adjustments for carbon burnout, should contain no more than 1-1.2% carbon. Homogeneous steel with this composition is very brittle, but due to the heterogeneity of the composite, it is possible to harden it to greater hardness. Take a 1/2 or 3/4 inch water pipe - this, as I already said, is StZ steel. You will need several pieces of pipe about 20 cm long. Using an iron wire brush, thoroughly clean the inner surface of the pipe from rust. Weld tightly one end of each piece of pipe. Mix crushed cast iron and U8 steel fragments in the proportion you calculated (when calculating, do not forget to take into account the weight of the pipe). Typically, U8 requires more weight than cast iron. Now fill the pipe sections with the mixture. Compact the cast-iron-steel mixture as thoroughly as possible using a pin of suitable diameter. The packed mixture is compacted in the pipe by vigorously tapping with a hammer on a pin inserted into the pipe like a piston. When the pipe is stuffed, weld the other end and weld the handle to it. You can use the pin you used to compact the mixture, leaving part of it in the pipe and welding it firmly. Having filled all the pipe sections, take an electric drill and drill 10-20 small-diameter holes in each pipe, placing them evenly over the surface. These holes are needed to allow the remaining air and excess molten cast iron to escape. Light the forge and heat the pipe section to maximum temperature.
In this case, a slight burn on the pipe surface is not dangerous, since the pipe walls are quite thick. Make sure the heating is even. When the pipe section turns white, hammer it with a heavy sledgehammer (preferably the help of a hammer) several times from end to beginning and back. Bring the resulting plate to a thickness of 3-4 mm. Forge the remaining pipe sections using the same pattern. The resulting steel still has a lot of internal lack of penetration, voids, and its composition is very heterogeneous. Therefore, you will have to weld the resulting plates many times. First weld them together into one. The resulting plate must be divided in two alternately lengthwise and crosswise and the welding must be repeated at least 10 times so that the steel becomes even in composition. At this stage, I advise you to start mastering one technique little by little. It will allow you to avoid the procedure of cutting the plate into parts and assembling it into a package using electric welding. The plate is cut with a chisel along the desired line to 1/2 the thickness. Then, on the edge of the anvil along the notch line, the plate is bent 90 degrees. On the plane of the anvil, the bend is brought to an acute angle. After heating, the bent plate is carefully fluxed with brown, especially those surfaces that will be welded. After applying flux, the forging is heated to welding temperature and forged. In fact, the plate simply folds in half. It must be remembered that it folds alternately - sometimes along, sometimes across. Let's say there were five lengths of pipe that you forged into plates. By welding them together, we got a 5-layer bag. After the first fold in half there will be 10 layers, after the 2nd - 20, after the 3rd - 40, after the 4th - 80, after the 5th - 160! Thus, after my recommended 10 welds, you will have several thousand layers. From such a package it is already possible to form a finished product. I do not recommend using any tricks to complicate the pattern on welded damask steel - it already has its own, unique characteristic chaotic pattern. You can read about the features of hardening welded damask steel and the amazing technology that allows you to achieve the formation of microscopic diamond crystals in layers of such steel in the article by V. Basov “Bulat - the line of life.”
Mosaic "Mosaic Damascus" is a name for steel in which sections with different types of patterns are welded together. The possibilities for imagination here are endless. I propose to make a damascus with the Sutton Hoo smoke pattern, after the name of a fossil Scandinavian sword. Weld a package consisting of 7 layers of three steels - StZ (gives a white metallic color when etched), U8 (black color) and any spring steel (gray color). The alternation can be anything. The finished plate should be wide and thick enough so that 8 square-section rods with a thickness and width of approximately 7-8 mm can be cut from it. You may have to make several plates. The length of the rods should be about 30 cm. After this, mark 4 cm sections on each of the rods. Heating and clamping the rods in a vice, according to the marks obtained, twist half of the rods in one direction (say, clockwise), and half in the other. Twisting will occur in sections, so that twisted sections alternate with untwisted ones. Try to keep the twisted and untwisted areas on all rods in the same places. After this, hammer each rod again, restoring their square cross-section along the entire length. Now take four rods - two, twisted in each direction. Lay them sideways on the workbench, making sure that the layers of metal in each bar are facing you. The twisted sections will touch and alternate. A rod twisted clockwise next to a rod twisted counterclockwise, and so on. You will end up with a package that resembles the folded fingers of a hand. Place several thick nails across the bag on each side - they can be removed later - and electric weld, holding the bag together. Also weld the handle rod. Since the thickness of the package is small, fluxing can be done immediately before forge welding. Heat the bag until scarlet, sprinkle thickly with borax on both flat sides, and heat further. Welding is carried out at the highest possible, but excluding burnout, temperature, with very light blows of a hammer (to prevent delamination of the fan-shaped package). They are applied along the side surface of the package, and not along a wide plane. Mastering this art, called end welding, is not easy. First, it makes sense to practice on square steel bars, so as not to spoil the complex layered steel.
As a result, you should have two monolithic plates. Each consists of four sections of bars twisted in opposite directions. By itself, such steel is not very strong, so it should be welded onto the base. The base can be either Damascus or simple (in this case, the best option is a plate made from a tempered and forged spring). It should be the same size as the resulting mosaic plates. The base is collected in a bag with the resulting plates and welded together. The result is a finished piece of steel, the surface of which has a beautiful pattern, similar to smoke from a candle. A product made from such Damascus should be forged very carefully, trying to achieve the most approximate shape through forging. When turning with a grinder or on a wheel, the pattern may deteriorate. Proceed with grinding work only when the shape of the future product is indicated in almost all details. Make sure that the metal deforms evenly when forging, so that the core and outer patterned plates do not move relative to each other. Making mosaic, or any other Damascus, is fascinating. For the sake of pleasure from the unique beauty and properties of steel, it is worth looking for your own path, and not being afraid to start over again and again. Good luck to you in your endeavors, and may Volund, the ancient patron of Scandinavian blacksmiths, help you!
You may also be interested in:
No similar materials found.
Bulat and Damascus
Drawing of Damascus steel on a metal cut:
The term Damascus steel appeared relatively recently. A similar name for forged products began to appear in various sources in the middle of the 19th century. Before this, the name “Gurda” was more often used, as the creations of blacksmiths from the Caucasus and Mesopotamia were called. There they began to forge products from a mixture of alloys, achieving an unusual pattern on the surface of the blades.
Damask steel, as historical research shows, came from India. History museums have preserved samples of weapons that used alloy steel castings. Most often they contain chromium, the concentration of which can reach up to 14%.
However, damask steel production is designed only for individual production. Therefore, the technology is quite expensive. The master spends a lot of time to make a specific sample. If there is a conversation about mass production, then do not count on complex technology.
Metallurgist Pavel Petrovich Anosov studied production technology and created industrial technologies. The results of his work are present in all textbooks on metal science and blacksmithing.
Modern damask steel in products - a replica of the HP-40 knife in a modern design, made to order:
During the Great Patriotic War, the plant produced army knives and sabers for cavalry. Quite a lot of weapons have since been sold on various Internet resources. Modern blacksmiths produce remakes (this is the name for products that are made in the image and likeness of ancient samples). Several hundred workshops offer copies that are difficult to distinguish from the original.
Scout knife NR-40, made in 1942 - more than 7 million copies were produced:
Judging by the number of offers and prices, we can conclude that individual goods are in stable demand. The production of products from damask steel and Damascus steel can be quite an interesting and profitable business.
Modern knife HP-40, made according to samples from the period of the Great Patriotic War:
Experts see the difference between damask steel and Damascus steel in the raw materials:
- Damask steel is an alloy that contains a significant amount of alloying elements; during subsequent forging processing, platinum is connected using the forge welding method, which gives the product a complex of new properties.
- Damascus is a mechanical connection of metal blanks that differ in their properties. Forging up to several dozen layers is performed.
Use of high-quality steel in products
It's not just weapons that need durable materials. Structural materials with special properties are used in a wide variety of industries.
Forged products work in cars, railways, agricultural machinery, and spaceships. Only very simplified technology is used. Forging is used to achieve fine grain in the structure of the metal. Possible cavities that are present in the castings are eliminated.
An example of a modern blade with a pronounced pattern:
There are pros and cons for Damascus steel.
Positive characteristics
- High strength of the product, withstands loads applied in different directions (compressive, tensile, bending and other types of loads).
- Wear resistance of the cutting edge, holds its edge for a long time.
- It has an unusual appearance, it is impossible to repeat the design on a similar object, it makes it recognizable.
- High cost of implementation.
A special type of Damascus steel made from wire rope:
The listed advantages often attract craftsmen to engage in production using the technology of repeated forging of workpieces. For each new batch of goods, its own forging methods and sequence can be used.
Flaws
The main disadvantage is the high labor costs for producing the product. It is necessary to resort to repeated heating of the workpiece.
High carbon steel is susceptible to corrosion. To the question: “Does it rust?” We can answer unequivocally that without proper care, rust quickly destroys the product.
Damascus steel fin, modern product:
Features of operation
The service life of a Damascus knife is affected by its correct sharpening. Before starting the procedure, study the hardness of the material. Next, pay attention to the factory sharpening angle; this should be preserved . Stick to a 45 degree angle.
The knife should be sharpened very carefully so as not to bend the soft layer onto the hard one on the edge of the blade. Otherwise, despite its external sharpness, the blade will turn out to be dull when used.
Before sharpening, do not forget to inspect the blade for damage or chips. If you sharpen such a surface, the sharpness will be seriously affected.
You cannot use automation in this process, only the manual method. You should feel the layers being peeled away.
Stages:
- Use a coarse abrasive to remove the old layer. This step accounts for 80% of all work. Minimum 5 minutes required. To achieve the best result, forget about sudden and jerking movements. Use the abrasive evenly and smoothly along the blade. Do not press too hard, otherwise you will damage the soft layers. Cross sharpening is not acceptable.
- Start decorative sharpening. To do this, use a fine-grain abrasive. Grind carefully, remove scratches, improve the appearance of the blade.
- The final step is to wipe with a napkin soaked in lemon juice. If there is no juice, you can replace it with zest and seal with beeswax.
Due to its low corrosion resistance, the blade must be stored in oil. If you ignore this rule, as a result of rust damage, the knife will quickly lose its external and operational properties.
Equipping a workshop for the production of products
In the workshop of a home craftsman who wants to start making products from Damascus steel, you need to have:
- Welding machine - with its help, plates of materials of different strengths are welded into a single block, which can be processed together.
- Forge - it heats blanks from finished items to high temperatures (more than 800 ⁰C).
- An anvil is needed for forging. Forge welding is performed using the deformation method; the shape of the part changes at different stages of processing.
- A set of hammers and mallets helps you strike with different strengths. When working together, the leading blacksmith uses a light hammer to show the assistant where to strike with a heavy hammer.
- A vice is used to hold workpieces at different stages of work.
- A drill press is needed to drill holes.
- The sharpening machine is used more often than others; it gives shape and sharpness to products.
- A grinder is a variant of a sharpening machine; its distinctive feature is the use of an abrasive-coated tape glued into a ring. Using a grinder, smooth slopes are formed at a given angle.
- Machine for making slopes. High-quality sharpening to razor sharpness is possible only with a special device that allows you to move along a strictly defined trajectory.
- Grinder with a set of cutting and cleaning discs. A simple tool provides assistance in performing a variety of types of actions.
Step-by-step technology for making damask steel from bearings
Products from finished ingots or billets are produced in the following sequence.
The inner ring of the bearing is made of ShKh-15 alloy. It is sawed with a grinder cutting disc and sent to the forge for heating. The desired heating temperature is 900…950 ⁰С.
The workpiece is held on the anvil with blacksmith tongs. By beating off the bulges with a hammer, a strip is formed from the ring.
The grinder gives the desired shape.
The workpiece is held in place using a special mandrel. A constant angle allows you to create identical slopes on both sides.
The final shape of the product is obtained by turning.
GOI paste and an auxiliary velvet roller help polish the surface.
After polishing, a finished blade is obtained. All that remains is to make the handle, bolster and sheath. Then the product can be considered finished.
Blanks for the production of Damascus
Any craftsman can make Damascus steel at home; alloy kits are used for this. They contain soft and hard inclusions. By combining them with each other, they achieve blades with pronounced structural patterns.
The following combinations are used, shown in the table. Some workshops offer their own options. The proposed schemes give the best performance.
When starting production in your own workshop, it’s easy to find out how much the finished product costs. Many online shopping sites list prices. As you gain experience and improve the quality of the product, you can increase the price of your products.
Video: how to make Damascus steel?
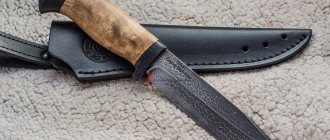
Examples of knives with Damascus steel blades
The layered texture of damascus extends throughout the entire thickness, so it also appears when turning various notches and recesses on the blade:
Etching makes the patterns of Damascus steel more contrasting:
Special manufacturing technologies make it possible to give damask a stylized decorative color:
When making kitchen knives with Damascus steel, you need to take into account its need for care and protection from moisture:
Usually, rare and valuable types of wood are used to create handles for Damascus blades: