24.01.2018 1,
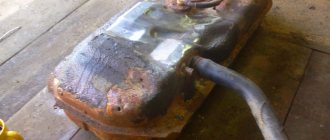
If you find that your gas tank is rotten or you accidentally punctured it, then do not rush to buy a new one. Even buying a used gas tank can cost a pretty penny. First you need to identify the extent of the damage.
We remove the gas tank, dry it and check for rust. For most cars it is located on the rear right side of the car. If necessary, clean it of all deposits. Cleaning can be done either with improvised means (sandpaper) or with special mechanisms (sandblasting).
Soldering the gas tank
After assessing the identified damage, you can begin soldering the gas tank. The most popular method can be considered cold welding. We clean the surfaces where the gas tank is damaged. Mix the epoxy resin and hardeners in a separate bowl. Apply a homogeneous mass to the hole.
It is necessary to apply a fabric patch on top of the homogeneous mass, having previously generously lubricated and soaked it with the same mixture. After the resin has cured, you must ensure that the entire surface of the hole is covered and generously covered with resin and patch. Such a patch may take more than one season, but you should not rely on it for the rest of the time you use the car.
This soldering is suitable in most cases, but for plastic tanks a different soldering method is required. In this case, you need a soldering iron (250 W). If there is major damage, additional pieces of plastic (of the same brand as the gas tank) will be required. Each plastic part must be marked.
Plastics are mainly divided into three types. PP (polypropylene), ABS (acrylonitrile butadiene styrene), PA (polyamide). It is necessary to solder the plastic gas tank only from the outside. If necessary, use reinforcing materials (fine metal mesh). After soldering plastic products, do not allow the soldered parts to cool suddenly.
The main thing is a soldering iron!
Before you begin, consider whether you should actually solder rather than use other fastening methods. Soldering is advisable if metal parts cannot be drilled or the bolted connection is unreliable.
The main factors that influence the process: a good electric soldering iron and the right flux, which ensures the connection of surfaces for a long time.
Pay special attention to the following:
- The power of the soldering iron should be 60-100 W; if it is less, then it will not be possible to heat the metal well and melt it to the desired state. High power at home is not needed - it leads to excessive energy consumption.
- You need to purchase a soldering iron with permanent heating - it lasts a long time and saves energy.
- It is best to have a soldering iron with a tip that does not burn - this will work longer. It needs to be descaled periodically, and also sharpened for precise work.
- Tin is an almost ideal solder for stainless steel. It does not contain lead, like POS, and can be used with products in contact with food.
- Without the correct choice of flux, it is impossible to tin stainless steel, as an oxide film will form. The best flux in this case is phosphoric acid.
Gas tank, soldering iron, solder...
To solder a metal gas tank, a powerful soldering iron (500 W) is required. Before soldering, the hole area must be treated with soldering acid. The solder must be fusible; in extreme cases, a copper plate will do. After soldering, it is necessary to cover the entire surface with resin to prevent rust from appearing.
If there is minor damage during the trip, you can use a folk remedy, of course, if you have laundry soap on hand. It is necessary to strongly rub the surface in which the holes are supposed to be made with soap. The soap will clog all the small cracks and thereby help you get to the nearest service station. This method is only intended to help you get to the nearest service station. serving.
All the methods described do not guarantee long and high-quality operation of your gas tank. If a part breaks, the part must be replaced. In our case, we postpone the timing of replacing the gas tank, but in the end, sooner or later, it is necessary to replace the broken gas tank.
Gas tanks that are part of the fuel system of modern cars are most often made of two materials: cross-linked polyethylene (plastic) or metal. However, if something happens to a plastic tank, this material can only be repaired in extremely rare cases; most often it is replaced. As for containers made of metal, the situation with them is somewhat simpler and in many cases it is possible to repair a fuel tank made of this type of material.
Preparing the gas tank for repair
If there is a question about high-quality independent repair of a gas tank, the surface must be prepared. Preparation involves draining the gas tank, cleaning (including sanding) and degreasing the area to be repaired. Of course, it would be best to remove the gas tank from under the bottom of the car, but repairs can be made without removal.
If the gas tank is broken on the road, preparing the surface for repair can be neglected. Below is how to carry out repairs in such hardcore conditions.
Material and characteristics of the metal tank
We will be considering a container made of metal, because as mentioned above, such a gas tank can be repaired. As for the material from which this container is made, in 95% of cases it is a soft steel sheet. This sheet has additional treatment, usually a secondary lead coating, which slows down irreversible corrosion processes.
The advantage of this material and the reason why it can be repaired is that when deformed, it is possible to level the metal sheet. If for any reason a gap appears in such a gas tank (for example, a breakthrough due to an accident or thinning of the material due to rust), then it can be soldered or welded.
Flux preparation
Corrosion-resistant alloys are very sensitive to soldering conditions, so the correct choice of flux for soldering stainless steel is extremely important.
The most widely used flux contains:
- 7 parts technical borax;
- 2 parts boric acid;
- 1 part calcium fluoride.
Making flux at home
For soldering small workpieces, the composition of the flux is simplified - equal parts of borax and boric acid are taken. The mixture is diluted in water and applied to the soldering area. Once it dries, it will provide excellent adhesion to the surface of the alloy.
Before applying flux, it is necessary to thoroughly mechanically treat the soldering area with sandpaper, a wire brush or a needle file.
Causes of gas tank damage
Naturally, there can be many reasons for mechanical damage. However, it is worth mentioning the most common ones:
- Corrosion;
- Bloating due to high blood pressure;
- Deformation or ruptures due to an accident;
- External mechanical factors.
All reasons except the last one are obvious; as for the fourth point, it is due to the location of the fuel tank. This means that in many cars the gas tank is located under the car and one of its sides is perpendicular to the ground. In this case, stones flying out at an unpleasant angle, the bottom touching bumps or debris on the road can lead to some damage to the fuel container, but even in this case it can be repaired, for example, by soldering it.
Installing a tank on a car
Plug all the holes in the tank and connect it to the pump. Pump air under a pressure of 1.5 atmospheres and coat the entire surface of the tank with soap solution. If no air comes out anywhere, you have successfully sealed the fuel tank. Place the tank on the car, connect all the hoses, install the fuel pump and fuel level sensor float. Tighten all clamps. The car is ready for use. Now you have learned how to repair a gas tank and can repair your car yourself.
Source
Fuel tank repair
First of all, before you begin, you need to understand that although the process of repairing a fuel tank is not very complicated, you must adhere to the mandatory precautions and be extremely careful at some stages of the work, so you can avoid possible troubles and reduce the risk to life .
First of all, when starting repairs, the owner must drain all the fuel from the tank, to the last drop. To do this, you can use a regular rubber tube, but if the process is inconvenient, use a jack, tilting the car in the desired direction.
Soldering the fuel tank
Now it is necessary to assess the degree of destruction, and this degree is divided into two points:
- Normal dents, no fuel leaks. In this case, you can level the walls of the tank by supplying compressed air inside.
- Damage to the tank with fuel leakage. Let us dwell on this point in more detail, since it poses the greatest threat.
So, the first thing to remember is that under no circumstances do you weld immediately after draining the fuel. The tank can also be sealed only after time has passed. This is due to the fact that explosive fuel vapors are stored in the gas tank, which detonate when heated, and this is extremely dangerous.
To seal the tank, you need to rinse the tank thoroughly and fill it with water. Rinse with hot water and detergent. If you decide to solder the tank using tin solder, then you don’t have to fill it with water, since the temperature will not be high. However, such soldering is suitable only if the damage is small.
If the gaps are larger and hot soldering with fire is required, be sure to fill the tank with water, but in the place where you want to solder the gap, you must leave a small pocket of air by tilting the gas tank accordingly. At the same time, when carrying out soldering, do not close the lid of the fuel container under any circumstances, since the gas formed during heating must escape freely.
Plastic tank repair
To repair a plastic tank you will need:
- soldering iron with a power of over 200 watts (hatchet);
- pieces of the same tank;
- metal mesh (steel or copper) with a pitch of no more than 1 mm;
- alcohol;
- brush;
- sandpaper;
- metal scissors;
- jigsaw
If you decide to repair a plastic gas tank, then buy the same one. This can be done at a disassembly site or through an advertisement in the newspaper. Cut a piece from the repair gas tank that covers the damage by 3–5 cm in each direction.
It is very important to use the same plastic for repairs as the one from which the gas tank is made. Otherwise, there is a high probability that different plastics will not connect.
It is advisable to cut out the plastic from the same area of the repair tank where the damage is located. If this is not possible, do not worry, because you can even seal the fuel tank with several pieces of plastic.
Using metal scissors, cut a piece of mesh of suitable size and shape. Clean the surface of the tank with coarse sandpaper, then degrease it and the mesh with alcohol. Heat the soldering iron to such a temperature that it easily melts the plastic, place the mesh on the tank and fuse it into the plastic. Do not press hard or hold the soldering iron in one place for more than 2-3 seconds, so as not to push or deform the fuel tank. This is especially important where the fuel pump or float is located. It is not necessary to completely recess the mesh into the plastic; it is enough that both materials are connected. Clean and degrease the patch, place it on the tank and start heating it. It is necessary to fuse it with plastic and metal mesh. Do not press hard, do not hold the soldering iron in one place for more than 3-5 seconds, so as not to push through the plastic. When the patch has completely cooled, the plastic tank will stop leaking.
Conclusion
So, as you can see, there is nothing complicated in repairing a tank, and although this text presents only one of the methods that allows you to solder a tank, the other methods are also not particularly difficult. The main thing in this matter is to follow the precautionary rules prescribed above, otherwise the consequences can be severe for both man and machine.
A leak in the gas tank occurs as a result of physical wear or due to damage with collapse of the housing. Fuel vapor accumulates in an empty tank, so welding and heating can cause an explosion. Many motorists ask how to properly seal a gas tank. There are several repair methods: argon arc and cold welding, soldering. Let's look at each of them in more detail.
Solder Types
Solders for stainless steel are divided into two main groups:
- soft;
- solid.
Soft ones are the usual compositions based on Pb and Sn grades POS. Sufficient tin content increases ductility and fluidity, allowing it to penetrate into all micro-irregularities of the surface and significantly improving adhesion. In addition, tin is a good deoxidizer, which is especially important when working with stainless alloys. The disadvantage of such soldering compositions is the low strength of the resulting joint.
To obtain stronger solder joints on stainless steel, hard solders are used. They are used both in industrial conditions and in the home workshop. Up to 30% technical silver is added to solid compositions. They are produced in the form of thin rods and are designated by the letters PSR.
Solder HTS – 528
If you need to solder together dissimilar products made from materials such as stainless steel, copper alloys, nickel, cast iron, use the HTS-528 composition. It already contains flux, and the melting point is not less than 750 ° C
General rules for repairing a gas tank
The presence of a leak is indicated by increased fuel consumption and a specific smell in the cabin. Even a minor crack is dangerous for the life of the driver and passengers. The leak area ignites when struck by a spark. Damage occurs as a result of cracking of the body during driving and exposure to corrosion. Defects occur when there is a malfunction in the vehicle's fuel system. The discharged pressure contributes to the gradual cracking of the walls. Microcracks gradually increase, causing leaks. Before welding the gas tank, you must follow the safety rules:
- be sure to drain gasoline or diesel fuel from the tank;
- thoroughly dry and dismantle the tank, inspect for damage;
- wash inside using specialized detergents;
- After washing with household chemicals, rinse thoroughly and dry.
Washing the tank allows you to completely remove explosive vapors. The repair method is selected based on the material from which the tank is made. Argon arc welding of a fuel tank is only suitable for metal containers; it is recommended to repair plastic products using cold welding; hot soldering is a universal method. Let's take a closer look at how to seal the gas tank yourself.
Causes of gas tank cracks
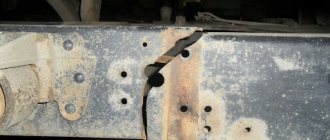
On most cars, the gas tank is located in the rear (right, left, under the rear seat). This design feature is explained by safety for passengers and the driver. In addition, vehicle handling is improved. However, the rear part of the body is quite often exposed to external damage during the operation of the car, as a result of which the gas tank also suffers.
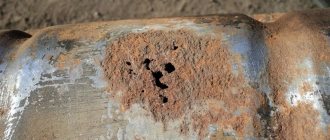
The most common cause of cracks is mechanical stress leading to holes in the container. Considering the quality of Russian roads, sometimes even a slight impact is enough to cause a hole to form.
Significant causes of damage also include metal corrosion, which is an inevitable process. The more mileage a car has, the higher the likelihood of this type of problem. Less common are power system faults. Since a rarefied pressure is created in the middle of the tank as fuel is consumed, this affects the condition of its walls. During operation, small cracks may appear on them, and as a result of their enlargement, leakage occurs. This situation indicates the need to repair the gas tank.
One of the reasons for gas tank damage is corrosion.
What to do if your tank leaks
The appearance of a crack, hole or any other type of damage to the gas tank is typical not only for domestic cars, but also for foreign cars. When the seal of the tank is broken, it is necessary to fix the problem as soon as possible. Operating a vehicle with such a malfunction can lead to disastrous consequences, and danger threatens not only those in the car, but also those around them. Due to the fact that the fuel tank is a simple structure, restoring the tightness will not be difficult. However, much depends on the degree of damage and the feasibility of such an event. Since gas tanks are made of different materials, different repair methods are used.
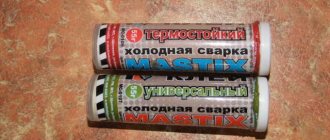
Cold welding gas tank repair
Cold welding is suitable for containers with hard plastic walls or for metal tanks. Glue does not adhere well to thin-walled tanks, so such repairs will be ineffective. The adhesive composition is selected in accordance with the type of container material. It is recommended to wear gloves when repairing a gas tank using cold welding. The crack is cleaned of contaminants and degreased with nefras.
Two-component mixtures are combined in the proportion specified by the manufacturer. The prepared solution must be used within 10-20 minutes depending on the brand name. The glue is applied to the damaged area in layers and smoothed, pressing it to the surface. 2-3 hours after repair, the tank is ready for use. The glue in the form of a bar is thoroughly kneaded with a damp hand and the crack is covered.
Cold Welding Selection
When choosing a cold weld, it is necessary to take into account that it must be resistant to gasoline. Only minor damage can be sealed with it. Moment superglue or similar special compounds from other manufacturers are perfect for eliminating leaks on the road. The rags are cut into patches, soaked in glue and attached to the hole in several layers. This repair method is temporary; it allows you to get home or to a service station and completely solder the holes.
Repairing a cracked metal gas tank
In order for gas tank repair to be not only competent, but also safe, certain rules must be followed. They boil down to the fact that all additional equipment will need to be dismantled, the fuel drained and the container washed.
When repairing a cracked gas tank, it is necessary to drain the fuel, remove the container and wash it.
How to remove the gas tank
Removing the gas tank involves removing the hatch, cable, neck, fuel sensor and pump. The list of certain elements, as well as the process of dismantling them, depends on the specific car.
Tools you may need:
- pliers;
- side cutters;
- screwdriver;
- wrench or socket of appropriate size.
Sequence of actions during dismantling:
- First, the remaining fuel is drained. For this purpose, the design of the tank has a special hole in the lower part. To prevent fuel from spilling on the ground, prepare the container in advance. If there is no plug, gasoline can be drained using a hose and a pump bulb.
Before removing the gas tank, it is necessary to drain the remaining fuel. - After emptying the tank, disconnect the connector, which is responsible for connecting the wires to the fuel level sensor. This connector may be located under the rear seat or in the luggage compartment. The element can be separated by snapping off the special tab. After this, disconnect the ventilation hose located at the bottom of the tank.
After the fuel has been drained from the tank, remove the connector with the fuel sensor wires, as well as the power supply to the fuel pump. - Using a screwdriver, loosen the clamp of the fuel supply hose and tighten the tube. If the hose does not come off, try turning it in different directions.
One of the stages of dismantling the gas tank is the removal of the fuel hoses, for which the fastening of the clamps is loosened - Removing fasteners. To do this, unscrew the nuts that secure the clamps securing the gas tank to the body, and then remove them from the studs. The free side is lowered, then the second side of the fastening is released.
To dismantle the tank fastenings, unscrew the nuts securing the fuel tank clamps - Remove the gas tank filler cap by simply unscrewing it. After this, the tank is moved to the side to release the neck from the rubber seal.
To remove the gas filler neck from the seal, you will need to remove the plug. - The ground wire is disconnected from the tank body. It is secured with a nut, which must be unscrewed with a wrench of the appropriate size. There are no longer any elements holding the fuel tank in place and it can be removed from the vehicle.
When nothing interferes with dismantling the tank, it is removed from the car
Cleaning the gas tank
After the fuel has been drained from the tank, it will need to be cleaned of contaminants, for example, by washing under running water using detergents. After drying the tank, it is necessary to clearly indicate the places of future work and understand whether there is a need for its dismantling or restoration is possible directly on site. Is it possible to repair a gas tank without draining the fuel? You need to understand that doing quality work, even with the slightest leak, is problematic. When all the preparatory aspects have been resolved, they proceed directly to the repair procedure.
To reveal the extent of the damage, the container must be washed and dried.
Necessary tools and materials to repair a cracked metal gas tank
Depending on the chosen repair method, the list of tools and materials used will differ. In general, you will need the following:
- tire pump for supplying compressed air;
- hose connected to a hot water supply;
- special cleaning liquids;
- petrol;
- drill;
- bolts and nuts;
- file;
- degreaser;
- sandpaper;
- primer paint.
How to solder a gas tank
One common method of repairing cracks in a metal fuel tank is soldering. To carry out the procedure, you will need a soldering iron with a power of more than 200 W, soldering acid and tin. Leave the tank neck open during operation. Let's start restoration:
- We determine the location of the leak.
- If any deformations are found, we straighten them out.
- We carefully clean the soldering area and degrease it, for which you can use any product (acetone, solvent, gasoline).
Before soldering, the damaged area is cleaned to bare metal. - Apply soldering acid to the soldering area.
- To make it easier to tin the problem area, heat it with an incandescent lamp or hairdryer. To apply tin, the damaged area must be heated
- We tin the metal. If the crack is large, we fuse tin in several layers until the damage disappears.
For large crack sizes, tin must be deposited in several layers - When the soldering area has cooled down, clean it of rosin with a solvent or other means.
After soldering is completed, the area is cleaned of rosin with a solvent.
On old gas tanks, in addition to eliminating the crack, it is appropriate to clean the tank from corrosion, and then apply primer and paint.
Video: do-it-yourself soldering of a gas tank
How to brew a gas tank with a semi-automatic machine
To carry out welding work on the fuel tank, you will need to pour water inside to prevent ignition of gasoline vapors. The welding site is cleaned to bare metal, removing corrosion using a wire attachment on a grinder or drill. If a large area is damaged, it is cut out, a metal patch of similar thickness is applied, and then scalded. After cooling, the container is covered with primer and painted.
Cold welding repair
When repairing a crack in a fuel tank using cold welding, the same preparatory measures are performed as for soldering (draining fuel, washing, drying, cleaning). If the damage is in an accessible place, the container does not need to be removed from the vehicle. When working with cold welding, you must take care to protect your hands, i.e. use rubber gloves. Then cut off the required amount of the composition and knead it well in your hands. As a result of the chemical process, the product will begin to soften. At this moment, it must be applied to the damaged area with great force, and then leveled.
One way to repair a gas tank is to use cold welding
For greater reliability, a piece of fabric is placed on top of the first layer, then the second layer is applied. Depending on the type of cold welding, it may require dilution with various means. In this case, it is recommended to perform the kneading procedure in a metal container.
Video: repairing a gas tank using cold welding
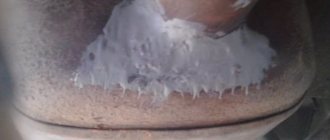
Sealing a crack with epoxy resin
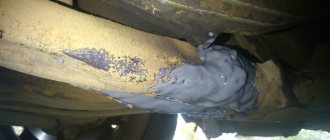
Repairs using epoxy resin are resorted to when it is not possible to carry out a full restoration by soldering or welding. All epoxy components are mixed according to the instructions. The damaged area of the gas tank is thoroughly cleaned and a layer of resin is applied to it, after which it is covered with a piece of fiberglass or a clean rag soaked in the same substance. Several such layers are applied. When the patches are dry, you can fill the gas tank with fuel and continue driving. It is worth considering that epoxy resin, as well as cold welding, has an excellent expansion coefficient and low bending strength compared to metal. This suggests that repairing a fuel tank using such materials is a temporary measure.
Soldering
Compared to cold welding, fuel tank soldering is more resistant to mechanical stress and external factors. To eliminate a leak, prepare a patch 4-5 cm larger than the area of damage. Repair of plastic products is carried out on the outer part of the walls of the gas tank with a 250-watt soldering iron. When sealing, you need to select a patch from the same material. The type of plastic is indicated on each part. Most often, gas tanks are made of ABS, polypropylene or polyamide.
For high-quality adhesion, a substrate of fine reinforcing mesh made of metal or copper is required. The substrate is fused into the wall of the gas tank, evenly distributing liquid plastic over the entire surface of the defect until a new uniform coating appears. The procedure is performed quickly so that the plastic does not harden, otherwise sagging will form.
In metal containers, you can seal the hole with a thin metal or copper patch. You can heat the case using a blowtorch or iron. The patch is attached with low-melting solder along the entire perimeter using a 500-watt soldering iron, having previously treated the joints with soldering acid. After soldering, you need to let the body cool, then cover the patched area with bitumen mastic or paint. The coating will protect the patch from corrosion.
Lada 2106 B17 project › Logbook › Soldered the gas tank
Got back from the garage, cleaned up a bit today, and finally sealed the gas tank. Fortunately, it dried out very well, nothing even thought of catching fire or exploding.
Carefully! If the gas tank is not drained of gasoline before all operations, you can go down in astronautics history. This is less likely than when welding it (when welding on an undried tank, you will DEFINITELY go down in its history, most likely as a disabled cosmonaut); you are not supposed to deal with open fire, but it’s not worth the risk.
1. We discover an unplanned hole. 2. Using a brush or just a metal brush, we clean off the rust and paint flow (if there is still any). 3. We clean it with sandpaper if something doesn’t come off (which is very unlikely; the brush works wonders if it’s mounted on a drill). We will assume that the soldering area is already degreased. If you don't touch it and the brush is clean, then that's it. 4. Heat up a large soldering iron. I found a 100 watt ax in my garage. 5. While it is heating up, coat the soldering area with zinc chloride (buy or make it yourself, I have a homemade one, but back then it was impossible to buy it). 6. We put more solder on the hot soldering iron and press it to the place of soldering, shaking it from side to side slightly. Sometimes we pick it up and look. As soon as the solder sticks to the tank and does not solidify immediately after removing the soldering iron, the place can be considered tinned and ready. 7. If the hole is small, then most likely it has already sealed up and will not leak any further. To be on the safe side, I also attached a patch because I found another smaller hole nearby. I found a brass strip, cleaned it with sandpaper, tinned it with solder and pressed it to the soldering area with a soldering iron. 8. Pressing the patch with a soldering iron, move a rod or solder wire next to it. The solder should melt and flow under the patch due to capillary effect. When it stops leaking, you can carefully remove the soldering iron and cool both the tank and the tool. 9. Be sure to wipe the soldering area with a wet cloth or rinse with water. Zinc chloride will likely cause increased corrosion if not washed off. 10. For reliability, fill everything with varnish or paint.
If you can't find zinc chloride, you can try aspirin instead of flux. I once did this. But it stinks terribly, and soldering with it is much more difficult. Soldering steel with rosin is practically useless.
There cannot be a lot of solder, if the solder does not stick to the soldering iron (it is old, the tip is oxidized or just very dirty), then before heating it, you need to clean it with sandpaper or a wire brush until the copper is pure or to the solder where it is. It is advisable to coat it with flux (rosin, or even better, alcohol rosin), turn it on, and as soon as it begins to approach the melting temperature, start rubbing it with a solder rod. The solder will begin to melt and stick well to the cleaned areas.
Before soldering, the gas tank must not only be drained, but also washed and dried. Although you won’t have to deal with open flames (unless you use a gas soldering iron or a blowtorch, and it’s better not to use one), it’s better to be safe. A spark may appear during the cleaning process, or the soldering iron may not be in good working order. In general, drain, wash with water and powder, air dry until the smell of gasoline disappears. I also read that after washing the tank, you can dry it well by putting it on the muffler and keeping the car running for 10-15 minutes.
One of these days I will check how well I did, I hope that this one will serve for a long time.
Source
Repair using electric welding
Welding a fuel tank using a argon arc welding machine and tungsten electrodes is considered the most reliable method. It reliably connects non-ferrous metal with alloy steel. Most gas tanks are made of aluminum, so inverter welding is not suitable for repairs. The repair area is cleaned of oils and dirt. The patch is welded around the entire perimeter, trying to maintain a homogeneous gas environment. The seam is smooth and durable. After cooling, the repaired area is painted or covered with bitumen mastic.
Preparation of equipment and necessary materials
When preparing equipment, it is important to pay attention to the characteristics and design features of the soldering iron. Its power is at least 80-110 watts; weaker devices will not be able to provide sufficient heating of the working area. The sting must be fireproof. You can work with a soldering iron using soft, low-melting solders - rods made of pure tin or from mixtures like POS. Pure tin will be needed when repairing kitchen utensils and vessels that come into contact with food or drinking water. It does not contain harmful components. The most suitable flux for such dishes is phosphoric acid.
For hard solders you will have to use a gas torch.
Plastic gas tank repair
Repair using epoxy glue is the fastest. This is a temporary measure to fix a leak along the way. You can patch the hole using a plastic welder - an extruder. Welding tanks using this method requires certain experience and knowledge of technology. It is recommended to practice on a small piece of plastic before welding. To correctly calculate the productivity of an extruder, you need to know the size of the cross-section of the crack. Welding begins from the edge of the fracture, laying the molten plastic welding wire evenly across the entire width of the hole with a small margin. For thorough welding, movements are made across the crack, completely filling the hole. In order for the seam to lie evenly, it is necessary that the hot air gun and the shoe of the device are evenly heated.
Selection of solder and auxiliary materials
The correct choice of composition allows high-quality soldering of stainless steel parts. Such a connection will be reliable and durable. The most common types of soldering compounds are tin-lead POS grades. For soldering work on stainless steel, experts recommend:
- POS50Kd18 (with the addition of cadmium);
- POS-61;
- POS-40.
Only clean tin should be used to repair items that come into contact with food. Not every flux is suitable for stainless steel.
- soldering acid;
- orthophosphoric acid ;
- zinc chloride.
It is necessary to apply flux immediately before soldering, so that the oxide film does not have time to re-form.
Interesting: Phosphoric acid is part of Coca-Cola. A good reason to think about whether you should drink it.
Common Mistakes
The most common mistake when soldering stainless steel is
- poor cleaning;
- insufficient defatting;
- insufficient heating of the parts, as a result of which the solder did not penetrate into all the gaps and did not connect them.
It is necessary to periodically clean the soldering iron tip.
Do not solder with compounds containing high lead content or use rosin.
You can check the quality of the connection by trying to pick it with an awl or screwdriver. A reliable connection can only be scratched; it will not be possible to peel off the solder from the stainless steel.
Cleaning stainless steel after soldering
After the soldering has cooled, clean off any remaining soldering compound and flux. Stainless steel food utensils should be washed with warm soapy water and boiled before use.
If you find an error, please select a piece of text and press Ctrl+Enter.
Stainless steel products are quite widely used in everyday life, they have high resistance to external influences, strength, durability and are quite affordable. True, sometimes there is a need to repair one or another stainless steel part. And if you don’t have argon welding at hand, then soldering can be used as an alternative.
Technology of soldering stainless steel with tin
It is very important to carry out the preparatory operations correctly and carefully. Their purpose is to remove oxide film and other contaminants from the surface of the stainless steel that prevent the formation of a strong and durable solder joint. First, the surface is protected with sandpaper, a wire brush or a file. Next, after removing sawdust and abrasive particles, degreasing is carried out. To do this, take a special degreaser. It can be successfully replaced by any organic solvent - acetone, white spirit, numbered solvents (646, 657), etc.
Immediately after degreasing, the soldering area is coated with a flux compound. (If flux is included in the solder rod, this step is not performed.)
Now the actual tin soldering begins. First, the soldering area is heated using a soldering iron tip or a gas torch. When soldering with a torch, the oxygen content should be monitored, since if it is in excess, oxidation processes will begin, deteriorating the quality of the connection. When the permissible oxygen concentration is exceeded, the flame acquires a light blue tint.
Soldering stainless steel at home
It often happens that a home handyman needs to repair household utensils and stainless steel dishes. To do this, it is necessary to prepare a certain set of equipment, as well as working and auxiliary materials. In order to quickly and efficiently repair stainless steel products, you will also need to acquire a certain skill. Therefore, you should not immediately take on the repair of complex or large-sized products. To get better at “feeling metal and fire,” it’s better to practice on spoons, mugs, or just scraps of stainless steel.
Soldering stainless steel at home
To work, you will need to equip a workplace. The work table must be metal or have a non-flammable coating. Exhaust ventilation must be equipped - both the fumes from the soldering compound and the flux and degreaser are harmful to the respiratory system. The parts to be soldered must be securely fastened with inventory fastening devices - vices, clamps, clamps, spacers.
The work area should not be cluttered; only parts to be soldered may be contained in it.
Containers with working fluids should be tightly closed immediately after use and stored in a cabinet or bedside table.
It is necessary to carefully follow the technology for performing the work. If the processing is carried out poorly and the solder does not stick to the surface of the parts, it is necessary to stop soldering and repeat mechanical processing and degreasing. After degreasing, you can handle parts only with thick gloves - even a small sweat stain left by your fingers can ruin the work.
You can make your own wire brush for stripping. To do this, wires obtained from a piece of metal cable must be tightly inserted into a piece of pipe with a diameter of 5-10 millimeters and a length of about 10 cm. They should protrude from the tube by a few millimeters. For small soldering areas of stainless steel, and especially in narrow and hard-to-reach places, such a homemade product is much more convenient and effective than purchased brushes with a wooden handle.
This brush can be used to work in close proximity to a soldering iron or burner flame, minimizing the time between stripping and the start of soldering.
Soldering with a gas torch
The burner is moved smoothly, heating the metal evenly. The solder rod should melt not from the flame of the burner, but from the heat of the workpiece - only then will a strong and reliable connection be obtained. After applying the rod to the joint area, it is necessary to further heat the workpieces so that it completely penetrates into all the gaps and fills them. Heating is continued until excess soldering compound begins to flow out of the joint.