Lada 2106 LSA › Logbook › Sports gas tank
Hello reader! Today I will tell you how to make a sports gas tank with your own hands, or at least according to your own dimensions! So, according to the class requirements, we get to purchasing a tank! We begin to monitor Avito, sites selling racing stuff and... we understand that there are not many people who want to sell a sports tank, and even fewer who want to sell it for adequate money. In principle, with 8000 you can already find something, but it’s really not cheap! We understand that we will have to handjob again! Anyway! let's go! So here is an excerpt from the regulations: “ 13.2 Fuel tank
. The fuel tank must meet the following conditions: Installed fuel tanks must be located in the luggage compartment between the rear wheel arches at least 30 cm from the rear panel of the car without changing the load-bearing structures of the body. Participation with fuel tanks is allowed, the certification period of which has expired no more than 5 (five) after the validity period and is decided in each specific case by the technical commission of the competition. The fuel tank may be made of a material with a thickness of at least 2 mm (aluminum or steel). The location of the filling hole is not regulated, except that the filling hole cover should not protrude beyond the perimeter of the body. In all cases, there is a fire and waterproof partition between the cabin and the luggage compartment. The hole that remains after dismantling the original tank can be closed with a lid that has the same dimensions as the fuel tank. The minimum capacity of the fuel tank is 20 liters.” (c) regulations 2015 What to do is clear! The smaller the tank, the lighter it is! Provided that we had no idea how much the car weighed even before the demolition and how much it would weigh by the end of the project... we don’t need more than 24-25 liters! Let's build on this! So, first we need a fuel intake! We decided to take from the VAZ-2108 due to its cheapness and suitable height (approximately 165mm.)
Having the height and the required volume, we calculate the size of the walls, it turns out 375x375. From a relative, at whose factory the welding took place, we learned the diameters of stainless steel pipes in stock, to make a hole for the neck, we also lay a hole for air access. We measure the mounting and connecting dimensions of the fuel intake. We are designing a bulkhead inside for fuel drainage, at least that’s how I imagined it.
Next, we take out the patterns and send them to the office for laser cutting, after which all we have to do is wait for the piece of iron to be made! Having collected it, we send it all to a rummaging person for assembly and welding, accompanied by a child’s drawing, and wait for the result. Imported stainless steel was chosen as the material, so it would have been impossible to weld it in the garage!
Upon arrival from the welder, we begin to fap, or rather, screw in everything that is needed. Having installed the fuel intake, we blow the lid inward through the hose and the ventilation hole at 6 atmospheres and make sure that there is no siphonage anywhere and the weld is of high quality!
At the end of this whole journey we have a 23.9 liter tank. Low and relatively light! It contains enough gasoline for about an hour of racing, but our real race lasts 20 minutes!
PS: Later we looked at different designs, but in 75% of cases they use 70-liter UAZ tanks, Soviet additional tanks installed above the bridge, factory ones attached between the arches... In general, we got one of the coolest tanks, for very reasonable money!
Spent: Cutting stainless steel. . . . . . .3384 Fuel intake 2108. . . .169 Welding. . . . . . . . . . . . . . . . . .Priceless!
Manufacturing of capacitive fuel level sensor
The capacitance sensor for measuring fuel is based on the principle of comparing data on the electrical capacitance of the device. The design itself is simple - an ordinary capacitor. Therefore, a homemade fuel meter is a completely feasible device. It can be made from scrap materials - two metal plates or tubes. It is important to observe certain measures when manufacturing the sensor:
- The surface of both electrodes must be insulated from electrical contact;
- The space between these electrodes must be freely filled with fuel while the sensor is immersed and emptied when the fuel level decreases;
- Such a measuring device is mounted in the tank at an angle;
- A homemade device should not have moving parts;
- It can be powered with no more than 5 watts; at a higher voltage, the fuel will ignite from a spark;
- The measuring circuit should be placed as close to the sensor as possible;
- The wires for connecting the circuit to the sensor should not exceed 2 cm.
A homemade capacitive sensor consists of two modules connected by three wires. The first is a capacitive sensor module, the second is a display module. Two wires supply power to the sensor module; the third wire transmits a signal to the display module, which is transformed into an indicator of the fuel level.
Fastening the gas tank to a car
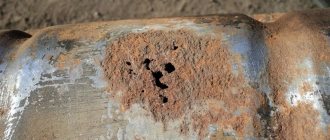
One of the most common problems of every car enthusiast is a breakdown associated with the installation of a gas tank. Due to long-term use, tape connections are constantly exposed to dirt and moisture. Over time, the metal becomes covered with rust, losing its strength.
As a result, the driver hears a knock on the right side of the car. Of course, with such a problem you can contact a specialist at any service station. But why overpay if you can change the gas tank yourself.
- Gas tank mounting design
- For passenger cars
- For trucks
- Reasons for fastener failure
- Replacement and repair of gas tank mounts
- Light vehicles
- On trucks
- Features of making a mount for a gas tank with your own hands
Selection of materials
There are several materials that are used to make sauna tanks.
Cast iron
The classic option for making sauna tanks is cast iron. However, this option has a number of both pros and cons. Despite the fact that this material is undoubtedly very strong and durable, heating water in such a container requires a large amount of fuel and time, but the high temperature of the water remains for a long time. Cast iron is not afraid of corrosion and temperature changes. One of the most significant disadvantages of cast iron is its large mass and the difficulty of making it yourself. In addition, it requires mandatory protection from exposure to high humidity.
Stainless steel
Stainless steel bath tanks are increasingly being used. Their popularity is due to the fact that they:
- do not need protection from high humidity and negative environmental influences;
- have a high percentage of heat conductivity, which ensures heating of water in a short time;
- practically do not give in to deformation under sudden temperature changes;
Enameled material
Sauna tanks made of enameled material are practically rust-resistant.
Also, enameled containers have one important limitation during installation - they should not be built into the surface of the oven. In principle, these are all the basic rules when choosing a container for a bath, following which will help you enjoy the washing process for a long time
In principle, these are all the basic rules when choosing a container for a bath, following which will help you enjoy the washing process for a long time.
Most likely, you just (or a week ago) saw on the Internet a beautiful photo with a completely unusual, one might even say “magical” effect, and now you passionately want to create the same thing with your camera.
Gas tank mounting design
The fuel supply system in all cars works the same. But the method of installing a gas tank on different types of cars is very different. Fixation occurs either with special strips, or a gas tank fastening tape is used.
For passenger cars
Before you start replacing a broken part, you need to understand the design of this part of the car. This will help you better navigate the different connections in the gas tank. At first glance it may seem that everything is very simple. Actually this is not true. The fuel container consists of several parts:
- Filler neck. Open section of the gas tank. It consists of a valve and a retainer. The first part is used to safely fill the container. The second one prevents it from splashing out when moving.
- Fuel lines. Typically, rubber tubes and pumps that provide connection between the tank and the internal combustion engine.
- Control sensors. Electrical devices that provide information about the fuel level in the tank to the control panel.
- Fastening system. Helps keep the fuel container in one place. The gas tank fastening tape runs along the walls of the car, clamping the container to each of the surfaces.
For trucks
The gas tank design of trucks is very different from that of cars. After all, the capacity is more than 100 liters. Such dimensions are difficult to hide under the body of the car, so they are displayed on the edge. Typically, the gas tank on a truck is located on the right side. At the same time, it is located separately from other parts. The connection is under heavy load. Therefore, the tapes are made of durable material.
Number of liters in container
Firstly, it is worth identifying the system with which the water in the tank will be heated. For this, a built-in heating element or stove can be used. This is what will determine the choice of materials, displacement and location. The selection of a heating system depends on the number of people visiting the bathhouse, the optimal time for heating the water and the required tank volume.
If the bathhouse is intended for one visitor, then the best option is a 50 liter capacity. If the bathhouse is intended for a large family or company, it is worth purchasing a tank of at least 100 liters.
Note!
When choosing a mounting system, consider the thickness of the tank walls and its weight.
Reasons for fastener failure
A fastener can fail due to many factors. 90 percent of cases follow the same scenario. Usually a crack due to rust or mechanical damage. To avoid problems, you need to properly care for your car.
Every 10 thousand kilometers the car requires a complete check of the integrity of parts. It is necessary to ensure that dirt does not get clogged in the cracks of the connections. After all, due to high humidity, metal parts begin to rust and rot.
Replacement and repair of gas tank mounts
Replacing the tank mount occurs in stages. To do this, you need to completely disassemble the entire rear part. The principle of replacing connection parts is the same for all machines.
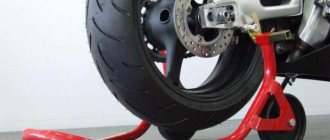
On passenger cars
In a passenger car, for example, a viburnum, changing the mount is quite simple. First you need to carefully examine and remember the location of the breakdown. In the end result, all disassembled parts should be in place. To be on the safe side, it is recommended to draw up a small diagram.
So, for work you will need:
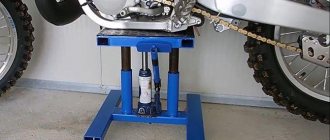
- repair pit with overpass;
- rust cleaning liquid (WD-40);
- set of tools;
- new clamps and tapes;
- empty tank.
- The repair must begin by removing the fuel tank and pump.
- After removing the fuel pump, drain the remaining fuel. If the tank contains 1-2 liters, this is not necessary.
- Disconnect the fuel line. Typically 3 separate pipes. Before removing the hoses, it is better to mark them with different colors (this will help avoid confusion). It will not be possible to remove all the hoses at once. First loosen the gas tank clamp, then disconnect everything together.
- All that remains is to separate the two sleeves. They are located under the lower casing. This metal part is secured with 4 nuts. Unscrewing them is quite difficult. 2 hoses are located on clamps that can be unfastened with light pressure.
- As a result, the tank is held on by two bolts. Supporting it with your hand, unscrew the bolts with a 13mm wrench. Cover the hole with a cloth to prevent debris from getting inside.
- The tank mounts are located along the walls. They are fixed with metal pins. After replacing the fasteners, you must make sure that the antennae are bent.
- Then reassemble everything only in reverse order.
On trucks
In trucks the process is simpler. After all, the gas tank is located in an open area, which greatly simplifies the work:
- First you need to disconnect the hoses and pump from the gas tank. Typically these parts are attached to the bottom of the fuel container. Unscrew the clamp using a 13mm wrench. The rubber hoses are located on special latches. They are removed with light pressure.
- Sign every detail. After all, in the end everything should be in its place.
- After the pump is separated, it is placed on a special platform. This base is attached to the vehicle structure itself.
- The platform is secured with 4 bolts. Unscrew them with a 20 key. They are located on the inside. It's easier to unscrew them from the bottom up.
- The top cover of the tank is fastened to the clamps - unscrew them.
- Change the fastening tape.
- When installing UAZ Patriot tanks, fastening should follow the same pattern as disassembly. Every detail must be in its place.
Recommendations
Comments 28
I want the same...what did I miss...at least I would suggest that it fit into the topic)
Well, you know all the logins and passwords
Did the guys make it themselves or order it from somewhere?
by eye - 55-60 liters
Hello ! check your eyesight))))) 120-140 l
I wrote on 1 eye, but there is also a second one! then you will get the displacement you expect
Hello, usually this is 0.7-1 liters, if you take a larger quantity, marmots or other animals may come, they say proteins are now in short supply and there is not enough for everyone. I agree completely - from the photo only by eye, with respect
Eco there, everything is rotting in your capitals)))
The climate of the city, but it’s not clear what they’re covering the roads with)
Why are you driving it around Moscow?))
San, I haven’t seen him for a long time
Come on, I recently rode chicks)))
Eco there, everything is rotting in your capitals)))
Hello . If after the ride you don’t or are too lazy to wash off all possible accumulations of dirt on the body, then don’t worry too much - you’ll quickly outstrip us. and after such repairs, we are ready to lose this competition in rust to anyone and anytime, and if we don’t get any prizes in this competition, I will consider it an honor. because only an idiot can be worse than this bastard. And if they take on the car together, the car simply has no chance.
I don’t understand a damn thing about your competition there)))
You wrote about the Kruzak that in the warm weather it also began to participate in these competitions and you are trying to remove it from the race by parking it on the street. How about a nurse for a friend? Haven't you looked under the kung?
The nurse there has a different design and there is nothing there to rot. The kung itself is plastic
but still take a look. Kung himself cannot live independently. especially plastic. I could be wrong, but the kung is placed on a 712t base and there the iron bottom is the same as everyone else’s
Yes, I specifically tried to find the same places where yours is rotting there and did not find it, although I looked without a hole from the outside. It seems to me that the design is made differently there.
you have a note in your blog about BarobanoFF2013, everything is visible there. It’s precisely those same floor enhancers that have given us headaches. It was precisely about the technological holes in them that I wrote. second photo - take a closer look. It just turns out that the water comes in and goes out, but the silt remains - you’re not walking on clean water.
All and a little more about gas tanks for motorboats
A continuous supply of fuel for the movement of a motor boat is provided by the gas tank for the outboard motor, which is an integral part of the fuel system.
They come in different types and configurations, and also vary in volume. This article will tell you more about this and whether it is possible to make a fuel tank with your own hands.
Design and types of fuel tank for a motor boat
A standard fuel tank for outboard motors usually consists of several components, namely:
- fuel tank;
- fuel cap;
- connecting hose;
- ventilation valve.
This equipment is inherent in all types of gas tanks.
The fuel is poured into a container, which is closed with a special lid equipped with a vent valve or fitting. This is due to the fact that when exposed to sunlight and elevated temperatures, the gasoline in the tank begins to evaporate and its vapors create excess pressure, which poses a danger of ignition of gasoline vapors. Excess pressure is released using a device mounted in the gas tank cap. Using a connecting hose, fuel is supplied from the tank directly to the outboard motor. The volume of the tank is determined based on the power of the motor installed on the boat.
Varieties and classification
There is a division of tanks for outboard motors according to design features into the following categories:
- built-in: non-removable tanks that are installed on motors up to 6 horsepower of small boats; they are mounted directly under the protective cover of the motor;
- removable or portable: used on inflatable boats and small boats, this type is preferred by fishermen and tourists traveling long distances;
- stationary: such tanks are installed on more powerful engines, they have a larger capacity and are used on large boats and yachts.
There is also a division of gas tanks into soft and hard. Soft fuel tanks are made from special impermeable materials with increased elasticity, ensuring the tightness of the tank container. When the tank is filled, they stretch, and as gasoline is used, their size decreases.
The advantage of this type of gas tank is the fact that gasoline vapors do not accumulate in them. Small dimensions and the ability to change shape allow them to be installed in places where a conventional rigid tank simply will not fit. The main disadvantage of such a tank for a motor boat is its high price.
As for the shape of the fuel tank, they are usually made either in the form of a canister or as a rectangular tank.
Based on the material used, gas tanks are divided into the following types:
- plastic;
- metal;
- fabric.
All materials must be petrol resistant. Fabric (soft) gas tanks are made from multi-layer polymer fabrics that provide the containers with tightness and chemical resistance to the aggressive effects of gasoline.
Features of choice
The volume of the fuel tank is determined based on the power of the outboard motor installed on the boat. Very often, people who make long trips on motor boats (fishermen, tourists) are faced with the question of increasing the capacity of the gas tank.
There are several options to solve the problem. You can install an additional fuel tank of greater capacity, take with you a supply of gasoline in cans, etc. But such a solution to the problem implies an irrational use of free space, of which there is already little on a boat or boat.
The best option is to install an additional gas tank on the transom of the boat; this saves space and prevents the tank from moving on the wave. On inflatable boats, such a tank is mounted on a suspended transom, on PVC boats - on a stationary one, and on boats and rigid boats - on the stern. Some craftsmen install several flat containers connected to each other by tubes under the flooring on the bottom.
It should be remembered that when choosing a fuel tank, you need to pay attention to the following points:
- equipment (all fittings and fasteners must correspond to the equipment declared by the manufacturer);
- quality of the material (the tank container must be sealed, resistant to gasoline vapors, durable and resistant to temperature changes);
- The bottom of the gas tank must be equipped with compartments to collect condensate to prevent water from entering the gas line.
Fuel tanks made of various types of plastics and flexible fuel tanks are becoming increasingly popular, despite their higher cost.
How to make a gas tank yourself?
Experienced fishermen and tourists, who have extensive experience in finishing and altering equipment in accordance with their needs, make gas tanks with their own hands. Various containers and reservoirs are used. There is a lot of useful information on the forums on how to make a gas tank yourself.
A fitting for adjusting the pressure, equipped with a valve, is cut into a regular canister, as well as a gas-resistant hose, mostly transparent, for supplying gasoline to the outboard motor.
In addition to canister tanks and containers of various kinds, they also remake car fuel tanks with their own hands for installation on a motor boat. And they even manage to install a fuel level monitoring system, also taken from a car. Anyone can learn from experience and make a gas tank with their own hands that meets their personal needs.
Fuel level control systems
An important point is the need to control the level of gasoline in the fuel tank, because... When traveling by water, there will be nowhere to refuel. There are various methods for controlling the amount of fuel, for example:
- visually – there are marks on the plastic tank and the gasoline level is visible;
- using a fuel level monitoring system.
Level sensors are mechanical and electronic. By analogy with automobile systems, boats are equipped with special fuel level monitoring systems that display data on the fullness of the gas tank on its lid or on the dashboard of the boat.
Such systems are an additional but necessary option that should not be neglected. Especially when planning long trips by water over long distances.
How to install on a motor boat?
There are some rules and restrictions that must be followed when installing the fuel tank. For example, you need to remember that bulky flat gas tanks need to be mounted along the side, because when installed crosswise, on a wave, gasoline will move from edge to edge, which can lead to instability on the surface of the water and the boat capsizing. Also, the internal space of the tank should be divided into sections that will prevent a sudden overflow of liquid from end to end of the container.
The gas tank is connected to the engine by a system of gas pipelines, which are hoses with fittings. It is important to choose the correct diameter of the fuel hose; the operation of the engine directly depends on this. Most often, hoses with a cross-sectional diameter of 8, 10 or 12 mm are installed. It is important to remember that the more powerful the motor is installed on the boat, the larger the diameter of the gas line should be.
The fuel supply system is installed without differences in height, without sharp bends or twisting of the hoses. Also, if installed at the wrong angle, an air lock may occur in the fuel line and the fuel supply will stop and the engine will stall.
A little about the fuel tank cap
The gas tank cap is an important part of its design, performing important functions such as:
- prevents leakage or splashing of gasoline when the boat is moving and on turns;
- prevents mechanical contaminants, precipitation, etc. from entering the fuel tank;
- regulates the pressure of gasoline vapors inside the tank;
- prevents excessive evaporation of gasoline.
Any, even the simplest cap, is equipped with special seals to seal the gas tank. A special valve is also installed in it to release fuel vapors and reduce the pressure inside the tank.
Experienced users do not recommend losing the caps included with the gas tank, because... If the cap is lost and replaced, the seal of the gas tank may be compromised.
Where and how to buy?
Currently, the market offers many different gas tanks for motor boats, boats and yachts to suit every taste and budget of the buyer. You just need to decide what kind of gas tank is needed, what material it is made of, what the capacity of the tank is, etc. The presence of additional options, such as gasoline level control, fuel filter, etc., also increases the cost of the tank, as does the manufacturer.
The leaders in sales of outboard motors and accessories are companies such as Yamaha, Honda, Tohatsu, Suzuki, etc. These names are a guarantee of the high quality of the product, and this is very important when choosing a gas tank and fuel system.
There are many companies selling boat motors and accessories on the Russian market. In addition to retail businesses, they have created online stores where you can select the best price for the desired product, pay and arrange delivery in a few clicks.
The table below shows the price ranges for fuel tanks in various online stores.
| Online store | Price range, rub. | Link to website on the Internet |
| "ALLIGATOR" | 3824,00 – 16399,00 | https://alligator-boat.ru/internet-magazin/folder/stacionarnye-toplivnye-baki |
| "Aliexpress" | 2961,81 – 6398,78 | https://ru.aliexpress.com/popular/fuel-tank-boat.html |
| "TIU.RU" | 1645,00 – 30150,00 | https://moskva.tiu.ru/Toplivnyj-bak-lodochnogo-motora.html?category=12070607&sort=-price |
| "1000 sizes" | 1645,00 – 11127,00 | https://vodnik.1000size.ru/perenosnye-i-stacionarnye-toplivnye-baki-dlya-lodochnyh-motorov |
The range offered by online stores is varied, the buyer can choose the best option that suits the price. In addition, many sellers organize promotions and sales, which will help you get an additional discount on your purchase. And those amateurs who like to do everything with their own hands can always find tips and tricks on how to make a fuel tank for a boat motor with their own hands.
Exhaust pipe with cooling. Tank ventilation head. The engine is powered by two gas tanks.
Exhaust pipe with cooling.
You can avoid thermal insulation of the exhaust pipe if you cool it with water injected from the engine cooling system.
Water is injected at a distance of 0.5-0.6 m from the flange of the exhaust manifold 1 of the engine (Fig. 198) after the exhaust pipe 4 is slightly bent upward, which prevents water from entering the engine when idling at low speeds.
Cooling water from the manifold jacket is introduced through tube 3 into the exhaust pipe in one of two ways shown in the figure. Supplying water through a cylindrical water jacket 6, which has 20-25 holes with a diameter of 2 mm, better atomizes and cools the exhaust gases. Pipe section 2 is insulated with asbestos before water is introduced; then the pipe can even be made of rubber (durite) hose 5.
Injecting water into the exhaust pipe also reduces noise, especially on two-stroke engines.
Kingston filter.
The water intake of the engine cooling system and the filter can be combined in one device
(Fig. 199) .
Housing 2 has a flange at one end for fastening to the casing, and at the other - a thread for cover 4. A thin-walled tube is inserted inside, into which holes with a diameter of 2.5-3 mm are drilled. The number of holes and the length of this filter tube 3 are easy to calculate: the total area of the holes should be 1.5-2 times greater than the area of the hole in the pipe 6. Instead of a tube, you can use a metal mesh with a corresponding cell.
Valve 5 is installed on the pipe; The hole in pillow 1 must be made smaller than the diameter of filter 3.
Tank ventilation head.
To reliably protect the gas tank from water ingress, a deck head is placed at the outlet of the air tube (it can also be installed on vertical walls).
Housing 6 (Fig. 200) with an air tube 7 inserted into it from the gas tank is attached to deck 3 with a nut 5 with gaskets 4.
One central (pos. a) and four external (pos. b) air holes are drilled in the body, closed with a package 2 of six to eight layers of thin copper mesh, pressed with a mushroom-shaped cap 1 on the thread. The mesh pack protects the device from sparks and water.
Additional gas tanks for Kazanka.
Gas tanks shown in
Fig. 201 , are conveniently placed between the first and second (counting from the transom) frames along the sides of the Kazanka.
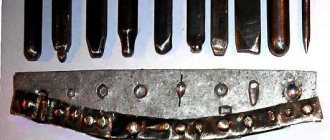
The capacity of each tank is 35 l; they can be welded from 1.5mm thick aluminum alloy sheets or made from galvanized iron roofing. The tank is bent from one sheet of 750x890 mm in such a way as to create one longitudinal seam located on the top side. All connection locks on iron tanks must be soldered and their tightness checked.
The filler plug is used to secure the intake tube and place the air hole.
Gas tank for Progress.
Under the front seat of the Progress it is advisable to place a permanent gas tank with a capacity of up to 100 liters
(Fig. 202). To prevent fuel from overflowing from one side to the other when heeling (the boat may end up with a dangerous heel as a result), the gas tank is divided by several baffle partitions 3. Small holes must be made in the corners of these partitions so that the fuel flows to the intake tube 4. Air tube 2 is better bring up and onto the deck of the boat; Plug 1 can be taken from a standard outboard motor tank.
How to weld a fuel tank
A leak in the gas tank occurs as a result of physical wear or due to damage with collapse of the housing. Fuel vapor accumulates in an empty tank, so welding and heating can cause an explosion. Many motorists ask how to properly seal a gas tank. There are several repair methods: argon arc and cold welding, soldering. Let's look at each of them in more detail.
General rules for repairing a gas tank
The presence of a leak is indicated by increased fuel consumption and a specific smell in the cabin. Even a minor crack is dangerous for the life of the driver and passengers. The leak area ignites when struck by a spark. Damage occurs as a result of cracking of the body during driving and exposure to corrosion. Defects occur when there is a malfunction in the vehicle's fuel system. The discharged pressure contributes to the gradual cracking of the walls. Microcracks gradually increase, causing leaks. Before welding the gas tank, you must follow the safety rules:
- be sure to drain gasoline or diesel fuel from the tank;
- thoroughly dry and dismantle the tank, inspect for damage;
- wash inside using specialized detergents;
- After washing with household chemicals, rinse thoroughly and dry.
Washing the tank allows you to completely remove explosive vapors. The repair method is selected based on the material from which the tank is made. Argon arc welding of a fuel tank is only suitable for metal containers; it is recommended to repair plastic products using cold welding; hot soldering is a universal method. Let's take a closer look at how to seal the gas tank yourself.
Cold welding gas tank repair
Cold welding is suitable for containers with hard plastic walls or for metal tanks. Glue does not adhere well to thin-walled tanks, so such repairs will be ineffective. The adhesive composition is selected in accordance with the type of container material. It is recommended to wear gloves when repairing a gas tank using cold welding. The crack is cleaned of contaminants and degreased with nefras.
Two-component mixtures are combined in the proportion specified by the manufacturer. The prepared solution must be used within 10-20 minutes depending on the brand name. The glue is applied to the damaged area in layers and smoothed, pressing it to the surface. 2-3 hours after repair, the tank is ready for use. The glue in the form of a bar is thoroughly kneaded with a damp hand and the crack is covered.
Cold Welding Selection
When choosing a cold weld, it is necessary to take into account that it must be resistant to gasoline. Only minor damage can be sealed with it. Moment superglue or similar special compounds from other manufacturers are perfect for eliminating leaks on the road. The rags are cut into patches, soaked in glue and attached to the hole in several layers. This repair method is temporary; it allows you to get home or to a service station and completely solder the holes.
To repair minor damage on your own, you can use epoxy resin with a hardener and fiberglass. The defect area is treated with sandpaper to increase adhesion. After the surface has dried, a glass cloth impregnated with resin is applied to the crack. Each subsequent layer is laid after the previous one has dried. After the last layer has hardened, the patch is treated with an anti-corrosion compound.
Soldering
Compared to cold welding, fuel tank soldering is more resistant to mechanical stress and external factors. To eliminate a leak, prepare a patch 4-5 cm larger than the area of damage. Repair of plastic products is carried out on the outer part of the walls of the gas tank with a 250-watt soldering iron. When sealing, you need to select a patch from the same material. The type of plastic is indicated on each part. Most often, gas tanks are made of ABS, polypropylene or polyamide.
For high-quality adhesion, a substrate of fine reinforcing mesh made of metal or copper is required. The substrate is fused into the wall of the gas tank, evenly distributing liquid plastic over the entire surface of the defect until a new uniform coating appears. The procedure is performed quickly so that the plastic does not harden, otherwise sagging will form.
In metal containers, you can seal the hole with a thin metal or copper patch. You can heat the case using a blowtorch or iron. The patch is attached with low-melting solder along the entire perimeter using a 500-watt soldering iron, having previously treated the joints with soldering acid. After soldering, you need to let the body cool, then cover the patched area with bitumen mastic or paint. The coating will protect the patch from corrosion.
Repair using electric welding
Welding a fuel tank using a argon arc welding machine and tungsten electrodes is considered the most reliable method. It reliably connects non-ferrous metal with alloy steel. Most gas tanks are made of aluminum, so inverter welding is not suitable for repairs. The repair area is cleaned of oils and dirt. The patch is welded around the entire perimeter, trying to maintain a homogeneous gas environment. The seam is smooth and durable. After cooling, the repaired area is painted or covered with bitumen mastic.
Plastic gas tank repair
Repair using epoxy glue is the fastest. This is a temporary measure to fix a leak along the way. You can patch the hole using a plastic welder - an extruder. Welding tanks using this method requires certain experience and knowledge of technology. It is recommended to practice on a small piece of plastic before welding. To correctly calculate the productivity of an extruder, you need to know the size of the cross-section of the crack. Welding begins from the edge of the fracture, laying the molten plastic welding wire evenly across the entire width of the hole with a small margin. For thorough welding, movements are made across the crack, completely filling the hole. In order for the seam to lie evenly, it is necessary that the hot air gun and the shoe of the device are evenly heated.
If you find an error, please select a piece of text and press Ctrl+Enter.
Manufacturing options
We will look at two main solutions: constructing a container from sheet metal and using ready-made containers that are adapted for shower structures. Each of them has its own characteristics, let’s consider them in more detail.
Homemade tank
To work we need the following:
- Sheet metal 2-3 mm thick, such options provide high structural rigidity and reliability.
Sheet metal is the main raw material for the tank
- To further strengthen the frame, you will need a corner of 20x20 or 25x25 mm; if the structure is not very large and the sheet is durable, you can do without them.
- A welding machine is necessary to connect the elements together. If you do not have the appropriate skills, then it is better to hire a professional specialist.
- To cut the material you will need a grinder and several metal cutting discs.
Let's look at how a rectangular shower tank is made from sheet material:
- First of all, you should decide on the dimensions of the structure, taking into account both the dimensions of the cabin and the required capacity of the system.
- Next, markings are made and the sheets are cut into pieces of the required size . When working, follow safety precautions and use protective equipment.
Cutting metal is a rather labor-intensive task that requires accuracy.
- Next, all the elements are welded into a single structure, and we recommend making the upper part in the form of a cover, so you can clean the system if necessary and treat it with anti-corrosion compounds.
- It is important to embed into the structure an outlet for connecting a shower head and an outlet for a sanitary drainage tap. And if drainage is done at the very bottom of the container, since it is used to drain water from the tank, then the outlet for the shower should be 20-30 mm above the bottom so that sediment does not get into the watering can.
- The outlet under the shower head can be tightly welded, but it is better to drill a hole of the required diameter in the metal where the head for the shower tank will be attached, and secure the structure with nuts and rubber gaskets. For these purposes, it is best to purchase a squeegee of the appropriate diameter at a plumbing store.
The assembly must be secured using rubber gaskets
- After completing the work, do not forget to check the structure for leaks; in case of leaks, all problem areas are marked and welded.
This is what a finished metal tank for a shower cabin looks like, the lid is made separate and placed after securing the tank
Use of ready-made structures
Very often, shower tanks are made from improvised containers and barrels; this option is easier to implement:
- First of all, you need to find a suitable option; if you find a metal barrel, it is important that it does not previously store hazardous substances and other compounds that are very difficult to clean.
- First of all, it is necessary to cut a hole measuring 40x40 cm in the upper part so that you can inspect the system from the inside and clean it. Again, it is better to make a drainage descent from the lowest point and a water intake 2-3 cm above the bottom.
- Next, you need to paint the structure black for the best accumulation of heat from the sun.
Preparing the gas tank for repair
If there is a question about high-quality independent repair of a gas tank, the surface must be prepared. Preparation involves draining the gas tank, cleaning (including sanding) and degreasing the area to be repaired. Of course, it would be best to remove the gas tank from under the bottom of the car, but repairs can be made without removal.
If the gas tank is broken on the road, preparing the surface for repair can be neglected. Below is how to carry out repairs in such hardcore conditions.
Repair with epoxy resin
It is advisable to use such a fibrous fabric, but for repairs on the road, any will do.
Any two-component epoxy resin can be used
You can fix a leak in a plastic gas tank using regular epoxy resin. After degreasing and sanding the area, apply the mixed epoxy resin to the crack. If it is quite large and you cannot cover it completely, you will have to get a little confused.
Take a piece of fabric whose area is slightly larger than the crack and apply glue to its surface. After this, cover the crack with this fabric, applying force while pressing the fabric. Thus, it must be held for at least 30 seconds. When the fabric is glued, apply more glue on top of the fabric so that the surface is completely covered. In this case, “more” does not mean worse.” The main thing is to avoid getting pieces of epoxy resin into the tank itself.
When such a patch dries, you can additionally treat the surface with a sealant to avoid wear of the epoxy resin (as a result of the same sandblasting) and to consolidate the result.
In the field, the process is similar. Only here you need to use a cloth impregnated with an adhesive composition. Place the epoxy on the engine (this will warm it up, and as a result, it will mix and harden faster), saturate a rag with it and glue it directly to the hole. Also use the remaining glue to secure the result.
This method of repair will at least allow you to get to the nearest service station. We do not recommend using it as a major repair for a gas tank leak. There are ways to do this, which you will learn about further.
Self-mixing for electronic cigarette
Viper can create his own e-liquid, called "self-mixing" in the community. To do this, you need to know what the homemade liquid should consist of.
It contains glycerin, propylene glycol, nicotine and flavorings. Glycerin provides a large amount of vapor, propylene glycol allows the flavors to dissolve better and gives a “throat hit” feeling, the nicotine in the liquid is useful for those who quit smoking tobacco products to get high, and the flavors will have to be bought at the nearest vape shop.
You can also order fragrances from an online store or refrain from using them. On the Internet you can find many recipes for liquids, which describe how much you need to add one or another component of the liquid in order to get a homemade delicious premium liquid. In this matter, it is important to strictly observe all proportions and carefully follow the recipes.
Repair by plastic welding
This repair method is most often used at specialized service stations, since it involves the use of a special tool, and for a one-time use it is extremely stupid to buy it (it is not very cheap).
Surface preparation for repair is exactly the same as in the case of repair with epoxy resin. For welding, a plastic rod is used, which is heated and, like a glue gun, is applied to the surface to be treated.
This method is reliable, but it is very important to carry out the preparatory process correctly, otherwise such repairs will not last long.
Mastic or glue
Some motorists use body mastic or Moment glue for repairs. Of course, this method is also effective, but not long-term. It can be used for temporary gluing, but upon arrival at the garage it is recommended to repair the tank in a more reliable way.
The gluing procedure is simple - we clean the surface of the crack and apply the material. It usually takes up to an hour to dry, so you can quickly repair the tank and move on. But there is a high probability that the glue will fall off along the way.
Source of the article: https://armrinok.ru/nasosy/samodelnyj-benzobak.html
Repair with a soldering iron
This method of eliminating gas tank leaks is suitable for those who want to make the repair themselves, but thoroughly. Basically, you will need a soldering iron, a piece of plastic (slightly larger than the crack or hole) and sealant.
The process of preparing the area to be repaired is similar - drain the fuel, degrease and sand. Then you need to heat the edges of the crack, but only until they become soft and do not float. After that, we take a patch and solder the hole.
Again, we recommend securing the repair with sealant. Many places advise using epoxy resin, but what's the point if you can buy a sealant - it will be much more reliable.
Is it worth risking your health?
There are cases when amateur activities directly lead to a hospital bed. And there are a lot of them.
Therefore, those who want to make their own cigarette must be very careful and have experience in assembling electronic devices.
Improper assembly and operation can result in burns to the face, hands, and respiratory tract . To reduce the risk of burns, you need to buy liquid for cigarettes rather than make your own.
Additionally, the vape can explode and cause serious injury.