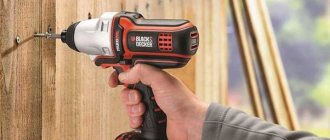
A screwdriver is a tool designed for tightening screws and drilling small-diameter holes. There are mains ones, powered by 220V mains, and rechargeable ones, with two replaceable batteries.
Cordless and corded screwdrivers
If the battery in such devices fails, there are three options:
- replacing the battery is expensive; in a budget-class device, the price of the kit is close to the cost of a new device;
- repair is not always possible, and in some cases its cost is comparable to the cost of new batteries;
- Converting a cordless screwdriver to a corded one.
This article talks about how to power a screwdriver from a 220V network, or how to turn a cordless screwdriver into a network one.
Screwdriver device
This mechanism consists of the following parts:
- DC motor. It has the shape of a cylinder; instead of an excitation winding, the housing contains permanent magnets. This simplifies the design and provides sufficient torque at low speeds. The drive (sun) gear of the planetary gearbox is mounted on the electric motor shaft;
- Reversible speed controller. The adjustment circuit is assembled on a PWM controller and a field-effect transistor. Reversing is carried out by switching the polarity of the power connection to the motor brushes;
- Planetary reductor. Made in a separate building. It got its name because of its resemblance to the solar system. Consists of a ring gear, a central (sun) gear, satellites and a carrier. The ring gear transmits force through the spring-loaded balls of the load regulator. There are models with two-speed gearboxes. Increased speed is activated when using the device as a drill;
- Rotation force limitation mechanism. Serves to limit the force when tightening screws. Transmits torque through balls pressed by an adjustable spring;
- Removable battery. Consists of individual elements in one housing. The voltage in different models ranges from 9 to 18 volts.
Screwdriver device
Battery restoration by replacing several elements
Restoring a screwdriver battery by replacing several elements can be successful for all types of batteries. It also does not pose any risk to them, as does manipulation with distilled water, provided that care is taken during soldering.
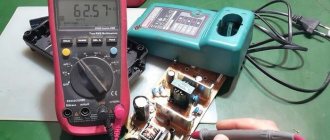
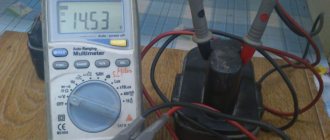
First, the output voltage of each “can” is measured using a multimeter, which in total should be 12-14 V. Accordingly, the voltage of one “can” should be 1.2-1.4 V. The U indicators are compared with each other, the most weak elements. Read more about how to check a screwdriver battery with a multimeter →
It is recommended to solder the battery chain using spot welding, but if this is not available, there is nothing left to do but use a regular soldering iron and do everything as quickly and accurately as possible, in order, if possible, to prevent the battery from overheating.
After soldering is completed, insert the battery back into the screwdriver and carry out 2-3 complete charge-discharge cycles to equalize the energy potential of all batteries. In order for the updated battery to last longer, it should carry out such training 2-3 times a month. How to quickly and completely discharge a screwdriver battery →
Screwdriver battery design
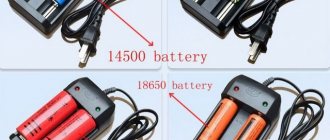
Converting a screwdriver to 18650 lithium batteries
The design of the battery does not depend on the brand. In all devices, the battery design is similar and differs in appearance, housing and contacts.
Battery device
The housing contains several elements connected in series. Their number depends on the voltage of each element and the battery as a whole. When using the most common nickel-cadmium elements with a voltage of 1.2V, 10 pcs are needed to power a device with a nominal value of 12V. Battery capacity is indicated in ampere hours.
Interesting. With a series connection, the output voltage increases, but the capacitance does not change and is equal to the capacitance of the individual elements.
Step-by-step repair instructions
At home, you can independently revive the screwdriver battery. To do this, you need to open the battery case and replace the elements (or in other words, the cans).
How to disassemble the battery case
The battery of most screwdrivers has a collapsible housing. But some manufacturers, to prevent self-replacement of elements, make battery cases non-separable. Thus, they force the owner to purchase a new branded battery. In this case, it will be very difficult to disassemble the case without irreversible damage.
The connection of the housing parts can be done using screws, latches or glue. In the first case, you can separate the parts of the case by simply unscrewing the screws with a screwdriver.
If the body parts are glued together, you need to carefully use a knife to push the parts apart by inserting the blade into it. Then you need to wedge the joint by inserting any solid object of suitable size into the resulting gap. Then you need to move along the entire perimeter of the body. After the body is disassembled, its parts will need to be reattached with glue.
Finding faulty cells
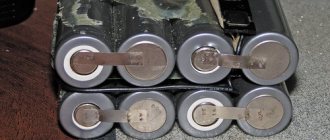
After the case is opened, you can see that the battery cells are connected in series to each other. In order to repair a battery for a screwdriver, you will need to identify the faulty element - usually one or two elements - and replace it.
Prolonged soldering cannot be used, as the element can be damaged if it is heated. Lithium-ion batteries are especially sensitive to heat. If you have no experience soldering such batteries, you can purchase batteries with already welded contacts on AliExpress.
They write on the Internet that nickel-cadmium batteries dry out over time and the element (can) can be restored by drilling a hole in it and using a syringe to pour water inside. But this method of restoration can lead to damage to the element and even injury, so we will not consider it.
In order to find faulty cells, you need to check what voltage each battery cell produces individually.
To make accurate measurements, the battery must be fully charged.
You need to remove the contents of the case and lay out all the elements on a flat surface. It will be much easier to measure voltage if you provide free access to each contact of the battery cell.
For convenience, you should draw a diagram on a piece of paper and mark the voltage of each element on it. We measure the voltage using a multimeter, having previously selected the DC voltage measurement mode with a low measurement limit.
The voltage level for each nickel-cadmium cell should be between 1.2 and 1.4 V, and for lithium-ion cells between 3.6 and 3.8 V.
Then you should discharge the battery. To do this, you can connect a load to it. For example, a high-power incandescent lamp, or you can assemble a battery and use a screwdriver until it runs out.
After this, the battery is disassembled again and the voltage is measured. If voltage losses were previously determined on the elements, when measuring again, the multimeter readings will be even lower. It is necessary to replace elements where the difference in voltage readings will be significant: up to 0.5 or 0.7 V for cadmium and less than 2.5 volts for lithium.
Expert opinion
Alexey Bartosh
Specialist in repair and maintenance of electrical equipment and industrial electronics.
Ask a Question
If the battery is very worn out, then even after long-term charging, the voltage on some batteries will be significantly lower than on others (sometimes even close to 0 volts). They need to be changed; they are unlikely to be restored.
Selection of replacement elements
There are several ways to select Li-Ion (lithium-ion) or Ni-Cd (nickel-cadmium) battery cells for replacement. If you have several faulty batteries from one screwdriver, you can find working ones by disassembling them, or find them in electrical goods stores, or on online shopping sites, for example, on AliExpress. As a rule, manufacturers of major brands of screwdrivers use lithium battery models produced by several manufacturers.
Also on AliExpress you can buy the necessary battery cells with additional contacts already welded using resistance welding. This will greatly simplify the replacement process and reduce the likelihood of damage to the element being replaced.
Pay attention to the compliance of the technical characteristics of the replaced elements, especially capacitance and voltage.
How to solder cans to a battery
If you have experience in soldering radio components, then replacing a damaged battery (can) will not cause difficulties:
- Carefully disconnect the damaged element by cutting the connecting plate. When replacing an element, observe the polarity;
- then you need to solder the elements together. Pay attention to the heating time of the contact - it should be minimal, which is especially important for lithium-ion batteries. With prolonged contact, such an element will inevitably fail, and may also spontaneously ignite or explode. Therefore, the soldering movement must be precise and very fast;
- After all the elements are securely soldered, you need to assemble them and fasten them together with tape or insulating tape. The assembly process is similar to disassembly, but in reverse order. After assembly, the contents are placed in the housing and the lid is secured with screws or glue.
Types of battery cells
Battery for screwdriver
These devices use elements of different types and voltages, each of which has its own advantages and disadvantages.
The most common are nickel-cadmium (Ni – Cd) with a voltage of 1.2V.
Advantages:
- low price;
- stored in a discharged state.
Flaws:
- have a memory effect;
- high self-discharge;
- small capacity;
- small number of charge/discharge cycles.
More advanced nickel-metal hydride (Ni-MH) voltages are 1.2V.
Advantages:
- less memory effect and self-discharge;
- large capacity and number of charge/discharge cycles.
Flaws:
- higher price;
- do not tolerate low temperatures and storage in a discharged state.
The most advanced lithium-ion (Li-Ion) voltage 3.6V.
Advantages:
- no memory effect;
- very low self-discharge current;
- high specific capacity, allowing to reduce the weight and dimensions of the device;
- the number of charge/discharge cycles is many times higher than other types of batteries.
Flaws:
- high price;
- loss of capacity three years after manufacture.
Checking the battery after repair
After replacing battery elements, it is necessary to equalize the potentials of all battery elements. To do this, leave the latter to charge for a long time. Then, after charging the battery of the screwdriver, you need to leave it for about a day to recover.
You can discharge the battery by using a screwdriver until it is completely discharged or by connecting a load to it. For example, an incandescent lamp designed for the appropriate voltage. To equalize the battery charge, the charge and discharge cycle should be repeated twice.
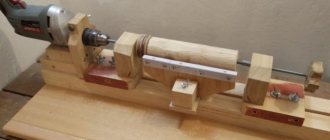
Converting a screwdriver to power from a 220V network
If the battery fails and it cannot be repaired, the only way out is to convert the cordless screwdriver into a mains one.
DIY power supply for 12V screwdriver
In this case, the power of the power supply must exceed the power of the engine, taking into account possible overloads at the moment of completion of tightening. It is not indicated in the device passport, but this parameter is written on the body of the electric motor, or it can be calculated by connecting the device to a constant voltage source through an ammeter. For a 70W motor, a 120W power supply is sufficient.
Important! The charger's power is insufficient to operate it. When converting a cordless screwdriver into a mains-powered one for 220 volts, you must use a different power supply.
Using an external power supply
The external power supply device is larger in size than the built-in one, but in any case, if you power the screwdriver from the mains, the tool will be “tied” by a wire to the outlet.
External power supply
The current coming from the power supply reaches 10-15A, so the cable cross-section must be at least 1mm².
Interesting. The screwdriver can be powered from an old car battery or from a car through the cigarette lighter socket.
Computer power supply
The simplest and cheapest option is to use a power supply from an old computer with a power of at least 300W and a current of 15A.
In old units there was a switch, in modern ones - to turn it on you need to short-circuit the wires going to the device. The color of these wires depends on the model. This can be found on the Internet or by selection.
The 12V output is located in a four-pin connector: black “–”, yellow “+”.
Such devices have a built-in fan, so when making a housing for it, it is necessary to make holes or install it with the fan facing outward. It's best to simply hide the excess wires inside the case.
Important! A 14.4 or 18 volt screwdriver will operate at reduced power.
Car battery charger
The requirements for this device are the same as when using a computer unit.
If so, it is advisable to use a device with a built-in voltmeter and voltage regulation. Some models have a current-limiting resistor installed inside. It needs to be short-circuited.
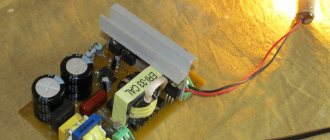
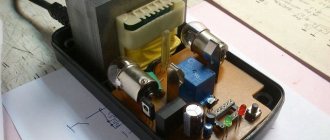
How to make a homemade power supply
In addition to the purchased one, you can make your own power supply. To do this, you need a 160W transformer, the kind that was installed in tube TVs.
First of all, it is necessary to determine the required number of turns. The procedure is as follows:
- disassemble the transformer;
- unwind all secondary windings from the reel;
- wind 10 turns of wire;
- assemble a transformer;
- connect to 220V network;
- measure the voltage on the secondary winding;
- divide the number of turns (in this case 10) by the measured voltage.
The resulting value is multiplied by the supply voltage of the screwdriver and the required number of turns is obtained.
Transformer
Attention! The number of turns per volt can be obtained by measuring the voltage and counting the turns in the secondary winding.
The step-down winding is wound with a wire with a cross-section of 1 mm² to reduce the voltage drop in the transformer.
The output of the transformer is alternating voltage, but the device requires constant voltage, so a diode bridge is installed in addition to the transformer. It is assembled from diodes on radiators with a voltage of more than 20V and a current of 10A. It is mounted together with a transformer or in a battery case from which the elements have been removed.
Built-in battery power supply in case
If you have the desire, time and direct hands, the unit can be placed in the battery case. To do this, a ready-made device with the appropriate parameters is purchased, removed from its housing and mounted in the battery housing. The terminals are soldered with a wire with a cross-section of at least 1 mm² to the battery terminals, and the power cord is replaced with a longer one.
Built-in power supply
Important! If there were ventilation holes in the power supply case, then it is necessary to make similar ones in the new design.
Sequencing
- We completely discharge the battery.
- We remove it from the screwdriver socket and open it using a straight screwdriver.
- We remove all the old cans and remove the connecting plates using the desoldering method.
- We solder a new electrical circuit based on new elements.
- We perform several cycles of charging and discharging the battery.
The first three stages should not cause any particular difficulties, so there is no point in describing them in detail. The most important point is to maintain the order of polarity of the circuit elements when soldering again.
Read here how to repair a screwdriver.
In this article you will learn about jigsaws.
Here we mean the type of connection; it is serial, implying the connection of elements from the negative to the positive pole.
Using the previous "plate" terminals, begin assembling the circuit, following the existing configuration for the form factor of your battery. Otherwise, it will be difficult to insert the entire power unit back into its housing.
The procedure for charging and discharging the battery should be carried out several times with a break, and then let it sit for about a day.
During the charging process, it is important to measure the voltage on each bank using a multimeter; it should be 1.3 V
Expert advice: soldering is carried out at maximum heating of the soldering iron, so avoid overexposing the contacts of the cans to avoid their premature burnout.
The process of replacing cans significantly reduces the cost of purchasing a new battery, and domestic instruments are no exception. For example, a well-known tool from the Russian manufacturer Interskol will not cost less than its foreign counterparts.
But it has a small advantage - a wide network of service centers that can save you from replacing the screwdriver battery elements yourself.
You will learn how to disassemble a screwdriver from this video:
We invite you to watch a video on how to repair a power tool battery:
Assembling a working battery from two that have lost capacity
From two faulty devices you can assemble one that is suitable for use.
Important! By connecting a power supply to the body of the faulty battery, a second repaired one will provide mobility when performing small amounts of work.
Finding faulty elements
The battery is assembled from individual elements. They do not fail at the same time, but even one faulty element impairs the performance of the entire battery.
To determine the parts that have lost capacity, you must:
- charge the battery;
- work until power loss;
- disassemble the battery;
- measure the voltage on each element separately.
Batteries on which the voltage is noticeably less than others or absent altogether must be replaced.
Battery repair
After identifying and removing the faulty parts, the remaining parts are assembled into a device suitable for further use. The connection is made by soldering, wires with a cross-section of 1.5 mm² or a strip similar to the one with which the parts were connected before.
If there is an insufficient number of serviceable elements, we purchase the missing ones or convert the instrument to a 220-volt mains power supply.
Knowing how to convert a cordless screwdriver into a corded one with your own hands will help you save money and not have to purchase a new device.
How to identify battery problems
If, when working with a screwdriver, the operating time on a single charge is significantly reduced and the power of the tool drops noticeably, the battery is faulty. You can check this by simply replacing the battery.
Of course, batteries do not last forever, and their service life is limited. The easiest option, of course, would be to buy a new battery. Or you can take a chance and restore the screwdriver battery yourself. To do this, you need to open the battery case, remove the battery and, after identifying the faulty element, replace the latter.
What do lithium batteries look like?
Most lithium devices are housed in a prismatic body; unfortunately, some models have a cylindrical shape. These batteries use roll electrodes and separators. The body is made of aluminum or steel. The positive pole goes to the housing cover.
In prismatic configurations, the electrodes look like rectangular plates. To ensure safety, the battery contains a device that acts as a regulator of all processes and opens the electronic circuit in critical situations. The increased sealing of the housing prevents electrolyte from leaking out and oxygen and moisture from leaking inside.
Advantages of the second option
Option 2 is more suitable, since the voltage in the battery drops quite rapidly from the highest to the lowest (from 16.8 to 14.8 V). For an electronic motor, which, in fact, is a screwdriver, exceeding 2.4.8 V is not a critical point.
The lowest voltage indicator is for the 3S-Li-Ion modification. It is equal to 7.5 V, which is insufficient for the production activities of the electronic device. By mounting four configurations, we will increase the electronic capacity of the battery.
Replacing Ni-Cd batteries with lithium ones
Many users today try to install lithium batteries in their screwdriver batteries instead of Ni-Cd ones, since the latter have many times more capacity and charge/discharge cycles. Most often, cadmium banks are replaced with lithium 18650, which received this name because of their size. This is done in cases where the screwdriver is constantly being actively used.
18650 battery with solder strips
To convert the battery, you need to purchase 18650 cells and a charging board. It allows you to control battery charging and electricity output on the same terminals. It also provides protection against short circuits between banks. Complete replacement of Ni-Cd power supply with lithium power supply in the screwdriver battery involves not only soldering, but also resistance welding. Therefore, it is necessary to disassemble all this.
Problems with the screwdriver
Despite the variety of power sources for batteries, they all have a similar structure, which means they have the same faults:
- breaking the chain connecting the banks;
- loss of charge capacity (one or more);
- evaporation of electrolyte;
- lithium decomposition (only in some batteries).
The main reasons for tool failure
Reduced battery cell capacity is a common problem that occurs even with short-term use of the device. The problem is caused by the fact that even when a single charge loses its capacity, the remaining banks can no longer be fully charged. As a result, the time of continuous use of the screwdriver is reduced.
The cause of such a breakdown is the “memory effect” or evaporation of the electrolyte in the batteries, which occurs when they are very hot. However, even such troubles can be dealt with at home, without turning to specialists.
Non-functional elements are restored or replaced with new ones. The second case is relevant for lithium-ion batteries in which lithium has decomposed - in this case, all that remains is to buy a new power source.
It is necessary to detect the faulty battery element, then repair it or buy a new one