General points
To ensure normal storage of firewood in the woodshed, it should be properly prepared.
Wood is stored in the form of logs, which are obtained from split logs. If you purchased timber in the form of long logs, which is very profitable, then in order to be able to store the wood, they should be cleared of branches and twigs, sawn into logs, and then split into more or less uniform logs. At the same time, it is necessary to cut the logs into logs of the same length so that they not only fit in the barn, oven, but also stacked in a neat stack. In a well-assembled woodpile, the wood dries better because it is well ventilated.
During cutting, the easiest way is to prepare a wooden stick, a branch and use it to check the size of the next log, or use a chainsaw to prepare firewood to mark the entire log using a tape measure at once, and then start cutting. For the convenience of cutting logs, you should prepare trestles and stands of the original type, since sawing wood on the ground is inconvenient.
Previously, two-handed saws were used to cut logs on trestles.
After the logs of approximately the same size are prepared, you can start chopping them. Classical splitting of firewood involves the use of an ax or cleaver, but there is also an alternative, mechanical option, when firewood is split by a special machine, a wood splitter. It is worth noting that working with an ax is very labor-intensive, so using a special machine not only speeds up, but also makes the work easier.
If you live in a house that is heated exclusively with wood, if you have a bathhouse, then to simplify and facilitate the process of collecting firewood, you should definitely consider purchasing a wood splitter. This device will facilitate the annual winter wood harvesting activities for the following year. By the way, the system is so simple that you can easily do it yourself.
If there is no wood splitter, you will have to chop the wood into logs using an ax. If you also don’t have experience and skill in this matter, then this activity will be very dangerous for you, so we decided to give some recommendations for such work.
The nuances of splitting wood
So, we found out that firewood can be split in various ways. As a rule, for this purpose, blows are made with an ax in order to split a sawn piece of log, and the blows are applied to the end.
A massive wedge (and the ax is shaped like a wedge) is driven into the log. If it is soft and without knots, then the wedge will go inside even with relatively little physical effort. The wood fibers will move apart under the influence of tangential forces, and the body of the log will split into two parts.
In the case of a small angle at the apex, the tangential forces will be smaller, but the wedge will penetrate deeper inside. However, the destructive force will not be enough, and the ax will jam in the crack that appears. And if the angle is less acute, the tangential forces will increase and the wood, as a result, will split.
On a note! The viscosity of wood will depend on a number of factors. It has been laboratory proven that the wedge angle at the apex for most wood species should be 25-30°. In this case, the chopping properties of the wedge-shaped tool will be the best.
If the wedge penetrates slowly, then the energy accumulated during the swing and subsequent impact is no longer the determining factor. In this case, the connections between the fibers are broken after certain values are reached during implementation. According to research, the optimal tip angle for manual wood splitters is 30-38°. Then the connections will be broken with less effort. Although some types of wood can “resist” - for example, cherry, elm, apple tree.
Pine, ash, oak and some other species split with a slight penetration of the wedge.
Important! The magnitude of the forces also depends on the length of the block. The shorter the log, the less resistance the wood will provide when splitting. As a rule, this length is determined by the depth of the firebox, because the firewood in the stove must be positioned in such a way that the door closes smoothly.
Recommendations from our expert
To ensure that the wood splitter is reliable and lasts as long as possible, you should listen to the following tips:
- Do not ignore painting the structure, especially when you plan to install it outdoors.
- Make calculations with a reserve. This applies to engine power, steel thickness and other indicators.
- Start working with diagrams and drawings. Proper preparation will save time during installation and help avoid loss of materials due to errors.
- Try it on first, and then carry out welding or other fixation.
A wood splitter greatly simplifies the life of users who often have to prepare logs. Once assembled, the structure will save time and effort in the future. Making it yourself allows you to avoid unnecessary expenses.
Safety precautions
To work safely with a homemade device, you must follow the following rules:
- The process of harvesting wood should be carried out in closed clothing, gloves and safety glasses, so as not to be injured by chips flying away from the workpiece.
- The workpiece must be firmly positioned in the chute and not move during movement.
- When the piston moves, it is forbidden to reach out to the knives and adjust the shifted workpiece.
- Any manipulations with the workpiece are performed after turning off the unit and completely stopping all its components.
- Work on repairing or replacing the components of the wood splitter is carried out by disconnecting the electric motor from the mains power.
Wood splitters greatly facilitate the preparation of large volumes of firewood, saving effort and time. However, to provide firewood for a fireplace or bathhouse, there is no need to purchase complex, expensive equipment. It is much more pleasant and healthier to use an ordinary ax.
Self-production of the machine
It is possible to make a wood splitter with your own hands even if you do not have some of the necessary parts. However, if you do not have the skills to carry out welding work, then it would be better to purchase such a machine in a store or order it from a specialist. Poorly performed welding can result in serious injury.
To make a homemade wood splitter, you will need:
- profile pipes or corner;
- sheet metal;
- electric motor with starter;
- screw cone;
- support with bearing units and shaft;
- pulleys and V-belts;
- fastener
Drawings for making a machine, if you have certain skills, can be drawn up yourself or found on a thematic forum on the Internet. Many craftsmen who have made such a unit on their own post not only them, but also videos with the sequence of actions.
Work begins with the manufacture of the frame. For this purpose, profile pipes 40x25 mm or corner 40x40 mm are used. The dimensions of the frame will depend on the dimensions of the parts used and can be approximately:
- height – 70-80 cm;
- width – 50-55 cm;
- length – 70-80 cm.
Structurally, the frame consists of 4 legs (supports), connected to each other by welding with horizontal sections of pipes or angles. In the lower part there is a place for installing an electric motor. This may be an additional frame made of the same material, or a platform made of sheet iron.
The jumpers in the upper part are welded flush with the ends of the legs. The resulting frame is sheathed with sheet metal with a thickness of at least 1 mm. A screw mechanism with a pulley is attached to one of the sides. A wedge is welded under the screw, which will fix the wooden block during splitting. An electric motor is installed on the lower platform. Both pulleys must be in the same plane. The starter is mounted on one of the supports in such a way that it is possible to conveniently and quickly turn off the unit in the event of an unusual situation.
It must be remembered that the entire load is concentrated on one side of the structure. This must be taken into account when installing it for work. To make the machine easier to move, it is equipped with wheels, which are located on an axis mounted under the electric motor. Before turning on the unit for the first time, you must ensure that all parts are securely fastened. The finished cone splitter is cleaned of rust and painted. The electric motor is connected to the network using a 4-core cable of the appropriate cross-section with mandatory grounding.
Assembly diagram of a hand-held device
This type only makes the process of splitting logs easier, so you still have to work hard.
For production we will need:
- materials that you already have, or you will have to purchase them;
- drawings, video tutorials from practitioners, photos of finished copies and the work process - finding these materials on the Internet is not so difficult;
- tools - grinder, welding inverter;
- welder skills, the ability to draw up and calculate a diagram and ingenuity, because any ready-made diagram will need to be adapted to the parts you have on hand.
A round frame is brewed, the diameter of which is slightly larger than the diameter of the chocks (approximately 23 cm). To do this, you need to take a round, thick metal blank and weld two pipes to it, the height of which should be 35 cm. To complete the frame, you will also need to weld a ring on top. A knife is installed at the bottom with the tip facing up, and holes for fasteners are made in the base.
A log is placed on the knife and hit with a sledgehammer on top. However, it is worth remembering that such a wood splitter is only suitable for soft wood species.
Step-by-step guide to making a spring log splitter
To complete the work you will need the following tools:
- Angle grinder (grinder) with a set of cutting discs and cleaning flap wheels.
- Welding machines and modern inverter-type household devices for welding steel structures are relatively small in weight. The process is carried out using direct current, so the welds are neat, and the molten metal of the electrode completely fills the joints between the parts.
- Clamps will help connect the parts to be welded.
- Measuring and marking tools will help produce blanks for future designs.
Materials needed:
- Channel No. 10...16 (the number determines the height expressed in centimeters).
- Profile pipe 40·60 mm (30·60 mm).
- Rail 300…400 mm long.
- I-beam No. 12...16.
- Corner No. 30...50.
- Bushing from the car suspension (it may have wear).
- Pipes with a diameter of 40...70 mm.
- A suspension spring for a passenger car, for example, from a VAZ.
Before starting work, a preliminary design is drawn. Some craftsmen have mastered engineering design programs, with the help of which they can work out the details of a future product. Manufacturing details are shown below.
An approximate diagram will help you navigate the process of manufacturing the installation.
The support is made from the channel. A stand is welded to it. It is best to use an I-beam for the rack. This type of rolled product has high rigidity. Under prolonged loads, it is quite difficult to bend such an element.
To ensure stability of the base, jibs are welded to it. Additionally, stops are created from the existing pipes; they will prevent a possible fall of the entire product.
A support for the spring is cut from the channel. A square hole is sawn through it. This will allow you to securely fix the element on the rack in the future.
The installation height of the support is determined by the length of the existing spring. At the same time, they focus on the height of the entire wood splitter, as well as its ease of use for humans. It is convenient to lift a load located at waist height. You will have to lift it slightly above chest level.
All these considerations will allow you to choose the height of installation of the spring support on the strut.
The corners are used to make jibs. They will hold the support. Then, when the wood splitter is dynamically loaded, there will be no displacement of the supporting surface.
To fix the lower end of the spring, you need to make a cylindrical clamp. A small piece of pipe is used to make it. It is advisable to select a pipe according to the inner diameter of the spring. Then it will not move during operation.
There is a slot in the top of the rack. A bushing is installed in it. Then it is boiled. When installing, you must maintain perpendicularity to the rack. The hub axis must be parallel to the ground. For welding, a conductor is used that will allow the specified conditions to be met.
The shaft is installed in the sleeve. A rocker arm is welded to it (a channel is used). A small piece of pipe is mounted on the lower part of the rocker. The upper part of the spring will be fixed in it.
In order for the rocker to move freely, a window is cut in it; its dimensions depend on the parameters of the rack.
A profile pipe is welded to the rocker arm. A chisel is installed at its end. These tools are made from carbon steel U9...U10. The hardness of this metal is HRC 60...63. This tool will last a long time. During operation, it is easy to sharpen it using an angle grinder and a grinding wheel.
The wood splitter becomes operational. A load (part of the rail) is welded above the chisel. For ease of use, the handle is welded. To reduce damage to your hands, wear rubber elements. They will dampen vibration upon impact.
To work, you will need to install a large piece of log. Logs will be placed on it, which will have to be cut.
The log is held with one hand. They raise the cleaver and then strike.
The cleaver goes down. The fragment located below splits. The chisel goes lower. If a complete split occurs, the point hits the wood support and does not become dull.
Specifications
The simplest design of a wood splitter is the splitting ax. To work with it, you need some practical experience. For experienced woodcutters, a splitting ax can be the main tool when processing massive wooden pieces; the ax size of this tool is up to one meter. In recent years, the cleaver has been made from innovative materials, which allows it to be used more efficiently in the labor process.
To harvest firewood in large quantities, push-type wood splitters are usually used. They have a rack or pinion pusher. Such a device pushes a massive piece of wood onto a cleaver, which, in turn, splits it into several small pieces. The feed speed of the workpiece is about 5 centimeters per second. Vertical wood splitters have a greater safety margin and are more compact. The disadvantage of this device is that there is a risk of ejection of the workpiece, which contains the following “difficulties”:
- many layers;
- a lot of knots;
- There are various irregular cuts.
A horizontal wood splitter is safer. The worker does not risk getting hit by flying chips, because their speed can sometimes be very high. The vertical unit has a circular scattering of fragments, therefore, from a safety point of view, there are questions about this unit. Hydraulic wood splitter:
- productive;
- spends minimal energy;
- safe to operate
The hydraulic log splitter does not have a return spring, and also has a rather long switching time - about 0.55 seconds. The period of time is quite significant, because the workpiece can split and fall into many fragments. Such wood splitters have a common drawback: their engine operates through a fluid coupling and sometimes cannot cope with the load. The engine usually operates in standard mode, consuming little fuel. A gear is attached to the flywheel (it is usually hydraulic, there is also a fractional one). This lever is a coupling with a pusher, which ensures that the lump is fed to the splitting knife.
Tools and materials
To make the blade you will need the following:
- Bulgarian. Preparing the blade of an old ax or spring requires sawing and shaping. This can be done with a regular hacksaw, but the labor costs will be disproportionate. The grinder will require a cutting wheel. Since you will have to work with spring steel, it is better to take a diamond-coated disk.
- Abrasives. The finishing of the metal will have to be done manually. You can use an engraver with diamond bits and stones. If you don't have it, sandpaper, needle files and files will do.
- Hacksaw. To make an ax handle, you will need a handsaw. Wedging and fitting are easier to do on machines, but regular hand tools will do.
- Welding machine.
The following are used as the basis for the chopping part:
- Old axe. You can buy them at a flea market or at a metal collection center. Old Soviet axes are made of good steel, which does not splinter if you miss a log.
- Spring. Spring steel has a high carbon content. It practically does not chip and can withstand constant shock loads. At the same time, it is easy to heat treat. A device for chopping firewood with your own hands from a spring is appropriate, since the shape of the blade can be selected to suit your own requirements.
The ax handle must be made of hard wood. Soft pine, spruce, fir and larch will not work. You can choose:
- Oak. You can take the same log that will split. Oak is hard, cheap and available.
- Beech. The wood is inexpensive, but beautiful. It has a porous structure, so it is easy to saw, but holds its shape well.
- Birch. Birch is hard, but axes for splitting firewood must be impregnated with linseed or tung oil.
- Nut.
Clear benefits
A hydraulic cleaver is the most powerful device, almost industrial type. What does it mean? They can process wood without pauses, replacement of consumables and risk for the operator. It is very profitable and practical if the wood splitter is powered by electricity.
Some models, created independently, are equipped with a lever. With it, the operator can not adapt to the operation of the system, but control the process himself, putting a new log into operation without haste.
It is not difficult to assemble any system for splitting firewood, be it mechanical or hydraulic. But calculation of the load is important, otherwise it will be very expensive to inject natural fuel.
So, the advantages of a hydraulic wood splitter are as follows:
- Minimum expenditure of physical strength in work.
- Efficient and fast.
- Healthy back, time saved.
- There is no need for unit maintenance.
- Continuous work all day long.
There are also disadvantages:
- You will have to work on creating the design.
- The finished product using hydraulics is not cheap.
Electric wood splitters
A manual wood splitter, of course, makes it easier to prepare firewood, but it still requires considerable physical effort. Not as much as they are spent waving a regular cleaver, but still... The electric motor helps make the effort even less. Wood splitters of various designs are made on its basis. But making such a wood splitter with your own hands is more difficult. Here the device is more complex, and at least minimal knowledge of electrics is required - it is advisable to connect the motor through a starter, with “start” and “start” buttons.
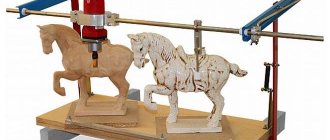
Screw (conical)
One of the most common models is a cone or screw splitter. The only difference between them is the absence/presence of threads on the piercing element, which in this model is made in the form of a cone.
The cone splitter speeds up the preparation of firewood
The logs split due to the fact that a cone rotated by a motor cuts into the wood, gradually tearing it into pieces. For large logs, first the edges are chipped off, then the middle is torn.
Taper and thread parameters
First, the cutting part was turned into a smooth cone. If you use a smooth cone, when working you have to lean quite hard on the block so that the cylinder “bites” into the wood. The process is much easier if a thread is cut on its surface. In this case, the block seems to be screwed onto a screw, and then splits.
Drawing with dimensions of a cone with thread for a screw log splitter
The main thing is to make the cone with thread correctly. If you have a lathe and work experience, you can try to do it yourself. If not, you'll have to order it. The threads are made in different ways, but the following parameters are considered optimal: pitch 7 mm, depth 3 mm (minimum 2 mm). Another important point is that the depth of the seat on the motor gearbox is at least 70 mm.
Wood splitter screw
If you have a cone with a thread, making this wood splitter with your own hands will not be difficult.
Electric motor and gearbox
You need an electric motor that is powerful enough (2 kW and above, or 5-9 l/s), but with a low rotation speed: 250-600 rpm. At 250 rpm and below it chops very slowly, and if the rpm is more than 500, it is dangerous to work, as it can tear the log out of your hands.
Wood splitter with a screw mounted directly on the crankshaft
If you manage to find an engine with such parameters, you can attach the made lance (screw) directly to the crankshaft (pictured above). If there are more revolutions, you need to install a reduction gear or make a chain or belt drive to reduce the rotation speed.
The ratio is calculated depending on the engine speed. For example, there is a 900 rpm engine. By making a 1:2 gearbox we get 450 rpm. Just the best option.
Reducing gearbox for screw log splitter
Transmissions can be belt or chain. Chain ones work many times louder, require constant brushing, and it usually costs more to grind sprockets with the required parameters. A double belt drive is desirable (as in the photo above). In this case, there will be less slippage.
Where to place the motor
If the design includes a gear, it is better to place the motor at the bottom and secure the screw itself on the working surface. Choose the height of the working surface to suit your height so that you don’t have to work at an angle.
A safer model. Making such a wood splitter with your own hands will make your life much easier
There is also such a parameter as the height of the screw above the working surface. The gap from the table to the cylinder should be around 8-20 cm. It should not be placed higher - it may turn small diameter logs. The optimal distance is 8-12 cm. Even small-sized logs do not rotate.
Hydraulic wood splitter
A hydraulic wood splitter is the most powerful, but also the most complex and expensive to manufacture. In addition to the frame, engine and cutting knives, you need a hydraulic cylinder of sufficient power. They are not cheap. In addition, you also need an oil tank and a pump.
Hydraulic splitter device
A hydraulic firewood splitter develops considerable forces, which is why metal of considerable thickness is used in its manufacture - 6-10 mm, depending on the drive power. The developed force is quite enough to break the log into 6-8 logs at a time. That’s why knives are made in the shape of a “star”.
The hydraulically driven splitter is equipped with a complex cutter, which splits the log into several logs at once
When making knives, they are spaced several centimeters apart from each other. So that there is only one at work. For example, first - horizontal, then - vertical, then - right and finally - left. At the same time, strengthen each of the knives by welding reinforcing plates at the back. It is advisable to use hard steel, having previously sharpened it according to the same principle as for cleavers.
Features of homemade models
A wood splitter is especially necessary in private households, where it is necessary to heat the house using firewood. You can make such a tool with your own hands; it is not difficult and will save a significant amount of money. Working with solid wood is quite risky and can cause injury, so you should use a good tool and follow the necessary safety regulations.
Mechanical units that help split solid wood and heavy logs tend to accumulate energy, they are economical, and they are easy to operate. There is no need for muscular strength to operate such devices. The units can cope with any logs and wooden ingots. They operate in push mode and can handle logs up to 35 cm long, no physical effort is required.
Pressure-action devices are driven by an internal combustion engine and can also be connected to an electric motor. They are not cheap, but their use almost completely eliminates the muscular effort that must be expended. Using this device, you can heat a house up to 350 square meters, while frosts can be Siberian, down to -35 degrees Celsius.
The return stroke of the pusher is usually no more than 7 centimeters per second. In a few hours, one person can prepare more than half a ton of firewood. You cannot work with wet wood; it is recommended to place wooden blanks in a woodpile under a canopy during the warm season. In about three months, the tree will “fit” to the required condition. Raw wood does not provide enough heat, the thermal conductivity is much lower (by 25%), the cleaver often gets stuck in it, and getting it out of there can sometimes be extremely difficult. A homemade wood splitter can be made no worse than a factory one, that is, it will have horizontal and vertical feeding of the workpiece.
For guidance, it’s worth saying what the approximate monetary savings could be:
- a high-quality unit that runs on diesel fuel and is designed for splitting ingots 25 cm in diameter costs from 20 thousand rubles;
- a machine that can “deal” with workpieces up to 35 cm, splitting them into 4-5 fragments, costs about 30 thousand rubles.
How to do it?
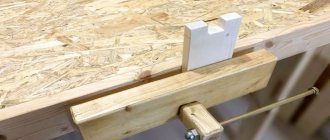
The easiest way is to make a mechanized wood splitter (Scheme 1). Assembly is very simple: the cutting part is attached to a vertical rod with a base made of any profiled metal, but leaving the possibility of free movement of the rod. The movement unit may consist of two welded ears with holes on the stand and a metal pin that serves as a shaft for turning the fastener and the cleaver.
A pressure or spring wood splitter will require a little more effort to manufacture. A shelf is welded between the frame and the horizontal movable arm with the cutter, onto which a spring is installed and fastened; the second end of the spring is attached to the horizontal arm of the wood splitter, absorbing impacts on the cutter (cleaver). Taking into account the fact that the executive part of the wood splitter becomes heavier, the blow to the splitting deck is made with a minimum of effort (Fig. 2). However, some effort is still necessary, as there will be kickback due to the spring.
At this point, attention should be paid to the spring used in the device so that the cleaver remains effective upon impact, can easily split wood, and at the same time it would be easier to hold the shoulder of the structure during recoil
Assembling a vertical inertial wood splitter is very simple. First you need to weld the first pipe to the base plate. The length of such a pipe is a little more than a meter (Fig. 3). Then from a tube of larger diameter it is necessary to cut a piece that will be longer than the length of the cleaver. Then you need to weld the cleaver to a piece of a larger diameter tube and put it on the base tube. The principle of operation is extremely simple - place a log on the base under the cleaver and hit it on top with another log or sledgehammer.
An engine is installed on the frame, it is connected to a gearbox, which transmits movement to the cone directly or through a belt drive. In order to power such an electric motor, certain skills will be required, since special parameters and requirements for the engine are taken into account. The motor power should not be less than 2 kW, and the number of revolutions, as a rule, from 250 to 500. Such a motor can be connected directly to the cone.
It doesn’t matter if you couldn’t find a suitable engine. In this case, you need to purchase a gearbox that increases or decreases the number of revolutions depending on the number of engine revolutions. Therefore, an engine with a speed of 250 to 500 can be installed directly with a cone, and an engine using a gearbox is better placed at the bottom of the frame and the movement is transmitted by belts.
It couldn't be simpler
The simplest non-volatile manual wood splitter is nothing more than a splitting axe. If you use it little by little, but regularly, so that you develop skill and eye, then it is even safer than mechanical and mechanized ones and more productive than the former. Provided that the configuration of the cleaver and the ax is optimal and consistent.
The splitting ax has undergone a long evolution and continues to improve. On the right in Fig. a drawing of the Strela cleaver, adapted for manual splitting of knotty and twisted ridges, is given; on the left are axes for it (the cleaver is attached to it with a wedge). With the ax handle as you wish, whether you like to swing the ax or not, but the cleaver itself will still be very useful to us, see below.
Drawings of a wood splitting cleaver Arrow and axes for it
But what not to do
A dangerous way to manually split wood
For several years now, a Finnish farmer’s discovery has been circulating on the Internet: chopping logs for firewood in a tire, see fig. on right. It is not clear why it is good that the split lump will not fall apart, but will remain sticking out in the shell. But something else is clear. If, when chopping wood normally, you smear a cleaver instead of a block on the block, the ax handle will hurt in your hands. You might not even be able to stand on your feet and hurt yourself. But if you miss the rubber with the same cleaver, you can get hit on the forehead with the butt. So don't. The wood splitter tire is a curiosity, but not at all useful.