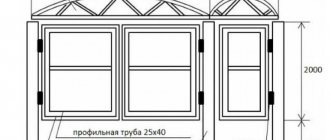
Advantages of blades made of valve steel x40
Having made a knife from such a valve with your own hands, it will serve for decades, but you must make it in compliance with all technological processes. Then realistically, at least 20 years of guaranteed pleasure, because with such a product it will be a pleasure to do any work.
Steel x40.
There are also several advantages:
- sharpening is quite easy and holds it for a long time;
- even after use with hard materials, there will be no nicks on the blade;
- excellent cutting properties;
- the hardness of the blade will be about 57-58 units on the Rockwell scale;
- no need to constantly polish, the shine will be permanent;
- easy to care for.
According to some reports, fans of making knives with their own hands report the resulting hardness as 62-64 HRC. And as an example, they give such an interesting fact, supposedly with such a product you can cut a bolt to 12 and nothing will happen to the blade. But it can be difficult to believe words until you try it yourself.
Fan for forge
The forge occupies a central place in the blacksmith's workshop. It is not just an integral, but the main element of any forge, which cannot be done without. In it, the workpieces are heated to the temperature required for processing (minimum T = 1300 °C). The following materials are used as fuel in the forge:
- coking coal grades OS, T and K (GOST 8180-75);
- coke;
- charcoal;
- gas (propane-butane), etc.
For efficient combustion of fuel (read: creation of maximum temperature), air must be blown into the furnace with an excess pressure of about 150...200 mm of water column. This air pressure is provided by the fan for the forge.
- The design of the fan for the forge and its principle of operation;
- Fan drive
- Technical parameters of the fan for the forge
- Delivery contents
- Advantages of a fan
The design of the fan for the forge and its principle of operation;
In industrial furnace designs, centrifugal (radial) fans in a snail-type housing are used. The basis of a centrifugal fan is a housing that looks like a snail. An impeller rotates inside this housing. The wheel has blades. The design of the blades (their shape) in combination with the direction of rotation of the wheel ensures air movement in a certain direction. The direction is chosen from the inlet hole (in) to the pressure hole (the “snail” turn ends with this hole).
Fan with universal drive.
When a wheel with blades rotates, a centrifugal force (acting from the center of rotation to the periphery) is created in the radial direction. Under its influence, air is sucked in through the inlet hole in the center of the fan and exits through a pressure hole directed tangentially to the circumference of the housing. The absence in this design of the possibility of a centripetal force (if present, it would act from the periphery to the center and interfere with the centrifugal force) contributes to the effective removal of air from the “snail”.
Fan drive
The fan drive, which creates rotational movement of the impeller, has different design solutions:
- electric. Its basis is an electric motor (three-phase is installed on powerful fans), which converts electrical energy into rotational energy;
- manual. Converts the muscular force of the person turning the handle through a cylindrical planar gearbox into rotational motion;
- combined. Hybrid of manual and electric drives. If there is a power outage (which is not uncommon in rural areas), the blacksmith can continue heating the workpieces by placing an assistant “on the handle.”
Technical parameters of the fan for the forge
To illustrate the operation of a fan for a forge, we present the main parameters of the very common model “VT1-2” from the Blacksmith brand. This fan is used to supply air to a portable or stationary open-type forge in which the top is completely open.
The fan has the following technical characteristics:
- pressure channel diameter, mm: Ø 50.8;
- maximum productivity, m3/hour: 240;
- power supply, V: 220;
- power consumption, W: 150;
- rotor (impeller) rotation speed, rpm: 3000/3600;
- maximum pressure in the pressure port, Pa: 490;
- weight, kg: 2.65;
- geometric dimensions of the package, mm: 225 x 180 x 225.
Delivery contents
The fan is supplied assembled, fully prepared for installation. The packaging is a cardboard box.
Advantages of a fan
The fan for the forge “VT1-2” of the Blacksmith brand has the following advantages:
- simple and convenient air flow adjustment;
- cast durable housing;
In addition, for intensive work over a long service life, the device is equipped with built-in thermal protection. It has a low noise level, installation and assembly are easy, and operation does not require special training of operating personnel.
Fan for forge “VT1-2” brand “BlackSmith”.
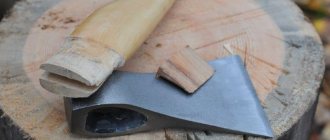
Experience of forging a knife from a valve (I got the intake valve)
Attention!!!
This homemade product is posted for informational purposes only. The creation and use as a bladed weapon is prohibited; according to Article 223.4 of the Criminal Code of the Russian Federation, it is punishable by imprisonment for up to two years!
List of materials:
— valve from the engine (inlet caught); - a piece of dry maple branch; - a piece of threaded rod and a nut; - Super glue; - oil or other wood impregnation. List of tools:
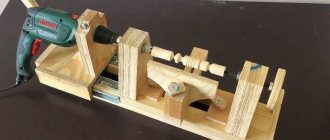
- hammer; — mini-horn (my homemade one); - an improvised anvil made from a sledgehammer and hemp; — belt grinder; — grinder (angle grinder); - drill. Homemade manufacturing process:
Step one. Forging
At first I welded pieces of steel wire to the rod as a handle, but over time they fell off. Then he worked, holding the workpiece with pliers.
Everything is forged easily with a light hammer. When the steel is heated to the forging temperature, it does not ring, so by hearing I determined at what point I should forge.
I forged the rod into the plate quite quickly and easily.
Step two. Grinding
I also drew the slopes by hand, they need to be made as flat as possible, the steel will withstand, and the knife will cut well even without a razor-sharpened blade.
Step three.
Hardening Step three.
Handle and final touches The knife looks good, in an ancient style, it also cuts quite normally, at the level of a household knife, I like it.
I also have another valve, this one is already an exhaust valve, but the stem there is much narrower, I don’t know if it’s worth messing with it?
This completes the project, I hope you liked the homemade product and found useful thoughts for yourself. Good luck and creative inspiration if you decide to do this again. Don't forget to share your ideas and crafts with us!
Attention!!!
This homemade product is posted for informational purposes only. The creation and use as a bladed weapon is prohibited; according to Article 223.4 of the Criminal Code of the Russian Federation, it is punishable by imprisonment for up to two years!
Become the author of the site, publish your own articles, descriptions of homemade products and pay for the text. Read more here.
Purpose of the fan for the forge
You can understand the role of the fan by studying the principle of the forge structure. It can be installed permanently or have a mobile design.
A classic stationary forge consists of a work table, in the center of which there is a recess (socket) intended for burning fuel.
Indoors, the forge must have a pipe with an exhaust hood to remove smoke.
A special feature of the forge is that the metal workpiece is placed in direct contact with the fuel.
This ensures that the workpieces are heated to a plastic state, in which the metal can be easily forged. The temperature in the working area of the forge should be at least 1000–1300 o C. It is achieved through fuel combustion. To maintain the combustion process in this area there must be good air exchange, which is provided by a fan. The air stream from it is directed into the forge socket through the nozzle.
The fan must provide a certain air pressure.
Important! The efficiency of the blowing and combustion process, which affects the temperature in the working area, depends on the fan power.
The combustion process is also affected by the type of fuel used. Fuel from coke, charcoal and gas is used as fuel. Liquid fuels made from petroleum products, such as gasoline or kerosene, are rarely used.
Briefly about everything
We hope that the material will be useful to both novice and experienced craftsmen. But it should be noted that working with such a material as valve steel is quite difficult work and it is necessary to “get your hand” on it. When forging, it will move to the side, but there is no need to be afraid of this, continue working and it will return to its place.
Experienced craftsmen recommend that you first learn to work with other metals, and only then take on steel from the valve. When making bevels and cutting edges, be careful. And when hardening, do not overheat the blade, and everything will work out.
Previous Making knives Do-it-yourself knife from a mechanical saw blade Next National knives Kiridashi - Japanese jamb knife: features and do-it-yourself making
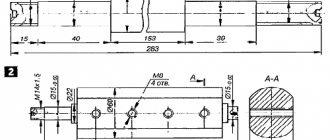
Fan drive for forge
- electrically;
- by manual force;
- a combination of methods.
When using an electric drive, rotation is carried out using an electric motor that converts electrical energy into mechanical rotational energy.
The manual method involves simply rotating the handle of a glider-type gearbox.
This option is usually a backup and is used when there is a power outage and the installed electric motor cannot be used.
The figure shows the drives: a) - manually, b) - using an electric motor.
1—belt on pulley;
2 and 3 - transmission gears;
4 — rotation handle;
Hardening a knife at home
It is very good if there is a furnace for hardening steel. You can even purchase it in a specialized store, but the pleasure is not cheap. So how to harden a knife at home without a special muffle furnace? There is a way out, and to be honest, there is more than one.
But first, you need to conduct small experiments and remember in detail all your actions. If the result is positive, then the same manipulations can be performed with a real part.
This tricky technique will help you get better at working on small workpieces and acquiring the skills to heat and cool a blade. We must not forget that different alloys require different temperatures and cooling methods, otherwise cracks and brittleness of the workpiece cannot be avoided.
Heating source
Basically, several sources of heating the workpiece can be distinguished. It is better to exclude the muffle furnace, since according to all expert estimates, it is the best in this matter. But we will try to evaluate other fairly common heating devices.
The forge copes quite well with heating workpieces. A blowtorch or propane torch may be suitable for this purpose; by trial and error, you can achieve the desired result. By the way, for these two options, you can build a small oven from refractory bricks, and the process will be simpler and the result will be positive.
Well, the last, one might say, completely unacceptable source of heating is a gas stove. If you want to spoil something, use this option.
Temperature
As has been said many times, every steel requires a certain temperature. In production, special thermometers are used for control, but in everyday life you can use a magnet (also mentioned above).
Dark spots should not be allowed; this is overheating, which will subsequently ruin the entire workpiece. If the master has enough experience, then he can determine by eye by the color of the hot metal whether the workpiece is heated enough or not. There is also such a hardening method: the part of the blade that is sharpened three times is heated to a temperature of 285 degrees, and the cutting part is heated only once, and to the maximum 950-1000 degrees.
The heating modes for each brand of steel are different:
- low-carbon steel requires heating in the range of 757-950 °C;
- steel with a high carbon content is sufficient at 680-850 °C;
- but alloying grades require from 850 to 1150 °C.
There is a whole table of colors, colors of incandescence. For example: brown-red 580-650 °C, dark red 780-830 °C or orange 950-1000 °C. So be careful and do not overheat the workpiece.
Cooling and holiday
For proper hardening, you need to maintain the correct temperature during cooling. It is preferable to cool stainless alloys in mineral oil with additives. And low-alloy steels, in aqueous solutions with salt and other additions.
There are many cooling options:
- blades with double-sided blades are dipped first into oil and then into an aqueous solution;
- Red-hot workpieces are dipped into the oil three times, each immersion taking a little longer than the previous one. And only then they lower it into the water;
- To give elasticity to the middle of the blade, this part is heated, then dipped in boiling water for 2 hours, and then in ice water.
With all these manipulations, it is worth considering that metal cools twice as fast in oil. A workpiece that has undergone hardening is subjected to a special process called tempering to restore the crystal lattice of the metal structure. There is nothing complicated in this procedure: the blade needs to be warmed up for a couple of hours. For alloy steel 270-320 degrees, for plain steel 150-200 degrees.
Blower installation
We move on to the final stage - installation of the blower. We attach the first part with the pipe to the engine. Here you should pay attention to the fastening so that they are reliable. Next, install the impeller in this part and close it all with a lid. The latter is also secured with epoxy resin. For a more presentable look, you can paint the structure in a single color. As a result, the snail design should look like this:
Now the fan for the forge is ready and all that remains is to attach it to the forge itself and check the effectiveness of the product.
This type of blower for the ash pit is most preferable, since the air flow can be directed in the desired direction.
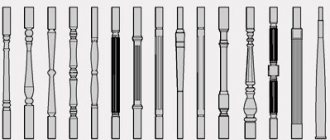
Steel for making knives
Steel for making knives
Steel ШХ15
This type of steel is a bearing steel; it has all the properties necessary for the manufacture of especially durable knives. All blades made from ShKh15 steel are distinguished by high cutting performance, durability, and visual appeal. ShKh15 steel belongs to the class of low-alloy chromium materials. It can be saturated with special elements to improve hardenability and heat resistance. The steel is characterized by high homogeneity and contact endurance, which allows knives to remain unusually sharp for a long time. The metal is quite hard, which makes the products resistant to crushing and deformation. At the same time, such steel has good toughness and ductility, it does not crumble under heavy loads, and is easy to process. Dark shades of the material make the knives attractive in appearance; exclusive products made from ShKh15 steel look very elegant. All knives made from ShKh15 steel are durable in use, do not wear down for a long time, maintaining excellent cutting performance.
Locomotive Valve Steel
A material that is widely used in the manufacture of designer blades. Locomotive valve steel has all the qualities that a blade needs. In addition, this material is quite common; the exhaust valves of a steam locomotive, having served their time, can be easily forged, processed and calcined. Why is this material suitable for making knives? Everything is very simple, this steel has unique properties that make the blades the best, highly durable.
1. Sufficient hardness of the material provides the knives with resistance to mechanical stress and deformation.
2. Plasticity, which allows you to make knives unusually sharp.
3. Easy to process when sharpening blades.
4. High strength, wear resistance.
5. Endurance in contact with other materials.
6. Good material uniformity.
7. Visual appeal - white color, which remains even after processing.
Locomotive valve steel knives last a long time and do not require frequent sharpening.
Damascus steel
A unique and truly legendary type of steel, the recipe for which was once lost. Over time, craftsmen restored the composition of Damascus steel. However, no one can claim that it remains the same as it was with the Crusaders. But in any case, Damascus steel is the ideal material for knives that has the best characteristics and combines all the properties of the best metals for blades in the world.
1. Particular strength and hardness - the material is not susceptible to almost any mechanical stress, it is able to withstand enormous loads.
2. Unusual cutting performance - when sharpened, Damascus steel knives can cut thick metal wire.
3. Wear resistance, and such blades do not require frequent sharpening; they remain sharp for more than a month.
4. Durability in use - the knife will last for decades.
5. Exquisite appearance - the delicate, twisted patterns of Damascus steel fascinate with their beauty.
Steel 95x18
The main advantage of this steel is its resistance to corrosion. This indicator allows the use of knives in harsh weather conditions
In addition, 95x18 steel is flexible and ductile, which is important for sharpening and operation. The material is characterized by high strength, resistance to various deformations and mechanical stress.
Stainless steel knives made of 95x18 steel are durable in use; they do not wear down and do not lose their cutting properties for many years.
How to make blacksmith's tongs
Pliers are an extension of the craftsman's hand; they should provide reliable grip and hold of the workpiece, be a little springy, and the jaws should adhere to the part.
Blacksmith pliers are classified as auxiliary tools. Their purpose is to manipulate heated workpieces during operation. Any master should have several types of such devices that are convenient to work with.
How to make such a tool yourself and what you need to know about blacksmith pliers is further in our article.
Assembling a homemade knife
Having completed all the above operations and bringing the knife steel to the required hardness, we proceed to assembly. We adjust the shape of the pads to the shank of the knife and cut out two additional leather inserts.
Then we lubricate the parts with glue, install brass inserts on the glue and leave to dry for several hours.
It is better to make the extreme insert not from a rod, but from a tube of the required diameter. This will help attach the finished product to a leather strap during use, which will prevent its loss while hiking, fishing or hunting.
After the glue has dried, carefully sand the handle and blade with sandpaper. To protect the blade from corrosion, it is enough to polish it well after final sharpening and finishing.
Mounting according to view
There are several options for attaching the handle to the knife blade. The most popular are the mounted and overhead handles. Each of them is designed for specific knives.
Horseback
Mounted fastening technology provides for a narrow knife shank. The handle will be made in one piece. This mechanism provides resistance to damage. The design will be lightweight compared to riveted technology. This predetermines when used in long and voluminous work. If the manufacturer has chosen the mounting technology, epoxy resin and wood sawdust will be needed for excellent adhesion. The work is carried out according to the following scheme:
- Selected types of wood are treated with an antiseptic;
- A blank with suitable proportions is made from the block. The cutting angle is taken into account in order to achieve a beautiful cut;
- Marking is carried out and a hole of suitable diameter is drilled;
- You should dilute the epoxy, combine it with sawdust, and pour it into the hole;
- At the same time, you should insert the blade, which was previously wrapped with tape to protect it from dirt;
- Place the semi-finished product in a vice or press and wait until it dries completely (a day or two).
You can make such a handle with grooves for your fingers. To do this, make a recess under the index finger. You can practice performing the correct form on plasticine, only after that you can move on to wood. After this, you should use a cutter, rasp and sandpaper to sand the workpiece. Soak the product in heated drying oil and dry it in the sun. After this, treat the handle again with a zero polish. Complete the production with a coating of rosin, turpentine and wax, melted in a water bath, which should be used to polish the handle.
Invoice
Such a handle provides for the presence of a wide shank, which is necessary to determine the contour of the created handle. It is assembled from two wooden blocks, united by metal rivets. This method of fastening does not affect the dimensions of the product in any way, thanks to this it is possible to balance a wide or elongated blade. The overhead fastening option is popular among the manufacture of kitchen knives. Main stages of work:
- The prepared wood is treated with an antiseptic and placed in a vice, where it is evenly divided into two symmetrical parts;
- The surface of the shank is carefully cleaned and polished to avoid gaps;
- Future fastenings are marked to connect the two parts;
- It is necessary to prepare a rod of copper or brass and drill holes in the markings in accordance with the diameter of the rod;
- Make rivets; their length should be greater than the thickness of the finished handle.
Before doing the work, you can practice rough assembly of parts. After assembly is completed, the handle should be processed using a cutter and sandpaper. The halves must be attached symmetrically. You also need to saturate the wooden halves on the side adjacent to the shank with epoxy glue or resin, and add toner to give the desired shade to the product. Next, you need to wrap the knife blade with tape and connect the workpiece, cut off the pieces of rod and protruding rivets. Place the finished knife in a vice again, after wrapping the handle in oiled rubber. Allow the finished product to dry (a day or two).
Soak the handle in heated drying oil and dry in the sun. After this, treat it with zero. Polish the product with a mixture of rosin, turpentine, and wax, melted in a water bath. Instead of this product, you can use ship varnish.
Main characteristics of x40 steel
The most interesting thing is that steel for valves of different technologies is made from different alloys. Cars have one, diesel locomotives have another, for airplanes in general it is probably classified, even ships will have their own alloy special for loads.
And what’s even more interesting is that, taking equipment of the same nature, the valves can also be of different compositions, for example, “Kamaz” and “Zhiguli”.
There are at least a dozen grades of steel, for example: EP 303 55Х20Г9АН4, 45Х14Н14В2М GOST 5632-72, 40Х9С2 GOST 5632-72, 45Х22Н4М3 GOST 5632-72, etc. And taking into account the customer’s specifications, in general, a hundred. But it so happens among the people that the most popular is 40th steel. So let's talk about it.
As the steelmakers and rollers themselves write, this steel is structural alloy. It is used in industry for high-strength products and is prone to temper brittleness. Products made from it have the following characteristics:
- does not rust due to the high chromium content;
- increased hardness is achieved due to the high carbon content;
- the material can be easily obtained, even in a car workshop.
It’s hard to disagree here; indeed, the characteristics have become quite high. But even if you can’t get this particular steel. Metallurgists claim that it can be replaced with the following brands: 45Х, 38ХА, 40ХН, 40ХС, 40ХФ, 40ХР. And this designation is only for domestic production, and there are many foreign analogues.
Operating rules
Despite the high popularity of the material, epoxy resin handles cannot be called very durable. The operation of knives must comply with certain rules.
It is traditionally believed that products made from epoxy are purely decorative, so such knives are given as souvenirs, but they have found their practical application. A knife with a resin handle can be successfully used in the kitchen, but such a weapon should not be thrown. High impact loads may cause chips or cracks.
It is advisable to put the knife in a closet after use. On the one hand, this is required by safety precautions, on the other hand, extra protection from direct exposure to sunlight will not hurt. If the handle becomes dirty, you can clean it with a soap solution or other non-chemically active cleaning agent. It is better to refrain from using acids.
As for safety, modern epoxy resin in hardened and liquid form is absolutely harmless to humans, although it is still worth using personal protective equipment when pouring.
Forging a knife from Soviet recycled materials
Recycled raw materials will not allow you to make a blade of the highest quality. But many people like the feeling of other materials being reborn into cutting and piercing objects. For example, forging a knife from a file or chain, spring, valve, bearing, cable, drill.
Rope knives
The cable makes good blades, but the Damascus properties are not high due to the large patterns. Cable knives contain a small amount of carbon, so a Damascus cutting edge must be welded to their bodies.
Spring knives
Many people prefer to make knives with their own hands from springs that were made back in the Soviet period. Then high-quality steel 65G was used for the spring. The properties of the metal springs are increased due to the correct ratio of the components and technological heat treatment. If the spring knives are overheated, they will become brittle.
Chain knives
Recycled material such as chains is widely used for forging. Most often these are chains from a chainsaw, but there are also motor chains from a gasoline engine.
Valve knives
To make knives with your own hands, hollow exhaust valves are taken from the valve. Not every craftsman knows how to correctly pull the knife out of the valve. Therefore this is not the best option.
Drill knives
Good knives come from a drill. The tool steel from which the drills are made speaks for itself. If you properly harden a blade made with your own hands from a drill, it will not break under impact loads and will be able to withstand high bending loads.
File knives
To make a knife from a file with your own hands, you first need to draw a sketch - the shape of the blade and handle, choose the mounting method, as in the video. The metal for the file is carbon steel U10. Its hardness is 57 - 58 HRC. These properties of the metal are preserved during forging, and knives made from a file are strong, have high cutting performance and can withstand heavy loads.
Saw knives
An alternative would be to use a powered rail saw. Their strength is even higher than that of files. Both of these products are ideal for forging knives at home. Since the old file is more accessible, we will consider the technology of hand forging from it in more detail. You can also watch the process on video.
Stages of converting a file into a knife
Forging at home should be carried out with strict adherence to all safety precautions. We will use:
We will use:
- A file (preferably Soviet).
- Material for making the handle (plastic, bone, wood, etc.).
- Shoe polish and wax.
- Gas stove or other heating device.
- A machine, a vice and a grinder.
- Magnet.
- Sandpaper.
- Material for rivets (preferably brass).
- Glue for leather and metal.
Step 1
First, we fire the file in the oven, as in the video. Heat it for 6 hours and leave it there until it cools completely. We do this so that the steel becomes the same as before factory processing. Instead of a stove, you can use hot coals from a fire. At home, you can use a gas burner for this. The future knife is placed on it in the place where the cutting part is supposed to be. A metal heat shield is placed on top so that it does not touch the file. The workpiece is sprinkled with salt, which should melt when heated. Process time – 6 hours.
Cliche for embossing. Soldering iron stamp. Creating a vector drawing
Making clichés for embossing on leather, wood or paper
MAGNESIUM
Or a brass cliche for hot
And cold stamping
Per day
from 3,000 RUBLES
The CheGoods workshop will produce cliches for hot and cold stamping on leather, paper and wood for subsequent application to any branded accessories, personalized gifts, boxes, packaging and other souvenir and presentation products.
A variety of cliches for different types of application - embossing, blind printing and foil stamping. All cliches, both brass and magnesium, are produced by the Chegoods workshop using modern high-precision equipment.
Do-it-yourself hot stamping on leather, wood or paper or solving the problem of applying a logo at home using a replaceable stamp with a soldering iron
We produce replacement hot stamping stamps from brass or magnesium and come complete with a soldering iron so you can apply your logo at home or in a small production facility as part of your hobby or small business. The stamp is removable, and in its place, to the soldering iron, you can screw another one.
A brass or magnesium stamp with a soldering iron can be used to apply a logo or personal signature on leather, wood, some types of plastic, or thick paper manually without the use of expensive equipment.
PRICE
REPLACEABLE BRASS
OR MAGNESIUM
STAMPS WITH SOLDERING IRON
from 4,000 RUBLES
The price is for an 80 watt soldering iron.
When purchasing a 150 watt soldering iron
the price for a cliche + soldering iron will be from 5000 rubles
What is the difference between magnesium cliches
And the brass cliche?
Both magnesium and brass cliches are perfect for a soldering iron, and you can choose the material based on their properties.
The main advantages of magnesium cliches are fast heating and an attractive price. However, when used under pressure, it is better to use brass cliches due to the greater strength of the material.
Basically, if you only use a soldering iron for embossing, you can get by with magnesium. If you have the prospect of using embossing machines, then it makes sense to take a brass cliche.
Free registration of personal signature and initials for subsequent embossing
As a gift, we can create a personalized stamp for free, choosing the font to add a personal signature. Usually, for a gift to a colleague, management or dear client, initials or various combinations of last name, first name and patronymic are added to the organization’s logo. The result is a memorable gift that compares favorably with the “mass market”. You can write any inscription in the style of your choice - modern, vintage, old Russian, calligraphic, abstract, creative, military and others of your choice.
Personal signature
In the selected
Your style
As a gift
A selection of vector images from an extensive gallery according to your wishes
Sometimes you want to give your loved ones a gift that reflects their hobbies, professional activities, character or your associations with this person. It can also be something personal that you want to put on your own items or leather accessories from the CheGoods workshop. In any case, due to the specific format of the equipment that makes cliches for hot and cold stamping, you need to have a professional design program for working with vectors and image storage to select the desired picture.
We will save you from this problem and you will receive a vector image that you can later use for applying to any surface. These vector images are used not only in the production of cliches for hot and cold stamping. They are needed for applying designs to non-standard surfaces, high-quality printing (booklets, stickers, banners, etc.), laser engraving, cutting from various materials (wood, plastic, metal, etc.), embossing, making badges, and this is just the beginning list
The CheGoods workshop will select you a vector image from an extensive database, apply a personal signature according to your font preferences and send it to the specified e-mail file saved in the two most popular formats - Corel Draw and Adobe Illustrator
Creating a vector image for a cliche
And other needs
1,000 RUBLES
Collection of vector images for making cliches
did not you find what you were looking for?
Contact us and we will try to offer the image you like
Our complete collection includes more than 1,000 vector images of various subjects
Release of blanks
High temperature treatment creates internal stress in the metal. This negatively affects the flexibility and strength of the metal. The workpiece becomes fragile - if the pressure is incorrect or skewed, it begins to crumble or burst.
In order for the metal to become more ductile, a tempering procedure is carried out - bringing the temperature of the workpiece to the point of maximum ductility of the metal and its gradual, natural cooling. To do this, the metal is heated in a muffle furnace to the required temperature, and then, with the door closed, it is gradually cooled for 2-3 days.
It is quite simple to check whether the blade has been properly hardened - just run a file over the blade - if the blade slides, the hardening was successful, but if it touches the metal, then the procedure will have to be repeated.
Many centuries ago, master blacksmiths wondered about the hardness of the blade. And many of them understood that steel must be cooled quickly after heating. Damascus craftsmen hardened steel in gorges where strong winds blew. They believed that the force of the wind was transferred to the blade, and it became elastic, hard and did not break.
Alternative Tool Options
To convert it into a blacksmith's tool, you can take nail pullers or old pliers.
In the first option, they need to be remade, since the grip of this tool is too curved for comfortable clamping of nail heads.
To do this, you need to disassemble them into two separate parts and, by heating the ends of the clamp, disperse it into a flat shape. You can also simply weld jaws made from a strip of metal to the clamp.
For normal and comfortable operation, you will need to lengthen the handles. This can be done by welding pieces of pipes or fittings onto the existing handles.
Then you need to assemble the tool.
Pliers can also be adapted for blacksmith tools. To do this, they increase the length of the handles. However, such a tool is suitable when working with small forgings, because the area of the jaws will not provide reliable grip and hold of a large part.
It is possible to replace real pliers for the first time. However, it is better to get a normal tool later. The metal of pliers and forceps is hardened and working under high temperatures will cause them to become brittle and break very quickly. In addition, without a professional device it will be very difficult to work, because such a tool is intended to perform other, and not unusual, functions. And pliers have a very small gripping area, which will make it much more difficult to hold forged parts.
Rules for quality hardening
There are a few more simple rules that allow you to harden a knife at home to the highest possible quality.
- Before you begin surface or deep hardening of a knife made of a certain grade of steel, you can select the modes for performing such a technological operation using plates made of the same material. The first plate is used to more accurately select the required heating temperature. To do this, the metal plate must be heated unevenly: one part to the maximum temperature, the second to the minimum. Then the heated plate is dipped in water or oil and, after complete cooling, it is clamped in a vice, broken and the metal is examined for fracture. High-quality hardened metal, if the temperature conditions were selected correctly, should have a coarse-grained structure.
- The next stage of experiments with metal plates is the selection of the optimal cooling medium. Using various cooling media (water, oil, liquid lead, etc.), harden the plate to such a state that, when clamped in a vice, it breaks at a deflection of 30°. After this, it is necessary to temper the plate, also selecting various cooling media and temperature conditions. As a result of this operation, you should ensure that the plate, clamped in a vice, breaks at an angle of deflection of 45°.
- To avoid the appearance of surface cracks on the blade of a hardened knife, the product must first be annealed. When performing such a technological operation, for which it is desirable to use a muffle furnace with a temperature controller, the following rules must be adhered to: the knife is heated as long as possible, slowly and evenly.
Industrial fans design
A fan for a forge of this type often has a casing that is made in the shape of a snail. Its internal structure and principle of operation are shown in the figure, where a) is the appearance, b) is the structure and arrangement of internal parts.
The principle of operation of the “snail” is as follows:
- Inside the casing (3) of the fan housing, a rotation wheel (1) equipped with blades (2) is located on the axis.
- The shape of the blades and the direction of rotation of the wheel create the movement of air flow into the pipe (4) in the direction of the combustion zone.
- The direction of air flow is provided from the hole located in the central part of the volute body to its final turn, which has a narrowing. Due to this, the air pressure increases.
An example of an industrial product is a fan of the common brand VT1-2, produced under the Blacksmith brand.
It is designed for blowing both stationary and portable forges with a completely open top. The diameter for connecting the pipe of such a device is 50.8 mm, power is supplied from a 220 V network, power consumption is 150 W, the impeller rotates at a speed of 3000/3600 rpm.
The maximum pressure (pressure) of the air stream in the supply hole is 490 Pa. The fan has dimensions of 225x180x225 mm and weight of 2.65 kg.
The fan housing is made by casting and is highly durable. The device operates almost silently and is easily connected to the forge.
Secrets of hardening: cooling
To cool a workpiece heated to the required temperatures, take a container of convenient volume and pour the working material into it. Holding the knife by the shank with long-handled pliers, lower it into the oil and wait a while. The viscosity of the liquid ensures optimal heat transfer. Be careful, the oil on the surface may ignite!
The second method of cooling is using water. In this case, it is better not to use pure liquid. Before work, dissolve a few tablespoons of table salt in it or use brine to cool the metal. In the old days, when salt had a very high price, blacksmiths used their own urine as a brine solution.
One of the unpleasant moments that sometimes arises during hardening is the leash of the blade or its deformation, which occurs due to uneven heating or cooling. To avoid this, it is best to lower the blade into the cooling medium with the cutting edge down strictly vertically.
Burning stamp
| Wood burning stamp with a raised image | |
| Area up to 10 cm2 | 1800 rub. |
| Area from 10 to 25 cm2 | 180 rub./cm2 |
| Area from 25 to 50 cm2 | 150 rub./cm2 |
| Area from 50 to 80 cm2 | 130 rub./cm2 |
| Soldering iron 200 - 300 W (with adapter) | 2500 rub. |
| Soldering iron 500 W (with adapter) | 3500 rub. |
| Handle 150mm (brass + textolite) | 500 rub. |
| 350 rub. |
- Engraving depth over 1.5 mm + 50% for each additional. mm
- Coat of arms + 50%
- Complex image with high labor intensity from + 25% to +100% to the cost of the product
To order, contact us by phone +7 (499) 3940020, mail or use the online chat in the left corner of the screen.
- ———————————————————————————————————-
The process of burning a design on wood is known to us as an ancient art form that is found in the culture of various peoples.
For quite a long time, the process of burning was perceived only as folk art, and even now many people are interested in wood burning as a hobby.
But already at the end of the last century, wood burning firmly entered the professional environment, where this fascinating process began to be used for commercial purposes.
In a professional environment, wood, leather, plastic and other materials that can withstand high temperatures are processed using burning clichés.
The essence of his work is simple - an exclusive text or design is engraved of a wood cliche a stamp is obtained on the wood .
Using a burning cliché
At all times, they sought to protect their product from counterfeiting and, caring about preserving the authorship, tried to gracefully sign their work. Nothing has changed now. Artists, workshops and various enterprises use cliches for burning on wood - they leave a brand mark on objects and products, which serves to distinguish original products from fakes.
And again about the valve
Good day! Gentlemen, I understand perfectly well that valve blades are a hackneyed topic, but I’ll still risk describing my ordeals and asking for advice. They brought several locomotive valves for forging and subsequent manufacturing. I tried to make them out of them before, but they didn’t work, I couldn’t harden them. Now I have the Internet, I looked into the directories. So, I cut off the plates, cut off the required piece (10 cm), put it on the end, unfolded it, pulled it out and molded the blade. According to the reference book, valve steel is 40Х9С2 or 40Х10С2М, hardening temperature 1050-1090 C in oil or air. I stuck it in the forge, heated it to the required temperature (the temperature was controlled with a piece of brass, Tmelt = 1070C), stuck it in oil (Toil about 60-70C), as a result, the wedge is freely sharpened with an ordinary file, the second wedge is hardened in air (like X12MF). The result is the same. He freaked out, threw both blades into the mine, where the rest of the valve was “languishing,” turned off the gas and went home. The blades cooled down along with the forge. In the morning, the devil pulled me to scrape a file along the wedge - it whistles! He shuffled with a file - the same! So the question is, what am I doing wrong and how to deal with it?! Why were the blades hardened under such conditions? There was a similar post with a Swedish bearing, and here is a valve.
No questions! But.. 1. The client is always right. 2. If the client is wrong, see point 1!
quote: Originally posted by ballistikpf: No questions asked! But.. 1. The client is always right. 2. If the client is wrong, see point 1!
I know, that’s why I conducted a small test in front of the customer with demonstrations of the X12MF and R6M5 (which was ready) and an old wedge from the valve. Count 1000000000:1 (does not rust). As a result, I took it for testing without guarantees. And then it happened. The question remains - how and why?
Perhaps you are not holding it at the hardening temperature.
Comments on issue 2
quote: Originally posted by ballistikpf: Stuck it in the forge, heated it to the desired temperature (the temperature was controlled with a piece of brass. Melting point = 1070C
L63, for example, has a melting point of 900 degrees. and you can get a banal underheating, since for these steels the temperature Ac3, above which it is necessary to heat, is 970 and 950 degrees, respectively. If you are using a fusible temperature mark, use pure copper - 1083 degrees Celsius
and regarding hardening with a forge - in my memory, the X12MF was hardened when cooling with a laboratory furnace. Its stability of austenite during cooling is very long over time. The other side of the issue is the presence of retained austenite (of which there may be half) and the position of the Mk point (the end of the martensitic transformation). And in 40Kh10S2M this austenite will disintegrate when tempered at as much as 400 degrees.
Based on this, I think two things are necessary. 1. buy a Chinese multimeter tester for 400 rubles with chromel-alumel thermocouples (in addition, they are sold there in the markets for 50 rubles). And you will control the temperature much better. True, in fiery furnaces, thermocouples are used two or three times, since they quickly begin to lie, carbonizing. 2. Buy steel at a metal warehouse. It's more reliable and better quality. I understand that there are not many metal service centers in Uzhur, but when you go to big cities, the trunks are not bought in the village store
. that there are not many metal service centers in Uzhur. What metal centers? Population 35 thousand, city-forming missile division (remains). I'll try it with copper tomorrow. . Perhaps you are not holding it at the hardening temperature. Exposure as expected, depending on the size (thickness) of the wedge. Thanks for the advice, I'll try it tomorrow and report back.
At our work, blacksmiths make kitchen knives only from diesel locomotive valves. As far as I know, the best ones come from graduations and from the plate. I have had this knife in my kitchen for over 15 years. Hardness by eye: 54-55 Rockwell. They soak in used oil. Sincerely
quote: Originally posted by Boomerang: Hardness by eye 54-55 Rockwell
quote: This is if the eye is a diamond in the form of a cone with an apex of 120 degrees
I think the eyes and hands of a mechanical engineer with 30 years of experience can be trusted at least a little. Regards
quote: Originally posted by boroda Kostroma: but this is fundamentally wrong and then they will say about you “he’s doing shit” and it won’t be easy to clean up
quote: Originally posted by AndYur: Agree, this is not the best steel in our time.
And I don’t harden the valves after forging. I don't see the point in this. IHMO. RK behaves excellently) but to be honest, I’m afraid to heat it... (and there’s no particular need for it) I cut a 5mm nail with a blade, and there were no dents or chips. and after forging I don’t put it in oil, I leave it in the air to cool... and everything is a bundle) either fools are lucky, or the skis don’t work)))
I didn’t make it from the valve myself, but I condemn it. I did, though a long time ago. It seems like more than one point has been made on this issue. Valve is different. 1. It seems like it would be better to make it from plates, since the rods are made of lower quality steel and are welded to the plates by friction (at least on large valves. Simple saving of good metal). 2. It is better to make them from inlet ones (they must be magnetic), there is a lot of molybdenum in the exhaust ones for heat resistance and they do not magnetize and are not hardened. 3. It is possible that the small valves are completely homogeneous; perhaps the steel is the same if the exhaust temperature is low. Summary: search, try, strive - it should work. Poetry however
quote: Originally posted by anatoly: 3. It is possible that small valves are completely made homogeneous, perhaps the steel is the same if the exhaust temperature is low.
Since we were talking about AvtoVAZ and valves, they developed an exhaust valve for an internal combustion engine from 55X20G9AN4, onto which they then sprayed something equally exotic with plasma
Maybe Burchitay, as a more advanced metallurgist, understands the meaning of this action?
heat resistance and heat resistance.
More and more new requirements of Euro standards for exhaust purity (probably does not apply to diesel locomotives) force the manufacturer to increase the compression ratio in the cylinders and the combustion temperature of the fuel. As a result, more heat-resistant and heat-resistant materials are needed for the valve. If you (hypothetically) install a valve from a 412 Muscovite or Kopeika into a new Corolla, it won’t travel even a hundred kilometers, it will burn out. Therefore, friction welding, surfacing of metal-ceramics and sophisticated coatings, titanium alloys and much more are used. The most intricate combinations of materials can be found with the valve. That’s why I think that steel should be bought at a metal depot.
It seemed to me that this piece of iron was metastable austenitic, but with additional alloying with chromium for corrosion and heat resistance
Accordingly, spraying something on her is a little strange
quote: Originally posted by Grinya: accordingly, spraying something on her is a little strange
I will grunt about the thermocouple - to prevent carburization, it is advisable to place it in ceramic beads in a tube, at least made of stainless steel, welded on the side of the working chamber.
quote: the tube is at least made of stainless steel
All prom. thermocouples in stainless steel tubes of one brand or another (depending on max. T). And I don’t care about inertia - 1-2 minutes. they won't make any difference to the weather. Sincerely.
quote: Originally posted by MukhAN: All prom. thermocouples in stainless steel tubes
Source: guns.allzip.org