Icer
6537 0 0
Icer June 13, 2017Specialization: master in the construction of plasterboard structures, finishing work and laying floor coverings. Installation of door and window units, finishing of facades, installation of electrical, plumbing and heating - I can give detailed advice on all types of work.
Drywall corners not only straighten corners, but also strengthen them
Don’t know how to make perfectly even corners in plasterboard structures? Then this review is for you, in it I will talk about the types of corners used in the work and show you step by step the process of installing them. By following simple recommendations, you can easily make strong and perfectly even corners.
There are corners for both flat and arched structures
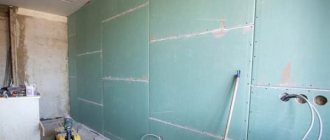
Necessary materials and tools for filling corners
The most problematic and vulnerable to negative influences places in plasterboard sheets are the corners. Therefore, in order to avoid their damage during the operation of the home, it is necessary to putty the surface. Due to the difficulties of placing external and internal corners, special tools and materials have to be used during the procedure.
To carry out the work you need:
- Electric drill with a mixer attachment for mixing the solution. This procedure can be performed manually, but this will increase the time required to prepare the mixture.
- Spatulas with different widths, including corner models, sandpaper and a grater, or a block for rubbing surfaces.
- Construction or laser level. Using a tool, you can check the evenness of the coating.
- Tank for mixing raw materials. Specialists use a special construction container with a volume of 20 liters.
- Paint brushes, a construction knife and a plastic trowel.
The materials you will need to prepare are:
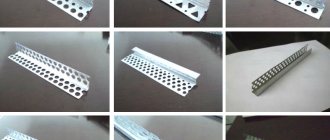
- Perforated corners
. You can take self-adhesive or rounded products made of plastic or metal. Each type performs its functions well. At the same time, rounded structures are in demand in rooms where children live, because... they eliminate the risk of damage in a collision. Metal or “arched” corners are flexible, so they can quickly adapt to any shape of the room.
- Starting putty mixture
. The selected solution must be of high quality. Before preparing the mass, you need to calculate the time required for kneading and the proportions. Popular products are putty from Axolit, Fugenfüller, Knauf and a number of other brands.
- Reinforcing mesh
. Necessary for increasing the strength of the coating and processing internal corners.
- Primer for drywall
. It is applied to increase adhesion between the putty solution and the base.
- Non-woven tape (serpyanka)
. Strengthens the resulting structure.
- Sandpaper
with slight graininess.
- PVA glue
, which is necessary for fixing the serpyanka.
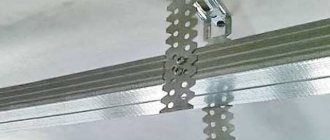
How to seal seams in drywall: materials used
Let's start by looking at the question of what cannot be used to solve the problem of how to seal drywall joints? Quite often, many craftsmen use for these purposes not very suitable materials, which seem to be able to be used if they were not distinguished by their weak ability to adhere to the surface in a thick layer. I’ll say it a little differently - they can be used, but the technology in this case will take a considerable amount of time. Such materials should be applied in thin layers, after allowing them to dry completely. Such materials include finishing putty of all stripes.
To seal drywall seams, only two types of materials are used - a reinforcing mesh called serpyanka, and a special glue. Let's talk about these materials in a little more detail.
- Adhesive for drywall joints. A prominent representative of the materials in this group is a dry construction mixture called “Fugenfüller” - adhesive compositions similar to it are adapted in such a way that they do not crack during the drying process, no matter how quickly they dry and no matter how thick a layer they are applied. They can only be replaced with glue for installing drywall on the surface - they hold the joint perfectly, but working with them is not very convenient due to their viscosity and high hardening speed. As an option, some craftsmen use mixtures for starting putty to solve the problem of how to putty plasterboard seams - in principle, they hold the joint, but subject to the correct manufacture of the frame, the correct sewing of plasterboard sheets and, in general, full compliance with all the subtleties and nuances of working with structures from plasterboard.
- Serpyanka is an auxiliary reinforcing tape for drywall seams. It does not help if the frame is weak or incorrectly made - it is also of little use if installed incorrectly. What is sickle tape? This is a mesh made from modern synthetic materials - exactly the same as is used for plastering polystyrene foam, only it is implemented with a narrow tape. Recently, solid tape made from special paper has appeared on sale - let's face it, the option is not a very good one for one reason. It is simply glued to the joint, over which glue is subsequently applied - it does not strengthen the seam and, in principle, does not weaken it. In general, there is practically no sense from it.
There are practically no options here - if you want to make the drywall joint reliable, durable and non-cracking, use serpyanka and special glue. How to use them? But this is what we will talk about next.
Choice of putty
Before you putty the drywall, you need to choose the right solution.
A wide range of dry compounds are available in construction hypermarkets, so to select the appropriate mixture you need to understand the differences and features of all options. Some products are designed for ceilings and walls, others are designed for eliminating cracks and leveling slopes. Decorative putties are also on sale.
Depending on the purpose and composition of the mixture, the cost varies. Dry options are the most affordable, and their service life is quite long. Such material can be used in doses, which is especially important when performing emergency repair work. Ready-made compositions are not afraid of various environmental influences, but are more expensive.
Taking into account the raw materials, the following types of putty are distinguished:
- Polymer.
- Cement.
- Plaster.
All types are suitable for puttying plasterboard walls. But if we are talking about treating rooms with high humidity (kitchen, bathroom), it is better to use a cement-based mixture. Gypsum analogues do not withstand dampness, so over time cracks appear on their surface.
However, gypsum-based putties are suitable for most other purposes because... their structure meets strict criteria of quality and durability. Using the solution, you can prepare the surface for wallpapering and make it smooth.
Models made of polymer particles are in demand due to their plasticity. Their main purpose is to treat joints and problem areas.
Preparatory work
Before filling a plasterboard wall, you need to perform a number of steps.
You should proceed to this stage immediately after mixing the raw materials, adhering to the following algorithm:
- First, you should trim the corner cuts and get rid of defects.
- The intersection of surfaces must be carefully wiped with a rag so as not to damage the sheets.
- Then you need to prime the treated areas with a brush and wait until they are completely dry.
Once the primer has soaked into the drywall, you need to prepare the putty. To do this, you need to pour the amount of liquid recommended by the manufacturer into the container and add the powder. A drill with a mixer attachment is suitable for mixing, but you can also do it by hand.
For the solution to infuse, you need to wait 3-5 minutes. The mixing cycle is then repeated.
Repairing holes in drywall ceilings
The technology for constructing a frame for large holes in drywall is the same for both vertical and horizontal surfaces.
Therefore, novice craftsmen will not have the question of how to repair a hole in the drywall on the ceiling. If you don’t have a drill and a screwdriver at hand, but you still have a bottle of construction foam left over from the repair, you can use it to fill the hole in the ceiling and form a stable base. Before filling the hole with foam, it is necessary to clean the inner edges of dust to ensure adhesion of the foam to the underside of the drywall. After hardening, the foam is cut flush with the plane and puttied. The method works on fragments up to 15 cm or at a short distance to the rough ceiling.
When repairing ceiling defects caused by soaking of gypsum boards, it is worth remembering that the ceiling should be thoroughly dried before starting work. Otherwise, mold will grow under the drywall, which has a devastating effect on health.
The listed methods are not the only possible ones. After all, drywall is a universal material that can work in conjunction with a wide variety of mixtures and solutions. How to repair a hole in a plasterboard wall? - ingenuity and imagination will prompt the home craftsman with his own ideas that will work just as well.
Selecting corners for gypsum boards
There are several modifications of corners for drywall. They differ in material of manufacture and purpose.
Using a plastic corner like AquaBead
AquaBead is an ordinary plastic corner with a special paper with an adhesive mixture on the inner surface. To install the product, you do not need to pre-apply glue. Paper with an adhesive surface is treated with water, which leads to activation of the base.
Working with such corners looks like this:
- The base is checked for evenness using a water or laser level.
- Next, the adhesive part of the paper on the corner is moistened with a spray bottle or a wet brush.
- After a few seconds, you can fix the corner in the indicated place, making sure that the adhesiveness is not broken.
- 15-20 minutes after fixation, you can distribute the leveling layer.
Such parts are sold in most construction hypermarkets, but they are more expensive than analogues without an adhesive surface.
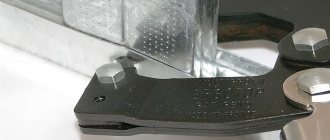
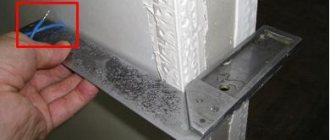
Metal perforated corner
If a classic metal corner is used, installation should be carried out according to the following instructions:
- Check the evenness of the surface using a level.
- Prepare a corner with the required dimensions.
- Mix the solution to fix the structure along the length of the corner.
- Apply the solution to both sides in small portions.
- Attach a corner and press it into the mixture, leveling it with a level.
The glue, which will be released through the holes in the corner when pressed, must be evenly distributed along the height with a spatula. Sometimes builders resort to a different fixation scheme, using a simple stapler.
Semicircular corner made of plastic
Such products are distinguished by the absence of sharp corners and are needed for use in those parts of the room where the risk of mechanical stress is maximum. The design is made of durable ABS plastic.
Before installing the corner, the end of the plasterboard sheet is cut in height by 1.5-2 cm, maintaining an angle of 45°. It is necessary to apply a thick layer of base putty solution and install the product into the treated end.
Before filling the surface, the position of the plastic corner must be corrected with a laser or water level. To strengthen the fixation, you can use a construction stapler. Having leveled the end, the remaining mixture must be removed with a sponge or rag.
How to putty the inside corners of drywall
In most cases, filling of internal corners is carried out using plastic corners, complete with an installed stack for reinforcing the joints. But if you have an angle spatula at your disposal, you can get by with just a mounting grid.
Before processing the corners of gypsum boards, it is necessary to organize high-quality adhesion of the sheets at the junction. In case of strong vibrations, cracks and cracks appear in these places.
Puttying is done something like this:
- A mounting mesh is applied to the joints so that the center of the cavity is clearly located in the center.
- On top of this mesh you need to apply prepared putty along the height of the corner.
- Then the corner should be leveled with an angle spatula.
It is recommended to align all parts of the corner one by one.
Useful tips
In order to obtain the highest quality result after sealing plasterboard joints, during the work process it is necessary to follow the following recommendations of specialists:
- Ensure optimal temperature (more than 10 C°) indoors. It is also extremely important to eliminate drafts.
- In conditions of excessive humidity, the tape for sealing gypsum board joints will not adhere well. Therefore, its installation should be planned after the completion of wet finishing work.
- Before you begin laying the reinforcing tape material, you need to make sure that the drywall is securely fastened.
- If there is no chamfer at the joints of the gypsum plasterboard, you definitely need to apply it yourself.
- To prevent cracks from appearing in the corners over time, they should be filled with putty carefully and evenly.
- When special tape is not used to finish the corners, ordinary tape must be folded in half, then glued to the seam.
- Before using putty, you need to read the information on its packaging. Some compounds are incompatible with reinforcing tapes and are not able to hold them at the joint.
- If air bubbles have formed on the paper tape material, they should be pierced with a needle, then the air should be removed.
- To process joints that are too long, it is advisable to divide the reinforcing products into meter-long sections, which are then glued in stages.
How to putty the outside corners of drywall
Puttying external corners is quite difficult.
In addition to the materials and tools mentioned earlier, you will need to prepare:
- Perforated, plastic or metal corners.
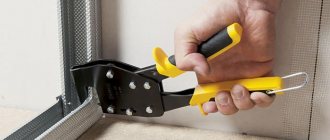
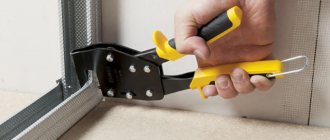
- A device for cutting metal or plastic products.
- Building level.
Next you need to follow these instructions:
- At the first stage, you should determine the length and cut off the required part of the corner.
- Then you need to make sure the slope is level using a level. If there are no deviations, you can proceed to applying the putty solution. If there are defects, it is worth partially opening the material and treating the problem areas with putty.
- Next, you need to install a corner in the desired part of the sheet and press it lightly until the putty begins to squeeze out through the holes.
- Using a level, make sure that the corner is evenly positioned. If necessary, it is worth additionally fixing the product in certain places.
- The remaining mixture is distributed evenly over the perforated corner.
- Before the subsequent stages of puttying, you need to sand the base layer using sandpaper and then apply a primer.
- The finishing solution is distributed in a thin layer. It is necessary for masking defects, differences in height, etc.
The final stage
If you plan to decorate the wall with non-woven or other types of wallpaper with a texture or three-dimensional pattern, you will simply need to rub the corners with a mesh or sandpaper. If the surface will be painted or covered with paper wallpaper without embossing, it is important to achieve a smooth surface.
To do this, you will need to once again treat the plane and corners with finishing putty, which eliminates unevenness and makes the surface attractive.
Before putting drywall in the corners, they need to be primed. Having distributed the finishing mixture, you need to stick non-woven tape over it and level the putty with a spatula. This will allow the tape to soak and harden, increasing the degree of reinforcement and resistance of the base to mechanical loads.
Then you need to apply the final leveling layer of putty and wait 2-3 days until it is completely dry.
At the last stage, grouting should be done using sandpaper or a grouting mesh. This treatment will smooth out all the unevenness and make the surface even and smooth.
Handling uneven sheet edges
If the sheet has been cut or broken and then trimmed along the edge, it must be prepared before use. Why, how and why - we will answer further.
If you pay attention, at the edges of all gypsum sheets, you can notice a rounding, or a decrease in the thickness of the sheet. This was done for a reason, but for a very specific purpose - sealing sheet joints
Putty is applied to the recess that is created by connecting two sheets with the edges when leveling. It forms an even and strong layer if it “extends” a little over the sheet area, and is not just located at the joint itself. To make such a recess, you need to prepare cut plasterboard parts.
It's very simple - you need a drywall plane or a sharp knife. Either one or the other, you need to chamfer along the edge of the part at an angle of 45 degrees.
Now, if you place such a part against another, even with a factory edge, a recess will be formed, which will be filled with putty mixture during alignment, and as a result, the seam will be stronger.