Welding car thresholds - different methods and technologies
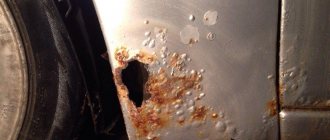
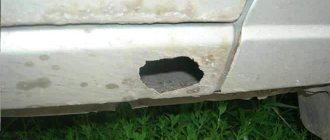
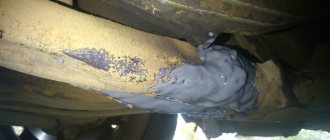
When operating a car, the thresholds most often suffer. This part of the car body is considered the most vulnerable, since they are constantly in contact with road reagents. As a result, the thresholds begin to rust.
All this not only spoils the external attractiveness of the vehicle, but also significantly reduces its market value. Therefore, selling a car with rusty linings is much more difficult. To correct the situation, it is recommended to use welding.
Methods of welding car thresholds
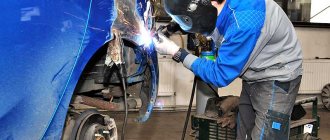
First, you should know what kind of equipment is suitable for these purposes. Welding of car thresholds can be performed in various ways. Here a lot depends on the type and nature of the defect. The amount of work is also important.
Welding of the thresholds can be carried out using MIG welding, straightening and further stretching of the thresholds using spot welding, as well as manual electric arc welding. All these methods have their own characteristics.
Nature of damage requiring repair
The main types of damage to the sills (regardless of their type) and the bottom include:
mechanical damage resulting from contact with other cars or as a result of impacts from stones and gravel particles;- a corrosive effect on the material, leading to the formation of rusty cracks and cavities, the protective treatment of which does not bring tangible results.
The first group of faults is associated with the peculiarities of domestic roads and leads to the car losing its strength characteristics, and, as a consequence, the impossibility of operation in the previous modes. If there are a large number of them and the spar is damaged, driving a car becomes completely unsafe.
Corrosion processes also pose a serious threat to the supporting structure, which increases over time. Despite the many ways to combat corrosion, they, however, do not stop the destruction process, which ultimately leads to the need to replace rotten elements.
With non-removable body parts, the only way out of this situation is to use welding of the thresholds using any known method.
Technologies for restoring damage to the structure of these parts differ both in the methods used and in the cost of the materials used in welding.
MIG welding of thresholds
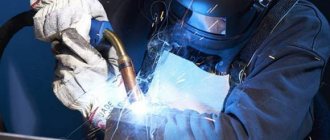
Semi-automatic welding of car thresholds is carried out in a protective gas environment, for example, a mixture of argon or pure carbon dioxide. A wire of 0.6-0.8 mm is used for this. Thanks to MIG welding, you can weld small holes or completely replace car sills. This method is not suitable for straightening and dents of thresholds.
Pros:
- simple setting of tacks;
- greater productivity;
- obtaining a thin seam that does not require processing afterwards;
- high quality weld.
Repair methods
The choice of method for restoring the sills and bottom depends on the nature of the damage received and can be reduced to the following options:
- classic welding of fixed body parts;
- straightening of small dents on removable and non-removable elements, for which the former must be removed from the car;
- replacement with new products (in case of severe damage or rust);
- Do-it-yourself threshold repair without welding using non-standard restoration techniques.
Atypical options include the use of fiberglass with epoxy glue, as well as a method that allows you to stretch the thresholds using special mechanisms. The latter method allows you to completely restore the previous shape of any car products (including the famous VAZ brand).
One of the types of threshold stretching involves the use of special vacuum inverters, with the help of which any deformation (a dent, for example) is corrected due to the difference in pressure inside and outside the structure.
Repairing the bottom without welding may consist of regular inspection of straightening, cleaning and painting.
Repair of thresholds using spot welding
This type of welding is carried out using a spotter. It is a device with a reverse hammer. After being hit with a hammer, the concave part of the threshold is extended. Thanks to spot welding, you can get rid of dents and also straighten car sills.
This equipment is not suitable for replacing parts of thresholds or welding large holes. Spot welding is used exclusively for straightening.
The device of car thresholds
The outer part of the threshold is not the main power part of this structure. It provides rigidity to the body, but the main rigidity is provided by the internal reinforcement, connector and internal part of the sill. These panels are spot welded together to form a box-shaped hollow structure that bears the bulk of the loads. This design gives the car longitudinal strength. The outer part of the threshold provides a more cosmetic function.
Each internal part of the threshold plays a role in providing structural rigidity.
The entire sill design reinforces the underbody. Example of a car threshold design
- The inside of the sill is the part that can be seen from inside the car.
- Connector - This part can be seen from below the car.
- The internal reinforcement is usually a flat piece of steel that is stamped for reinforcement.
- The outer part of the threshold is the part of the threshold that can be seen from the outside, it is called the threshold.
The design of the threshold of a particular vehicle may differ from that shown in the illustration.
Repair of thresholds using RDS
Working with manual arc welding is quite difficult. Indeed, in this case, it becomes necessary to correctly adjust the current strength. The result should be a high-quality weld without any burn-through. As for productivity, it is extremely low.
At the end of the work, the weld has to be further processed. In principle, with the help of RDS it is possible to carry out local repairs of auto thresholds or completely replace them. However, this will require spending a lot of time on such work. Therefore, this option is not suitable for everyone.
Any equipment for welding work today can be easily purchased in an online store. You just need to first decide on the main purpose of the welding machine. As a result, you will be able to repair car sills and even make money from it.
Share on social networks
Fixed and removable
The designs of most machines provide only two types of threshold elements. The first ones are “seated” for welding and form a single whole with the body and side member, the second ones are removable or overhead sills.
The second type of thresholds is installed extremely rarely and most often for the purpose of additional protection from mechanical damage and strengthening the body.
Restoration of rigidly fixed thresholds is possible only by leveling the damaged areas, welding them, or completely replacing them with new elements. However, not everyone can weld thresholds with their own hands, even if they have a welding machine.
Restoring heavily worn removable thresholds attached to the body using special screws, as a rule, comes down to updating them. However, the seemingly simple replacement of thresholds also requires preparing the body for the upcoming repair.
Manufacturing of thresholds for cars
Removable thresholds, which were made in factories or special companies, are in most cases located in vehicle interiors. They are called the top of the thresholds.
It is this part that gets most contaminated when passengers get into or out of the car.
If something impacts the body, then the upper part of the sills is susceptible to mechanical damage.
The lower parts of the vehicle sills are also removable; they are located outside the car.
Removable thresholds for protection are installed by car owners so that they can protect the main structures from various damages: dirt, chemicals, and cracks.
On the Internet you will find many videos on the topic of how to make thresholds for a car with your own hands.
The manufacture of thresholds for cars, as well as their repair, can be done independently, without turning to specialists for help and without spending extra savings. The threshold structure is quite easy to remove. To do this job, there is no need to use welding. It will be enough to prepare straightening or hood. If all the work on repairing thresholds is done extremely carefully, then you will not need to paint the structure. The protective sills are removable parts, but still, this is considered a body repair.
To repair car thresholds, you need to prepare:
- Workbench;
- anvils;
- mallet, as well as everything for straightening.
If there is a dent on the threshold, it must be removed without much effort, as it can damage the structure of the metal and also damage the paintwork. It happens that corrosion begins to corrode the metal of the threshold. In this case, it is necessary to correctly assess the extent of the damage.
If the damage is minor, then you can simply cut out the part with the flaw and weld another one.
But it happens that corrosion has damaged most of it, then it is better to install a new structure.
Replacing parts or the entire bottom
Repairs begin with inspection and repair of thresholds. Rotting of the central part of the body begins with corrosion of the sills and wheel arches, so if rust has destroyed parts of the bottom by 30%, then we can confidently say that the sill is rotten by 60% and requires complete replacement. The bottom of the VAZ 2114 consists of the following elements:
- underbody panels under the seats;
- threshold extension;
- crossbars;
- side member amplifier;
- space for a jack or jacks;
- central support platform;
After cleaning the underbody from anticorrosion, the jacks, side members and panels under the feet of the driver and passenger are inspected. These are the most vulnerable parts. If the general condition is satisfactory, then it is recommended to cut out the problem areas and install the original floor parts from the repair kit. The process of partial overcooking of the bottom in steps:
- Drill out the spot welding points and cut out the rusted metal with a chisel.
- Clean the edge of the future weld with a grinder and treat with a degreaser.
- Attach the original part or the cut out patch. The metal patch should protrude 1 cm beyond the edges of the trim; welding will be carried out overlapping.
- Spot weld the edge of the metal. Weld the patch in increments of 2 cm welding, 4 cm skip.
- Clean the weld seam.
- Treat with primer, apply a layer of oil anticorrosive or bitumen mastic under the sound insulation layer.
- After complete cleaning, treat the outer part of the bottom with bitumen mastic.
A complete replacement of the bottom of the VAZ 2114 is required in 50% of cases of body repair. However, experienced drivers warn about the danger of independently repairing the entire bottom, which remains the main part of the supporting body. If you don’t have experience, you can disrupt the geometry of the car, and even the slightest misalignment threatens that it will be impossible to set the wheel alignment and the car will start to drive sideways, the tires will quickly begin to wear out, the engine mount may come off, fuel and oil consumption will increase, etc. Beginners are advised to cut out the bottom in parts and replace only the part that is rotten.
Before the bottom is completely re-welded, all pipes of the fuel, brake and exhaust systems are dismantled. On VAZ 2114 cars, after three to four years, all pipes and fittings of the fuel and brake systems are corroded and acidified. It is almost impossible to remove the element; service technicians recommend cutting out the metal hoses and, after working on the bottom, installing new pipes made of brass or copper. The advantages of such hoses over metal ones are obvious.
- The softness of the metal will allow the hoses to be bent and installed exactly in the bottom pockets.
- If the bottom is changed in parts and the master has to tap out the place for the pipe himself, the brass tube can be installed at any angle and secured to a special coupling.
Algorithm for replacing the entire bottom:
- Drill out spot welding areas.
- Use a chisel to cut out the bottom. You can use a grinder, but it is recommended to tap the metal with a chisel or hacksaw blade.
- Leave 1 cm of the old bottom to allow for overlapping welding of the new element.
- Reinforce the side members with additional metal panels.
- Place the bottom from below and grab the points.
- Cook in 3-4 cm increments.
- Clean the weld seam with a grinder or metal disc.
What are the defects?
According to the type of attachment to the supporting body, the thresholds are classified into removable, which are installed on the body with bolts, and non-removable. The elements are welded to the sidewall and provide the car structure with the necessary rigidity and reinforcement. Regardless of the type of installation, the elements suffer the same damage.
- Dents. Defects are formed from impacts with gravel, careless parking, or as a result of a minor accident. Mechanical damage from gravel damages the outer part of the underbody, wheel arches, and side members.
- Scratches, chips. The outer part is damaged. The defect does not affect driving safety; the appearance of the car suffers.
- Corrosion. Rust occurs due to natural wear and tear of the metal and due to improper processing or lack of anti-gravel protection. The degree of wear affects driving safety. If the non-removable threshold, as part of the power element of the body, rots, the overall geometry of the structure changes, the main components and assemblies are distorted: the engine and transmission elements.
Depending on the defect, the repair method is selected: welding, pulling out dents, straightening using spot welding, or sealing holes with adhesive.
Replacing thresholds with your own hands
p, blockquote 11,0,0,0,0 –>
- When welding thresholds on flanges through holes, position the welding torch with wire in the center of the hole so that the wire touches the metal to which the panel will be welded. It is necessary that the electric arc forms precisely on the metal to which the panel will be welded, and not on the edge of the hole. Start welding in this position and do not move the welding torch until the hole is almost full. Next, move the burner in a spiral towards the edges. This way the penetration into the metal being welded will be good and the welded joint will be strong.
- Clean the welds. When stripping, do not remove too much of the seam as this will weaken it.
- Provide anti-corrosion protection. You can use epoxy primer directly on the weld area before applying subsequent coatings. Through the technological holes, treat the threshold from the inside with an anti-corrosion spray compound.
Reasons for replacement
There are quite a decent number of such reasons, the most common of which are the appearance of rust or severe deformation. In the second case, most likely, the consequences of a traffic accident.
But before you start replacing the thresholds, you need to understand the degree of wear. Thanks to this, it is easier to understand whether it is necessary to change the entire threshold or a separate part of it.
You can understand this by looking at the state of the paint on the metal, if it is completely absent or appears in bubbles. If this occurs over the entire area of the part, then the easiest way would be to replace the entire threshold. However, there may be another case when only part of the threshold is in such a state; it can be cut off and the whole part welded on.
How to properly restore a body?
An important condition for successful welding of the body is the correct setup of the device.
Therefore, before starting work, you should check on available materials.
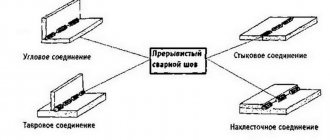
We simply take two pieces of metal of the appropriate thickness and try to weld them, and be sure to use the same method that will be used on the body (overlapping or end-to-end, with stitches or through holes). During the testing process, we adjust the device.
It is important to ensure that there is no burning, and that the metal melts well and is connected to each other.
When using an inverter, it is important to select the electrode thickness and welding current. As a rule, 30-40 Amperes of current are required per 1 mm of electrode. Therefore, a 2.5 mm electrode requires 75-100 Amperes. You also need to take into account the thickness of the metal, so the correct data is indicated in the table.
But this is provided that the network produces 220V. If the voltage in the network drops, selecting the current may become more difficult, so it is important to do test welding before the main work.
Also, you should not weld the part sequentially (attach it and start welding from edge to edge), since this may cause the element to “lead.”
You should do this: attach the part, grab it in several places, and only after that we go around the entire perimeter.
After welding the element, the welding points must be cleaned of flux. If it is an external element, you will have to grind them down to ensure a smooth surface.
If the welded element will cover something (for example, a threshold box), then the internal surfaces must be treated with corrosion inhibitors and then covered with anti-corrosion materials. The resulting seams should also be properly processed.
As for the external parts, the entire surface is puttied and primed to completely hide welding marks, after which the body parts are painted.
Complete wheel arch repair
One of the next days we took on the complete repair of the wheel arch, which was also noticeably rotten. I had to remove the stand to make it easier to work with. There is nothing special to tell here, the scheme of work is the same:
- we remove everything that gets in the way, both in the arch itself and under the hood;
- cut out rotten areas;
- cover them with a steel sheet;
- and cover with mastic.
We welded the extensive rotten area behind the counter with a 3-mm steel sheet, because... it is subject to stress. The remaining patches are cut from the same millimeter sheet.
On the same day, inside the threshold, for its durability, I poured about 100 ml of waste through the drilled hole and plugged it with a plastic plug. It is clear that the entire car body will rot sooner than a pipe with a 2 mm wall, but it’s still safer.
Then we finally assemble everything, install the wing, fender liner, plastic trims, seats and you’re done. By the way, under the plastic sill trim the pipe is completely invisible. You need to look underneath to notice that the sills and areas of the bottom have changed.
That’s all for this part, now I’ll briefly talk about door hinges and let’s summarize.
