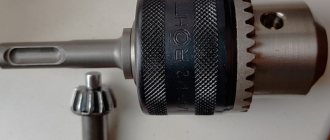
Types of chucks for hammer drills
In most tools, regardless of the manufacturer: Bosch or Makita, SDS standard cartridges are installed: SDS-plus and SDS-max. The first is used on light hammer drills; it accepts nozzles with shanks with a diameter of 10 mm, which fit into the device 40 mm. It is fixed by two balls that fit into closed grooves of the nozzle, located one opposite the other. The force is transmitted through a pair of wedges that have contact with the shank with an area of 75 mm2.
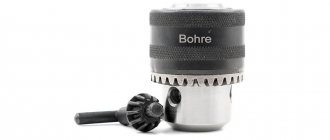
Disassembled cone for a hammer drill
SDS-max components are installed on powerful semi-professional and industrial rotary hammers. They differ from SDS+:
- number of open grooves - three;
- contact area – increased to 389 mm2;
- immersion depth of the nozzle is 90 mm.
Less common are the SDS-quick and SDS-top standards. To work with hex and cylindrical shank bits, the SDS can accept a classic gear chuck, like a drill. It allows you to use ordinary drills for wood, metal, glass, mixers for mixing solutions from bulk materials with a round shank. It even works with a bat.
Sometimes jaw chucks or quick-release chucks and double-clutch chucks are installed instead of SDS.
What is it needed for
Drills, drills, crowns, chisels are attached to a special element of the hammer drill, which is called a chuck. This allows you to perform various types of work.
Drills, which are in many ways similar to rotary hammers, use collet-type clamps. Rotary hammers use mechanisms with a special design. This allows you to securely secure the nozzle, and also cope with the processing of concrete and reinforced concrete surfaces.
It is also interesting that the clamps for drill and hammer drill attachments are very similar in appearance. But the collet mechanism includes several jaws that are evenly pressed against each other, which allows the cylindrical attachment to be clamped.
But the structure of the cartridge for a more powerful power tool, that is, a rotary hammer, is different.
How to disassemble a hammer drill chuck
To assess the technical condition, service or replace the clamping device, you need to disassemble the hammer drill chuck. Work gloves are first put on - they minimize the contamination of hands with dirt, construction dust, and grease. The plug of the tool must be pulled out of the socket.
- The slider or rear clutch of the chuck is retracted towards the tool. If it is installed vertically - down.
Pull the coupling down
- A straight screwdriver is inserted between the boot and the slider and turned in any direction, or the boot is pryed off with it.
Removing the cover
- A puller removes the retaining ring holding the bearing.
Using a circlip puller
- The slider is moved down again and the metal washer for the boot is removed.
Removing the gasket
- The second retaining ring is pulled out from the seat. It is larger in diameter than the first one. The plastic boot is removed.
Removing the polymer cover
- A ball is shaken out of the hole.
- The spring is removed.
- All parts are thoroughly cleaned of stuck dirt and dust with a dry cloth or napkin.
Afterwards, it is advisable to wash the components in kerosene. There will be a lot of plaque if, instead of lubricating the shank, the lubricant is sometimes applied inside the cartridge, which is absolutely not allowed.
- Four cotter pins are removed from the seats. The easiest way to do this is with a magnet.
Removing fasteners
- The inner part of the mechanism is pulled out from the base, where the attachments are inserted.
- Using a straight screwdriver, remove the oil seal from the sleeve and remove the sealing rubber.
Assembling the hammer drill chuck
To assemble the device, the steps performed during dismantling are repeated in reverse order.
- Washed, cleaned or new parts are lubricated with silicone lubricant like WD-40.
Lubrication of rubbing parts
- The oil seal and rubber seal are put in place. The inner part is placed in the sleeve so that the holes for the cotter pins match.
- All four fastening elements are installed in place.
Installation of cotter pins
- A spring is installed, followed by a washer that secures the ball. With its protrusion it turns towards the ball socket.
Correct installation
- The spring is pressed with a washer, and the ball is put in place.
Installing the washer
- A slider is put on top of the mechanics. It is pressed with a locking ring.
- A washer for the boot is installed, and then secured with a small retaining ring.
Second retaining ring
- The slider lowers, and with a slight force the boot is put in place.
You can install the attachment and check the quality of maintenance of the cartridge. In cartridges from different manufacturers, the disassembly process may differ slightly due to the presence of additional washers and gaskets.
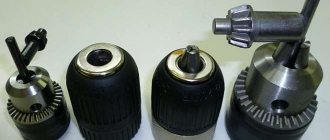
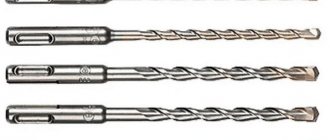
About the attachments
There are several types of drills and other attachments for hammer drills:
- Standard straight drills - needed for drilling holes in brick, concrete or stone.
- Crowns - needed to create not very deep, but wide holes - for junction boxes for electrical wiring and other things. For concrete, it is better to use crowns with diamond tips.
- Chisels – can be used for dismantling tiles or other similar work. The tip of the drill is not hardened; it will have to be sharpened periodically.
- Peaks – often used to create holes for pipes.
- Drills in the form of blades - for creating channels for electrical wiring.
The main part of the nozzle is the shank. It is this that is inserted into the hammer drill chuck. It is made of alloy steel and is highly durable. There is a marking on the shank indicating the type of attachment.
The working part is made of special steels for long-term contact with particularly hard non-metallic materials: concrete, stone.
The shape depends on what the nozzle is used for:
- Screw - needed to create deep holes of different diameters.
- Drills with a small inclination of the spiral grooves are best used for a large number of shallow holes. Does not require much effort during labor.
- Drills with a large angle of inclination of the spiral grooves can be recommended for high-speed work in order to make a small number of fairly deep holes.
Reference : the working part of the drill ends with a cutting part made in the form of soldering. Each manufacturer keeps the composition of the alloy secret. The durability of the nozzle and its efficiency depend on it.
How to remove a chuck from a hammer drill
To remove most SDS chucks from a rotary hammer, the base located behind it is moved axially towards the electric motor, and the clamping device is easily removed, because it is attached according to the principle of holding the drill. (First 12 seconds of video)
Some models, such as those from Makita, use two-clutch clamping devices. To remove them, the base of the chuck located behind it must be turned counterclockwise 1/8 of a turn so that the arrow points to the icon of the disconnected clamping unit. As a result, he will be freed.
When using a keyless chuck in a hammer drill, you will have to use a screwdriver. The cams are opened to the limit, a straight screwdriver is used to unscrew the fixing screw with a left-hand thread - unscrew it clockwise.
Rotate counterclockwise
The cartridge itself is unscrewed counterclockwise by hand after fixing the shaft with a pin. If not removed, a large hex key is inserted into it and clamped. Afterwards, one strong blow is applied to the key with a wooden object, so as not to deform the tool, counterclockwise.
Clamped hexagon
Alternatively, hold the hex socket between the jaws and unscrew the cartridge using the appropriate wrench.
Key Usage
If the screw does not come out, you need to knock on it to loosen the fixation - a screwdriver is inserted into the slot and several gentle blows are applied to it. If traces of corrosion are visible near or on the fixing bolt, lubricate it with liquid lubricant.
The jaw chuck, which is inserted into the hammer drill through an adapter, is removed like any attachment: the rear coupling of the SDS equipment is moved towards the electric motor in the direction of the axis, and the clamping device is removed.
Repair, prevention, modernization, personal opinion. Bosch GBH 2-26 DRE.
Bosch GBH 2-26 DRE
. One of the most popular hammer drills in the middle weight with an SDS+ shank, and this is not an accident of course. At least somewhere, the policy of reducing the price of the final Bosch product did not have a stylish impact on quality and reliability. My copy was purchased back in 2008...the years fly by...
The kit does not include a replaceable barrel, as I did not need it.
I got my very first Bosch hammer drill 20 years ago... it was a lightweight 2-20, but it had to work in hellish conditions. At that time, the hammer drill cost simply fabulous money at that time... Now the original 2-26 can be bought even for $130...
What did you save on... and what happened to the perf over 8 years (almost)... with an average load on it.
I had been planning to disassemble and replace the lubricant for a long time, but as always... either the work is perfect, or other things are up to my ears. But here I had to use the perf like a jackhammer...on the ground...and it had to be buried up to the very brushes in the ground...Sucking in the soil on one side and spitting it out on the other) Well, after this, my conscience simply did not allow me to put off maintenance.
Starting with the electrical part. Let's disassemble the handle.
Remove the brush reverse mechanism.
It’s hard for me to say how many engine hours this perf has lasted, but the brushes and commutator are simply in surprisingly new condition. Mystic.
The reverse current leads are also without burn-ins... because I almost never use reverse. Having disconnected the gearbox from the stator housing, remove the rotor.
Well, as always, disease 2-26, dead bearing on the manifold side.
Lifting the cuff, we discover something that is no longer surprising... the bearing is dry.
It’s amazing how manically BOSCH (and not only unfortunately) saves on bearings. Approximately 70-75% of Bosch is equipped with “non-name” bearings of disgusting quality. Having found exactly the same bearing with the same markings on Ali, we see the price... 23 cents per piece AT RETAIL...
Damn... I understand that over two decades you have made your tool twice or more accessible to the user in material terms... but how much will you save by installing, for example, SKF or NSK for $1... To remove the rotor from the gearbox housing, unscrew the two screws of the thrust plates.
Shaking, we remove the rotor with the bearing from the housing. Why these bearings never fly is clear...NTN Germany...
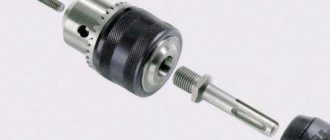
Next, disassembling the cartridge...
Removing the barrel is easy. The magnet simply removes the fixing sleeves.
In general, a replaceable barrel is good, even using drills with poor-quality shank polishing, a worn-out barrel can be replaced “on the knee” and is not very expensive. We take out the barrel.
We dismember and wash everything.
The firing pin is in just new condition... Some kind of simply super successful specimen in my hands...
There must be a fly in the ointment somewhere here... Next, we take out the mode switch... It’s no longer a secret how this is done. ...I remember when I was dismantling my first perf at about 15-16 years old, I understood that this handle was removable...but how... In the end I took it off, breaking it, picking it up with a screwdriver)) Then, when capitalizing my perf, I ended up not only on the piston, but also on the switch .
Switch to drilling mode, press in the latch and turn it some more...at about 7.30.
Then the handle simply rises up.
We halve the body. Yes... but before they used much more lubricant...
An interesting story from life. When I used to buy a tool from a dealer, 15-16 years ago, it was then that the price of a blue Boche began to fall... And the quality... or rather, the reliability of the tool began to fall very sharply. The services were overwhelmed 2-24 at that time, people were simply swearing... And the leadership in the pro market, at least in the Republic of Belarus, was shaken. People began to look at the exotic DeWalt, Metabo, Makita at that time... there were some rumors about some kind of space tool Hilti... No one saw it, but knowing the word Hilti was at least cool)
Hammer chuck repair
A couple of parts of the clamping device can be replaced with similar ones: a worn-out ball, a rubber gasket and a spring that has lost its original properties, for example, flexibility. Sometimes, for example, when the nozzle jams or gets stuck, the spring tendril jumps out of its seat.
The antenna is inserted into place
If the remaining components wear out, the hammer drill chuck cannot be repaired; it must be replaced with a new one. You will have to look for a ball with a spring not in tool stores and construction markets, but in service centers where devices are serviced and repaired. Another option is to order a spare part on a Chinese trading platform. It is often easier to replace the cartridge with a new one than to repair it. It's a little more expensive, but more reliable and faster.
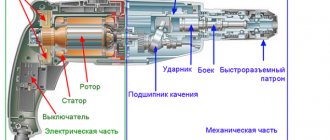
Device
Diagram of the chuck in disassembled form
The purpose of the chuck is to securely hold the working tool (drill) during operation and ensure a quick change of equipment if necessary.
The first prototypes of modern devices appeared in the first half of the 20th century.
The engineers eventually came to the conclusion that the simpler the clamping structure, the more reliable it is.
But over time, different modifications began to be developed, each of them with its own pros and cons.
An important feature of the hammer drill chuck is its maximum closedness. This ensures that particles of concrete and other materials do not get inside.
Components of the most common clamping devices:
- The axle has a bushing with many splines pressed onto it.
- A ring with a conical spring that fits onto the bushing.
- Locking balls that are located between the ring and the bushing.
- A protective casing made of plastic or rubber protects the cartridge from the penetration of foreign particles.
This type was developed by technicians from the German company Bosh. It is called an SDS chuck, the letters are the first in those words that describe the principle of changing attachments (German): “Insert, turn - secure.”
Replacing a hammer drill chuck
Sometimes old spare parts have to be replaced with new ones due to significant wear or careless operation. Replacing a chuck on a hammer drill begins with removing the old clamping device. After dismantling it, the new equipment is installed in place in the reverse order of disassembly.
It is necessary to replace a damaged cartridge on a rotary hammer if its components are worn out: there is play, nozzles fall out, or the device jams. Most often, the locking plates that secure the balls and the body itself are affected. The retaining spring weakens less often. Sometimes, to correct a problem on a construction site, a thin washer is placed under it.