Hi all! Even if you are not a professional furniture maker, but rather an amateur, you may still be interested in a tool for assembling furniture.
When buying furniture, in extremely rare cases it arrives already assembled. Basically, these are structural elements that need to be combined with each other. This is how items of upholstered furniture, kitchen furniture, cabinet furniture, etc. are purchased. Here is a set of parts and fasteners. It doesn’t matter whether it is made of chipboard, chipboard, solid wood or even natural wood.
A furniture maker always has a certain set of tools in his arsenal, which allows him to save on the services of assemblers from the store and do everything with his own hands.
If you want to do the assembly yourself, then to make ready-made structures you will need to assemble a specific kit. Some you already have at home, other components are easy to buy at Ikea or similar stores. All tools that may be useful during assembly are conventionally divided into marking and assembly (fixing).
DIY tool for pre-assembling furniture and wardrobes
Before assembly, it is necessary to mark the parts and drill the joints for confirmation in the ends and front parts of the chipboard. This process will make further assembly much easier.
Also, preliminary marking will be required for attaching various lifting and sliding mechanisms, furniture hinges, shelf holders, rod holders and other fittings.
For the marking process, at the initial stage you will need all the measuring tools described above.
To add parts (drill holes) at home, you will need a simple hand tool:
- Drill. Drilling holes in furniture parts does not require a high power drill; 350W is sufficient. The main thing is that it is light and comfortable - after all, for large volumes of making furniture with your own hands, you will have to hold this tool in your hand for quite a long time. The drill will require a set of drills - confirmat, wood and metal drills 3, 4, 5, 7, 8, 10mm. And also Forstner drills 15 and 20mm for installing minifixes and eccentrics, 26 and 35mm for inserting furniture hinges, core drills 60.65 and 80mm for inserting lamps, plugs for wires (if required by the purpose and design of the furniture).
- Clamps and vices. Needed when assembling large-format parts and gluing (for example, when assembling furniture dowels). Also used for direct drilling in place, without preliminary additives, to evenly clamp parts in the desired position. It is better to use quick-release clamps. Homemade variations of clamps and vices are also useful for this purpose.
- Mallet. Used to install hidden fasteners (furniture dowels) and adjust conventional ones. Indispensable when inserting dense removable shelves into designated niches, since it allows you to precisely and without damage “fit” the parts to the right place.
- Hammer . Needed for attaching back walls and bottoms of fiberboard drawers to small nails. But many assemblers have gotten used to screwing fiberboard onto thin self-tapping screws. Or attach to staples using a construction stapler.
Types of consumables
- Jigsaw files. Thanks to removable files, it is possible to saw through chipboard.
Various jigsaw files
Quality bits for driving screws
You will need a Forstner drill bit to cut holes for overhead or internal hinges and holes for a minifix tie.
Screw and twist drills for wood for drilling through holes and holes in the ends of parts
Differences between professional and domestic
Typically, professional screwdrivers are more expensive than household ones and are able to work for a long time without losing their power. If you decide to choose a screwdriver for furniture assembly, it is recommended to choose a professional unit . With it you can drill into concrete, metal and hard wood, and use the tool as a construction mixer.
Products in the professional segment are made from wear-resistant materials; generally, the tools contain more metal parts. Also, this category of screwdrivers provides precise adjustment of torque and rotation speed.
Other tools
- Self-tapping screws and confirmations.
Self-tapping screws and confirmations for furniture assembly
Rafix - eccentric couplers, which are used for fastening horizontal and vertical furniture parts.
Minifix is used for joining furniture pieces made of chipboard, MDF, plywood, solid wood
A drill for furniture hinges is used when assembling furniture in those places where it is necessary to install furniture hinges
This drill differs from other drills in that it drills an additional hole for mounting the confirmat head
Furniture tools are very different. They differ in size, functions, and purpose. This can come as a shock to a novice needleworker. It is difficult to know the features of each device, and even more so to decide on the fly where it should be used. But the right advice and practice will help you achieve your desired heights.
When creating such a specific creation as furniture, you need to get acquainted with another interesting group: consumables. These are any materials. They are unique in that they lose their properties during use. They are indispensable when twisting cabinet furniture.
Other electric tools for cabinet furniture production
It is assumed that cutting chipboard to size is not done by hand. To design bevels, radii on some parts, to design cuts in the place for installation, as well as inserting a sink or hob, you will need a regular jigsaw with a wood saw or chipboard installed.
The edges of the chipboard after the jigsaw are processed with a grinding machine with fine-grained sandpaper and covered with PVC edges or melamine tape. In the first case, you will need a router, a hair dryer and special glue. In the second - a regular iron with a metal “sole” (aluminum can leave untidy whitish stains on the surface of the melamine tape) and a short knife with a wide blade for trimming excess (jamb knife).
You will not need another electric tool for the production of cabinet furniture.
Professional tool for furniture assembler
In every person’s life, situations arise when it is necessary to use a tool, in this situation it is assembling furniture. A good tool is the quality of the work and its speed, and the level of a professional can be determined by the tool he uses. A set of tools in skillful hands becomes a means by which any furniture installation is made so much easier that it turns into almost a pleasure when doing the work.
It’s hard to believe, but today one furniture assembler, armed with a high-tech set of tools, is doing what was previously difficult for a team of craftsmen to do. The cordless screwdriver is especially popular, as it frees the assembler from heavy and tedious manual work, and with modern measuring tools, furniture installation has become more accurate and of better quality.
In complex modular systems, high-quality furniture assembly is not possible without the use of specialized tools. To perform installation, hanging, fitting of furniture, the following are used: cordless tools, power tools, measuring tools, hand tools. Let’s take a look at the characteristics of the tool, and in the assembly of which modular furniture systems are needed:
Cordless drill/driver
The main tool. It is advisable to have two batteries and a fast charger. Batteries - power in volt (6, 9, 12, 14, 18...), volume (working duration) in Ah (1.4, 2.0, 2.4, 3.0...). A screwdriver usually has two torque speeds. For the clamping chuck we use a magnetic holder with a set of bits and drills. screwdriver for furniture assembly
Hammer
An auxiliary tool for hanging furniture elements and components. Often included when installing kitchen furniture and built-in cabinets, when drilling in concrete. Inside the hammer drill there is an impact mechanism that produces the impact itself. Therefore, all that remains is to place it against the wall and press the release button, and the hammer drill will do the rest itself. Specialized drills, drills, and crowns are used.
Hammer drill
At its core, the drill is multifunctional. It is used for drilling holes in furniture panels, table tops, and drilling walls. The drill is equipped with a chuck rotation speed regulator and an impact mechanism. We drill wood and metal at high speed. At low speeds we use it like a screwdriver. We turn on the impact mechanism when drilling walls. Useful in assembling cabinet and built-in furniture.
Jigsaw
A jigsaw has found its way into use when installing kitchen furniture, cutting countertops, making cutouts for sinks and hobs, it can be used to change the parameters of cabinets, etc. We use it for built-in furniture, to adjust panels to size. Equipped with speed regulator and blade tilt. Large selection of blades (files) for jigsaws; For cutting furniture panels, blades with the least chipping (finishing) are used. Metal files.
Circular Saw
The circular saw cuts kitchen countertops, built-in furniture, and large-sized furniture panels. An indispensable tool for installing furniture made from bare chipboard panels according to customer dimensions. We use specialized discs when cutting chipboard or MDF to reduce chipping.
Grinder
In furniture assembly, the tool is used to process the surface after cutting down the furniture component. Aligns the cutting line and removes chips. In most cases, it is included as an additional tool for jigsaws and circular saws. The machine is used for furniture restoration, also for removing varnish or when cleaning wooden surfaces before painting.
Electric coupler
Found application for upholstery of upholstered furniture. Can be used when installing hardboard, for example when installing the back wall of a cabinet.
Miter saw
The tool has proven itself in cutting furniture elements at an angle - cornices, dust covers, baseboards. Due to the high revolutions of the cutting disc, cutting occurs practically without chipping. Installation of stationary office partitions - a miter saw cuts an aluminum profile.
Miter box
A manual analogue of a miter saw. It is used for cutting decorative furniture elements at an angle, for example in home furniture for installing cornices (walls, slides, kitchens).
Hand tool set
Assembling and installing furniture with hand tools: Set of screwdrivers Hammer and mallet Set of chisels Set of hex keys Knife
Measuring tool
Furniture installation is not complete without a measuring tool. Tape measure, rulers, corners for marking furniture components. Level for leveling furniture. For more accurate measurements of furniture installation spaces, laser meters are used.
Electrical wiring detector, metal detector
An auxiliary tool for checking walls when drilling. Detects live electrical wiring, metal, wood. Indispensable for hanging shelves on plasterboard walls. Finds metal channels, and some models and wooden beams.
Furniture installation - observing safety precautions when using tools.
During the operation of a modern professional power tool, if used incorrectly, there is a threat to the health of the person using it.
The tool can cause significant injury to both the operator and the observer. It follows from this that the tool must be used by adults who understand the safety rules. Think over your work in advance, prepare the place. Always wear close-fitting clothing and eye protection. Children, bystanders and animals must be kept at a certain distance from your workplace. Read and follow the tool manufacturer's instructions. Use the tool when you are in good physical and mental condition and ready to use. It is prohibited to work with a defective tool, as well as damaged components for it. A good tool is the quality of the work and its speed, and the level of a professional can be determined by the tool he uses. A set of tools in skillful hands becomes a means by which any furniture installation becomes so much easier that it turns into almost a pleasure when performing the work. 2018-03-12T19:36:04+04:00, Furniture Service Masters
Recommendations
The main principle in equipping your own workshop is to purchase tools as needed.
You should start with simple products and amateur tools, gradually improving your skills and craftsmanship.
Moving on to more complex tasks, purchasing professional tools for making furniture will become a necessity.
Due to the high cost, do not rush to buy everything.
Focusing on the cheapest models is the most common mistake.
There is also no need to purchase expensive options at the initial stage.
The main thing is convenience and the ability to complete the necessary tasks that lie ahead of you.
Now you know what tools you need to make your own furniture.
Scheme and drawings
In order to independently assemble any furniture structure, the craftsman needs a drawing on which the technological process of installing the assembly unit is “outlined” in detail and clearly. The presence of schematic images simplifies the task. It is worth noting that the manufacturer is not responsible if customers damage wood chips, mirrors, or plastic parts during the assembly process, so the work must be done carefully, use mechanical equipment, and carefully study the attached diagram and instructions. What useful information does the drawing contain:
- instructions for assembling the unit (kit). Typically, the manufacturer indicates that the order’s complete set of parts, fastening, connecting, mounting, and decorative fittings must be checked upon receipt of the goods;
- the assembly of Italian furniture or a regular set from a furniture supermarket begins in the same way - with studying the specification, which indicates the number of parts, their name, size, code;
- a separate table shows the specification of fittings, consumables, and fasteners. For ease of use of the drawing and assembly diagram, the name and size of the fittings are given - screw, bolt, clamp, confirmat, clamp;
- The craftsman needs text instructions to correctly assemble the product - the specification and assembly order are indicated for each unit, and the design details and fittings are marked on the drawing - a template for drilling holes.
The diagram on how to hang a mirror deserves special attention. There are several options for installing mirror panels. To choose the appropriate installation method, you need to consider the weight of the mirror and the strength of the base plate. Technology for hanging a mirror:
- use double-sided tape - place glued strips of tape on the surface of an MDF or chipboard, “try on” the mirror, remove the protective film and fix the glass. The work is carried out with the part in a horizontal position so that the glue on the mounting tape sets. You can hang the mirror vertically, increasing the consumption of adhesive tape;
- acrylic glue - necessary to hang the mirror without damaging the amalgam. The sealant can be applied dotted or in separate strips, distributing the adhesive over the surface indented from the edge of the mirror. It is recommended to glue the slab to the mirror part in a horizontal position. Equipment for work – glue gun, glue dries in 24 hours;
- colorless construction silicone is quite suitable for securely hanging a mirror on a cabinet door. To firmly glue the parts, it is not necessary to apply silicone to the entire back surface of the mirror; it is enough to distribute the substance in thin transverse stripes, attach the mirror glass, and fix the decorative frame to the glued mirror.
As an alternative, you can use fastening hardware made according to the principle of clamping tabs. But the disadvantage of this method is the presence of visible parts of the mounting hardware. To avoid drilling mirrors and glass parts, accessories such as clamps are widely used. There is a large selection of products in terms of construction, design, and material of manufacture - the gluer can be made of plastic, have a transparent structure, round or rectangular shape. A clamp is a universal device that acts as a mirror holder or glass shelf holder. Installation option - fixation with a self-tapping screw or drilling under the clamp.
An example of a diagram for assembling a children's wardrobe according to the manufacturer's drawing: place the right side on a table for assembling furniture, install the rod holder, guides, hinge counters, rods. Place the bottom on the dowels, secure the left side panel using eccentric fasteners. Insert the back wall into the groove, secure the connecting beam, and secure the left side panel. Next, the box is assembled according to the diagram - the rods are screwed in, the sides of the box are mounted, the unit is secured with eccentrics, and the bottom is secured with euroscrews - confirmats.
After hammering in the thrust bearings, the children's closet is placed in a vertical position on the furniture assembly table, and the door hinges are mounted on self-tapping screws (the size is indicated in the drawing). The final stage of assembly is the installation of doors, rods, handles, then a drawer and shelves are inserted into the cabinet. Using such a simple and understandable diagram, which is attached in the drawing to the furniture structure, you can assemble any cabinet unit - a table, a chair, a wardrobe, a bed.
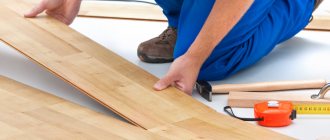
Tool for cutting and edging furniture parts
Cutting parts to size and then gluing the visible ends is rarely done at home. It is much easier to order cutting and edging in a workshop. Many companies that supply chipboards offer these services locally. It's very convenient and ultimately cheaper. If you take into account your own labor costs for the need to transport entire sheets of chipboard, their loading and unloading, the cutting itself, sanding the ends and covering them with melamine tape, as well as all the costs of electricity and consumables. Value your time.
In addition, cutting on a wide-format machine is much more accurate and of higher quality than manual cutting, and PVC edges are many times superior to melamine edges in terms of durability and aesthetics.
But there are some designs of built-in furniture (in particular wardrobes) that require adjustment and sawing in place. Some beveled and radius shelves are also designed during installation. This is how hobs and sinks are embedded into kitchen countertops.
In these cases, you should ensure that you have the following tools for making furniture:
- Jigsaw with wood files . The main electric tool for making furniture with your own hands, if you need to saw parts at home. The length of the file is selected according to the thickness of the material (it can be fiberboard with a thickness of 4-5mm, chipboard with a thickness of 10-25mm, postforming with a thickness of 26-38mm). As well as narrow files for decorating radii with reverse and straight teeth without streaking.
- Manual router for removing edge overhang . It will be needed when gluing and subsequent processing of PVC edges with a thickness of 1-2mm. The technology requires a certain skill and additional study to carry out at home.
- Grinder machine. An indispensable tool when installing built-in wardrobes. Using a sander, you can adjust the parts to fit the unevenness on the wall, for a tighter and more aesthetic connection without gaps. The grinder is also used to smooth the ends after cutting with a jigsaw, in order to glue the melamine edge more accurately and evenly.
- Iron or hair dryer. The melamine tape is glued with a regular iron and gently pressed until it is completely glued. You can use a hair dryer for these purposes, manually pressing the edge with a rag. Wear gloves, otherwise you may get burned.
- A stationery knife and a blunt knife, sandpaper 40, 60, “one” and “zero”. Excess glue and edges are carefully cut off with knives, then the cut edges are sanded to a visually aesthetic appearance.
- Silicone sealant or wax, wax restoration crayons, touch-ups for masking defects and scratches . This set of consumables cannot be classified as a tool for assembling furniture with your own hands, but in the process you will definitely need it for processing cuts, accidental defects, etc.
Measuring tool for furniture making
At all stages of making furniture with your own hands, you will need a measuring tool. Even if you just wanted to assemble ready-made IKEA furniture, you can’t do without measurements.
- Markers and pencils. Markers come in different thicknesses, mostly alcohol-based, which can be easily erased when the mark is no longer needed.
- Tape measure and square. It is worth taking a responsible approach to the choice of this measuring instrument and giving preference to those options where there will be no doubt about the accuracy of the calibration.
- Awl. Using an awl and a pencil, it is convenient to mark the places for screwing in self-tapping screws and holes for confirmations, shelf holders and other fasteners.
- Level. Strictly speaking, this tool for making furniture with your own hands will only be needed at the very initial stage - measurements. In order to correctly develop a design project for a built-in wardrobe, it is important to take into account the curvature of the walls and the difference in horizontal and vertical planes. You will also need a level when installing already assembled modules.
- Furniture templates and conductors. Ready-made furniture jigs for marking holes for guides, hinges, handles and other fasteners make the process much easier. After all, in fact, all connecting holes in furniture are applied in the same way, according to the well-known “System 32”.
Furniture templates for marking furniture parts can be purchased ready-made.
Or make it yourself from thick cardboard, leftovers and scraps of thin plastic, fiberboard, HDF.
How to choose a professional screwdriver
By paying attention to the technical characteristics of a particular tool, you will find out which professional screwdrivers are the best models.
Torque, speed (revolutions), number of speeds and reverse
The higher the torque, the stronger the rotation of the chuck. The minimum moment of force in professional models is 30 N*m , the maximum is 150 N*m . At a high moment of force, the risk of damage to the equipment is high, so it is recommended to regulate the moment of force with a special coupling. The rotation speed in professional screwdrivers reaches from 1200 to 1500 rpm, which is a plus when drilling holes in hard surfaces.
Some models feature 2- or 3-speed gearboxes, making them versatile and efficient, while also saving energy when powered by a battery.
Almost all units are equipped with a reverse function . Thanks to it, the chuck rotates in the opposite direction, thereby freeing a stuck drill or unscrewing an unnecessary screw.
What affects the amount of torque?
The moment of force is selected according to the characteristics of the screws used. In addition, it depends on the thickness of the working surface. So, when tightening a screw 10 cm , the optimal value of the moment of force will be from 40 N*m . For dense surfaces, the optimal value is from 130 N*m .
Features and battery kits
Professional units have advanced functionality, which makes their use comfortable. Additional features include:
- LED backlighting, allowing work to be carried out in the absence of normal lighting;
- impact mechanism that facilitates drilling on hard surfaces such as brick and concrete;
- depth limiter (to avoid screwing the screw in too deeply);
- fixing the power button (the function helps, for example, when driving screws in batches, working with band screwdrivers);
- magnetic holder for reliable fixation of fasteners.
Many models come with spare batteries, which are necessary for continuous repair and construction work.
Battery type, capacity, mounting type
Professional screwdrivers are divided into corded and cordless. The second type, in turn, supports 3 types of batteries: Li-Ion , Ni-Mh and Ni-Cd .
The most common are models powered by lithium-ion batteries, which have no memory effect and the likelihood of self-discharge is minimized. From this point follows the possibility of recharging at any time. Nickel-metal hydride batteries have the same characteristics. Nickel-cadmium batteries allow you to operate the tool even at low temperatures. The battery capacity directly affects the autonomy of the screwdriver. For professional devices this figure is from 3 A*h .
As for the type of fastening, most models support a quick-release chuck , which is the most convenient due to the ability to easily change equipment.
Battery power
The power of a screwdriver battery is affected by its electrical voltage. In professional models, the battery voltage must be at least 18 volts . However, along with the power, the weight of the device also increases, which affects the comfort during its operation.
Accessories
No furniture can do without high-quality and functional fittings - front and fasteners. The first type includes parts that serve only for decoration. This is an important part of the interior, which is always in sight. Facial accessories include:
- door handles;
- hooks for clothes;
- decorative locks and much more.
Depending on the design of the room, you can choose front fittings made of plastic, wood, metal or glass. There must be a special coating that reduces friction and protects against mechanical stress. Fittings of the second type perform the function of fasteners, connecting parts and increasing the reliability of furniture. It should be compact, durable and made of quality materials. This type includes:
- loops;
- shelf holders;
- bolts;
- mechanisms for drawing drawers;
- seals.
Door handles
Coat hooks
LocksHinges
Shelf holders
Bolts
Drawer pull out mechanisms
Seals
Tools for drilling and installing furniture with your own hands: electric drill and hammer drill
It is better to purchase an electric drill for drilling holes in furniture parts for subsequent assembly separately and not combine it with a screwdriver. Or replace it with a hammer drill, which can be used for further wall mounting of furniture. The expediency is explained by simple logic: often during the assembly process it is discovered that something was underdrilled or the markings were wrong. If the screwdriver performs the functions of an electric drill, then you will have to periodically unscrew and change the bit to the drill during the assembly process, which is distracting, disrupts the working rhythm and takes time. The hammer drill, with its own set of drills for concrete and brick, will be used when the furniture assembly is completed. This means that during assembly, the hammer drill can completely replace the functionality of an electric drill.
In the process of drilling holes for fasteners, you will need a standard set of drills with a diameter of 2.3 mm, 5 mm, 8 mm, 10 mm, a confirmation drill, drills with a diameter of 15-20 mm, 26-35 mm, 60-65-65 mm for holes for eccentric screed, shelf supports, hinges, lamps and plugs for cable ducts.
TOP Rating
Below is a rating of the best models of screwdrivers based on the results of 2015
| Model | average price | Popularity |
| Bosch PSR 1200 | 2,200 rub. | 5 out of 10 |
| Bosch PSR 14.4 | RUB 2,730 | 3 out of 10 |
| Makita 6261DWPE | RUB 3,130 | 7 out of 10 |
| DeWALT DW907K2 | RUB 3,509 | 4 out of 10 |
| Hitachi DS12DVF3 (18 W) | RUB 3,660 | 10 of 10 |
| Makita 6281 DWPE | RUB 4,290 | 8 out of 10 |
| Bosch GSR 12-2V | RUB 4,375 | 7 out of 10 |
| Hitachi DS14DVF3 | RUB 4,464 | 4 out of 10 |
| Makita 6271DWAE | RUB 4,490 | 5 out of 10 |
| DeWalt DCD 940 B2 | RUB 8,680 | 1 out of 10 |
Equipment for furniture makers
While waiting for the assembly of a large cabinet, I decided to write a small review on the attachments. The more accurately the additive is performed, the better the furniture will be assembled in the end. Since home craftsmen do not have access to industrial drilling machines, they have to use what is freely available. Let's look at some furniture joints and how to add them using WPW Engineering products as an example.
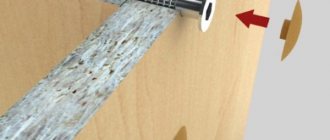
Furniture is assembled using so-called confirmats, many know them under the names “euroscrew”, “screw tie”, “euroscrew”. By the way, this type of connection received its name from the name of the German trademark of the same name “Confirmat”. To connect using a confirmat, it is necessary to drill a hole, but everything is aggravated by drilling with several drill diameters, since the confirmat has different diameters along the length of the rod. You can use drills with a diameter of 5 and 8 mm, and then use a countersink to make a countersunk for the head of the confirmat, or you can use a specialized drill, which makes an filler hole and a countersunk for the confirmat at one time.
The operating principle of this drill is simple: drills are used to drill a hole for the threaded part of the screw, and a two-stage countersink is used to make a hole for the smooth part of the screw and a countersunk for the head. All diameters are drilled in one go, which simplifies and speeds up the work process. I have been using these drills for a long time and have accumulated several types of them. I would like to note that the quality of a drill depends directly on its cost. I have two “noneme” drills and have a lot of questions about them. Let's start with the fact that their drills are “plasticine” and they should be immediately replaced with something good, since working with a crooked drill is not very convenient. But the replacement is not all that simple, due to the poor quality of the locking screw, after unscrewing and tightening several times, the slots on the screw are licked off and you need to look again for something of better quality. The sharpening of the countersink does not last very long, so you constantly need to adjust the countersink. All these shortcomings are not present in the WPW three-stage drill. The drill is packaged in a polyethylene “envelope” with a product code and company logo printed on it. The drill itself is preserved in silicone, which is easily removed and leaves no traces. The drill consists of three parts and comes complete with a key. The twist drill is made of high-speed steel HSS. The drill is fixed in the countersink using a locking screw with an internal hexagonal slot using the key that comes with the kit. The two-stage countersink is made of hardened steel and has one cutting blade. There are inscriptions on the drill indicating: - drill catalog number ASD0704D - step diameters, mm 5x7x10 In the WPW catalog there are three-stage drills with different shanks, I chose a drill with a hex shank 1/4" (6.3mm) HEX series ASD for use with a bit holder 1/ 4”, there is also an ACD series with a cylindrical shank for the chuck of a conventional drill or screwdriver.
Time will tell how the drill will perform, but so far the first impressions of the three-stage drill are only positive. Smooth, durable drill made of high-speed steel, absence of any runout, the ability to quickly change equipment thanks to a 1/4” hex shank, high-quality locking screw complete with a key.
Next, I would like to talk about connections with eccentric ties, the so-called connections with rafixes and minifixes. These connections, like the previous ones, require drilling holes, both through and blind. But if everything is clear with drilling for the rods (dowels), they can be drilled with an ordinary cylindrical drill for wood or metal, then with drilling for the eccentric itself there is a slight difficulty. The easiest way is to use a Forstner drill or cup drill bits inserted into a drill. The drills I have at my disposal are of Chinese origin; they don’t last long, and it’s not very convenient to use with a drill. As an option, you can use professional cup drills for MPK series drilling and attachment machines. Drills are used in production, are of very high quality, are produced in large quantities and therefore have a lower cost than a similar drill for individual use with the same quality characteristics.
To all these advantages there is a very big disadvantage. Drills for filler machines have standard shanks, 10 mm in diameter with a flat. Unfortunately, this cutter cannot be installed in a hand router, since the standard collets for hand routers are 6, 8 and 12 mm. WPW Engineering has adapted this drill bit for use in a conventional router using a TA series adapter. The adapters have a socket for a 10mm shank with two locking screws for fixing the drill and a shank for 6, 8 and 12mm in the metric system and 1/4″ and 1/2″ in the inch system. This adapter allows you to put a professional drill into a regular hand-held plunge router and use it for drilling blind holes in chipboard (chipboard). That is, with the help of these tools and devices we can get a “mini drilling and attachment machine”. For drilling with a router, drills with a length of 56.5 mm (MPK XX07 series) are better suited, this is due to the use of an adapter and the working stroke of the cutter. If there is not enough base overhang, you can make a spacer with the required size for the router base. I have an adapter for an 8mm collet in stock. On the adapter there are inscriptions indicating: - catalog number TA 10005 - diameter for the shank, mm 10 Let's take a closer look at the WPW cup drills. The drill is equipped with a carbide insert with a guide center and carbide trimmers, as well as an adjusting screw in the shank. The adjusting screw can be unscrewed, since we don’t need it. The drills are supplied, like the three-stage drill discussed above, in a polyethylene “envelope” and are preserved with silicone. There are inscriptions on the drills indicating: - drill catalog number MPK1507 (MPK2017) - diameter, mm 15.0 (20.0)
A few words about the positive aspects when using a manual milling machine for adding body parts. Since the router is used with a plunge base, the positioning accuracy of the hole and its verticality can be guaranteed. Using a turret stop, you can adjust the immersion depth of the drill, and using a parallel stop, the distance from the edge. A dust removal system can be connected to the router. Thanks to high speeds, the hole is smooth and without chips. It is worth paying attention that holes should be made at the lowest speed of the router, since the router is a high-speed tool, and the drills are designed for use in drilling and additive machines that operate at speeds up to 9000 rpm. It is also worth noting that Forstner drills are not intended for use in a router and are strictly prohibited from being used with this tool.
I will describe the drilling process in more detail in an article about making a cabinet, but for now let’s test the drills on a piece of chipboard using a router, drill and screwdriver. We will use a Makita RT 0700 CX2 milling cutter, a Boсsh PSB 650RE drill, a Bosch GSR 12-15 screwdriver and a DeWALT DCD785.
For clarity, I marked the laminated chipboard (Egger) and performed the drilling: 1 – with a Makita RT 0700 CX2 router, MPK1507 drill with an adapter Ø15mm – 3 pcs. and a Boсsh PSB 650RE drill, MPK2017 drill Ø20mm. 2 – DeWALT DCD785 screwdriver, MPK1507 Ø15mm drill – 2 pieces and Bosch GSR 12-15 screwdriver, MPK2017 Ø20mm drill and MPK1507 Ø15mm drill. 3 – DeWALT DCD785 screwdriver, “noname” drill Ø15mm and “noname” Ø20mm. 4 – drill Boсsh PSB 650RE, drill “noname” Ø15mm and “noname” Ø20mm.
When drilling with a router, there is no vibration of the tool, both at idle and under load, this indicates good balancing of the cup drill and adapter. The holes are smooth, without chips, there is no effort when the drill enters the material, and the drilling speed is very high. For complete convenience, you need to adjust the turret stop to the required immersion depth and set the parallel stop to the required distance from the edge. My simple 700W edge router coped with the task perfectly, I think with a more powerful router the immersion will not be felt at all. I also want to remind you that shanks are available for all collets and there will be no problems with installation. A drill at maximum speed (3000 rpm) and two screwdrivers at second speeds (1800 and 1300 rpm) also coped with the task. When drilling with a drill or screwdriver, it is necessary to control the perpendicularity of the tool to the plane of the workpiece. When drilling with “noname” drills, you have to slightly deflect the tool in different directions so that the drill cuts the chipboard, which causes small chips, which, although not critical, spoil the overall impression. A little more effort had to be made when using a 12V screwdriver, due to the low speed. The WPW drills entered without problems; there was no need for oscillating movements. The edges turned out without chips. I also tested the three-stage drills available. Two “no name” drills from the manufacturer and one WPW drill from the ASD0704D brand. The drill entry is good in all cases, but when the “no name” drill is immersed to the level of the countersink, problems begin. And if in the first diameter of the countersink this is unimportant, then in the countersink under the countersunk screw, the countersink tears out the chipboard and spoils the edge. The problem can be solved by straightening the countersink blade, but from experience with "no name" drills, this must be done very often to ensure a good result. The WPW drill makes all three holes without chipping and at high speed. The test results can be seen in the photo below.
Well, an attempt was made to drill a Ø35mm hole with an unknown drill without carbide tips, the attempt ended without starting, due to the fact that the drill refused to enter the material, I want to note that about 8 holes were made with this drill in the past.
As a result, the impressions from the drills from WPW Engineering were only positive. Let your instrument serve you for a long time and bring only positive emotions! If you liked the article, click “This is useful!”, write reviews, criticism and suggestions in the discussions! Thanks to all! All the best!
Tools for furniture assembly
- Electric screwdriver. Indispensable for screwing in screws and attaching fittings.
A screwdriver will help you speed up the assembly process
Drill for drilling holes in chipboard, it is desirable that the drill has a reverse
Drills for wood and metal of different diameters
A jigsaw is needed for sawing off parts
You may need a rubber hammer if you need to knock something and put it in its place.
Hex key for confirmation for assembling cabinet furniture
Construction hair dryer for gluing edges
Furniture clamps for fixing, gluing, joining parts
A stapler will be very useful for stuffing the back wall of fiberboard
Remember to be vigilant and cautious when using these tools. Don't act hastily. It is best to invite an assistant.
Fixing tools have an important role in twisting furniture, and also as important “helpers”. These and other gear perform the function of installing fragile parts (mirrors and handles). They help attach and adjust doors.
Additional tool
A hammer drill is useful in the production or assembly of furniture.
This is a highly specialized tool with high impact power.
The main purpose is to drill holes for mounting and installation of built-in furniture.
Over time, a circular saw will be in demand in the carpentry workshop for cutting wooden panels, countertops and furniture panels.
The miter saw is designed for cutting at an angle.
In addition to wooden elements, this tool is used for cutting aluminum profiles.
High speeds ensure an even cut, without chipping or cracking.
Using a miter box allows you to replace an electric saw with a regular hacksaw.
The miter box is designed for smooth cutting at different angles.
Rating of the best professional screwdrivers
| Place | Model | ||
| 1. | Cordless impact drill/driver DeWALT DCD785C2 | Prices | Review |
| 2. | Cordless drill/driver Makita DDF485RFE Li-Ion 3 Ah 18 V x 2 case | Prices | Review |
| 3. | Cordless screwdriver Makita DF032DWAE | Prices | Review |
| 4. | Cordless drill-driver Metabo BS 18 LTX Quick 2013 5.2Ah x2 Case | Prices | Review |
| 5. | Cordless impact drill/driver Makita HP333DWME Li-Ion 4.0 Ah 10.8 V x 2 case | Prices | Review |
| 6. | Cordless drill/driver Metabo BS 18 LTX BL QI 5.2Ah x2 Case | Prices | Review |
| 7. | Cordless drill/driver Worx WX176 2.0Ah x1 bag | Prices | Review |
| 8. | Cordless impact drill/driver Metabo SB 18 LTX BL I 0 box, without battery | Prices | Review |
| 9. | Cordless drill/driver Metabo BS 18 LTX-3 BL QI 0 MetaLoc, without battery | Prices | Review |
| 10. | Drill-driver BISON DSH-M1-400 box, 400 W | Prices | Review |
| 11. | Drill driver Hammer DRL420A, 300 W | Prices | Review |
| 12. | Impact drill/driver Makita HP0300 box, 320 W | Prices | Review |
| 13. | Drill/driver Makita DF0300, box, 320 W | Prices | Review |
| 14. | Drill-driver BISON DSH-M3-500-2 box, 500 W | Prices | Review |
| 15. | Drill-driver Bort BSM-250×2, 280 W | Prices | Review |