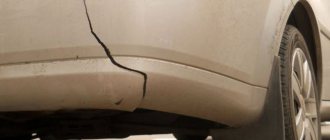
Today, plastic is used everywhere - from cars to household utensils. It happens that a crack appears on the material or it breaks. Many people think that it is easier to throw it away than to repair it, but this is not true, and it is not always possible to quickly replace the part.
It’s easy to learn how to solder plastic at home. It melts easily at high temperatures and “sticks together”; for strength, a mesh is fused inside. If the part is small or is not intended to be touched, you can use glue.
Source ad-cd.net
Necessary tool
In this case, the following soldering tools can be used:
an ordinary 100-watt soldering iron;- hair dryer (also called a heat gun);
- Soldering Station.
The capabilities and operating principle of a conventional soldering iron are familiar to almost every home craftsman. Such a soldering apparatus may have a straight or curved tip.
The hot-melt gun solders plastic by supplying heated air. The heating temperature ranges from +80 to +600 ℃, it can be continuously adjusted.
As a rule, models of soldering guns are equipped with a large number of attachments that make this tool as convenient and efficient as possible.
The nozzles help direct the air to the desired area and create the required angle of inclination. High-quality hair dryers for soldering plastic have a power of at least 1600 watts.
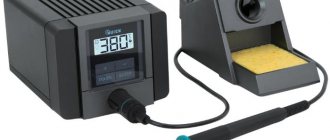
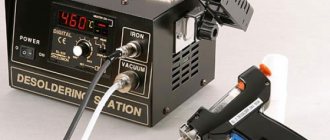
The soldering station combines a regular soldering iron and a hot-melt gun for plastic. Such a unit is capable of solving many problems. Temperature adjustment and a huge number of attachments allow you to carefully solder plastic, as well as other materials.
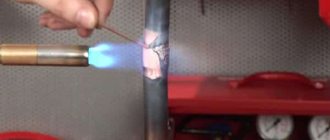
Soldering with a hot air gun
Sealing cracks with an industrial hair dryer is similar to welding with an acetylene torch.
The hair dryer usually comes with nozzles; it is better to choose the minimum one that provides a directed flow of hot air into a hole with a diameter of several millimeters. Otherwise, the bumper may move due to heating of undamaged areas.
For soldering, you must use filler material from the same part. The edges of the crack are heated until melting, after which plastic solder is applied there.
Metal brackets are used for reinforcement. The temperature is selected after testing, overheating is unacceptable, the plastic will bubble and burn, such a seam is fragile and weak.
Types of plastics
In order to successfully repair a car element, it is worth determining in advance what kind of plastic it is made of. All plastics can be divided into hard and soft. In particular, fiberglass plastics that do not have any markings are considered soft.
Hard types of plastics can have different markings, for example, ABS, GF30, PAG6. The markings are visible if you look from the back of the vehicle part. Polypropylene (PP marking) is considered the most durable.
Quite often, vehicle owners require soldering of ABS plastic, since it is from this material that the bumpers of cars of many well-known brands are made.
Pipe after repair: operating features
After the polypropylene pipe has been repaired, you should pay attention to some features of its operation. Under no circumstances should any mechanical impact be allowed on the soldering area.
The repaired breakdown itself must be constantly monitored to see if it begins to get wet. This cannot always be seen with the naked eye, but ordinary toilet paper leaning against the pipe will help determine the location of even the smallest leak. Moisture stains will instantly become visible on it.
I would like to remind you that such a measure is only temporary. At the first opportunity, it is necessary to replace the damaged section of the pipe. You can do this kind of work yourself if you have the opportunity to “rent” an iron from your friends, which is used for soldering. By the way, I saw the algorithm for producing work on the pages of this magazine. At the same time, everything was described quite competently, as far as I thought. At least, I carried out soldering in my apartment, guided by these instructions.
This is what the repaired pipe will look like after soldering
Use of a soldering iron
Let's assume that the plastic bumper of a car is seriously damaged and needs to be repaired by soldering. How to do it?
To make it easier to solder the structure, it must be removed from the car. It also doesn’t hurt to look at the labeling in advance. Most likely, the part will be made of ABS plastic.
Then you should clean the surface of the bumper from dirt, remove paint and varnish residues. Additionally, the entire plastic part must be degreased. Next, you need to connect all the fragments of the bumper together.
For such a connection, it is important to use clamps or staples. But this must be done carefully so that they do not penetrate through the car plastic.
Soldering plastic with a standard soldering iron should begin from the inside of the car bumper . To do this, one of its edges is securely fixed, and special plastic electrodes are laid along the future seam (although the name “electrodes” in this case is very arbitrary).
At the next stage, a soldering iron for soldering plastic melts the electrode material, and it fills all the recesses of the crack. This operation must be repeated as many times as stitches need to be made, that is, it all depends on the initial number of defects and damage.
Now you need to wait for the molten mass (characteristic bubbles appear on it) to cool a little - this will take about five minutes. Then you need to smooth out the seams on the plastic.
In principle, any blunt object can be used for this procedure. In hard-to-reach places, the surface can be smoothed and leveled with gloved hands. Complete hardening of the seams will occur in a few hours. At this point, the soldering of the auto plastic can be considered complete.
Using glue
Before we figure out how to solder plastic at home, we’ll look at a simpler method - gluing. But gluing plastic is much more difficult than, for example, ceramics. The fact is that plastic has a smooth structure and low adhesion (“sticking”), so in industrial conditions the parts are usually soldered together.
But you can still glue them together. In this case, special adhesives are used that dissolve the surface of the plastic. The dissolved parts are compressed, they stick to each other and do not fall apart.
Let's figure out which glue is best to use:
- Liquid . Not the most effective option: it should only be used for gluing small objects that will not be subject to stress afterwards. Liquid glue does not deform the surface (this is important for small parts), but it does not adhere well to parts and takes a long time to dry (at least a day).
- Contact . The plastic adheres firmly. It consists of 2 parts: the glue itself and the activator or hardener, which are mixed before use. The main disadvantage is that cantate glue is toxic. It can only be used in a ventilated area and using protection.
Source prom.st
- Reactionary . When analyzing options for how to seal plastic, reaction adhesive is considered the most suitable. It can be used in hot and cold, in water. It can even be used on surfaces that will be regularly subjected to stress.
- Hot melt adhesive . Sold in the form of sticks for glue guns, melts when heated. Does not glue parts well and can only be used for small parts or for a short time.
Most often, the packaging of the glue will indicate whether it is suitable for plastic, as well as how to use it correctly. It is recommended to follow the instructions, since glue from different companies may differ in composition and use.
The gluing process will be carried out in several steps:
- The place is cleared of dirt and dust.
- Degrease with a soap solution or alcohol.
- Lightly wipe the gluing area with sandpaper - the surface will absorb the solution better.
- Apply glue carefully so that there is no excess, otherwise there will be smudges.
- The parts are placed evenly, clearly along the line, pressed tightly for the time specified in the instructions.
Source ad-cd.net
When deciding how to solder plastic at home, it is important to remember that the glue dissolves the surface, after which it is easily deformed. It is better not to touch the part until it has completely hardened.
Using a hair dryer
Soldering automotive plastic is done a little differently if a heat gun (hair dryer) is used. Here you will need special welding rods (essentially, this is solder for soldering plastic).
You can purchase them in specialized stores or even make them yourself. The main thing is that they are similar to the material being welded. One of the ends of the rod is sharpened and then inserted into the corresponding hole in the nozzle of the heat gun.
The hair dryer should be moved slowly along the crack being repaired; the filler rod should be inclined towards the workpiece at an angle of approximately 45°. If a plastic part has shattered into separate pieces, then soldering it with a hairdryer is carried out in two passes.
First, the pieces or fragments are fastened together with short stitches (seams). And only after this the final reliable soldering is made. When the material has cooled, the surface of the part is puttied and sanded, preparing for painting.
To repair the plastic of a motorcycle, all kinds of elements of its external design, you can use soldering using approximately the same technology as in the case of repairing a car bumper. Moreover, motorcycle panels are usually made of the same ABS plastic.
How to prepare a plastic bumper for restoration
First of all, you need to collect all the fragments and fold the bumper along the cracks. This will make sure that the repair will be reduced only to fixing debris and cracked parts, and there will be no need to prepare patches.
All parts are thoroughly washed, dried and degreased. Any contamination will reduce the strength of the seams.
On topic: How to repair a crack in a plastic bumper yourself
Depending on the chosen technology, cleaning, chamfering, and selection of additives may be required. It is important to know the material from which the bumper is made; the melting point and the possibility of using heating in principle depend on this.
For example, fiberglass parts do not melt and will require adhesive compounds and repair kits.
The edges of the parts are securely fixed with clamping devices such as clamps or welding pliers.
Reinforcing mesh
Also, home craftsmen can use in their work such a device as a reinforcing mesh for soldering hard plastic.
It is needed to ensure that the final result is stronger and more durable. This mesh is placed on the inside of the structures.
Then, using a soldering iron or hair dryer, it is heated and, in this state, pressed into the plastic using a screwdriver. The mesh should become a kind of frame that holds and strengthens the part.
Excess plastic resulting from reinforcement can be removed using a grinding machine or an ordinary knife. If you work carefully on the outside, traces of cracks and breaks will not be visible even close up.
How to glue a bumper with composite material
Some parts are made of heat-stable plastic, which cannot be heated. In this case, repair kits made of epoxy or polyester resin with fiberglass for reinforcement are used. The technology of work here is fundamentally different.
The edges of the cracks are cut with a drill, sanded with coarse sandpaper to roughen it, after which the first layer of resin is applied.
From the inside, a layer of fiberglass is applied to the crack and smoothed, overlapping it by several centimeters. A second layer of resin is applied on top, which will provide a reliable “sandwich” with reinforcement.
The combination of fabric and compound practically restores the original structure of the fiberglass part, which allows not only to bridge cracks, but also to eliminate large defects, such as lost fragments.
The protruding layers are located from the inside of the part, and possible depressions from the outside are filled with elastic putty on plastic. It can be of different types, depending on the filler. Coarse compositions provide the strength of thick layers, and finishing ones provide surface quality for grinding and priming.
Painting a repaired part is quite complicated; painting the metal of the body is easier. Special materials and a complex color selection process will be required. It is better to entrust such work to professionals or be prepared for trial and error.
Your water supply
Coupling assembly
Soldering Polyethylene models are mounted using the soldering method or using couplings/fittings (coupling assembly).
How to solder plastic pipes for water supply? For new water supply networks, products made of PVC and polyethylene without reinforcement or reinforcement are suitable. Preparation requires creating a diagram of the future water supply indicating the lengths of the branches, its position and all the fittings necessary for installing the structure. Correct calculation of the lengths and number of bends will simplify the technology, increase the speed of task completion and prevent rework.
Soldering iron
Pipe cutter
To solder polyethylene connections you will need:
- Soldering iron.
- Pipe cutter
- A trimmer for cutting pipes and trimming the edges of cut ends.
- Fine sandpaper for cleaning edges
- Connecting coupling (if coupling assembly)
The heating device is a special device with a sole with special nozzles of various diameters attached to it. There are devices that include two or more attachments at the same time.
The stages of technology for laying hydraulic communications will tell you how to learn to solder:
- We measure the required length with a tape measure.
- Use a pipe cutter to cut the measured length.
- Trim the cut ends. This is an important step in soldering. The cuts must be smoothly sanded and cleaned. To be more sure, you can additionally degrease it with an alcohol solution.
- We solder the ends. If a coupling connection is used when installing life support networks, then we install a coupling/fitting at one end of the structure and heat it together with the future return in a soldering iron nozzle of the required diameter. After warming up, immediately connect the ends and wait for the assembly to cool completely. The quality of welding is indicated by the presence of a shoulder.
Attention! When installing heat and water supply using a soldered seam, it is strictly forbidden for water or moisture to fall into the cavity or onto the surface. When heated, water turns into steam and deforms the plastic structure, causing it to lose its strength.
Part preparation
To work, we need a plastic part, as in the photo. We cut out the part we need from it and sand it.
You need to sand with P60 or even P40 paper. You need to go through sandpaper in order to peel off the old paint from the part being used.
Next, you should take scissors and cut out the strips that will be needed in further work.
Additional reinforcement of the seam along the crack in the bottom of the bucket
After the seam has been pre-soldered, it needs to be reinforced. For this I used a strip cut from a plastic bottle. I was lucky; when it warmed up, the plastic was soldered together quite tightly.
When performing this work, you need to ensure that not only the strip of plastic from the bottle melts, but also the base. If you miss this moment, then the patch will peel off after cooling, which means there will be no talk of any strengthening of the seam. When heating the base, you should also not be too zealous, so as not to burn a hole in the bottom of the bucket. It is quite possible to solder it, but such work will take much more time. In general, I spent a little over half an hour repairing my plastic bucket, including cleaning and degreasing the surface. I think that if you have to repair such utensils next time, it will take even less time.
We strengthen the seam by fusing another layer of plastic on top of it