The operation of lathes is impossible without the use of cutting equipment. Most often, the equipment is equipped with cutters, which allow most processing operations to be performed. Among them are boring, cutting grooves and threads, trimming, etc. A separate group of cutting tools is used for preliminary preparation of wood. The operator eliminates excess workpiece mass, allowing it to be integrated into the work area for more precise, targeted operations. But in any case, the cutter for a wood lathe must have optimal sharpening. Special equipment helps to bring the characteristics of the equipment into the proper form, but first you should understand the design of the cutter itself.
How is the cutter constructed?
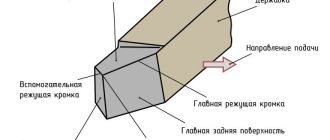
The base is a metal rod, which can be divided into two parts: the working head and the shank. The cutting part has the shape of a triangle with rear and front auxiliary surfaces along which chips flow during the cutting process. Processing is performed with the main cutting edge, which craftsmen call the apex. This is the intersection of the secondary and main edges.
As for sharpening, the condition of this particular part matters. The top may be rounded or sharp. The tool also has different formats. Usually the size of the holder is taken into account - on average from 8 to 25 mm. For universal work, it is better to purchase a set of wood cutters for a lathe, which includes more than 10 pieces. The standard set includes cutters with different shapes, which allows you to make grooves, grooves, chamfer and perform shaped processing.
Wood turning cutters
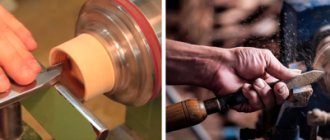
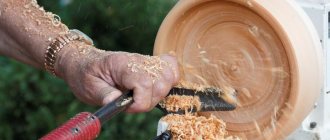
- Wood turning tools are intended for manual processing of a part rotating in a machine.
- They consist of two main parts: a working part (metal) and a handle (usually wooden).
- In turn, the working part can be divided into:
- cutting (blade) - this is the part that is sharpened and interacts with the workpiece;
- body - the main part by which the turner holds the cutter with his “non-working” hand on the armrest of the machine;
- shank - a narrowed part into which the body smoothly passes. The shank is designed for attaching a handle to it.
The handle can be divided into two parts:
- the base is the large part that the turner holds in his “working” hand;
- neck - a small cylindrical part with a metal fastening ring that prevents the handle from cracking when it is pressed onto the shank of the working part.
Types of turning tools
Depending on the type of work performed, wood turning tools have different configurations; the more complex the product, the more sophisticated their design will be, which will determine the specific sharpening of the blade.
Each master can have his own special, exclusive, highly specialized turning tools designed to perform some special work.
Therefore, there is no need to study the design of each individual cutter.
For the successful work of a novice turner, two types will be enough: reyer and meisel.
Reyer - designed for rough, roughing, initial processing of the workpiece. A design feature of this type is a blade shaped like a semicircle. It is made from a thick plate or from a semicircular groove. With the help of a reyer, the wooden blank is given the approximate outline of the future product.
Reyer
Meisel - for finishing the workpiece, giving it its final shape. Also, it can be used to cut off the product from the remains of the workpiece. The shape of a meisel resembles a jamb knife (a plate with an oblique blade, sharpened on both sides at the same angle).
Meysel
With the help of a reyer and a meisel, you can easily perform turning work of medium complexity. Processing the workpiece on the outer surface. In some cases, it is possible to work with the internal surfaces of a part.
All other wood turning tools can be classified as shaped tools. Among them, the most popular types are:
- chisel-scraper - for leveling the cylindrical surface of the workpiece. The shape resembles a straight chisel with one-sided sharpening;
- comb - designed for carving and applying decorative grooves and marks;
- hook – for turning cavities in the workpiece;
- ring - has the same purpose as the hook;
- for rough processing - has a blade shape in the form of a triangle. Designed to give the workpiece a cylindrical shape. This type is the safest of all others due to the small contact area between the tool and the workpiece.
Chisel-hook Chisel-scraper Shaped cutters
Homemade wood turning tools are something of a talisman for craftsmen. Therefore, they prefer to make working tools with their own hands rather than purchase them in a regular store. Although the purchased ones fully meet their requirements, technical characteristics and safe work practices.
Homemade cutters
Making reyer and meisel yourself is not difficult. To make them with your own hands, the most suitable material would be files and rasps that have already “outlived” their usefulness.
This decommissioned tool has the required dimensions, strength, material quality, and steel grade. Using a sharpening machine, the file is given the required shape in terms of the blade and shank.
Then a machined handle with a fastening ring is stuffed. And that’s it, the tool for making wood turning products is ready.
To make wood turning tools, you can use, in addition to files and rasps, car springs or reinforcement bars as materials. They have the necessary hardness. But after making the tool with your own hands, you need to be extremely careful.
Its tests must be carried out on soft wood (linden, poplar), after which the blade must be inspected for chips and cracks.
And only after such a check can turning tools made by yourself be used when working with harder wood (birch, oak, beech).
- Video about homemade cutters
- When making cutting tools yourself, you need to remember:
- The shorter the working part, the more difficult and inconvenient it is to hold it while turning. The length of the body should provide full grip with the hand, plus support on the armrest, plus the distance from the armrest to the workpiece, plus margin for wear and sharpening. Therefore, the initial length of the working part should be at least 20 cm, but a size exceeding 40 cm will cause inconvenience in work. The optimal length should be 20 – 30 cm;
- The shorter the shank, the greater the possibility that it can be torn out of the handle. Therefore, when a cutting tool is made from files or rasps, the shanks are lengthened by 1.5 - 2 times;
- The thinner and narrower the working part of the tool, the greater the likelihood of it being damaged by the workpiece during the turning process. Therefore, at the initial stages of processing, when the workpiece does not yet have an absolute cylindrical shape and runout on the blade occurs, as well as at large diameters, when the cutting force is of great importance, it is necessary to use cutters with sufficient thickness.
- wood turning tools must have a handle no shorter than 25 cm. If it is much smaller, then during the turning process it will be difficult to hold the tool in your hands, not to mention the quality of the work performed.
Do-it-yourself sharpening of cutters
- The quality of the treated surface largely depends on the correct sharpening of the working tool.
- To do this, you will need an electric sharpening machine with a set of wheels of different grain sizes and a velvet bar for manually editing the blade.
- Video of sharpening cutters
- Each craftsman chooses the sharpening angle independently, focusing on his skill as a turner, the hardness of the wood, the quality of the working tool and the final desired appearance of the surface being processed.
- For a novice turner, the optimal sharpening angle options will be:
- for meisel - the bevel itself should be 40° relative to the axis of the working surface and 40° for each side of the blade;
- for reyer – 50° – 60°.
Over time, as the turner's skill level increases, sharpening angles can be reduced to 20° - 35°.
Ideally, in addition to a set of different styles, it is desirable to have cutters of the same type, the same size, but with different sharpening angles. This will make the turner’s work much faster and easier, and will also extend their service life, because there will be no need to constantly resharpen the blades depending on the type of wood being processed.
Blunt sharpening angles are intended for: hard wood, initial (rough) processing.
Types of turning tools
The general segment of turning tools in the main classification involves the division of equipment by purpose - for wood and metal. In this case, the first type is considered. Such models differ from metal cutters in the material of manufacture. Technologists use tool grades of steel, while metal processing is carried out with cutters made of carbon hard alloys.
Also, different types of cutters for a wood lathe differ in design. The working part can be straight, bent, drawn or curved. The choice of one or another type of cutter is determined by the wood processing method, cutting characteristics and equipment. By the way, the parameters for integrating the equipment into the fastening zone also determine differences in the design of the shank. Modern machines focus on versatility, that is, the ability to work with rectangular, round or square holders. Moreover, in this aspect, differences between cutters for metal and wood are most often not made.
Special devices
Additionally, some special devices are used for wood carving, among which, first of all, it is necessary to highlight the following:
- Mallets. It is a famous carpentry tool made of hardwood. Recently, mallets have appeared that are made of rubber. This tool is used in cases where it is necessary to work with a chisel across the fibers of the workpiece. Also, a mallet may be necessary in cases where the volume of wood carving is quite significant. With its help, you can significantly facilitate the work and make the load on the master less significant. In most cases, the mallet has a round or semicircular box. This allows you to hit the chisel at almost any angle. The size of this tool can vary - from 75 to 150 millimeters in diameter. For most types of work, craftsmen select medium mallets.
- Tesla. They are carpenter's axes that have an unusual appearance. This is due to the fact that the blades in these tools are perpendicular to the ax handle. Thus, adzes are very similar to small peculiar hoes. In some cases, their blades have a convex or even semicircular shape. As a rule, adzes are used to hollow out various shapes from wood. In addition, with their help you can quite easily make grooves in workpieces. By purchasing one such hatchet cutter for spectacular wood carving, you can significantly speed up your work.
- Mints. They are a variety of metal rods that differ from each other in diameter, length, sharpening and some other important nuances. These instruments have notches on one side. As a rule, they are characterized by clearly defined geometric shapes. In most cases, embossing is used to finish the background if there is a sufficiently rough surface.
Thus, the above special tools for wood carving are also used when it is necessary to create sculptures or any other devices.
How do you make cutters with your own hands?
As you can see, the cutter is designed quite simply, and an ordinary lathe can easily be equipped with a homemade analogue. Typically, such products are created on the basis of files and rasps. Home craftsmen only remake them to fit the format of specific turning equipment. You can also use car springs or sections of reinforcing bar as a basis. But in such cases, more effort will be required when finalizing the shape of the element.
Next, homemade cutters for a wood lathe are carefully mechanically adjusted to the required size. This is the first sharpening during which the working edge will be formed. The disadvantage of a homemade cutter is that the workpiece may have internal defects resulting from previous use. The same file, after long-term use for its original purpose, due to stress in the structure, is often endowed with voids, which reduces its working life.
Wood surface and sanding
Depending on the item being manufactured, one or another surface treatment is required. A shelf or rack for the kitchen, a table or bedside table for the bedroom requires a perfectly flat and smooth surface. A toy figurine, panel or box does not need sanding, but a drawing made with a chisel cannot be sanded at all.
Cutting wood with a knife and shaping the surface with a chisel does not require preliminary sanding, and once the work is completed, the surface simply cannot be sanded.
In the creative process of wood cutting, the idea often arises: not to cut out what you want, but to refine a natural solution. When a fancy piece of wood (a branch, a stump, a trunk) falls into the hands of a craftsman, the idea arises of adding to it rather than cutting it out.
Why is cutter sharpening important?
The need to perform this operation, at first glance, is similar to sharpening kitchen knives. A sharp blade handles cutting tasks more efficiently, requiring less effort and time. But in the case of machine tool correction, there are other technological nuances. High-quality sharpening is a preventive measure that eliminates the risk of the working head falling off during operation.
In addition, negative deformation phenomena in the form of chipping and scuffing are prevented. Obviously, the quality of the work itself on a wood lathe also improves. Correctly sharpened cutters form even grooves and grooves, not to mention shaped operations. Other factors affect the quality of work, but the sharpness of the tool tip is key to achieving optimal results.
The procedure for sharpening a semicircular chisel
Sharpening a chisel with a semicircular cutter is done using a block of wood. In addition, its edge should follow the shape of the cutting edge.
To do this you will need the following:
- a piece of wood;
- a piece of polished leather.
- silicon rod;
- sandpaper (grit size from 400 to 2000 microns);
How is sharpening done?
Sharpening is performed in the following sequence:
- During the work, the chamfer is pressed at the desired angle and movements are made to the sides. The operation is carried out until the onset of acute illness;
- Then take a block, the edge of which is rounded, and on which sandpaper is fixed. During the work process, the abrasive is changed, gradually reducing its grain size;
- Finish the sharpening by polishing and straightening the edge of the leather piece.
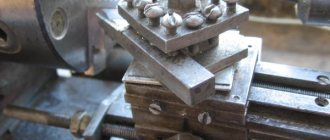
Sharpening equipment
Since the cutter is made on the basis of tool steel, its sharpening must be carried out on high-power equipment. For such needs, boring machines are used in different configurations. The basic structure of the design includes two base clamps and a retractable hand rest with a V-shaped stop. As an addition, adjustable hand rests can be used to expand the possibilities for securing the workpiece.
For example, if it is necessary to modify a bevel cutter for a wood lathe, then an appropriately shaped attachment may be required. In this case, an adjustable hand rest will help. But most often, universal holder models are used, designed for a wide range of standard cutters. The fixing base is usually attached under the elements that perform sharpening. The relative position of the functional sides in this part is determined by the sharpening parameters. Modern models of sharpening machines also allow you to service scraper blades, planer and chisel equipment.
Tools and materials for sharpening
To sharpen a chisel you will need the following tools and materials:
- abrasives in sheet form;
- horizontal and vertical machines;
- polishing cloth or felt.
- sharpener;
- sandpaper on a block;
- special clamps and frames;
In addition, frames with angle adjustment will be useful (it is recommended to use the factory version) and a device with which you can create a distortion on the bevel using special wedges (you can use a homemade device).
In addition, chisels, chisels, knives and planes are sharpened with a sharpener.
The same tools and materials can be used if it is necessary to process the knife in a plane.
Using a wheel and sandpaper
Blades are sharpened using grinding wheels and sandpaper. During the manufacturing process, it is necessary to use different types of wheels of medium and low hardness.
Sandpaper is used in the process of “trying on” the ideal shapes of a metal part. This material is used exclusively by hand.
Sharpening with abrasive wheels
A sharpening machine is only a technical basis for organizing the mechanical interaction between the tool being processed and the abrasive. Sharpening is carried out with discs made of electrocorundum when they rotate at a frequency of about 3000 rpm. The abrasive can be made from other materials of varying degrees of hardness, but in any case it must prevent overheating of the cutting edge.
For example, in some cases, low-frequency sharpening at 2000 rpm using a 20 cm aluminum oxide wheel is recommended. This results in a kind of “soft” sharpening effect, which is beneficial if you are using a medium-format or low-power wood lathe. How to sharpen a cutter with an abrasive disc? Experienced craftsmen recommend sharpening with slight pressure of the tool against the rotating disk. At the same time, uniformity must be ensured, which is achieved by moving the blade from side to side. If you use a machine with a retractable tool rest, then it is important to ensure that the contact patch between the abrasive and the cutter is located higher than the axis of rotation of the wheel.
Semicircular chisel
General rules for sharpening a semicircular chisel:
- In addition, further processing is carried out using coarse abrasives;
- The cutting edge must first be dull. This will smooth out the nicks;
- The final stage will be finishing;
- Next, an angle of 20-25° is selected for a semicircular and machined blade profile. Sometimes you have to divide the plane of a metal part into several parts and sharpen each one in turn.
Often the same model is used for chisels and planes. This is the wrong decision, since the instruments themselves (and, accordingly, their components), the principle of their operation and the design are completely different.
In order not to make mistakes when processing the cutting part of the tool, you need to know exactly how sharpening a chisel differs from a flat knife. To more accurately determine the differences, consider the following table:
Finishing the characteristics of the cutter
This is a more precise operation performed on machines with diamond wheels. This sharpening method is most often used when it is necessary to remove obvious defects. For example, if a wood lathe cutter has burrs, cracks or nicks. In this case, the working process is carried out under mechanical control. That is, the tool being processed is fixed in a vice and controlled by a hydraulic or electric drive. The operator adjusts the cutter displacement parameters in accordance with the requirements for its correction parameters.
Electrical tools
Wood carving kits most often contain only those tools that are intended for manual labor. In turn, in some cases electrical devices may be needed, among which the following are most often used:
- Drill. This tool is intended for drilling holes in workpieces. Its motor transmits rotational movements to the drill, which is shaped accordingly. By sharpening its edges in a certain way, a notch is gradually drilled into the wood. Each subsequent rotational movement leads to the drill moving deeper.
- Jigsaw. This hand tool is designed for sawing wood and other lumber by performing corresponding reciprocating movements with its saw blade. Using a jigsaw, you can cut a workpiece, cut a certain shape into it, or cut off the necessary part from it.
In addition to the above-mentioned electric tools, other devices can be used for wood carving. The choice of devices to perform the work is carried out by each master separately.
General recommendations for sharpening
Even before starting sharpening, the condition of the machine and the grinding wheel should be carefully checked. When working manually, the cutter must be supported on a handy support part, and not supported by weight. As a rule, the tool rest itself is installed 3-5 mm from the abrasive disc. To eliminate the risk of critical overheating, sharpening of cutters for a wood lathe is carried out with periodic cooling with water. This also avoids the formation of small cracks that occur under extremely high thermal loads.
Comparison of sharpening a chisel and a flat knife
| Chisel processing | Planing knives |
| A fine grit grinding wheel is used first and lapping is done using a coarse abrasive. | Primary processing is carried out with a coarse abrasive, correction of defects is carried out with a fine one, and finishing and finishing polishing is carried out with a leather belt or strip of leather. |
| The procedure can be carried out either manually or using an automated circle. | Sharpening is carried out only on automatic wheels with different abrasive grain sizes. Otherwise, the procedure will take a long time. |
| The sharpening angle usually varies from 25° to 35°. | The angle for a flat knife when sharpening can be 25° – 45°. |
| The inclination of the chamfer is determined based on the thickness of the metal of the chisel. | The inclination of the knife blade when sharpening is selected based on the thickness of the wood with which you will have to work. |
After such comparisons, it immediately becomes clear how sharpening a chisel differs from a flat knife. The difference is quite noticeable and should be taken into account in the process of preparing a particular tool for woodworking.
A little history
The preparation of logs for the winter, or products for everyday life, were widespread not only in Rus'. But time passed and people who had a desire for beauty in their souls and hearts quickly realized.
That wood is an excellent material on which you can depict your feelings or the events surrounding them. Each nation had its own special techniques for processing wood, which was related to the culture, worldview and worldview of the people themselves. The higher the cultural heritage, the better and higher quality the work of the masters.
In Rus', elements of carving were present in everyday life, which carried a ritual component. Household and kitchen utensils were always decorated with carved elements.
The patterns that were applied to the hut had the meaning of elements and natural phenomena. Or to attract light forces that were a symbol of fertility and longevity.
Today this craft continues to live, perhaps the tools have become a little more convenient and modern. Knives for wood carving were and are now quite diverse. Let's try to take a closer look at a modern woodworking workshop of a master.
Classification
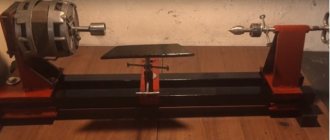
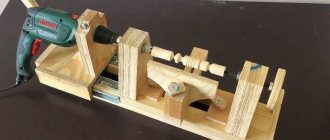
Lathes are divided into:
- center ones with mechanized feed. It is possible to perform work on this equipment using hand-held cutting tools (when installing a special tool rest on the frame). An oblong piece of wood is held by a spindle and a movable tailstock. The longitudinal feed of the caliper is mechanized. These machines can be used to work with a copier. When working with short, light workpieces, the tailstock fastening may not be used. When processing the inside of a wooden part, a faceplate serves as a fastener. The moving elements in the operating mode on these lathes are the cutters moving along the piece of wood being processed and the rotating spindle.
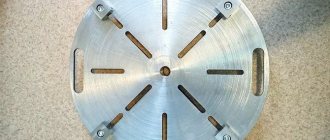
- Lathes are used to produce parts on a flat, wide wooden base. Beautiful multi-level carvings, bas-reliefs, high reliefs - this is what can be produced on machines that work with a wide faceplate, on which the workpiece is mounted. Work is carried out only on the front part of the part. The rest of the revision will be done manually.
- round-sticks process wood, giving it a shape with a round cross-section. When working on this equipment, the workpieces do not rotate or move. The only moving parts of the machine are the heads with the cutters. There are also machines in this group for processing long products. Then they will feed the workpieces with rollers under the cutters.
Shaping wood occurs by rotating the material being processed and using a cutting tool.
What do you need to make a homemade cutter?
To sharpen the cutting area, you will need an electric sharpener or sharpening machine. The production of some types of cutters involves sharpening using abrasive discs of different configurations.
You also need to prepare steel blanks according to the number of tools being made. The best wood cutters (chisels) for a lathe are made from R6M5 steel. Parts from old bearings, files, and taps are also suitable. You can use any suitable size product made from hard grade steel.
The tool is equipped with a wooden handle. You can buy it ready-made or make it yourself. In order to save time, it is better to buy, especially since there are handles of different sizes on sale, and they are inexpensive.
Before making wood cutters, you need to decide on the configuration and purpose: whether they will be used for finishing or rough processing, turning bowls or other purposes.
Processing on a grindstone
Sharpening a semicircular chisel is performed in several stages. For initial processing, you will need a regular sharpener, which you can buy or make yourself, as the author of the video did. The master clearly demonstrates the sharpening process on video. First he straightens the cutting edge. After this, the chisel will become completely dull, but will have a smooth end, which needs to be sharpened in the future.
Don't forget to use safety glasses, because scale getting into your eyes can cause you a lot of unnecessary problems!
Then we watch the movie, everything is very clear there. The only thing I could add to the master is the advice to apply the chisel to the stone without any pressure to avoid overheating the metal! The fact is that for the manufacture of tools, hardened steel is used, which has high cutting properties. However, during processing on a sharpener, the metal of the chisel can become very hot and lose its performance characteristics. This will become noticeable by the tarnished colors that appear on its surface. To prevent such a result, during processing on a sharpener, the chisel must be periodically dipped in water. Don’t forget to place a container of water next to the sharpener in advance!
How to determine the end of sharpening on a sharpener?! It's very simple. Burrs should appear on the entire cutting edge, called “regrinding” in professional slang. If the edge shines somewhere and there is no sharpening, continue sharpening.
So, visual criteria for correct sharpening on a sharpener:
- 1. There should be no tarnish on the tip;
- 2. Uniform “grinding” along the entire edge.
- 3. The chamfer must be uniform, i.e. ideally repeat the radius of the stone
Criterias of choice
Today, purchasing a tool is quite simple. Many stores provide a wide selection. But how can you avoid running into Chinese disposable products? This is a more complicated question.
It’s best to start by studying specialized forums and listening to the opinions of professionals. And it will be even better if you can find a real master and chat with him “live”.
But this is rare, so when purchasing a set or tool separately, do not hesitate to ask what grade of steel the product is and who the manufacturer is. Take a block of wood with you to the store and try on the spot how the tool will fit in your hand and what its cut will be like.
Price categories vary, but it is clear that a set of 10 items costing 300-400 rubles will not be normal. This means that saving is not worth it here.
Yes, the tool can be quite expensive, but again, a few items are enough for a novice master. And the rest can be purchased as your skill improves.