A wood lathe is a valuable piece of equipment for any woodworker. It doesn’t matter whether the unit is used in a workshop or solely for minor work in a home workshop, sometimes parts fail and require replacement.
Many of the parts of a wood lathe can be made at home with your own hands. This will be more economical and practical than purchasing an industrially produced structural element.
Functional features and device
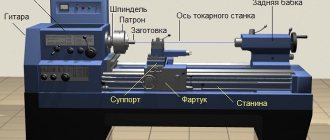
The tailstock and headstock of any lathe are important structural parts, each of which performs its own functions.
Headstock. The quality of the entire structure as a result depends on the precision of manufacturing of this part. A spindle is located on the headstock, which transmits torsional movement to the workpiece. The main elements of the headstock are:
- frame;
- spindle;
- bearings;
- design for controlling the direction of spindle movement;
- a device that controls the speed of the spindle;
- device for connecting and installing equipment.
Tailstock. This is the support unit of a woodworking lathe, which is designed to fix the workpiece. Main elements of the tailstock design:
- frame;
- quill;
- flywheel;
- flywheel handle;
- screw to move the tailstock laterally.
The tailstock has a hole in the quill into which a tool is inserted to process the part. During the working process, the headstock moves along the bed to select the optimal distance depending on the length of the workpiece being processed.
Main stages of work
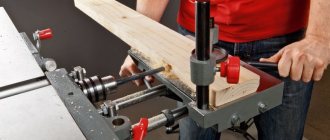
In the bed of the lathe, the author cut a groove a little more than 10 cm long and about 8 mm wide. You also need to drill mounting holes according to the markings.
A strip of metal 8 mm thick is fastened inside the frame using M6 screws.
The craftsman drilled a series of holes in the profile pipe and the strip itself with a pitch of 20 mm. They are threaded M8.
The headstock is attached to the frame using four M6 screws. To tighten them, holes for a hexagon are drilled from the bottom of the frame.
It is also necessary to drill holes for M4 screws from the bottom of the frame. The base (steel plate 6 mm thick) is attached to the frame using screws.
Base dimensions - 220x95 mm. We drill mounting holes in the base for fastening to a table or other work surface.
The author made the next part from a turning tool (its width is 17 mm). This part is inserted into the frame and secured with four M4 screws.
Step-by-step assembly and installation yourself
After studying the diagrams and drawings, you can proceed to the assembly and installation of both components of the lathe. Then you will need to set up and configure the equipment.
Headstock
Algorithm for making the headstock:
- Turn out a cylindrical body with a wall thickness of 10 mm.
- The channel, which will be necessary to make a drain for attaching the headstock to the frame, is welded to a corner of sheet steel.
- Attach the headstock to the stand.
The cylindrical body has the following dimensions:
- outer diameter – 56 mm;
- length – 18 cm;
- mounting sockets with a diameter of 24 mm for bearings;
- shaft diameter – 30 mm.
Tailstock
Tailstock manufacturing algorithm:
- weld 2 bolts together to increase the overall length;
- make a rotating center from a pipe of such diameter that the outer race of the bearings fits tightly into it;
- If necessary, you can make a 2-3 mm wide cut in the resulting sleeve;
- the future wall of the rotating center has the same diameter as the outer race of the bearing;
- scald the washer and nut on the right side;
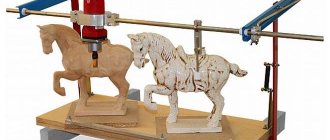
- Tighten the left nut and cut the horses flush with the washer;
- cut off the head of the bolts, clamp the bolt itself into a drilling machine and refine it using an abrasive stone.
Then you need to make the spindle housing. For this:
- Take a piece of pipe with a diameter of ¾ inches, 6-7 cm long.
- Nuts are welded at both ends.
- The tailstock cone is also made from a bolt.
Before installation, first grind the cone shank to such an extent that it fits into the inner race of the bearings. To support the outer race, before installing the bearings, install a ring of bent wire with a diameter of 1-2 mm into the housing.
How to make a wood lathe: making a bed
In serial devices, the frame is in most cases made of cast iron. This material is distinguished by its mass. For a homemade unit, you should choose a less heavy option. For example, as the basis for a future design, you can choose angles made of rolled angle steel. The recommended length of the segments is 125 cm.
The length of the bed can be increased, but this action will require intervention in other parts of the woodworking unit. Before making it, it is recommended to draw up a plan on paper. You can also take a ready-made drawing from the specialized website that will help you assemble a wood lathe with your own hands.
Let us consider step by step the algorithm of actions for the manufacture of this unit. First of all, you need to place the corresponding corners on a horizontal surface (open side to each other). Then it is recommended to place calibrated inserts between them, which will allow you to maintain the required distance of 4.5 cm.
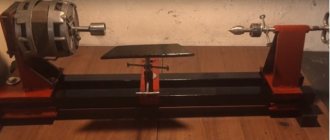
The components of a homemade lathe are placed directly on the bed
Next you need to connect the guides. For these purposes, the same corners are most often used, differing only in size (19 cm). It is recommended to mark the points at which welding will be performed in advance. The jumpers are located near the edges of the long corners. The next step is the welding itself.
Helpful information! The bed of any homemade woodworking machine is the basis of the structure, so its installation is very important. Any violation in the future will affect the efficiency and accuracy of the unit, made by hand.
Then you need to attach another jumper of the same size. It should have cutouts for long corners. After installing this part, a cell should be formed for the headstock tenon. The dimensions of this geometric element require precise adherence. To install a standard headstock tenon, 4.5 x 16.5 cm is sufficient.
Do-it-yourself woodworking machine: how to make a tool rest
Traditionally, this part includes two components. They are made from steel corners. The standard dimensions of workpieces for welding are 5 and 3 cm. The joining of these elements is carried out by welding (in length). The result is two segments, which should have a length of 26 and 60 cm.
Tool rest on a lathe - needed to support the cutters when working with wood
The short element is used as a customizable support base. Moreover, one of the corner shelves must be cut at an angle so that 11 cm of the untouched profile remains. Before performing the same manipulation on the other wing, it is necessary to step back from the edge by 6 cm. The angle itself in the second case remains straight.
Next, you need to make a counter frame for a homemade woodworking machine. A steel plate is suitable for the manufacture of this element. The next step is to make the guide element and its clamp. As a material for these purposes, you can use a regular inch pipe. You need to make a longitudinal slot in it using a grinder. Craftsmen advise not to make this part longer than 15 cm.
Then the guide sleeve is installed in a 2.5 cm corner. The cut made with a grinder should be perpendicular to one of the shelves. Next, the structure must be fixed in a clamp and connected using welding equipment. After this, the tube is covered with a second corner and connected to it in the same way.
The finished guide part is joined by welding to the protruding flange of the angle. For final fastening, it is necessary to weld a nut to the rail, and equip the second part with a screw. Also, do not forget that on the reverse side you need to perform additional fixation of the structure. To do this, you can weld a metal rod to its individual parts. It will give the structure strength and rigidity.
Diagram of a tool rest for a lathe on an eccentric clamp
The tool rest is fixed on a piece of reinforcement (smooth), which should have a diameter of 2 cm. Such a rod is fixed on the back side of the corner approximately in its center. At the end, it is necessary to connect the reinforcement to a long part (60 cm).
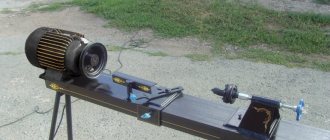
Homemade wood lathe: choosing a drive
The drive must have sufficient power to process wood products. When purchasing this device, it is advisable to pay attention to the standard models. Their power varies from 1200 to 2000 watts. This is quite enough for processing various kinds of parts at home. The most commonly used drive is a power rating of 1200 watts.
Induction motors are often used in homemade wood lathes. It is not possible to make this device with your own hands. Another characteristic that is common among drives installed on self-made machines is three-phase operation.
Note! When assembling such equipment at home, it is quite difficult to purchase an engine that would have the required rotation speed. However, if desired, this indicator can be adjusted by changing the diameter of the pulleys.
A homemade lathe must have sufficient power to process wood products
When installing the drive, it is recommended to equip the frame with a special plate. It is fixed on the gate canopies and ensures a tighter pressing of the strap. Some craftsmen install a pedal on the platform, which allows them to change the number of revolutions per second while processing a wooden block.
DIY lathe: headstock and tailstock
To manufacture these components, you must have access to a metalworking machine. If this is not possible, it is recommended to purchase ready-made structural elements. The headstock of a woodworking unit includes two housings that belong to the bearing category.
When assembling the machine yourself, it is important to remember that the height of the spindle axis above the base must be no less than 12 cm. This indicator affects the size of the front unit. The most suitable in this situation is a bearing block with a height of 7 cm. The shaft itself can be made on a metalworking device. Its diameter should not be less than 4 cm.
In turn, the procedure for making the tailstock of a wood lathe with your own hands is less complicated. This module includes 4 elements, including:
- base;
The headstock is designed to accurately support and move the part processed on the machine relative to the cutting tool or surface
- guide (external);
- inner tube;
- drive screw.
It is recommended to make the base from a steel angle, the height of which should not exceed 10 cm. To create a guide, you can use a tube measuring 4x15 cm. In its rear part, you must install a special plug with a hole (0.8 cm). In this case, the inner tube will have dimensions of 2 cm. Next, you need to make a drive screw. A thread is applied to it for the nut in the inner tube.
It is also worth noting that the headstock and tailstock should be on the same line. Otherwise, further construction of a woodworking machine will not bring any results. The headstocks are fixed to the bed in the same way as the tool rest.
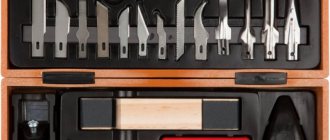
Making cutters for a wood lathe with your own hands
If necessary, these functional elements can be purchased at a specialized store or ordered online. However, many craftsmen prefer to make these devices themselves. The most popular cutting elements today are Reyer and Meisel. They are quite simple to perform on a sharpening machine.
Turning cutters: A - with a semicircular blade for rough turning; B - with a straight blade for finishing turning; B - shaped; G - machine passage
In order to make these cutting elements, you will need a blank. You can use old tools (for example, a file) as it. The metalworking unit allows you to sharpen this blank quite quickly. Forming is performed at two points: where the blade will be located and the tail.
Related article:
Wood lathe: device, characteristics and review of models
Review of popular models of woodworking machines. Tips for selection and rules of use.
The next step in making a wood cutter with your own hands is stuffing a turned handle with a locking ring. In this way, you can independently produce cutters for a woodworking unit.
Note! As the initial material for making these functional elements, you can use not only files, but also rasps or fittings.
It is also important to remember that a homemade tool must first be tested on soft wood. Such a check will determine how well the cutter is made and whether it is advisable to use it when working with hard rocks.
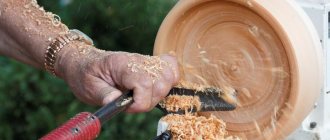
First start-up and equipment health check
To check the serviceability of the equipment, you must first run the machine at idle speed. Each master configures the machine in his own way, depending on the intended work and functions performed. All elements must be checked sequentially; only after checking at idle speed can you turn off the machine and set certain parameters for operation.
Before processing the workpiece, be sure to make sure that the wood is free of chips, deformations and cracks. The spindle should rotate without the slightest difficulty during operation. Be sure to check the coincidence of the centers of symmetry of the machine and the part.
Tailstock adjustment and repair
The initial adjustment of this element is carried out by specialists at the factory. Long-term use leads to disruption of these adjustments. This degrades processing accuracy. Therefore, it is necessary to periodically carry out adjustments. It is aimed at returning the node parameters to their original position. The adjustment will include the following operations:
- the amount of play formed between the frame guides and the base of the unit;
- minimum clearances in the front and rear quill mounting bearings (for models in which the quill rotates);
- elimination of the resulting displacement of the center relative to the spindle.
Of particular importance is the observance of geometric alignment between the spindle and the quill.
To check, a steel shaft with a diameter of, for example, 100 mm and a length of about 500 mm is clamped in the spindle. On the other hand, it is clamped with a quill. The size of the selected shaft depends on the characteristics of the machine. A special stand equipped with an indicator head is installed on the frame guides. It is moved along the installed blank and the displacement parameter is measured. If necessary, adjust the position of the stop center.
The frequency of inspection and adjustment procedure are indicated in the passport of each machine. The experience of professionals shows that it is advisable to carry out such checks once every six months. Violation of parameters or failure turns the unit into a lathe without a rear beam. Scheduled preventive inspections at enterprises are carried out by experienced service technicians. They can expertly identify changes in parameters and emerging faults.
After inspection, it may be necessary to carry out restoration or repair work. Repairing the tailstock of a lathe allows you to eliminate malfunctions and restore the following parameters:
- accuracy of joining of the frame with the unit body;
- height of the spindle and quill.
Conclusion
Today you learned how to make a wood lathe, which made maximum use of wood as the main material - plywood, timber and board. It is quite possible to make this design at home yourself, for which you will need to purchase or use an electric motor with transmission pulleys.
While working, you must remember to follow safety rules and safety glasses. The video in this article will give you the opportunity to find additional information on the above topic.