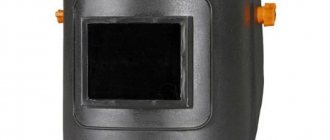
The chameleon mask does not darken - the main malfunctions
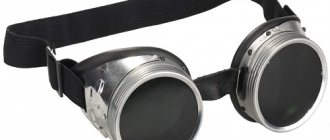
When carrying out welding work, you should follow all safety rules. And if you neglect this, you can cause serious harm to your own health. First and foremost, it is important to provide proper eye protection. After all, they are the ones who always suffer from welding. Flying sparks, radiation, generated gases, and so on.
Today, masks with a fixed degree of darkness are available on sale. Along with them, chameleon masks are also sold. The second option is more expensive, but despite all this, the quality of such products is much better. Chameleons are equipped with an automatic light filter. During strong luminescence, the filter reacts and thereby protects the eyes.
How does a chameleon mask work?
The chameleon mask can instantly darken when bright light appears. As a result, the welder does not have serious vision problems.
It is worth noting that during the production of the chameleon mask, the darkening filter is made in layers, where a special film and liquid crystals are alternated. When sparks appear, the crystals are positioned in such a way that only an acceptable portion of the light passes through the filter.
The chameleon mask does not work - what could it be?
Sometimes welders have to deal with darkening problems in chameleon masks. In this case, you need to figure out what can go wrong in the mask. Often the defect of a mask is that it does not cope with its main task, darkening the light radiation.
This may be due to insufficient charge. The masks are powered by small batteries. Power can also be supplied through a solar panel in the product body itself. In most cases, simply changing the batteries is enough.
If replacing the batteries does not produce any results, you should try recharging from solar energy. To do this, you just need to leave the mask for a while in direct sunlight or under bright light.
Welding helmet operating instructions
PLEASE READ THESE INSTRUCTIONS CAREFULLY BEFORE USING THE WELDING HELK.
ATTENTION!
A welding helmet with an automatic light filter protects the eyes and face from sparks, molten metal splashes and harmful radiation from the welding arc under normal welding conditions. The filter automatically switches from light to dark when the arc is ignited and returns to the light state when welding is completed. The welding helmet with automatic light filter is supplied fully assembled. Before use, you need to install two AAA batteries into the filter, adjust the mask according to your individual characteristics, select and set the required degree of darkness, sensitivity and delay time of the filter.
ATTENTION!
- This mask is not intended for gas and laser welding and cutting.
- Never place the mask and filter on a hot surface.
- Do not open the filter cartridge.
- This welding helmet is not intended to provide protection against severe impacts.
- Do not use this welding helmet while working with explosives or corrosive liquids.
- Do not make any changes to the filter or mask unless otherwise specified in these instructions. Use only spare parts specified in this manual. Making unauthorized modifications or using unauthorized parts will put the welder at risk and void your warranty.
- If the filter does not darken after igniting the arc, stop welding immediately and eliminate the possible causes of the malfunction. If you are unable to resolve the problem yourself, contact a technician or dealer.
- Do not immerse the filter in water.
- Do not use solvents when cleaning the filter and other parts of the mask.
- Use the mask only at temperatures between -10ºC and +55ºC.
- Store the mask and filter in a dry, cool, dark place when the mask is not in use for a long time. Storage temperature from -20ºC to +70ºC.
- Protect the filter from contact with liquid and dirt.
- Regularly clean the surface of the light filter from dust and dirt; do not use strong cleaning solutions. Use a clean, soft, lint-free cloth to clean optical sensors and solar cells.
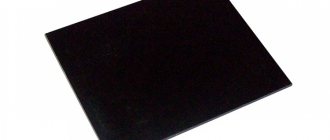
- Replace the outer protective glass regularly if splashes of molten metal adhere to the surface, or if pitting, cracks, scratches, unevenness or clouding appear.
- The headband may cause an allergic reaction in sensitive people where the adjustment straps come into direct contact with the skin.
- To extend battery life, switch the filter to Grind mode after use. When the red “LOW BATTERY” LED on the inside of the filter lights up, replace the AA batteries.
- Before starting welding work, adjust the mask to your liking to achieve maximum comfort and protection, install two AAA batteries in the filter, select and set the required degree of darkness, sensitivity level and filter lightening delay time depending on the conditions and method of welding.
Preparing for head size
- The circumference of the headband can be increased or decreased by rotating the knob while pressing on the back of the headband (see “Y” in Fig. 1). This procedure is performed with the welding helmet on and allows you to obtain the tension necessary to securely fix the welding helmet on the head.
- If the headband sits too high or too low on your head, adjust the strap that goes over the top of your head. To do this, loosen the end of the belt by pushing the locking pin out of the hole in the belt. Move the two parts of the belt relative to each other to the required length and insert the locking pin into the nearest hole (see “W” in Fig. 1).
- Check the fit of the helmet by raising and lowering the welding helmet while it is on. If the headband feels loose, readjust until you get a secure fit.
Adjusting the distance from the eyes to the filter
- Loosen the locking nuts (see “T” in Fig. 1) and move the mask towards or away from your face. Make sure that the distance between both eyes and the filter is the same to avoid uneven darkening of the filter.
- After adjustment, tighten the locking nuts.
Adjusting the viewing angle of the mask
The viewing angle adjuster is located on the right side of the mask (see Fig. 2). Loosen the right lock nut, push the lever pin out of the hole, turn to the required angle and tighten the lock nut.
Adjusting the degree of darkness (SHADE)
In the table “Degrees of darkness”, select the required level of darkness depending on the welding method and the value of the welding current.
Set the darkening control located on the outside of the mask to the desired position. The degrees of darkness can be adjusted during welding using an external regulator. Adjusting Sensitivity (SENSITIVITY)
Sensitivity can be “H” (high) or “L” (low).
Smooth adjustment of the filter sensitivity is carried out using the “SENSITIVITY” control knob located on the inside of the cartridge (see Fig. 3a). Medium-high sensitivity is recommended for most applications. Maximum sensitivity suitable for low amperage welding, TIG and other special applications. When working in the sun, in a brightly lit room, or near another welder, it is necessary to set the “SENSITIVITY” control knob to the “LO” (low) position (see Fig. 3b). To obtain the optimal effect, it is recommended to first set the sensitivity to high, and then gradually reduce it to a level where the filter begins to respond only to the welding arc, and not to ambient light (sun, bright indoor lighting, arc of another welder, etc.). Adjusting the delay time (DELAY)
The filter automatically returns to the light state after welding is completed.
Adjusting the delay time can prevent premature opening at the end of welding, when there is no longer an arc, but the hot metal still glows brightly, as well as to prevent the “blinking” of the light filter during short pauses. The delay can be short “S” (0.1 sec.) and long “L” (1.0 sec.). Smooth adjustment is carried out using the “DELAY” control knob located on the inside of the cartridge (see Fig. 3b). Short delay is suitable for spot welding, long delay is for high amperage welding. The long delay is also suitable for low current TIG welding and pulsed TIG/MIG/MAG welding. Selecting the operating mode
The welding mode “Weld” is used for most welding jobs.
In this mode, the filter automatically darkens when a welding arc is detected by optical sensors. In this mode, the degree of darkness, delay time and sensitivity are adjusted. Before welding, check the sensitivity adjustment and make sure you are already out of grinding mode. The “Grind” grinding mode is used when processing metal with abrasive wheels and grinding. In this mode, the light filter is turned off. The degree of darkness is fixed at 3.5 DIN, which gives clear visibility when working with an angle grinder. Power
When the red “LOW BATTERY” LED on the inside of the filter lights up, replace the batteries with new ones (see Fig. 5).
To replace, use new AAA batteries of the same type. Make sure the batteries have not passed their expiration date. Test
Before starting welding, to diagnose the operability of the light filter, press the “TEST” button and hold (see Fig. 5), if everything is in order and installed correctly, the light filter will go into the dark state, and when released, it will automatically return to the light state (3, 5 DIN).
MAINTENANCE
Replacement of protective glass filters. Replacement of the protective glasses of the light filter is carried out when they are damaged (scratches, cracks, chips, dirt, clouding). Slide the latches to the middle of the cartridge (see Fig. 6), lift the cartridge and remove the protective glass with rubber frame. Remove the frame and put it on the new glass, put the glass back in place. Snap the cartridge in reverse order. Replace the inner protective glass if it is damaged (scratches, cracks, chips, dirt, clouding). Remove the damaged glass with the end of your finger using the niche located at the bottom edge of the viewing window. Attach the new protective glass in the reverse order.
Replacing the cartridge/filter element. Remove the dimming control knob, unscrew the nut and remove the potentiometer. Slide the latches towards the middle of the cartridge and remove it (Fig. 6 and 6a). Take the new cartridge and insert in reverse order. Snap the cartridge into place and ensure that its front edge is securely held by the locking tabs, as shown in Figure 6. Insert the potentiometer axis into the hole from the inside of the mask, put a washer with a scale on the outside of the axis and tighten the nut. Place the dimmer knob onto the shaft.
Cleaning. Wipe the mask with a soft cloth. Clean the cartridge working surfaces regularly. The use of concentrated cleaning solutions is not permitted. Wipe optical sensors and solar panels with a clean, soft, lint-free cloth moistened with ethyl alcohol. Then wipe dry with a soft, lint-free cloth.
Possible malfunctions and methods for eliminating them
Uneven dimming. Different distance from the eyes to the filter due to incorrect adjustment of the mount. (Adjust the mount so that the distance from the eyes to the filter is equal.)
The filter does not work or flickers. 1. The outer protective glass is dirty or damaged. (Replace the outer protective glass.) 2. The optical sensors are dirty or blocked. (Clean the surface of the sensors, exit the Grind mode.) 3. Welding current is too low. (Set the filter sensitivity to high.) 4. Check the batteries, make sure they are in good condition and inserted correctly, also check the contact surfaces and clean them if necessary.
Slow response. Operating temperature too low. (Do not use the welding helmet when the ambient temperature is below -10°C.)
Bad review. 1. Contamination of the protective glass or filter surface. (Replace the protective glass or clean the filter from dirt.) 2. Insufficient lighting. 3. Incorrect dimming level setting. (Adjust the darkness level). 4. The film has not been removed from the protective glass. (Remove the film).
The mask does not fit well on the head. Incorrect headrest adjustment. (Adjust the headband.)