We recommend purchasing:
Installations for automatic welding of longitudinal seams of shells - in stock!
High performance, convenience, ease of operation and reliability in operation.
Welding screens and protective curtains are in stock!
Radiation protection when welding and cutting. Big choice. Delivery throughout Russia!
Lead
- a chemically resistant material widely used in the chemical industry for lining baths, vessels, apparatus and pipelines. The melting point of lead is low (327 °C); when heated, lead easily oxidizes and becomes covered with a film of lead oxide PbO, which has a melting point of 850 °C.
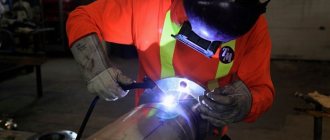
For welding lead
hydrogen-oxygen, acetylene-air, acetylene-oxygen flames are used, as well as acetylene substitute gases: propane-butane, city gas, natural gas, gasoline and kerosene vapors. Sheets up to 1.5 mm thick are butt welded with flanges without filler material. Sheets up to 6 mm thick are butt welded without bevel of the edges; for larger thicknesses, a one-sided bevel of the edges is used at an angle of 30-35°. Lap joints are also used. A wire or strip of lead is used as a filler rod. The diameter of the rod is chosen equal to 2-2.5δ, where δ is the thickness of the metal being welded.
The flame should not have excess oxygen. When welding sheets, the flame power is 5-10, when welding pipes - 15-20 dm3/h of acetylene per 1 mm of metal thickness. Welding speed
should be maintained as high as possible (15/δ—30/δ m/h). Welding is carried out in a lower or vertical position. The method of welding with separate baths is used. When the metal thickness is over 8 mm, multilayer welding is used. For better melting of the metal and removal of the lead oxide film, it is recommended to use a flux made from equal parts of rosin and stearin. When lap welding, the top edge is slightly bent and used as filler material. For small thicknesses, an acetylene-air flame is used.
To prevent metal leakage when welding lead
in positions other than the bottom, it is recommended to use steel forming strips placed along the seam, or steel arc-shaped molds moved along the seam during the process of filling it with metal. These molds (called crystallizers or coolers) speed up the cooling of the weld metal and facilitate its formation.
Differences between metal soldering and welding
There are two main methods of joining two metals: welding and soldering. In the first case, the elements are held together by melting the edge of the metal. This can be either heating or bonding using pressure. In the case of soldering, the workpieces are fastened together using filler material - solder.
In some cases, soldering is a more gentle and economical way of joining workpieces. Soldering also has a number of advantages:
- Both parts do not heat up to the melting point. In this way, it is possible to preserve their physical and chemical properties.
- The workpieces do not require thorough cleaning and processing, as is required when welding.
- Soldering equipment costs much less than welding machines.
- Possibility of manufacturing complex units and structures.
- The strength of the resulting joint. The parts do not bend or deform after soldering.
Let's take a closer look at the methods of soldering different metals.
Weldability of lead and its alloys
The low thermal conductivity of lead allows metal to be welded with low heat input. The low solubility of oxygen, nitrogen and hydrogen in molten lead allows the use of a hydrogen-oxygen flame in gas welding.
Lead vapors are poisonous, so the welding station must be equipped with supply and exhaust ventilation to ensure the lead content is below the maximum permissible concentrations.
When welding technical lead, the weld metal is coarse-crystalline and low-plastic. To increase the ductility of the weld, the base metal and filler wire are alloyed with calcium, tin, selenium and other modifiers.
Soldering of non-ferrous metals
Products made of non-ferrous metals require precise fitting. That is why they are often soldered rather than boiled. Let's study certain types of non-ferrous metals and their bonding using soldering.
Important:
Always secure both workpieces using a vice, clamps or other fasteners. Especially if you are working with large parts. Vibrations or shifts during soldering can warp the seam and the solder can drip. This will make the joint brittle and, over time, cracks or fistulas may form on it.
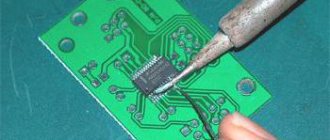
Soldering copper
Copper is a fairly common metal in everyday life. Water pipes, electrical cables, electronic components - they are all partially or completely made of copper.
There are mainly two methods for soldering copper:
- High temperature (working temperature about 600 ˚С);
- Low temperature (working temperature up to 450 ˚C).
In this article, we are considering soldering at home, so we will take low-temperature technology.
To solder copper you will need:
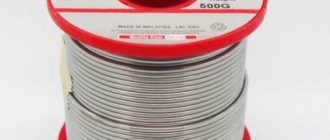
- Solder. It is mainly made from alloys of tin (95-97%) with copper, antimony, bismuth, silver, and selenium. Silver-containing solders have the best properties. Three-component types, which include tin, copper and silver, are also widely used. The use of tin-lead solders in production is limited due to the harmfulness of lead. At home, you should also protect your lungs from lead fumes. Use an active hood.
- Flux for soldering copper (activated, acidic, non-acidic, anti-corrosion).
- Gas-burner.
Information:
Large industries and factories often use solder paste. Most often it contains: flux, small particles of solder and special additives.
Let's look at the step-by-step technology for soldering two copper elements:
- Flux is applied to both parts. They cover the joint and the area where solder will be applied.
- Solder is placed at the joint. This can be tin wire or a special paste.
- The resulting compound is heated using a gas burner. Solder is distributed over the joint, as well as partially over the area near the solder.
- The resulting workpiece is left to cool. At this moment, you cannot twist or bend the resulting part. The joint must be completely cool before the solder can fully harden.
- Remaining flux is removed using an abrasive brush.
Important:
Do not point an open flame directly at the solder. It should melt and fill the seam due to heating of the edges of the parts.
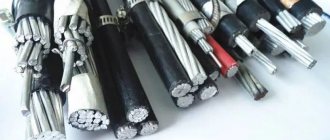
Soldering aluminum
Aluminum is a rather capricious material. Many experts believe that it is simply impossible to fasten two aluminum blanks at home, since the place of fastening must be heated to a temperature of about 600 ° C, and this risks burning out the aluminum sheet itself.
But this statement is not entirely true. You can solder two aluminum elements if you use a special flux and solder. Let's take a closer look at all the components that will be needed to work with aluminum:
- Solder. The best solders for working with aluminum are those containing: silicon, aluminum, copper, silver and zinc. These include domestic solder “34A” or its foreign analogue “Aluminium-13”.
- Flux. It is better if it contains ammonium fluoroborate with the addition of triethonalamine. Some people use regular borax.
- Soldering iron with a power of at least 100 W.
Healthy:
Solders with a high zinc content have better anti-corrosion properties.
Step-by-step guide to soldering aluminum blanks:
- Clean both workpieces from dirt and dust.
- Remove the oxide film using sandpaper. This operation is performed in order to reduce the oxide layer that instantly forms on the surface of the aluminum.
- Flux is applied to the joint.
- Solder is applied evenly and gradually, without subjecting the surface of aluminum workpieces to constant heating.
- The resulting joint is cleaned using a wire brush or fine sandpaper.
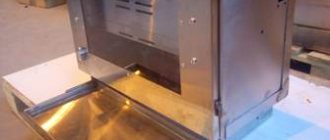
Soldering sheet metal
Ordinary tin is fastened quite simply. Metal without impurities or coating most often produces an even seam and does not change under the influence of high temperatures. To solder sheet metal you will need:
- Solder. Solders based on tin and antimony are mainly used. These include POS-40 or POS-30. In some cases, POS-90 is used, which contains lead.
- Flux. Both hydrochloric acid and ordinary rosin will do. Fresh oxide film on tin can be removed very easily.
- Soldering iron with a power of at least 40 W.
Soldering technology:
- Clean the tin elements from dirt and dust.
- Apply rosin to the joint.
- Place solder on the joint and use a soldering iron to melt it.
- Clean the resulting area using fine sandpaper or a wire brush to ensure a smooth seam.
Soldering galvanized iron
Unlike ordinary tin, galvanized iron has a number of specific characteristics. Firstly, zinc on the surface of the sheet evaporates at a temperature of 960˚C. Therefore, it is not recommended to use powerful burners when working with galvanized sheets.
Secondly, not all solders are suitable for working with galvanized iron. For example, it is highly not recommended to use POS-90 solder, as it destroys the structure of the sheet.
Soldering components:
- Solder. It is best to choose POS-30.
- Flux - boric acid or zinc chloride.
- Soldering iron with a power of at least 40 W.
The technology for soldering two galvanized elements is similar to working with ordinary sheet metal. The main thing is to heat the joint evenly, avoiding overheating of individual areas.
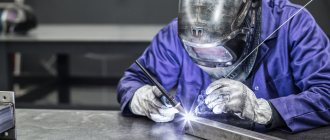
Soldering stainless steel
Stainless steel is an alloy containing nickel and chromium, as well as titanium. Soldering stainless steel is slightly different from similar work with regular or galvanized iron. Depending on the quantitative content of a particular metal in the composition of stainless steel, it will have different physical characteristics.
Thus, a sheet with a high nickel content at a temperature of 500 - 700 ˚C can release carbide compounds. Such sheets are subjected to uniform and rapid heating to avoid destruction of the material structure.
Let's look at the necessary components :
- Solder. It is selected depending on the soldering conditions. In open areas or high humidity, preference is given to solders based on silver alloys with a low nickel content. In dry rooms or blast furnaces, chromium-nickel or silver-manganese solders are used. For the initial tinning of two parts, ordinary solder based on tin and lead is used.
- Flux is borax in the form of powder or paste.
- Powerful gas burner producing temperatures above 800˚C. A soldering iron with a power above 100 W is useful for primary tinning.
Step-by-step soldering technology :
- Thoroughly clean the junction of two stainless steel elements.
- Secure both sheets and apply soldering acid flux to the joint.
- Tin the joint area with a thin layer of tin-based solder. At this stage, use a regular soldering iron. Be careful not to let the solder roll off the sheet. If this cannot be avoided, preheat the sheets and repeat tinning.
- Repeat tinning with flux.
- Solder both sheets using solder depending on the soldering conditions. Use a gas torch for this step.
Important:
If the solder rolls off the sheet even after preheating, use a wire brush. It helps remove the oxide film that may remain on the tinned surface after applying flux.
How to solder copper elements: general information
The most common problem is the need to solder strands of copper wires. But, regardless of what metals have to be soldered, there is always a need to clean the surfaces from fats and oxides. To do this, use rosin, paste for soldering copper pipes or soldering acid.
In order for the elements to be soldered firmly, it is recommended to first treat them individually with flux, and then tin the elements - apply a thin layer of solder on their surfaces. After this, they can be connected and, adding a little solder, thoroughly warmed up. The tin will melt and connect the elements as firmly as possible.
In some cases, a gas torch is used instead of a soldering iron. It is used when the parts being soldered are too large. In these cases, even the most powerful soldering iron is not able to warm them up, which means you can forget about a strong connection. The burner warms them up more thoroughly.
Soldering of ferrous metals
The quality of fastening of steel products depends on several factors:
- steel grades;
- porosity of workpieces;
- level of cleanliness of the joining seam.
Tin or brass alloys are chosen as solder. They are used depending on the task at hand. An easier way is to use tin. It is easier to work with, however, the final seam will not have a high level of strength.
Brass-based solders are much stronger, but you will need special equipment to work with them.
The work process at the preparatory stage is practically the same. In both cases, the parts are cleaned of dirt and rust. Fix with clamps or a vice. Orthophosphoric acid is used as a flux. After this comes the soldering stage.
Soldering steel with tin
When soldering with tin, select a soldering iron with a power of 100 W or more. To obtain a high-quality seam, both parts are pre-tinned, after which tin solder is fed into the finished seam and soldering is completed.
Soldering steel with brass
Brass melts at temperatures above 900 °C, so to work with such solder you will need a gas torch. It is important to heat both elements evenly. Otherwise, the brass will quickly melt. It will only adhere well to the edges of steel workpieces (which can cause brittleness and stress failure), which will contribute to the formation of cracks in the final product.
Content
- Lead welding methods. Features and difficulties of its welding
- Gas Lead Welding Technology
- Preparation of edges for welding
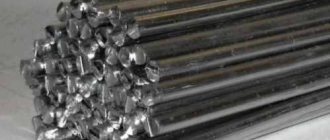
- Filler rods for welding
- Fluxes for welding
- Gas Lead Welding Technique
- Lead Arc Welding
- Preparing edges for welding
- Filler wire selection
- Lead arc welding modes
- Lead carbon arc welding technique
- Quality of lead carbon electrode welding
Tips for proper and strong soldering of metals
When working with steel or other metals, you must adhere to basic safety rules and also know some of the nuances of soldering.
How to heat and cool metal
An important step before starting work is preparing the workpieces. And here you need to know for sure which alloy you will solder or check it yourself:
- See how a metal workpiece reacts to heating with a soldering iron or torch. How quickly an oxide film forms on the surface. It’s better to know this in advance and for sure, otherwise subsequent work will be done in a hurry.
- It is best to warm up the prepared and secured parts gradually. Make sure that no overheated spots appear on the metal. The soldering area must be heated evenly over the entire area.
- Do not heat only the butt seam; also work on the area near the joint. Most often, you need to warm up 0.5 - 2 cm, depending on the purpose of soldering and the dimensions of the elements being connected.
- Use only soldering irons or torches that produce solder at operating melting temperature.
- Do not cool the finished seam with cold water or other liquids. Let the metal “rest” and cool evenly for several minutes in the open air.
- Remove soldered workpieces from a vice or clamps only after the solder has completely cooled.
Which metals are most strongly soldered to each other?
Unlike welding, in soldering the main indicator of the quality of the finished product is not the grade of steel or metal, but the choice of solder, as well as the technology for forming the solder seam itself. So the question here is rather about which metal, which solder sticks best to which metal. Of course, the closer in composition and density the solder and metal are, the better the adhesion will be. In the end, it all comes down to choosing the right solder for each individual case.
You also need to ensure that when connecting two metals, no electric couples are formed. Otherwise, the connection will rust and collapse from the slightest moisture. So a compatibility table for connecting non-ferrous metals with each other would be appropriate here.
The letter “A” in the compatibility table means “limitedly permissible in atmospheric conditions.”
Here are some more simple tips :
- Choose solders that are more refractory.
- Carefully clean the joints of fastened parts. Apply sandpaper not only to the seam itself, but also 0.5 - 2 cm near the joint on the metal surface.
- Tin and overlap seal. Thus, you increase the total area of fastening two or more parts.
Safety precautions when soldering steel at home
Often, neglect of basic rules for working with electrical or flammable appliances leads to loss of health or damage to property.
I strongly recommend following safety precautions when soldering:
- Keep the soldering iron on a metal pad or a special holder that takes the heated tip of the tool away from the plane of the table.
- Turn off the soldering iron from the mains immediately after finishing work.
- Check the quality of the connection of the gas cylinder to the burner itself. Avoid gas leaks.
- Work in a well-ventilated area.
- Do not leave the burner on if you have already finished working.
- Remove any flammable substances from the work area.
- Do not touch the heated seam with your bare hands. You may get burned.
- Do not touch the solder with your fingers to check the strength of the seam.
By following these measures, you can avoid injuries and also keep your property intact. Solder with pleasure and knowledge!
Use of borax
Soldering brown copper has always been considered the easiest way to connect copper pipes.
Essentially, borax is a high-temperature flux in the form of a paste. When heated to 700-900 ℃, it begins to melt, turning into a glassy mass. With its help, not only copper blanks are connected, but also copper and iron, for which solders made of copper, silver, gold or brass are used, that is, medium-melting alloys.
The only thing you need to pay attention to is the salts that are formed during the process of soldering copper with borax.
High-quality borax-based flux can be made at home, which is what most craftsmen do.
To do this, they mix boric acid and borax in equal proportions. Add water to it, mix and evaporate. The result is boron flux. To increase quality, chloride or fluoride salts can be added to the mixture.
The technology for soldering copper tubes is practically no different from the standard process. But it also has its own nuances.
For example, borax is applied both on top of the tubes and on its internal surfaces. Then the two pipes are heated for 15 seconds, and only after that solder is added to the heating zone.