You can make a canopy on your site in various ways, from different materials and using various technologies - what and how you make it from is your business, but you should understand that today the optimal approach to making a canopy has been outlined. This is exactly what we will talk about in this article, in which, together with the site stroisovety.org, we will deal with the question of how to make a canopy from corrugated sheets with your own hands?
Single-pitch canopy made of corrugated sheets photo
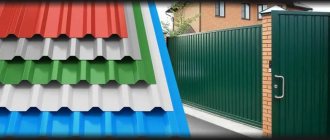
Canopy made of corrugated sheets: why this material?
The question of why most people prefer to make a canopy from corrugated sheets with their own hands can be answered briefly - this is the optimal solution, proven over the years. If we take a closer look, we can identify three main reasons.
- Simple manufacturing technology. The designs of canopies made of corrugated sheets are not complicated - in fact, it is a primitive frame, supplemented with sheathing elements and installed on four or more supports. If a person does not have enough skills in working with metal and the ability to use a welding machine, then it will not be difficult to build a canopy from corrugated sheets on a wooden frame. In this case, the service life of this product will be somewhat reduced - this is due to the properties of the wood itself. They can be slightly improved with the help of antiseptic and moisture-repellent impregnations.
- Affordable price. Both corrugated sheets and profile pipes are not very expensive. Naturally, corrugated sheeting can be different, and this must be taken into account when choosing materials - the thinner the profiled sheet, the lower its cost and shorter service life. In addition, the thinner the corrugated sheet, the thicker the sheathing will have to be made under it - and this, again, is an additional expense. In general, if you save on one thing, you will have to spend money on another - a double-edged sword, which indicates that it is better to purchase thick corrugated sheeting. At least it will last longer.
- Durability of the structure. The frame, if you take care of it and periodically update the protective coating (paint), can last a very, very long time. In contrast, profiled flooring lasts less (it rots before the frame), but it can always be replaced with a new one, extending the life of the canopy for another couple of decades.
Canopy structures made from corrugated sheets photo
It is this combination of factors that determines the widespread use of corrugated sheet canopies in private construction. Also, other factors should not be discounted - in addition, corrugated sheeting creates a reliable shelter from rain and snow, it is able to retain its color and original appearance for a long time. Among other things, roofs of houses are assembled from corrugated sheets, which naturally forces the use of the same material for the manufacture of canopies, fences and roofs of other buildings located in the local area.
Advantages and design features of a domed roof
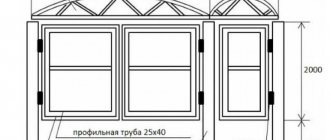
An example of a drawing of a slope of a semi-pitched roof: both external and internal dimensions must be indicated.
Today you can see many buildings with complex construction and architectural layouts. A domed roof is just an option for arranging such structures. Such a roof, which even an ordinary residential building can have, can help solve a number of problems. For example, moving from one room to another, providing a roof over a terrace or veranda. In addition, the domed roof:
- has high resistance to wind load;
- does not “allow” accumulation of snow on its surface;
- creates a significant air volume inside the room, which has a beneficial effect on the physical condition of people;
- provides natural light (if the roof is transparent), which saves money spent on electricity bills.
In such roofs, the load-bearing elements are arches and trusses, curved accordingly. The manufacturing material can be metal, reinforced concrete or wood. In residential construction, the latter option is most often used. Wood is a relatively durable and at the same time lightweight material. This allows you to reduce the load on the house and foundation, and thus spend less money on construction. The only drawback of wood is its relative fragility, which is not typical for metal. And if the iron profile for arranging the frame is too heavy, then an aluminum one will be just right. This material does not corrode, does not require maintenance, and its installation is simple; The aluminum profile is aesthetically attractive and, most importantly for a domed roof, is lightweight. The only negative is the high cost.
The rafter system, like the entire structure, has a rounded appearance.
One of the most expensive and time-consuming options for arranging a domed roof is natural tiles. Since this is still an expensive pleasure, they often prefer to cover a country house with a semicircular roof with a soft roof (flexible tiles, for example). And if the structure is non-residential, then modern homeowners use polycarbonate as a roof for domed roofs. This inexpensive modern material has a low mass and a high degree of transparency. Polycarbonate is resistant to mechanical stress, has high resistance to ultraviolet radiation, and is easy to install - all this has led to the high popularity of polycarbonate among fans of domed buildings. Typically, gazebos, rotundas on the site, and sometimes greenhouses and greenhouses are covered with this material.
Construction of a canopy made of corrugated sheets: which one to build
By and large, the design of any canopy is the same - the difference, which determines the division of these buildings into types, lies only in their shape. In this regard, canopies of arched and pitched construction can be distinguished.
- Single-pitched canopy made of corrugated sheets. In most cases, this type of canopy design is used when the building is attached to a house or something else - this canopy is simple in design and in most cases has supports on only one side. The other part of the canopy is simply attached to the walls of the house using anchor screws. Along with the simplicity of the design, one unpleasant moment appears - this is the same docking of the canopy to the walls, which requires a special approach to sealing this connection.
- Gable canopy made of corrugated sheets. This is already a full-fledged house, or rather a roof mounted on supports - as a rule, such canopies are rarely made. This form of roof is used only when we are talking about large canopies - for example, a spacious open-type summer kitchen, in which, in addition to equipment, it is planned to place a decent-sized dining area.
- Arched canopy made of corrugated sheets. He's just beautiful and nothing more. Alternatively, its advantages include versatility - it is perfect for both the manufacture of canopies attached to the house and for the installation of free-standing buildings of this type. The only “but” in the arched canopy design is that it is not suitable for large-area products - in most cases, a canopy of this shape has an elongated outline.
Canopy made of corrugated sheets photo
As an option, if we are talking about small canopies, you can consider a multi-slope structure - so to speak, a canopy covered with a hip roof - this is the most difficult canopy to manufacture and in order to take it on, you at least need to be a professional in the field of manufacturing roofing structures.
Types of semicircular roof
Arched, domed or semicircular roofs are mostly common on public buildings with large capacity; exhibition halls, swimming pools, sports complexes, galleries, winter gardens. However, in the last few years, private developers have also begun to pay attention to this ancient architectural delight. Many people, including far from wealthy citizens, want to have a house with an arched roof.
The construction of a semicircular roof is more labor-intensive than a conventional pitched one, but the result is always impressive.
It is worth noting that the semicircular roof attracted people not only due to its unusual shape. There are also practical advantages to this method of roofing, which has its own varieties.
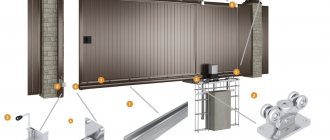
Installation of a canopy made of corrugated sheets: sequence of work
As mentioned above, a canopy made of corrugated sheets has a fairly simple design, and it is very easy to make - not very easy, of course, but it will take some work. This whole process can be represented in the form of the following sequence of work.
- Installation of supports. The work is very simple - holes up to 500mm deep are dug for the posts, in which they are concreted. In the process of this work, you need to pay attention to two things: firstly, this is a clear vertical level of installation of the supports (controlled in two planes) and, secondly, this is a combination of metal and concrete. It is provided by reinforcement welded to the bottom of the supports, corners, or any iron trash in general.
- Making a roof frame. First of all, all the supports (of course, after the concrete has hardened) are connected around the perimeter with a profile pipe - a kind of frame is made that will serve as the basis for the roof. It must be placed at an angle so that rain and melt water can flow freely from the roof. Next, the resulting frame is reinforced with transverse beams - they are installed in increments of 1000-1200mm. If the slope of the canopy is small, it is better to reduce the pitch to a minimum. This is the entire frame of the canopy - to enhance the strength of the structure, its supports can additionally be tied with another ring of rigidity. By placing it at a height of 1000-1200mm above the ground, you will create not only a rigid and durable gazebo, but also provide a base for a small parapet, which can subsequently be sheathed with the same corrugated sheeting, thus creating protection from the wind.
Installation of a canopy made of corrugated sheets photo
You can finish the work on making a canopy roof from corrugated sheets by filing it from below - this stage of work will allow, so to speak, to cultivate the canopy ceiling. Moreover, behind this very casing it is quite easy to hide the electrical wires supplying power to the lighting fixtures. Yes, yes, most covered canopies of this type are equipped with individual lighting - this is convenient and, most importantly, practical, regardless of the purpose of the canopy being manufactured.
Arched canopy made of corrugated sheets photo
And in conclusion, I will say a few words about the independent construction of an arched canopy - the whole problem of its manufacture lies in the need to bend the profile pipe. At home, without a special pipe bender, it is quite difficult to do this - you will have to cut the pipe into segments, and then bend and weld each individual seam. This is a very long and painstaking work - one might even say that it does not justify itself. It is much easier to order these arcs at the appropriate enterprise or workshop - having the arcs on hand, you simply weld the trusses and install them instead of beams on the canopy supports connected along the perimeter by a profile pipe. Well, then everything is standard - fastening the corrugated sheeting. With the exception of one nuance - the order of its installation. It needs to be fastened from the two lower edges of the arch - as if raising the roof from both sides to the center. The last, topmost sheet of corrugated sheeting is laid overlapping on sheets raised on both sides.
Basically, that's all! This is exactly how a canopy is made from corrugated sheets with your own hands. According to this assembly principle, you can independently make a canopy for any purpose.
Reading time: 8 minutes No time?
We will send the material to you by e-mail
An important part of the exterior of a country house is the canopy. It is designed to protect part of the yard from precipitation and ultraviolet rays, and also performs a decorative function. A small area, covered with material on top, consists of sheds attached to the house. Photos of similar structures can be seen in this review. In this case, the supports of the structure are brought to the required height. Attaching to the main structure involves attaching one side of the structure to the wall of the house.
The canopy structure allows you to create a magnificent outdoor recreation area
Selection of materials for the construction of canopies
Sheds attached to the house can be made with your own hands. The photo shows the main stages of installation. The frame of the structure is often made of profiled pipe or timber. This structure is adjacent to the wall and takes on the load from the snow accumulated on the roof.
The attached structure can be made of very durable and massive materials
The roof is usually covered with corrugated sheets, slate or galvanized material. The metal for the frame structure has ductility and strength. It suits different design styles. Such structures can be erected with your own hands.
The extensions are distinguished by their original design
The wood frame system combines well with other materials. Wood suits most architectural designs. Before use, this material should be treated with protective agents. Polycarbonate canopies attached to the house are becoming increasingly popular, photos of which can be viewed on the Internet.
Polycarbonate is easy to assemble and comes in a variety of colors
Polycarbonate enjoys the following advantages:
- plastic is characterized by durability. Mechanical impact is not scary for him;
- light weight of the material;
- polycarbonate transmits light well;
- flexibility of the canvas.
Helpful information! When purchasing a design kit for self-assembly, you must check the integrity and strength of all connections.
Convenient designs made from this material can improve the appearance of the main building and cover the area from prying eyes
Creating a Project
When choosing a design project, it is worth deciding on the following parameters:
- dimensions and purpose of the structure;
- plot size;
- snow and wind loads;
- snow depth and expected annual precipitation;
- structural features of the main structure.
A pre-created project allows you to choose the best solution and select high-quality material
Before installation work, a drawing must be completed. Based on the size of the building, the required amount of material is determined.
Helpful information! When creating a carport, it is worth considering the passage of a loaded vehicle.
Pros and cons of a semicircular roof
It is worth knowing that arched roofs carry a lot of advantages both for the house itself and for its owner. The main positive aspects of such an arc-shaped ceiling are:
- Reducing the wind load on the roof of the house. That is, moving along a sloping roof, the wind does not experience resistance, which means it does not tear off the roof and does not loosen the rafter system.
- Unhindered descent of snow crusts from the roof. This point is important, since precipitation in the form of snow puts additional pressure on the ceiling.
- The ability to fill the room with natural light (provided that a transparent roof is used).
- Significant savings in attic space. The absence of a complex rafter system ensures this.
But the semicircular roof also has some disadvantages. These include:
- Some complexity of installation. Especially if the master decides to make the load-bearing frame from wood.
- It is impossible to use any material you like as a roofing material.
Preparatory work
Before the planned sheds attached to the house are created, photos of which can be viewed on the website, it is necessary to carry out preparatory work. For this purpose, a suitable area is marked out, and trees are uprooted from it. The clean area is leveled. At the same time, sand and gravel are added.
Some durable sheds require a foundation
Recesses are drilled under the canopy supports. And at this stage it is worth considering laying the cable under the lighting sources. A certain step for placing supports is selected. It depends on the weight of the roof and frame part.
The number and placement of racks must be calculated in advance
The stands are lowered into the prepared pits and filled with concrete mixture. The pillars are set according to level.
Important information! If groundwater is located nearby, then the ends of the pillars need to be additionally waterproofed. Metal supports are pre-treated with a primer.
Buy arched corrugated sheets on favorable terms for you!
Arched corrugated sheeting is a profile with standard trapezoidal corrugations, longitudinally bent into an arc. The radius of the arc is agreed upon with the customer for a specific project and can vary widely: from a small, barely noticeable bend to an arch with a radius of 300 mm. Longitudinal bending of corrugated sheets is performed on special machines, so its load-bearing capacity does not decrease at all or decreases insignificantly. The production company
is engaged in the production and sale of corrugated sheets and offers certified products
on favorable terms
.
Our own production base allows us to produce a wide range of products with high performance characteristics in strict accordance with current standards. For all questions of cooperation, you can contact our specialists at the contacts listed on the website +8(495) 374-90-92;; 8(812) 317-74-52; [email protected] evroshtaketnikmoskva.ru.
You can also request a call back. We will definitely call you back at the time you specified.
How to make a polycarbonate canopy attached to a house: photos and installation steps
12-15 days after the concrete has completely hardened, you can begin assembling the structure. Brackets are mounted on the wall, and then a transverse beam is mounted on top.
Assembly of the structure requires the preparation of special tools
Creating a sheathing
The top trim is being done. The end parts of the racks are connected using a transverse beam and to each other. In this case, parallel laid profiles are used. The metal frame system is welded together, and the wooden frame system is tightened with steel corners.
The sheathing is attached to the main beam
Welding areas are cleaned, primed and painted. The rafters are mounted with transverse parts in increments of 600 mm. The structure is attached to the supporting beam using steel angles. The sheathing is laid across the rafters and mounted with self-tapping screws.
Roof installation
Sheets of roofing material are cut to size. Then they are attached to the sheathing. Holes for self-tapping screws are first made in the polycarbonate.
When installing a roof, you may need special insurance.
To facilitate water drainage, the cells should be directed downwards. When working with plastic, do not forget to leave gaps between the panels. The dimensions of the holes should be made with a margin of 2-3 mm. There are some features of installing roofs made of other materials.
Roof elements are attached to the sheathing
Wood beams can be used as beams. Over time, cracks may appear in the material, which will reduce the rigidity of the structure. After installing the beams, transverse boards are installed, and then the metal tiles are fastened. Installation of this material is carried out from the bottom sheets. It is worth considering that there should be an overlap of the upper sheets on the lower ones.
Helpful information! After installing the roof, drain gutters are installed. To do this, the required length of the gutter is measured and the excess metal is trimmed with a grinder.
In some cases it will be difficult to install the roof alone
Useful tips
After installing the main extension, you can make a platform. The easiest way is to fill the area with gravel. To do this, the turf is removed, the curb is dug in and crushed stone is poured. Then it needs to be compacted well.
Stylish and durable coating increases comfortable conditions for using the structure
You can also make a platform paved with paving stones or paving slabs. Equipping the site with concrete will be inexpensive.
A high-quality platform allows you to increase the usable area of the yard area
Using available materials and tools, you can create a beautiful canopy with your own hands. Such designs will allow you to build a wonderful place for a family vacation or reliable protection for a car and garden tools.
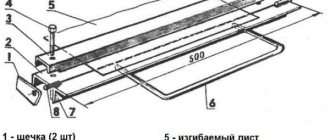
The procedure for laying corrugated sheets with your own hands
- Corrugated sheets are laid from bottom to top, starting along the slope from the end of the building, from left to right or from right to left - it all depends on which side of the sheet the manufacturer made the capillary groove on. When laying the material, the groove should be closed by the wave of the next sheet.
- The size of the overlap of corrugated sheets horizontally and vertically depends on the angle of the roof slope. For small values of the angle of inclination of the slope, the sheets are laid with an overlap in two waves vertically, for high values - in one or half a wave.
- The horizontal overlap of the slope is at least 10 cm. The first row is laid with an overhang of 30–50 cm above the overhang (the distance depends on the design of the drainage system). The joints between the profiled sheets are sealed with a special tape. The sheet of the second row is laid with an offset along the end by half the width.
How to lift sheets onto the roof
If 2 or more people are working, lifting the sheets is easy. They are placed on a frame of 5-6 bars in packs of 5-10 pieces and pulled upward along inclined boards attached to the sheathing.
To prevent the sheets from rolling down, one or two bars are nailed to the sheathing from below and a pack of covering sheets is placed. It’s much more convenient to work this way than to feed one at a time, although this method is also used.
How to attach corrugated sheets to the roof correctly
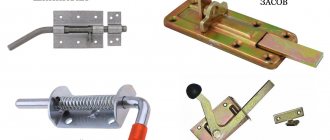
The sheets are secured to the sheathing with self-tapping screws, washers and sealing gaskets.
Single-pitch design
This canopy device is considered the simplest. The plane is flat, but there is a slight slope so that rainwater can drain without obstacles. There is no need to make a large slope, otherwise the lean-to canopy will become impractical and will not fulfill its intended role.
The optimal slope would be 10 cm by 2 m.
The construction of a single-pitch type canopy consists of erecting support pillars for the structure. Between them there are so-called purlins, onto which transverse veins are subsequently welded. It is on them that the corrugated sheeting will be screwed. Therefore, it takes a little time to make a canopy from corrugated sheets. That is why a lean-to canopy made of corrugated sheets is very popular among owners of private or country houses. Gable design
When installing a gable canopy made of corrugated sheets, you will have to spend a little more effort and materials. After all, installing a canopy of this type will require installing small trusses made of rolled metal between the pillars. They can be welded from profile pipes with a wall thickness of 1.5 to 2 mm. This will be enough for the trusses to support the weight of the entire corrugated sheet.
The highest pillars are mounted in the center of the structure. On both sides, deviating from the axis, you need to reduce the height of the pillars in uniform increments. Prefabricated trusses will be welded between the pillars. Transverse purlins are welded onto them at even intervals, onto which the corrugated sheeting will be attached. Thus, all snow and rainwater will not be able to linger on the surface of the canopy and will roll evenly on both sides of the structure.
Arched design
Canopies made of corrugated sheets, which have an arched appearance, are much more difficult to assemble. But this design looks presentable and beautiful.
For installation, you will need to pre-mount 4 massive pillars from profiled pipe. You can use a square pipe with a cross-section of 100x100 mm and a wall thickness of 4 mm. The pillars must be strictly in the same horizontal plane.
Then you will have to take the pipes that are intended for arched trusses to a pipe rolling mill. There, using a specialized installation, they are bent at a certain angle. Strong beams are welded between the two pillars, onto which the arched trusses will subsequently be welded.
Purlins are welded on top of the trusses, onto which corrugated sheeting is screwed.
Sound insulation and installation of drip tides
Many people are faced with the problem that it is impossible to stay under a corrugated sheet canopy when it rains. The fact is that corrugated sheeting is made of steel, so when drops of rainwater fall on its surface, a roar is heard. To avoid this, before installation, you should spread a special soundproofing film over the entire surface. This will keep the structure quiet for a long time.
It is also worth taking care of the installation of ebbs, which will allow rainwater to drain away. At the end of the corrugated sheet canopy slope, brackets should be welded to the support beam. This must be done with a slight slope in the direction in which the water will flow. The brackets have special latches, so you can easily insert individual gutter elements into them. But to achieve maximum results, all joints should be coated with sealants or silicone. Plugs are placed along the edges of the gutters, which are also coated with silicone. Next to the plug there is a hole to which the drain pipe is connected. This way, even with heavy rain, all the water will drain in a certain place.
- Sheets of corrugated sheets come in separate packs. In order to avoid scratching, you should carefully lift them from both sides and under no circumstances pull them together.
- When cutting material, you should use only a hacksaw or special scissors. A grinder cannot be used for these purposes, because when cutting, the edge heats up and the protective layer in the cut area will be damaged. This, in turn, can lead to premature corrosion.
- When installing corrugated sheets, you do not need to apply excessive force. The screws must be tightened carefully. The rubber gasket should not be deformed so that water does not subsequently enter the hole.
- Before painting, it is best to pre-coat the canopy frame with 2 layers of primer. There should also be at least two layers of paint.
If you follow these fairly simple rules, the design can serve you for many decades.
An example of calculating a metal truss from a profile pipe ↑
The calculation of such a product assumes:
- determination of the exact height (H) and length (L) of the metal structure. The latter value must exactly correspond to the span length, that is, the distance overlapping the structure. As for the height, it depends on the designed angle and contour features.
In triangular metal structures, the height is 1/5 or ¼ of the length, for other types with straight belts, for example, parallel or polygonal - 1/8.
- The angle of the grid braces ranges from 35–50°. On average it is 45°. It is important to determine the optimal distance from one node to another. Usually the required gap coincides with the width of the panel. For structures with a span length of more than 30 m, it is necessary to additionally calculate the construction lift. In the process of solving the problem, you can obtain the exact load on the metal structure and select the correct parameters for the profile pipes.
As an example, let's consider the calculation of the trusses of a standard single-pitch structure 4x6 m. The design uses a 3 by 3 cm profile, the walls of which have a thickness of 1.2 mm. The lower belt of the product has a length of 3.1 m, and the upper - 3.90 m. Between they are installed with vertical racks made of the same profile pipe. The largest of them has a height of 0.60 m. The rest are cut out in descending order. You can limit yourself to three racks, placing them from the beginning of the high slope.
The areas that are formed in this case are strengthened by installing diagonal lintels. The latter are made of a thinner profile. For example, a pipe with a cross section of 20 by 20 mm is suitable for these purposes. At the point where the belts meet, stands are not needed. On one product you can limit yourself to seven braces. For a 6 m length of the canopy, five similar structures are used. They are laid in increments of 1.5 m, connected by additional transverse jumpers made from a profile with a section of 20 by 20 mm. They are fixed to the upper chord, arranged in increments of 0.5 m. The polycarbonate panels are attached directly to these jumpers.
Calculation of an arched truss ↑
The manufacture of arched trusses also requires precise calculations. This is due to the fact that the load placed on them will be distributed evenly only if the created arched elements have ideal geometry, that is, the correct shape. Let's take a closer look at how to create an arched frame for a canopy with a span of 6 m (L). We will take the distance between the arches to be 1.05 m. With a product height of 1.5 meters, the architectural structure will look aesthetically pleasing and can withstand high loads. When calculating the profile length (mн) in the lower chord, use the following formula for the sector length: π •R•α :180, where the parameter values for this example in accordance with the drawing are respectively: R= 410 cm, α÷160°.
After substitution we have: 3.14•410•160:180 = 758 (cm). The structural units should be placed on the lower chord at a distance of 0.55 m (rounded) from each other. The position of the extreme ones is calculated individually. In cases where the span length is less than 6 m, welding of complex metal structures is often replaced with a single or double beam, bending the metal profile to a given radius. Although there is no need to calculate the arched frame, the correct selection of a profiled pipe still remains relevant. After all, the strength of the finished structure depends on its cross-section.
Calculation of an arched truss from a profile pipe online ↑
How to calculate the arc length for a polycarbonate canopy ↑
The arc length of an arch can be determined using Huygens' formula. The middle is marked on the arc, designated by point M, which is located on the perpendicular CM drawn to the chord AB, through its midpoint C. Then you need to measure the chords AB and AM. The length of the arc is determined by Huygens’ formula: p = 2l x 1/3 x ( 2l – L), where l is the chord AM, L is the chord AB) The relative error of the formula is 0.5% if the arc AB contains 60 degrees, and as the angular measure decreases, the error drops significantly. For an arc of 45 degrees. it is only 0.02%.