Varieties
Different criteria are used to subdivide developments into types.
- Method of use: machine or manual.
- The shape of the hole being processed and its own configuration are conical or cylindrical.
- Fastening method: mounted or tail mounted.
- The arrangement of the cutting edges around the circumference is uneven or with a certain pitch, that is, uniform. The roughness of the machined surface directly depends on the design used.
Machine reamers (installed on machines) and manual reamers are structurally different. In particular, the second type of tool has elongated cutting edges located on the working part. And the shank has a square cross-section, which allows you to securely fix the manual reamer in the existing driver. Using a machine tool, you can deploy nests that are characterized by a sufficiently large depth. This is ensured by the following features:
- the working part is noticeably shorter;
- the neck, on the contrary, is longer.
You need to choose a suitable scan taking into account:
- diameter of the hole planned for processing;
- types of tools: machine or hand type; for what processing is it suitable - finishing-finishing or preliminary-roughing. In the latter case, when choosing, you need to be guided by the following numbers of the required allowance: finishing reaming - min 0.05 mm; max 0.10 mm; roughing operation – min 0.1 mm; max 0.15 mm.
More complete information on this issue is shown in the table. Numerical values are given in millimeters.
| Allowance for surgery | Hole diameters and corresponding allowances | ||||
| 100,0 | 50,0-75,0 | 30,0-50,0 | 18,0-30,0 | 12,0-18,0 | |
| Clean deployment | 0,1 | 0,08-0,1 | 0,07 | 0,06 | 0,04-0,05 |
| Rough deployment | 0,3 | 0,2-0,22 | 0,18 | 0,14 | 0,1-0,11 |
| Common value for both types of processing | 0,4 | 0,3 | 0,25 | 0,2 | 0,15 |
Tool used
The finishing of the hole is done with a special tool, a “reamer”, manually, on a drilling or lathe. It is subdivided:
- Depending on the installation location, manual and machine.
- The shape of the hole is cylindrical and conical.
- Depending on the type of fixation in the cartridge - tail and attachment.
- According to the location of the cutting edges - with uniform and
uneven. The latter make it possible to impart different degrees of roughness to areas of the treated surface. Manual reamers differ from machine reamers in that they have elongated cutting teeth and a square shank for installation in a driver. The tool, designed for drilling machines and electric drills, allows you to machine deep holes thanks to its short working part and long neck. The shank has a cylindrical or conical shape.
Deployment Methodology
To fully understand the methodology for carrying out this procedure, it would be advisable to give a specific example. Let it be necessary to create a hole with a diameter of Ø30.0 mm according to qualifications IT6 – IT7. The sequence of steps for completing this task looks like this:
- First, a socket with a diameter of Ø28.0 mm is drilled;
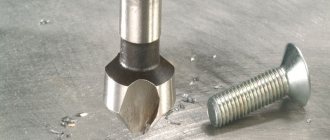
- then the countersinking operation is carried out using a countersink with a diameter of Ø29.60 mm:
- further – rough reaming using a tool with a diameter of Ø29.90 mm;
- finishing reaming using a finishing reamer with a diameter of 30.0 mm
The degree of accuracy of the hole formed as a result of this procedure, as well as the level of roughness of the resulting surface, is influenced, along with the geometric characteristics of the tool used, by the type of coolant (hereinafter, Lubricant and Coolant). If holes are drilled into steel structural elements, special disperse systems are used, in other words, emulsions with mineral oil additives. When parts made of brass and bronze are processed, coolant without such components is used. This topic will be discussed in more detail below.
The difference between countersinking and related operations
Countersinking is similar to reaming holes; the cutting edges of the tool remove excess material from the stenoctium, reduce roughness and increase the diameter. This is a semi-finish operation, which means it is followed by another processing step. Deployment is the final procedure. During countersinking, defects in drilling, stamping and casting are eliminated. In the process, you can slightly adjust the binding to achieve better alignment for the future connection. Accuracy can be increased to 5, and sometimes even to 4th class.
When setting the cutting mode, you need to remember that the thickness of the metal removed during countersinking is equal to half the allowance for a given hole diameter. Compared to drilling, the feed can be made 1.5-2 times larger, but the speed can remain the same. Specific cutting parameters are calculated using formulas given in the regulatory literature.
Since a countersink has greater rigidity compared to a drill, due to the increased number of sharp protrusions, the accuracy of the direction of movement increases, as well as the quality of processing, smoothness and cleanliness of the surface. For comparison, drilling gives a roughness of 20 microns and grades 11–12, countersinking gives a roughness of 2.5 microns, grades 9–11, and reaming gives a roughness of 0.25-1.25 microns and grades 6–9. Quality is the precision of manufacturing a part; as its value increases, tolerances increase and accuracy decreases. If the technological process for processing a product requires both countersinking and reaming, then they are performed in one installation and alignment of the workpiece on the machine.
This type of machining creates recesses to accommodate fasteners flush with the surface of the part. In addition to chamfering, a countersink is used to cut conical-shaped recesses. Another purpose will be to clean and process recesses before installing fasteners; this is done using flat or end countersinks, also called counterbores, which is more correct.
The most widely used on the market are conical countersinks with working angles of 90 and 120º, which create recesses to hide the heads of bolts and screws. In the metalworking industry, countersinks with a flat tip are also used, used for cleaning recesses for fasteners. Countersinks are installed in the same machines as other tools for processing holes for fasteners.
Working with hand tools
Manual deployment involves performing the following steps:
- the parameters of the initial hole and those specified by the T.Z. conditions are analyzed. its final technical characteristics;
- based on the data obtained, a tool is selected for carrying out the preliminary roughing and final finishing deployment procedures;
- the workpiece is firmly fixed in a vice;
- a tool is installed into the hole made in the workpiece at the casting stage or by drilling it, with which the rough reaming operation will be performed;
- then a collar is put on its shank;
- then a special lubricant is applied to both working surfaces - the inner hole being machined and the outer reamer;
- the next stage is the actual rough deployment. It is carried out by slow rotation, without any sudden movements. In this case, it is necessary to constantly apply lubricant material;
- At the end of this stage, the instrument should be carefully removed. This must be done so that it does not turn in the opposite direction;
- then a finishing tool is inserted into the hole, and a wrench is mounted on its square shank;
- finishing deployment is carried out by rotating the knob in a clockwise direction. To obtain a surface with a low level of roughness, the tool feed intensity should be very low, or even better, the minimum allowed according to the technological map;
- After completing the final reaming procedure, you need to check the quality of the machined surface and the correctness of the hole geometry. For this purpose, a scaleless device such as a smooth limiting metrological plug gauge is used.
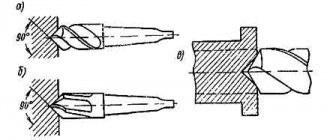
The figure shows the techniques for carrying out the deployment procedure.
How to Use Manual, Mechanical, Adjustable, and Spread Reamers
Let's look at the features of the tools.
How to use manual reamers
Manual metal reamers are manufactured in accordance with GOST 7722-77. Size range: 3–58 mm. Steps may vary.
When choosing manual metal reamers, craftsmen pay attention to the following parameters.
- Tool dimensions.
- Number of teeth.
- Uniformity of their distribution.
- Type of cutting part.
- Groove profile.
- Type of clamping part.
Reaming holes with a hand tool is done using a wrench. To secure it, there is a special groove at the end of the shank. Usually everything happens this way.
- Marking and marking are carried out.
- The hole is drilled.
- The reamer is secured in the driver, lubricated and inserted into the hole.
- To deploy it, the tool is rotated clockwise.
- The final stage is checking the hole parameters using a gauge.
Image #2: Reaming holes by hand
Let's talk about the important features.
- Manual reamers are very effective. The cutting teeth have sharp edges along their entire length.
- The diameters of the front surfaces of the working parts are reduced. Tools easily fit into pre-prepared holes of the required diameters.
- By increasing the number of cutting edges, the quality of the machined holes increases.
- The holes must be drilled out smoothly. Don't speed up even when moving lightly. Avoid jerking.
- The reamer cannot be rotated in the opposite direction. This leads to breakage of the cutting edges, as well as the appearance of scoring in the holes.
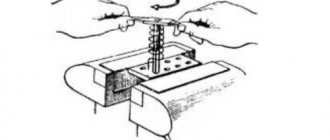
How to use machine reamers
Machine reamers are secured in chucks of lathes, drilling and milling machines. These tools have short working parts with steep leading edge angles (up to 45°). Machine deployment significantly improves productivity.
To machine a hole, you need to secure the reamer, add coolant and align the axes. Next, you need to set the desired rotation speed and start the equipment.
Machine reamers and their application have the following features.
- Tools have a large number of cutting edges. The quality of the resulting holes is at a very high level.
- Machine reaming requires spindle runout compensation. To eliminate this negative factor, hinged mandrels are used.
Photo #6: Machine deployment
Processing is carried out at high speeds. Machine reamers have increased wear resistance.
The sweep is positioned precisely. Due to this, the tool smoothly enters the hole. The same pressure is applied to all teeth. This greatly improves accuracy and minimizes runout.
The speed during reaming is less than when drilling, approximately 2–3 times. Tools do not overheat.
Machine reaming requires the use of significant quantities of cutting fluid.
How to use adjustable reamers
Adjustable reamers allow you to change the outer diameters of the cutting parts to suit specific hole diameters. This is especially useful when machining holes with fractional diameters.
Using small adjustable reamers, you can change the diameter within a range of up to 1 mm. Larger instruments have wider adjustment ranges. Diameters can be varied up to 3 mm.
Photo No. 7: adjustable metal reamer
Adjustable reamers are used in the same way as regular ones. The main difference is that tools of this type are equipped with replaceable knives, which are securely fixed by wedge inserts with linings. The adjustment is made using a locknut. When tightened, the processing diameter increases, and when loosened, it decreases. After adjustment, the diameter is checked using a caliper and a micrometer.
How to use expansion reamers
They are also called sliding ones.
Photo No. 8: metal expansion reamer
Inside such a reamer there is a ball and a screw. When it is twisted, the ball moves and pushes the edges of the tool apart. The diameter increases slightly. The use of expanding reamers makes it possible to increase processing diameters by 0.15–0.5 mm.
It is not recommended to use too much force when tightening the screws. The reamer body may crack.
Reaming Tapered Holes
The processing scheme for cone-shaped sockets is practically identical to the operation of reaming holes with a cylindrical cross-section or having ledges due to the use of drills of different diameters. Carrying out this procedure with sockets of the last (stepped) configuration differs in that a smaller allowance can be left. Another feature is the use, along with roughing and finishing, of an intermediate tool.
The sequence of stages for deploying holes in a conical configuration is shown in the figure.
The results of such an operation are monitored using a conical metrological gauge. This check is performed:
- determining the depth of passage of the device used for control;
- according to the configuration of the lines of contact between the surfaces of the metrological gauge and the created hole.
The quality of the cone-shaped socket deployment procedure is checked as follows:
- No more than 3-4 lines are drawn with a pencil on the side face of the scaleless control instrument along its longitudinal axis. The distance between them should be approximately the same.
- Under slight pressure, a gauge is inserted into the conical hole of the workpiece and turned a third of a turn.
- After removing the control tool, the condition of the lines drawn at stage No. 1 is checked.
The fact of uniform abrasion of all the above lines indicates the high-quality implementation of the deployment procedure.
Countersinking
All about square hole drills
A countersink is used to process holes that are pre-stamped, cast or drilled. Countersinking can be both preliminary (before deployment) and final processing. In addition to machining holes, countersinks are sometimes used to process the end surfaces of workpieces.
To increase the accuracy of countersinking (especially when processing cast or stamped deep holes), it is recommended to first bore (with a cutter) the hole to a diameter equal to the diameter of the countersink, to a depth approximately equal to half the length of the working part of the countersink.
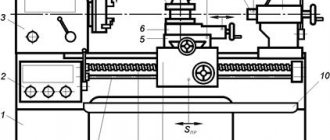
Countersinks, like drills, are installed on lathes most often in the tailstock or turret.
Performing a machine deployment
The choice of modes for carrying out such a technological operation involves the use of special tables. The following parameters are used as initial parameters: material for making the reamer; grade of alloy being processed; diameter of the hole being created. The main characteristics of machine reaming include: the speed of rotation of the machine spindle, as well as the speed of penetration of the tool into the socket. This operation is carried out at a minimum speed when holes in viscous alloys/metals are processed. Reaming of nests in normalized steels is usually carried out at the maximum speed possible according to the technological map.
Types of coolant used
The cutting fluid is matched to the material in which the hole to be reamed is made. Expert recommendations on this issue are formulated as follows:
- tool steel alloys (with a content of the element carbon C exceeding 0.7%), structural alloys of various quality and carbon (the content of the element carbon reaches 2.14%) - a mixture of mineral or petroleum oils; oils with sulfur additives (element S); emulsion, including those based on a 2-phase system; soap solution (water);
- bronze – coolant is not used when deploying;
- aluminum – rapeseed oil (rape seeds are used as a raw material for its production); a mixture of turpentine (scientifically called turpentine oil) with kerosene; refined kerosene; emulsion;
- copper and copper-containing alloys – emulsions;
- cast iron - kerosene is used as a coolant. It is possible to deploy this material without coolant.
Some nuances of the machine deployment procedure
Before you begin machine reaming a hole, special attention should be paid to preparing the equipment. It consists of performing the following actions:
- the seat in the spindle of the unit, as well as the cone-shaped shank of the tool, are wiped with maximum care;
- then the reamer must be inserted into the prepared spindle;
- The part to be processed is fixed on the machine table. In this case, it is necessary to ensure that the axes of the hole and the reamer coincide;
The machine deployment procedure itself includes the following steps:
- upon completion of creating a socket in the workpiece, you need to remove the drill from the spindle of the drilling unit and insert a rough reamer in its place;
- a rough deployment operation is carried out;
- then you need to replace the rough development with a finishing one, and then perform the procedure again;
- Having completed the finishing deployment, it is necessary to remove the tool from the working area, turn off the electric motor of the machine and, using a plug gauge, check the quality of the work performed.
Sometimes it is recommended to mount the reamer in a hinge-type mandrel or a floating chuck for finishing machining.
Purpose and principle of operation
A reamer is used to ream holes - the process of finishing them mechanically after drilling or countersinking.
The use of this tool allows you to achieve a high class of roughness of the hole walls and the accuracy of their geometry. Depending on the type and characteristics, it is used to perform specific technological tasks, including calibrating holes and cleaning them from burrs at the final stage of part processing.
- A special feature of this tool is a large number of teeth (usually from 6 to 16), which allows you to remove a small allowance, thereby adjusting the actual dimensions of the hole to the required ones with high accuracy.
- As for the shape of the holes, you can work with a reamer either along the cylinder or adjust the cones for various tasks, for example, for installing tapered pins.
- The teeth of the tool remove a layer of material by fractions of a millimeter; processing occurs through its rotation, as well as simultaneous longitudinal feed.
Device and characteristics
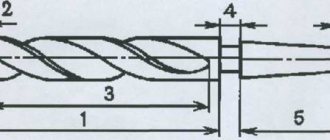
A standard scan consists of the following parts:
- The working part has a direct impact on the material and is formed by longitudinal teeth.
- The transition neck is a cylindrical zone of the tool that acts as a transition link between the previous and next parts.
- Shank - necessary for clamping a tool in a driver or chuck of machinery.
The working part is divided into several zones formed by the edges of the teeth:
- The intake part, at the very beginning of which there is a guide cone. In this zone, each tooth has a sharply sharpened cutting edge that selects material from the inside of the hole.
- The calibrating part is responsible for calibrating the hole. Here the edges of the teeth form a so-called cylindrical strip (flat surface), which increases the dimensional stability of the tool.
- The rear cone is where the teeth join the transition neck.
- Between the teeth there are grooves that remove chips.
- They are straight (most common) and spiral (helical, preferable when working with discontinuous surfaces).
- In the latter case, the direction of the screw formed by the grooves is opposite to the direction of rotation of the tool.
- This ensures resistance to seizing and self-tightening.
Material
In the manufacture of reamers, we mainly use tool alloy steel grade 9ХС, as well as high-speed steels P18 and P9.
The grade of steel used in the production of tools is selected taking into account the material that is supposed to be processed.
Dimensions
- Cylindrical manual models reach a length of 80 - 360 mm, where the working part occupies 40 - 190 mm.
- The diameter of the tool is in the range of 3-50 mm, and the length of the cutting part is 4 – 10 diameters.
- The front angle is from 5° to 10°, and the back angle is from 5° to 12°.
- The length of the conical manual options is 55 – 170 mm, of which the cutting part occupies 24 – 90 mm.
- The maximum and minimum diameters of the cone reach 7.67 - 45.715 mm and 6.39 - 40.978 mm, respectively.
- As for machine reamers, in addition to standard options, there are models with an extended working part, the design and dimensions of which are specified in GOST 11175-70.
- Reamers with a diameter of 1 – 120 mm with an allowance for finishing are designated by numbers from 1 to 6.
- This numbering establishes a correspondence between the nominal diameter of the tool and its maximum deviations.
Teeth
- The number of teeth varies from 6 to 14 pieces, however, there are options for 16 teeth, which are used mainly on high-precision equipment.
- In general, the number of teeth depends on their own rigidity, and in inverse proportion.
- The more of them, the higher the cleanliness of the final hole, but the worse the removal of chips and the lower the strength of each tooth.
To make it easier to control the reamer diameter, the number of teeth is always set to even.
- Depending on the inclination of the teeth relative to the axis of rotation of the tool, the reamer can be straight-toothed or helical.
- In addition, different models may have equal or different pitches, that is, the distance between adjacent teeth.
- As for sharpening, there are sharpened (pointed) and backed teeth.
GOST
A fairly large number of regulatory documents have been developed for sweeps, among which the main ones are:
- GOST 29240-91 – types, definitions and terms.
- GOST 11173-76 – for models with allowance for finishing.
- GOST 7722-77 – for manual options.
- GOST 1672-80 – for one-piece machine models.
What is the difference between a reamer and a drill?
A drill is a tool that creates holes by drilling into a material. Reamers are physically incapable of drilling, but bringing already formed holes to the required dimensions is exactly what they are created for.
Both tools are similar in appearance, however, they are not interchangeable, that is, each of them is capable of performing only the task for which it was created.
It should be noted that the holes after the drill almost always have deviations in geometry, which are eliminated by reaming. The surface accuracy after using the latter is equal to quality from 6 to 9, while the roughness (Ra) is 0.32 - 1.25 microns.
Types of scans and their prices
Mechanical processing of holes can be performed with tools of different designs.
Solid scan
It has a monolithic design and is widely used due to its relatively low cost (from 20 rubles per piece). Solid versions are cast from high-speed or tool steel.
Mounted
- It is a tube, on the outer side of which there are teeth, and in the center there is a hole for installation on the shank, which is then mounted in the machine chuck.
- The diameter of such an instrument can reach 30 cm.
- Cost 300 – 1300 rubles.
Combined
It is a combination of two tools at the same time, and/or has two working surfaces. A striking example: a countersink reamer.
Unregulated
With fixed diameter.
Adjustable
Essentially a universal reamer, the diameter of which can reach 50 mm. This is a special tool that, due to the ability to adjust the diameter (albeit within small limits), can replace several non-adjustable options.
According to the adjustment method, it can be expanding or sliding. The average price is from 350 rubles, but can exceed 3 thousand rubles.
Awl-reamer
Designed for manual adjustment of holes in soft and thin materials, such as plastic, cardboard, plywood, thin and soft metal.
There are two options:
- tetrahedral, differs from a regular awl by a tetrahedral tip of small diameter, mainly used for paper;
- collapsible - consists of two parts: the handle and the tip itself. Here the hole diameter can be expanded to 14mm.
According to the shape of the working part, the development is:
Cylindrical
For use with standard holes. Cost – from 50 to 100 rubles.
Conical
For processing both standard and conical holes, resulting in only a conical hole to fit the dimensions of the tool itself. The shape resembles a cone with a cut off top.
Price – from 50 rubles per piece, depending on the taper and diameter.
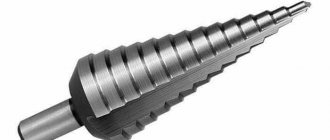
Stepped
It is much less common and looks like a conical version, but with a stepped bevel. Used for making holes in sheet metal.
Also, the division of the tool is carried out according to the accuracy of its work:
- According to the quality for cylindrical models.
- According to the quality of processing for conical. This can be a rough reamer (grinding, with teeth arranged continuously along the entire length), an intermediate reamer, and a finishing reamer for final finishing.
- By numbers from N1 to N6 for cylindrical options with calibration allowance.
According to the method of operation for which the tail section is manufactured, the reaming can be:
Manual
- For installation in a driver, with a square shank.
- The diameter usually does not exceed 50 mm, and as it increases, the difficulty of turning the tool increases due to increased friction.
- Price – from 20 rubles.