Countersinking
To obtain a groove or hole in a metal surface, first of all we need to drill it. This is always the initial stage. But before the development stage, the resulting recess must also be cleaned. That is, remove all kinds of metal layers, burrs, and irregularities. And adjust the accuracy to the parameter indicated in the drawings. It is this stage of processing, almost finishing, that we need.
For this, a special tool is used - a countersink. With it we can achieve:
- Accuracy class adjustments up to level 4, and in some cases even level 5.
- Increasing the level of adhesion of the coating, giving it a uniform and rough surface, which is important for subsequent adhesion.
- Working with geometry. That is, the ability to give an object a conceived geometric shape with symmetrical edges.
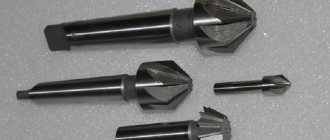
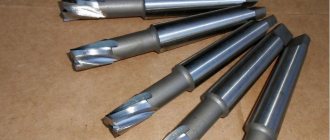
Let's return to the tool with which the entire technical process is carried out. Despite the external similarity, the differences between a countersink and a drill are very serious. And precise, more cutting edges and larger jumpers between them. As a result, we get from 3 to 4 edges. And together they exert smooth pressure on the metal and reliably adhere to the surface. And what is equally important, they do not remove the chips longitudinally, but only transversely. The result is a kind of intensive grinding.
The species diversity of this instrument is quite extensive. The main aspect is the number of cutting edges. 3 and 4 are often used. But there are also specialized tools used in special production areas. Where there is a need for high-precision processing. Such devices have up to 8 edges. Also, classification often affects the type of rod. It can be removable, which is usually necessary when working with large hole diameters. Up to 20 mm. And if the production concerns small grooves, around 8-12 mm, then it is better to use a one-piece device. There is also a plug-in option, which should be called an intermediate link between the designated types.
TOOLING - BEARING CENTER
There are three main methods for making a helical flute in a drill: ground profile, milled profile and screw rolled. In production, the cheapest method is screw rolling, which consequently sacrifices quality. This does not bother domestic companies and they massively purchase these drills from China. Moreover, they are made from the cheapest steel 4241 (less than 3% tungsten W) and are marked P6M5. In principle, they are quite suitable for woodworking.
Drill sharpening
If you work with wood, you don't need to sharpen the drill for years. It's a different story with metal drills. They are made of high-speed steel and the hardness of the working surface reaches HRC 62-64. The most common steel grades are P9, P6M5, P18 and P6M5K5. A special place is occupied by carbide drills made of VK8 and VK6M alloys, which are manufactured both monolithic and with brazed plates. A significant number of types of drills also determines different approaches to their sharpening and regrinding.
The type of material being processed also plays an important role, on which the angle of the drill depends. For drilling structural, alloyed and similar steels it is usually 2φ118°, and for softer steels 2φ135°.
When sharpening and regrinding, not only the cutting angle φ must be obtained, but also the rear angles α 8-18° necessary for cutting and the back of the head. This will prevent the rear surface from rubbing against the bottom of the hole. The quality of sharpening is assessed by the axial runout of the edges δ, which depends on the error in the circumferential pitch of the grooves Δ and the eccentricity of the core ω. The non-straightness of the cutting edges should not exceed 2 δ.
The runout can be easily checked with a dial gauge indicator, which is mounted on a stand.
When processing brittle materials, wear occurs along the back surface and corners, and when processing viscous materials, wear occurs along the strip. In addition to wear and tear, polyps can form on the ribbons. The main task is the consolidated placement of the chips formed during the drilling process in the drill flute. Various sharpening methods are used, among which the most common are screw, compound screw and two-plane for drills with brazed carbide plates. To extend the service life of the drill, a sharpening of the jumper is often used, since it essentially does not cut, but scrapes. Reducing the length of the bridge reduces heating and premature chipping of cutting edges.
Sharpening is carried out using abrasive wheels, both straight profile made of normal 25A electrocorundum, and cup-shaped CG wheels. Finishing is carried out with wheels made of green silicon carbide 64C. Sharpening of carbide drills is carried out with diamond discs of disc and cup shape 12A2. Diamond pencils are used to edit circles. When sharpening, it is advisable to use gloves and safety glasses to avoid injury.
When sharpening, do not allow the drill to overheat, as cracks may appear and the carbide plates may peel off. In order to avoid this, it is necessary to periodically cool the drill with liquid. For cooling, you can use ordinary water, but cutting fluid (coolant) is much more effective, which should not be forgotten during the drilling process. Selecting a drill for thread cutting
Countersinking
Countersinking holes is a completely different operation. Often in various connections of metal structures it is necessary to get rid of the head of the fastening element or other hardware or protruding parts. To do this, it is necessary to make a recess directly next to the groove, where, as a result, the protruding part will be safely hidden. Such a small “pocket” has a colloquial name - secret. To create them, special tools and a procedure are used, most of which are similar to drilling. But, as it becomes clear, it has its differences. This is the process we are looking for.
As a result, a countersinked, countersunk hole is allowed in a variety of shapes. It all depends on the applied pressure, the shape of the working tool, and the requirements. The depth also differs, depending on the size of the cap that needs to be hidden. This process allows you to solve a huge number of problems in an enterprise:
- Changing the support plane in prepared grooves. As well as adding new recesses to them, which do not change the structure of the original slot. It is especially important not to stray from the center in width, otherwise the structure will turn out unsuitable for use.
- Creation of longitudinal channels with a chamfer.
- Complete concealment of various threaded connections.
The features of the technological operation mainly depend on the material. If you have to work with a solid resource, such as cast iron and various alloys, then as usual you need to supply an emulsion to the contact point to reset the temperature. After all, the metal will get very hot. Also, when working with hard material, it is necessary to set the shaft speed higher. And if the surface is soft, then lower, to avoid excess threading.
Countersinking and countersinking, the difference between the processes
Distinguish the multitude. It’s easier to say that the procedures are the same. Basically, that's where we'll start. Both processing options are driven from the same source. A motor with a shaft, a machine, a device – it doesn’t matter. The main thing is the supply of torque. At the same time, there are a lot of differences in the type of impact on the surface. Let's start in order.
The countersink is designed for cleaning. This is a tool that removes all irregularities and brings holes to perfection. He polishes it and gets rid of the mustache. It also affects its overall shape. That is, the rod is usually larger than the groove. And he can make it larger, align it along the edges, give it a geometric shape.
This is how a countersink differs from a countersink; the difference mainly concerns the fact that the device itself does not affect the structure of the connector in the second type of processing. He only chamfers at first or makes a small indentation. So that when we screw the bolt there, for example, it doesn’t go completely into the surface, along with the head. And on top it was possible to install a new covering without openings.
It is also worth remembering that the processes have completely different stages. More precisely, the first type of work has its own stage. Immediately after drilling, before reaming, you need to align the groove along its entire symmetry and get rid of wall defects. And in this form, move on to the next stages. But, in fact, the operator can make a cut along the head at any time when it is convenient for him. Although it is best to do this after the final processing of the hole. To accurately represent its volumes. Yes, it is logical to carry out the countersinking of the chamfer at the end.
The mechanism of this action itself is as follows:
- First you need to completely measure the hat, which you will have to hide later. And here it is important to identify both the usual dimensional aspects - height, width, and more specific ones, such as bevel. Usually it is present if the fastener itself is, in principle, designed to be hidden.
- Select a cutting tool that accurately matches the dimensional aspects. Place it in a machine or other device.
- Fix the object with the groove, identify the correct axis point. An error of any percentage will lead to the fact that the cover will simply “fall off” the mark.
- Set the required speed. Either use standard regulations in production, or calculate the speed yourself, based on the hardness of the metal.
- Turn on the equipment and perform the operation.
Follow the rules when working with a counterbore
When performing counterboring, you must adhere to a number of rules:
- When counterboring open surfaces, it is recommended to fix a stop on the tool shank. The simplest method is to use a thrust nut with a lock nut.
- When counterboring recesses for hardware heads, a tool with a vertex angle of 90° is used. Reducing the angle is carried out in cases where, after counterboring, a cut remains on the surface of the hole being machined.
- Making holes for hardware is carried out in two stages. First, a hole is drilled to a certain diameter, then the hole is given the desired shape and size by counterbore.
- The counterbore guide should not be in full contact with the bushing. Contact with screw strips is acceptable. Violation of this rule can lead to jamming of the counterbore in the bushing as a result of strong heating of the workpiece and metal-cutting tool under the influence of high rotation speed of the machine spindle.
- Hole alignment is ensured through the use of counterbores with guides.
- When securing an end countersink in a quick-change chuck, it is recommended to place the cutting teeth at both ends.
- To process workpieces made of high-hard metals, you should use tools with carbide inserts.
- For processing brittle alloys, it is recommended to use single-tooth screw end countersinks with a radially located front surface.
Compliance with the rules guarantees perfectly accurate sized holes.
Main types of countersinks
Now let's look at species diversity. We have already clarified that the procedure may vary depending on the required task. Now we will analyze these points in more detail. Look at existing classifications.
Cylindrical
An operation of this type is often used in almost any type of production. The result is a cylindrical recess. It is an ideal choice for screws and bolts. And these fasteners in standard format are common in almost all designs. In fact, this is the most popular and current type of countersinking holes in metal.
Conical
The result is a cone-shaped depression. It is used not only for closing caps, but also for chamfering and preparing the surface for further work. Sometimes this method is used to simply remove metal hair from sharp edges. That is, they are cleaning. And here, the difference between the procedures becomes minimal. After all, countersinking and countersinking a recess are both methods of cleaning and grinding. True, in the first case, the alignment of a strict geometric shape is also added.
For production activities, a conical-shaped tool is used. The angle is selected for a specific task. But usually used at 90 or 120 degrees.
Flat and end
This method is sometimes called countersinking. A special final type of operation. Used in ready-made recesses. So that the caps themselves and other hardware for concealment fit tightly and without gaps. To do this, the surface is cleaned. And this is where we need these varieties.
In fact, counterbore and countersink are a small difference. It’s just that this is a narrower activity, which has this name only for flat or end stripping.
The difference between countersinking and related operations
We have already found out that this stage occurs after drilling and before deployment.
But the initial stage is not always drilling. Sometimes the first stage is considered to be casting or stamping. In this version there may be even more defects. Various sagging, layering of metals, beveled walls, serious rough protrusions and the like. Accordingly, it will definitely not be possible to finish the surface for a final look in one stage. It is worth understanding that deployment is already a finishing process; it cannot cope with serious defects. Doesn't fit the shape. Countersinking will almost always raise the accuracy class to level 5. If the work is done using high-precision equipment, and it is also performed by professionals, then class is achievable. But unlike drilling, the process is longer. You will have to perform almost twice as many tool movements.
The most important difference from drilling and reaming can also be the level of permissible roughness after processing and quality, that is, the degree of compliance of the resulting part with the original parameters in the drawing or diagram. The first stage - drilling usually leaves a “whisker” of 20 microns, and the degree of accuracy can reach up to 12. After grinding with a countersink, the surface will be cleaned to 2-3 microns, and the quality will increase to 9. Finishing brings the hardware to full readiness. The roughness drops to a threshold value of less than 1 micron, and the degree of accuracy is around 6.
That is, the differences are clearly visible. This includes the degree of quality, duration, and sequence. But if you compare a countersink and a countersink, the difference will be even more obvious. After all, these are, in principle, actions from different spheres.
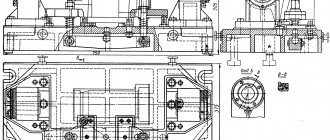
GOST 14953-S. 13
mm
| Table 4 |
| Dimensions in mm Table 5 |
| * Size on small diameter. |
| Dimensions in mm Table 6 | ||||
| GOST 14953-80 S. 15 | D | d | L | / |
| 2353-0083 | 5,0 | 2,00 | 45 | 3,0 |
| 2353-0084 | 6,3 | 2,50 | 50 | 3,7 |
| 2353-0085 | 8,0 | 3,15 | 4,7 | |
| 2353-0086 | 10,0 | 4,00 | 56 | 6,0 |
| 2353-0087 | 12,5 | 5,00 | 63 | 7,4 |
| 2353-0088 | 16,0 | 6,30 | 71 | 9,5 |
An example of a symbol for a countersink type 2, diameter D = 5 mm:
Countersink 2353-0083 GOST 14953-80 Type 3
Countersink designation | Applicability | d | D | D\ | L | / |
| 2357-0001 | 0,80 | 5,0 | 1,55 | 35,5 | 0,82 | |
| 2357-0002 | 1,00 | 6,3 | 2,00 | 1,13 | ||
| 2357-0003 | 1,25 | 7,1 | 2,40 | 40,0 | 1,21 | |
| 2357-0004 | 1,60 | 8,0 | 3,10 | 45,0 | 1,52 | |
| 2357-0005 | 2,00 | 10,0 | 4,00 | 2,20 | ||
| 2357-0006 | 2,50 | 12,5 | 5,00 | 50,0 | 2,60 | |
| 2357-0007 | 3,15 | 14,0 | 6,40 | 3,30 | ||
| 2357-0008 | 4,00 | 16,0 | 7,90 | 56,0 | 4,20 | |
| 2357-0009 | 5,00 | 20,0 | 10,00 | 63,0 | 5,20 | |
| 2357-0010 | 6,30 | 25,0 | 12,50 | 71,0 | 6,50 |
An example of a symbol for a countersink type 3, diameter D = 5 mm:
Countersink 2357-0001 GOST 14953-80
| mm Table 4 |
| An example of a symbol for a countersink type 4, diameter D = 6.3 mm: Countersink 2353-0089 GOST 14953-80 Table 5 mm |
| Continuation of the table. 5 |
| An example of a symbol for a countersink type 6, diameter D - 10 mm: Countersink 2353-0108 GOST 14953-80 |
Countersinking Equipment
In principle, not only for this operation, but also for both, which appear in the review, an ordinary hand-held device is also suitable.
That is, a drill, and some even use a screwdriver. Of course, doing this is strictly not recommended. Even if there is, in principle, enough power for successful completion, there will clearly be a serious loss in accuracy. Whatever expert undertakes such an undertaking, he will not be able to 100% accurately align the center and axis simply by holding the device with his hands. This means that deviations are inevitable. The logical option would be a lathe. It is used in almost all cases. Sometimes it is replaced by a special processing center, multifunctional equipment. The essence does not change from this.
The tool itself that is needed is a countersink. It consists of two components. The first is the cutter. The type of processing depends on its shape and location. So, there are cylindrical and conical options, which we talked about above, reverse and others. What is reverse countersinking of holes is easy to understand. This is the usual cleaning of the groove with a special nozzle. The second part is the tail. It is needed for fixation in the machine chuck.
Tools are produced from hard alloys of carbon and alloy steel. After all, the edge will have to work with a different resource. And among the materials in which it is necessary to make a recess there are often very hard ones, like cast iron. Accordingly, if the cutters are not higher in level of hardness, then at serious speeds they may simply break off or wear off prematurely. Which will lead to economic costs for the enterprise.
What is a countersink, systematization
A cutting tool for metal (countersink) allows you to countersink an opening in a part up to accuracy group 5. It is widely used for semi-finishing parts before mechanical reaming. According to its structure, it is divided into types:
- holistic;
- nozzles;
- tail;
- connected.
Externally, metal-cutting devices look like a simple small drill, but have an increased number of cutting edges. The correct dimensions of the opening of the workpiece being processed is determined by the gauge. The tools are fastened in the unit's chuck with the support of the shank.
To cultivate openings with a diameter of up to 10 cm, attachments with 4 points are used. Their main feature is fastening through a mandrel. The presence of a chamfer on the teeth of the element made it possible to achieve correct adjustment of the cut.
The correct process for countersinking metal
Mistakes when performing a task almost always lead to one sad epilogue - marriage.
If the countersink is chosen incorrectly, the hole diameter often turns out to be larger than what was planned according to the initial drawing. And if the cutting edges have already become very sharp, then the recess, on the contrary, will be too narrow. It is important to choose the feed speed, as well as clearly define the center. Otherwise, the geometry will be broken. And even without displacement, the quality of cleaning will definitely not be satisfactory according to the threshold values. In order not to accumulate waste and not perform one task several times, you need to initially approach it responsibly.
Deployment as a way to ensure maximum accuracy
As we have already clarified, finishing is often mandatory. But there are tasks where it is actually not important. That is, if, according to the regulations, the hardware has 1 accuracy class, then the quality must correspond to a value of 6-5, and the tolerance should not be higher than 1.3 microns. Of course, without deployment it is impossible to achieve such results by definition. But for class 5 accuracy it is enough to have a quality of 12 and a tolerance level of 21 microns. And the groove can boast of such parameters even after regular countersinking. Accordingly, the subsequent stage will simply not be needed.

