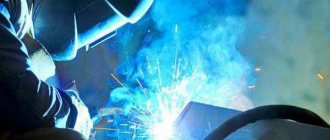
Welding metal parts has been known to mankind for a long time. However, with the development of metallurgy, the emergence of new alloys and compounds, technology began to improve in order to meet all the requirements of emerging realities. Any novice welder needs to learn more information about TIG welding: what it is, how to use the equipment, what strengths and weaknesses it has.
TIG welding
What is TIG welding?
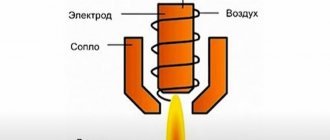
Before moving on to a description of the equipment and an analysis of the advantages and disadvantages, it is necessary to understand the principles of technology and the features of TIG welding. TIG welding is a method of joining metals that uses a tungsten electrode with a shielding gas. The rod is considered “non-melting”. The welder must sharpen it before use to ensure a stable arc and a straight weld.
The tungsten electrode is fixed in the torch in the center of the nozzle. At the edges of the burner there are holes through which protective gas is supplied. Argon is used for this. It protects the welding site from the formation of an oxide film. Additionally, filler wire must be used. It is desirable that it be made of the material that needs to be welded.
History of appearance
Welding has been known to mankind for decades. The idea that it was possible to join metal parts under intense heat first appeared at the beginning of the 20th century. Charles L. Coffin, an American engineer, thought about creating such equipment. However, the first samples of equipment did not allow the device to be used in industrial conditions or to weld metal alloys.
A non-consumable tungsten electrode and a shielding gas (inert helium) were first tested in the 1940s. Using this technology, it was possible to combine aluminum, magnesium, and nickel. The method became popular in aircraft and rocket engineering, and then gained popularity among other areas of industry.
Description of the welding process
So, the whole process will combine the following actions:
- Cleaning the surfaces of each part.
- Installation of the bottom lining.
- Installation of parts on the lining.
- Setting the gap width, as well as fixing the parts motionless.
- Laying electrodes between parts.
- Installation of protective gasket, steel and copper lining.
- Starting the welding arc.
- Cooling and cleaning the weld seam.
To begin with, the electrodes should be installed in the holder, and then you can place them between the parts - this way the mass will be connected to the bottom lining. The maximum permissible length of a seam to be welded in one procedure will be 120 cm, because with a longer length premature overheating of the electrode residues occurs.
It is interesting that welding with a lying electrode is most often used to form straight seams, but it is allowed to bend the electrode according to the shape of the intended seam by no more than an angle of 30 degrees, because bending can lead to the coating starting to crumble and the electrode to break during welding . For the same reason, the use of several joining electrodes instead of a single long one is not allowed.
A paper pad between the copper pad and the parts is used to prevent premature wear of the pad, and it is worth making sure that the edges of the pad do not stick out, because they have the property of spontaneous combustion when welding, which can cause a fire.
You can start an arc in two ways at once:
- The second electrode, which is connected to the device.
- A piece of unnecessary metal.
If you are using a stationary type welding machine, then it is better to start the arc with the second electrode, which is installed in the holder, and it is very important that the holder is secured (the one in which the electrodes are clamped). The fact is that the attraction that occurs when an arc appears can pull the recumbent electrodes from under the gasket. To start an arc with a piece of metal, use a piece of material to connect the edge of the part that is being welded and the end of the electrode. Please note that during this process the piece of metal should be held in electrically insulating gloves.
Despite the fact that the welding arc will be hidden under the surface of the copper plate, the welder is required to use special eye protection because the arc radiation is always visible at the beginning and at the end of welding. Moreover, there is a high risk of the insufficiently heavy pad being thrown back when welding and opening the arc. You can place the metal for welding in the same plane or at different angles to each other, but in this case the gap between the parts is not established, and the overlay is adjusted to the shape of a truncated corner in the section.
Please note that loose flux can be used together with copper pads, and in this case the electrodes must be taken without coating. The use of flux for lying electrode welding makes it possible not to limit the length of the weld that will be formed in one procedure. Moreover, the uncoated electrode can be bent to a greater angle when welding parts with bends.
When you need to weld 3-4 parts at once around one main seam, the items should be arranged in this order:
- Place the largest piece down.
- The sides should have similar shaped parts.
- We place the lightest part on top of the electrode itself.
The upper part must completely cover the recumbent electrode and must be pressed with a load (usually bricks are used for this). To weld more than two parts at the same time, it is best to use a bundle of 3 or 7 electrodes.
Using a recumbent electrode, you can form not only joints, but even weld flat sheets of metal that overlap. To do this, the top cover should be made in the form of a longitudinal metal bar, in which a groove for the electrodes will be made. The overlay should be placed on sheets that are overlapped, with the groove with the electrode facing down, and the sheets will be melted through (provided that their thickness is up to 0.8 cm), or only the top sheet will melt completely (and the bottom sheet is very thick) .
Advantages and disadvantages
Any technological process has strengths and weaknesses. Advantages of argon TIG welding:
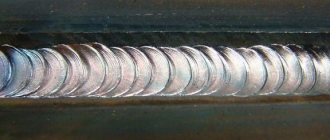
- Thanks to the use of protective gas, the seam is uniform, without pores, cracks, or voids. Argon protects the heated surface from the oxide film formed when hot metal interacts with oxygen.
- Internal stresses generated during welding without shielding gas are reduced.
- Metal does not splash.
- After welding, the products do not require additional processing.
- TIG welding can be used to join most known metals and alloys.
- It is enough to try to operate the equipment 2-3 times to master the skill of creating high-quality, beautiful seams.
Disadvantages of TIG welding:
- When using equipment outdoors, the connection point must be protected from the wind. Air flows disrupt the direction of movement of the protective gas, deteriorating the quality of the seam.
- It is necessary to carefully prepare the work surface.
- You cannot select an acute angle of inclination of the torch relative to the workpiece. This complicates the workflow.
- At the place where the electric arc ignites, a mark remains that will need to be cleaned off.
Considering the shortcomings of TIG equipment, you can prepare for possible difficulties during welding operation.
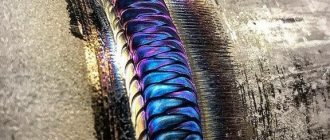
Beautiful weld seams
Application
Since TIG technology allows you to connect many metals and alloys based on them, it is used in various areas of industry:
- Automotive industry, manufacturing of parts for industrial equipment.
- Space industry.
- Construction of ships and airplanes.
- Manufacturing of medical instruments.
- Construction, creation of power tools.
TIG technology is often used at home. Using machines with tungsten electrodes, car body parts are welded and radiators are repaired.
Modes
TIG equipment operates using unipolar or alternating current. Each of the individual TIG welding modes is used for different materials.
TIG welding mode
D.C
Equipment operating on direct current has certain advantages. These include:
- The efficiency of the work process increases.
- You can weld parts to great depth. The seam is narrow, but deep.
- The speed of the welding process increases.
The minus is fed to the tungsten electrode, the plus goes to the workpiece. Equipment operating on direct current is suitable for joining alloy steels and stainless steel.
Alternating current
Equipment during operation of which there is an automatic change of minus and plus. As the reverse polarity increases, the surface is more effectively cleaned of the oxide film.
Gas cutting and welding machine
Gas welding involves heating the part until it melts with a high temperature flame . In this case, flammable gases are used - hydrogen, natural gas, acetylene. A distinctive property of these gases is their good combustion in air. Most often, acetylene is used in gas welding machines, which is easily obtained using calcium carbide and water. The combustion temperature of this gas is 3200–3400 °C.
Advantages of gas welding and metal cutting:
- Simple technology.
- No access to the electrical network is required, no need to use electric current.
- The equipment used for welding is quite simple.
It should be noted, however, that gas welding will not provide high speed and productivity, because it can only be done manually.
When gas welding, serious attention is paid to preparing parts, regulating the power of the torch, and installing it in the desired position.
Equipment
The welding process can be carried out with shielding gas and a non-consumable tungsten electrode using a conventional inverter with a torch that can supply gas. However, there are two types of specialized tools:
- TIG inverter. It is complemented by a block that can generate direct or alternating current. Thanks to this, the functionality of the device increases. Makes it possible to work with steels, aluminum, alloys.
- Welding rectifiers. The device converts alternating current into direct current. It is a professional device.
Equipment and consumables must be selected depending on what metal or alloy will be processed.
Inverter TIG welding
Algorithm for assembling a welding machine
After purchasing the installation, consumables, and connecting elements, you need to assemble the individual parts and mechanisms together. Assembly steps:
- Connect the oscillator to the inverter.
- Secure the wire responsible for ground to the terminal marked with a plus sign.
- The wire that is connected to the burner must be connected to the terminal with a minus sign.
- Attach the burner to the sleeve through which the gas flow will be conducted.
- Prepare an argon cylinder. Screw on the gearbox.
- Secure the gas supply hose to the reducer.
- Connect the inverter to a common network - 220 V. The oscillator must be powered from a power supply that produces 6 V.
To avoid mistakes when connecting elements, you can watch diagrams and training videos. After assembly, you need to configure the device. The quality of the work performed will depend on this.
Inverters
Devices of this type are also called pulsed. Today, welding inverters are considered one of the most common devices due to their light weight and general availability. And if 10 years ago inverters were expensive and not very reliable, now these shortcomings have been eliminated . The use of inverter technology today results in a reduction in the size of the transformer, an increase in the quality properties of the arc, optimization of efficiency, and a reduction in metal spatter during welding.
The welding inverter consists of a power transformer, the purpose of which is to reduce the mains voltage to the required value, a block of electrical circuits and a stabilizer choke, necessary to minimize current ripple.
The supply voltage is supplied to the rectifier in the inverter, at the output of which a circuit block transforms direct current into alternating current with a high frequency. This alternating current, obtained at the output of the power unit, is supplied to a high-frequency welding transformer, which is more compact and lighter than a conventional network converter. The voltage at the output of the welding transformer is rectified again and supplied to the arc.
Welding technique
The DIY welding process requires preliminary setup of the machine. To do this, the welder needs to perform a number of actions:
- When using non-consumable tungsten electrodes, they must be prepared in advance. The working rod must be sharpened using a needle file.
- After sharpening the electrode, it must be installed on the burner. A collet clamp is used for this.
- Open the valve on the argon cylinder. Using the reducer, set the operating gas flow rate. The optimal rate is 13 l/min.
- Fix the mass on the workpiece or metal work table.
- Turn on the oscillator. Bring the burner to the metal surface.
- After pressing the power button, a spark will appear. Open the gas supply to the burner.
The distance between the end of the electrode and the working surface must be at least 3 mm. You can guide the pointed part in different ways. If you increase the distance between the tungsten tip and the metal, the seam will become wide and the welding depth will decrease. When connecting thin workpieces, you need to move the torch from right to left. To make a root seam, you need to guide the electrode evenly. Corner joints are connected at an angle of 45 degrees.
TIG welding is used to join metals and metal-based alloys. The shielding gas used during the work prevents an oxide film from appearing. It is important to set up the equipment correctly, sharpen the non-consumable electrode before work, and keep the arc at the same distance from the workpiece.
Transformers
The transformer is the most traditional type of electric welding machine. At the same time, it is one of the simplest in design. The main design element of this type of welder is a step-down transformer, which converts the mains voltage to the value required for welding. The current strength is changed using different techniques, the most well-known is the displacement of one winding relative to the second. As the gap between the windings changes, the current changes.
A feature of welding transformers is considered to be alternating current at the output, which leads to noticeable spattering of metal and deterioration in the quality of seams. In order to weld non-ferrous metals and improve the quality of arc combustion, fairly massive and bulky components must be added to the structure of the apparatus. The main element - the transformer - is also not compact and light in weight. When using the device for serious work, specific (for alternating current) electrodes and considerable experience of the welder are required.
The efficiency of the device is quite high, reaching 90%, but part of the energy is spent on heating. Cooling is carried out using fans of different power, since it is necessary to cool a unit weighing several tens and sometimes hundreds of kilograms. The use of this type of welding machines is declining today, but they are still in demand due to their low cost, reliability and durability. Transformers are used for welding low-alloy types of steel .