Free air conditioning
Technically it should be called a heat exchanger, we lovingly call it a water cooler, but it's been providing us with free cold air for over 20 years, so it definitely works. Soon after moving, I noticed that the water from our well was really cold, up to 10 degrees Celsius. I built this heat exchanger to harness this source of cold for use in the house in the summer, and as a by-product it warms up the water going into the garden a bit before it hits the plants, since the plants don't seem to care much for super cold water. Good benefits all round, and since I'll be pumping the water outside anyway, the only real cost is the power of the box fan to push air through the copper pipes.
How well does it work? We reached a high temperature of 44 Celsius in July, the hottest I remember. The temperature inside was 24 degrees with the cooler running all the time. I almost didn't want to go out to move the sprinkler. Flaws? Well, you have to move the sprinkler a lot, but it keeps the grass green. Also, if the humidity gets high, water will condense on the heat exchanger just like it would on a glass of cold water. So I keep towels underneath to absorb moisture. If it gets really stuffy, I have to change the towels several times a day. I just hang wet dishes in the heat to dry and spin dry ones under the cooler. It takes some skill to put it together but once it's done it requires no maintenance except for the time I left it outside before putting it away for the winter and it froze the remaining water in the pipe and broke it . Make sure to drain the water from it and store it where it is above freezing. Another downside, the air conditioner is not pretty, but it is unique and truly “green.”
Consumables:
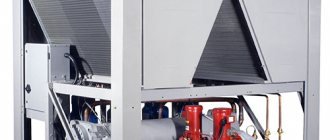
Description of industrial chiller
Chiller (water-cooling machine) is a device for cooling liquid through a vapor-compression or absorption refrigeration cycle. After the temperature has decreased, the liquid is used to cool the air in the heat exchanger (fan coil) or to remove heat from equipment.
Operating principle of an industrial chiller
The device is used in various industries. A cooling unit in a connected system with a fan coil is used in some models of air conditioners.
Operating principle of an industrial refrigeration plant
In production, special absorption chillers are used as a rapid heat removal unit. It is necessary to ensure the operation of various industrial equipment that generates heat. The chiller selects and removes excess heat and maintains the optimal temperature and thermal conditions of the equipment. Lithium bromide in water is used in industrial installations as a liquid that absorbs gas in full.
During the cooling process of water, excess heat is released, which is released into the environment.
The industrial installation consists of two blocks:
- top - generating hot container with relatively high pressure;
- lower - includes an evaporation tank and a section with an absorbent.
Nature of operation of the installation:
- The heat from the generator affects the absorbent, which releases water vapor.
- The steam is transferred to the condenser and turns into a liquid state, giving off heat to a special reservoir of water.
- Having lost heat, water from the condenser is supplied to the evaporator.
- Here the water evaporates under pressure, absorbing heat from the refrigerated circuit (chiller).
- By pumping boiling water through a pumping unit, heat transfer is enhanced.
- At this time, the remaining absorbent concentrate is transferred to the absorber, where gas is absorbed from the evaporator and heat is released.
- The exhaust circuit removes heat from the absorbent container outside the installation.
- After the heat is removed, the resulting water and absorbent are again transferred to the generator.
Diagram of a chiller in production
Advantages of chillers over compression refrigerators:
- small amount of energy consumed;
- low noise emission during operation;
- environmental friendliness, because the working substance is plain water, not freon;
- absorb the released energy;
- long period of effective operation;
- industrial safety;
- ease of control.
- price;
- the need for a source of hot energy;
- heavy weight;
- high water consumption of the system.
Chiller for beer production
Water cooling machines are actively used in beer production. It is used to cool the wort. When receiving malt liquor, you need to quickly reduce the temperature. The quality of the drink depends on this. This broth contains beneficial and harmful bacteria. Beneficial elements are preserved at temperatures above 60°C, and all harmful bacteria die. But with slow cooling after 60°C, the likelihood of the appearance of harmful microorganisms increases. Therefore, it is necessary to reduce the temperature quickly.
Cooler at a beer production plant
The importance of the speed of the production process is also reflected in the fact that the fermentation process and the addition of yeast can only be carried out at a favorable temperature of about 20°C.
When the broth cools slowly, a large number of bacteria are formed. Yeast, when added, will not be able to absorb excess microorganisms. The drink will be spoiled. Slow cooling also impairs the commercial quality of the product.
Aluminum fixtures
The most popular LED heat sink is made of aluminum. The main disadvantage of the device is that it consists of a number of layers. This inevitably causes transient thermal resistance, which can be overcome with the help of additional heat-conducting materials: adhesive substances, insulating plates, materials for filling air gaps.
Aluminum radiator for LEDs is used more often than others. It is subject to pressing and does an excellent job of dissipating heat.
An active level of cooling typically requires a flat sheet of aluminum no larger than the size of the luminaire. The sheet is blown by a fan.
The suitable temperature for LED operation is 65 °C. However, the lower the temperature, the higher the efficiency level of the device and the longer its resource. The optimal temperature of the radiator surface is considered to be 45 °C, but not higher. For a 1 W diode, it must be installed on an aluminum radiator. The radiator area is 30-35 cm2. A 3 W LED radiator will require a doubling of area and will be 60-70 cm2.
An aluminum device is best suited as a radiator as it is the lightest and relatively inexpensive. When calculating a device for LED matrices, a proportion of 35 cm per 1 W is taken.
For active cooling systems, the radiator area can be 10 times smaller. A 1 W LED is enough for 3-3.5 cm2.
For example, consider a star radiator for LEDs. The device is used to remove heat from the LED and is a small radiator. It is based on a plate made of a composite material - aluminum is used, which removes heat from the LED, and copper foil with contact pads. The radiator is mounted on LEDs with a high power rating (1-3 W).
Making a chiller yourself
To quickly cool liquids at home, you can make a chiller yourself. Let's figure out how to make a chiller with your own hands.
Necessary materials
Requirements for materials for a do-it-yourself chiller:
- good thermal conductivity;
- suitability for food use;
- possibility of processing at home;
- strength;
- withstands temperatures up to 100°C.
Glass fits these criteria perfectly, but the problem arises with one parameter - the possibility of processing. Silicone is not suitable. It does not withstand high temperatures well and does not have the necessary heat transfer parameters.
There remains one type of material - metal. Options include aluminum, copper and stainless steel. With stainless steel there are complaints about price and heat transfer. Aluminum oxidizes and is unsafe for health. The best choice is copper.
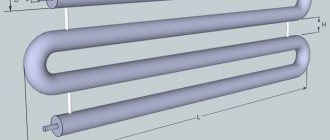
Homemade chiller made from water pipes
What parameters need to be decided on:
- Tube diameter. A larger diameter will ensure a high level of heat transfer.
- The number of turns in the circuit. The more turns, the better the heat transfer.
- Overall coil diameter.
When calculating the required parameters, it is necessary to determine the volume of the container into which the chiller will be immersed to remove heat.
The diameter of the coil and the diameter of the tubes must ensure free immersion and maintain the same distance from the device to the walls and center of the container. You can make any distance between the turns, but the closer they are to each other, the more they can be created.
Cooling unit for aquarium, swimming pool, hot tub
The second option seems more effective, because it involves the use of specialized equipment. Chillers for cooling water in a swimming pool, vat of water and other structures are quite popular. By the way, you can make such a design for an aquarium with your own hands. It is not difficult. And besides, it’s cheaper than purchasing an expensive factory model, which most aquarists definitely cannot afford.
If everything is clear with a household chiller, then what about a swimming pool or plunge pool? To cool large volumes of water, only a special cooling unit is suitable, which costs a lot of money.
Manufacturing process
A small homemade chiller will require about 10-15 m. Create turns. To do this, you can use a strong stick or other suitable object. The tube is bent to obtain the required number of spirals so that the overall size allows the structure to be placed in a container.
A hose is attached to one end of the tube. We connect one end of the hose to a faucet or pump, and lower the other end into a sink or other available drainage device. Chiller is ready.
Using a copper chiller when brewing beer
The principle of operation of a do-it-yourself chiller:
- The device is immersed in the container.
- The hose is connected to the tap. The second end is lowered into the sink.
- Cold water turns on.
- Hot liquid is placed in the container.
- There will be a rapid loss of temperature in the liquid.
Using a homemade chiller
A self-made chiller may be required for the following purposes:
- cooling malt when making homemade beer;
- reducing the water temperature in the aquarium;
- creating optimal conditions in a small pool.
Brewing beer with a chiller
Having a homemade chiller will allow you to quickly cool any liquid at a convenient time.
Air conditioner chiller.
How to make a chiller from an air conditioner? — the question is actually the title of this thread.
The idea is quite simple. In our business, water is usually used to cool all kinds of moonshine iron. If the cooling system is closed (autonomous), then the water, after passing through the reflux condenser (distiller), is heated. You can cool it, for example, by passing it through a radiator blown with air. What if the air in the room is hot? Or you want to get the water colder, say 5-10 degrees, but in the room it’s still 25.
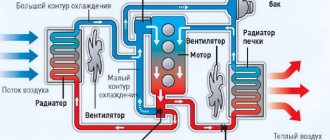
So I think the scheme is something like this. A storage tank, where there is a reserve volume of water, a supply pump, a heat exchanger-chiller, where freon cools the water by evaporation, our cooled piece of hardware, return with an additional air cooling radiator (optional) and back to the storage tank.
The question is the following: how to make a chiller (freon-liquid) from an air conditioner evaporator (freon-air)? I just don’t want to stick a standard evaporator into a jar of water. Maybe someone has experience of this kind or at least a link to the Internet with practical recommendations?
Last ed. 12 Apr. 10, 13:36 from igor223
Last ed. 12 Apr. 10, 14:04 from master24rus
master24rus
, there is an even simpler option - a coil in a container of water, from which the autonomous system pumps. The expansion valve (capillary) is placed at the inlet of this copper coil, which is the evaporator. Only this container needs to be thermally insulated from the external environment. I decided to do this in the morning, but suddenly there is a more elegant method.
What you are proposing is a flow-through heat exchanger. It’s also vital, although the “jar of water” you offer can, in principle, be reduced to zero. BUT - both here and there require small thermal and dimensional calculations. Which I'm too lazy to do myself. So I ask the collective mind. and he is still silent. almost silent))))
Okay, let's move on. The schematic diagram and operation of the window, which I am going to gut, is shown on this page
My window is different, but it doesn’t matter - they are all made according to almost the same design.
We bite off the evaporator, it turns out (most likely it will turn out) an air cooling radiator for return water.
The air temperature sensor, if it adjusts by 5-10C degrees, we put it in a barrel of water - if it cools below, the compressor turns off. If not, you will have to replace it.
My question is - what will happen if the water in the barrel cools down decently and the freon stops completely evaporating - then the compressor will fail. Who knows the answer, citizens?
Or am I again alone in the sandbox, playing with myself? )))
If the water in the barrel cools down decently and the freon stops completely evaporating, then the compressor will fail. Who knows the answer, citizens? igor223, 12 Apr. 10, 18:17
Last ed. 12 Apr. 10, 18:39 by SpankyHam
Well, here's a rough diagram.
Autonomous cooling with additional cooling of water to below room temperature.
For example, I use cold water to cool the product receiver during vacuum distillation and the vacuum distiller-shell-and-tube itself. This gives me the ability to work in a deeper vacuum (lower temperature). Yeast will live forever, gee-s-s.
Freon runs along its own contour, and water follows its own. Well, they change their temperatures. SpankyHam, 12 Apr. 10, 18:37
Great, quite satisfied. True - the compressor will rattle all the time - there is no cold storage tank - but to hell with it. We place it after the barrel of water; we do not insulate the barrel.
Freon needs to take two and a half kilos of heat from the water. (Nine air conditioners, and even then you don’t need that many - you just have it at hand)
How to calculate a heat exchanger made of two copper pipes - what is the diameter, what is the length?
The condenser coil is completely frozen with ice and nothing works anyway Master24rus, Apr 12. 10, 19:02
LED lamps with cooling radiator: types of radiators
LED lamps with a cooling radiator: types of radiators
LED lamps have firmly entered our lives, almost completely replacing incandescent lamps and energy-saving compact fluorescent lamps (CFLs). It can be assumed that the whole point is their cost-effectiveness, excellent technical characteristics (such as luminous flux, CRI, scattering angle), as well as their long service life.
Why do you need a radiator in an LED lamp?
The service life of the product is primarily influenced by the quality of the LEDs, as well as the driver, the correct operation of which directly affects the stability of the diodes.
However, during the operation of an LED lamp, its surface becomes dirty, which negatively affects the removal of the generated heat. Over time, the problem of overheating appears, which is associated with a decrease in the light output of the diodes until they fail.
To avoid this, increase the stability of the light sources. For this purpose, a radiator is provided in the design of each of them.
Types of radiators
A radiator is a structural element that serves to remove and dissipate heat from LEDs.
LED lamps with radiator cooling
LED lamps with a cooling radiator come in the following types:
- with aluminum radiator;
- ceramic;
- composite;
- plastic.
LED lamps with aluminum heatsink
These lamps belong to the standard or high class. The aluminum radiator in such products can be either a strip of metal or a structurally more complex aluminum base. Hence the division of such lamps into two types:
- with finned radiator;
- with a flat radiator.
LED lamps with finned aluminum heatsink
The most effectively protected lamps, the radiator of which is presented in the form of a multilayer structure with ventilation ducts. Due to them, the area of heat dissipation increases, which significantly increases the service life of LEDs, and also prevents their degradation over time due to overheating.
LED lamps with aluminum heatsink
Lamps with flat radiator
A flat radiator is less efficient than a finned one. Such a cooling element is used mainly in low-power lamps. Often, for more efficient heat removal, it has ventilation channels, and its dielectric surface is covered with a layer of special paint or varnish.
Composite radiator
LED lamps with a cooling radiator made of composite material are distinguished primarily by their affordable price. In such lamps, the element is a two-layer structure made of an aluminum strip coated with heat-conducting plastic.
Due to their low price, lamps with a composite radiator are the most widely represented on the market in the economy class segment.
However, such radiators cannot effectively remove heat, so the warranty period for products with them rarely exceeds 1 year.
Plastic radiator
The simplest option, it would be more correct to call it an imitation of a radiator. The element is a housing made of heat-dissipating plastic. The main differences between such lamps: low price, short warranty period, short service life (10,000-15,000 hours). In high-power lamps, to increase heat dissipation, the plastic radiator is made with additional massive fins and ventilation holes.
LED lamps with plastic radiator
Ceramic radiator
LED lamps with a ceramic cooling radiator are distinguished by high heat resistance, and the dielectric properties of the material allow LED modules to be mounted directly on the surface of such a radiator. The most common type of lamp with a ceramic radiator without a diffuser bulb is the so-called corn lamp.
LED lamps with ceramic cooling radiator
LED lamps with which cooling radiator to choose?
From all of the above, we can conclude that the quality of any LED lamp depends, among other things, on the quality of the radiator, or rather on the material from which it is made.
The most reliable, with a long actual service life, are considered to be LED lamps with an aluminum cooling radiator, as well as with a ceramic one (if such a light source does not have a diffuser bulb).
Plastic options can be preferred if such lamps will be used only occasionally and for a short time, for example, in closets and utility rooms.
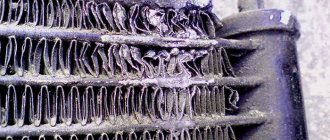
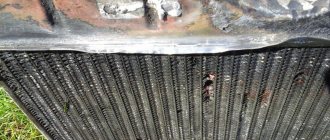
Do it yourself: freon chiller from an air conditioner
The idea of redesigning the cooling system of a laser machine has been in my head for a long time, but, as usual, my hands can’t keep up with my head. Initially, the work of cooling the “pipe” (laser emitter) was performed by a simple Chinese chiller, exactly like in the picture.
Its design is banal and simple: the liquid passes through a radiator made of an aluminum tube, which, in turn, is blown by a fan. Of course, there can be no talk of any temperature stability or power reserve. In the summer, a regular window air conditioner was purchased to accompany it, which simply cooled the air supplied to the chiller. The solution was temporary, but, as we know, there is nothing more permanent than something temporary.
The last straw was the upgrade of the machine to a more powerful “pipe”, which required more serious cooling. Initially, the choice fell on a Chinese freon chiller, but delivery times and costs turned out to be higher than expected, so it was decided to modify what was available. The system requirements were as follows:
• Stable temperature maintenance in the range of +8 ... +14 C • Autonomy • Ability to work in mode 247 • Less power consumption compared to the current system
The simplest thing that could be thought of was to immerse the cold part of the air conditioner in the liquid that directly cools the “pipe,” which is ultimately what was done.
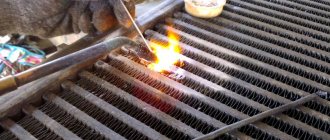
We disassembled both devices, so recklessly that we forgot to take a picture of it. The outer casing, the fan impeller that blows through the cold part, the insulation and a pair of tin walls were removed from the air conditioner. We took out all the electrics and the expansion tank from the chiller.
It was decided to make the reservoir for the cold part from PVC 6mm thick, since there was an abundance of plastic; it can be easily cut with either a router or a simple knife. And it's easy to glue. In addition, I didn’t want to disassemble the freon part of the air conditioner - I would have to re-pressure the tubes, refill, etc. The tank was glued almost in place, creating a rectangular box 360x300x90mm, which was connected to the expansion tank using two fittings mounted on sealant and a hose.
(I apologize for the quality of the photo - I only had an old iPhone at hand)
We glued the top cover of the tank with a bolt as a plug for the gas outlet (not shown in the photo)
We connected the pump, operation indicators and alarm system from the old chiller, charged the system (antifreeze was used as a refrigerant), and turned on the air conditioner in the “chill until victory” mode. Pretty soon the thermometer showed +5 degrees.
After some time, the temperature dropped to -2 and continued to fall. At this point, it was decided to stop the tests and work on the visual component of the device. The front panel and top cover were made from a piece of thin plastic, the air intake hole was covered with a mesh, and the tubes were thermally insulated.
Then came the turn of the front wall (with an air intake closed by a mesh and a window) and thermal insulation of both vessels.
The air conditioner thermistor was inelegantly glued to one of the hoses using blue electrical tape.
What we got as a result:
Pros
+
the temperature does not rise above +14 degrees, does not fall below the dew point
+
the air conditioner operates in auto-temperature mode and cools for about 5 minutes, the next switch on occurs only after an hour and a half (the declared power of the air conditioner is 2500 W)
+
cheap (approximate prices are slightly lower )
Cons
-
general clumsiness of the solution
-
collective farm appearance
-
it would be more correct to place the temperature sensor from the air conditioner inside the expansion tank, slightly modify the circuit, calibrating it, say, to +12 degrees. Unfortunately, I am frankly weak in electronics and have little idea how to do this.
The chiller has been working successfully for the second month, it doesn’t leak, it cools, it maintains the temperature. In a word, he does what he should do.
Materials and prices:
• window air conditioner - we got it for 2000 rubles
• universal remote control for air conditioning - approximately
300 rubles
• antifreeze (30l) -
1500 rubles
• pump -
600 rubles
• thermometer, wires, relays, sensors -
500 rubles
• plastic, glue, fittings, ties, blue electrical tape -
1000 rubles
Total approximately 6000 rubles
. Agree, a pleasant amount, especially for a refrigerator of such power.
Heat
To measure the heating of Philips Z ES LEDs, I heat the samples for 60 minutes. Unlike the original Philips Ultinon car lamps, Smart H7 also has a flexible radiator. Therefore, the service life of Smart will be approximately 2 times longer than that of real Philips Ultinon.
I take measurements near the LEDs on the plate. There were already holes for installing a temperature sensor on the copper board. I just used a file to make a groove for the thermocouple wire to come out.
The assembly and materials turned out to be very good, they did not skimp on thermal paste, this rarely happens. The diodes are on a copper plate, not an aluminum one. The thermal conductivity of copper is almost 2 times higher, and it is much more expensive than aluminum. The flexible part of the radiator is crimped with copper and placed on heat-conducting glue, so it is glued well. The petals are pressed very tightly, I tried to loosen them, but it didn’t work.
In cheap car lamps, the petals sometimes dangle, are connected to the body loosely or without thermal paste. The flexible petals even fell out of the car light bulb when trying to install them in the headlight.
For the most part, I am a supporter of a passive cooling system for LED lamps for cars. Passive cooling is more universal and is applicable not only to closed low-beam or high-beam headlights. Passive can be installed in foglights (abbreviated PTF) and other unprotected places. The simpler the cooling, the more reliable it is. Car LED lamps with a passive radiator are of course more difficult to install, but this can be solved with a set of additional covers. Enlarged rubber covers hide a massive rigid or flexible radiator without interfering with the operation of the electric corrector or hydraulic headlight angle corrector.
I have higher requirements for cooling with a fan, because problems with heat dissipation are much more common. Usually such models look decent on the outside, but when you figure it out, there are big problems inside,
Do-it-yourself water cooling chiller
7226 crazy ideas during this time
- home
- News
- Devices by zx-c64
- Materials
- – Processors and MB
- – Video cards
- - RAM
- – Drives and SSDs
- - Cooling systems
- – Cases and power supplies
- – Periphery
- – Overclocking and modifications
- – Gadgets
- Blogs
- Bencher's corner
- Photo gallery
- Forum
- Shop
- File archive
- Competitions
Introduction
From the editor (ALT-F13): It just so happened that we were able to publish the article just two months after it was written. During this time, the author did not sit idly by, but moved further towards more extreme cooling. Now Steff is engaged in assembling homemade phase-change direct-die systems, in common parlance - “freonok”. At the time of writing these lines, he has already demonstrated the second version of his system. However, the first one also worked great. So the lines with which the text of this article begins - “I became interested in extreme methods of cooling a computer quite recently, so this is a description of my first experiment in this area” can be considered invalid :)
I became interested in extreme computer cooling methods quite recently, so this is a description of my first experiment in this area.
I used water cooling for several years, but the moment came when I wanted more. You could, of course, buy a ready-made Asetek VapoChill or nVentiv Mach II (ex-Prometeia) system, but freons have their drawbacks. Firstly, this is the price, and secondly, the ability to cool only one element of the system. To cool, for example, a video card, you would have to buy another device and seriously bother with installation. Starting my acquaintance with extreme cooling by building a homemade direct-die system seemed to me quite a difficult task, so I chose a different path. An alternative to direct-die cooling are water chillers, that is, water-cooling systems with efficient cooling of the refrigerant, allowing to achieve temperatures below ambient temperatures. Today there is only one serial water chiller; it is a rather inefficient (about 0 degrees at 50-70W load) and expensive ($330) system from Swiftech. The Dutch OC-Shop.com promise to start selling their chiller, but over the past six months they have not made much progress towards the goal. Only the price of the product is known - 600 euros, which is even more than the Swifttech product. Due to the lack of effective mass-produced chillers, there are two options left - make it yourself or buy a chiller designed for another application. There are two main types of water chillers: based on phase-change or using Peltier modules. The first are a dual-circuit system, where the freon evaporator cools the refrigerant in the liquid cooling circuit. In the second case, water or other refrigerant passes through a water block cooled by Peltier modules. This type of chiller is more compact and easier to manufacture, but suffers greatly in terms of temperatures and the efficiency/energy consumption ratio. Thus, 500 W of the total power of the modules gives a liquid temperature just below zero degrees at a load of about 100 W. So, it’s decided - we’ll make a phase-change waterchiller with three cooled elements (processor, northbridge, video card core).
Why is it needed?
Along with other semiconductor devices, the LED is not an ideal element with 100% efficiency. Most of the energy it consumes is dissipated into heat. The exact efficiency value depends on the type of emitting diode and its manufacturing technology. The efficiency of low-current LEDs is 10-15%, and for modern white ones with a power of more than 1 W, its value reaches 30%, which means that the remaining 70% is spent as heat. Whatever the LED, for stable and long-term operation it requires a constant removal of thermal energy from the crystal, that is, a radiator. In low-current LEDs, the radiator function is performed by the leads (anode and cathode). For example, in SMD 2835 the anode lead takes up almost half of the bottom of the element. In high-power LEDs, the absolute value of power dissipation is several orders of magnitude greater. Therefore, they cannot function normally without an additional heat sink. Constant overheating of the light-emitting crystal significantly reduces the service life of the semiconductor device and contributes to a gradual loss of brightness with a shift in the operating wavelength.
System components
The easiest way to assemble a chiller is based on a household air conditioner. It is advisable to find an air conditioner that uses R22 gas rather than R134a, since R22 evaporates at a lower temperature. A refrigerator system is also suitable for these purposes. I used a 5000BTU air conditioner, they usually have 1/2 HP compressors.
Any container with thermal insulation will be suitable as a reservoir, but in extreme cases you can make it yourself. In my case, this is an insulated cold water tank.
The main headache for those who venture into extreme cooling is thermal insulation to prevent condensation. The simple methods described in the article “Thermal insulation of water blocks” will no longer be enough if the temperature approaches zero and below. Therefore, “heavy artillery” will be used. For heat exchangers - polyurethane foam filler and insulating tape, for tubes and hoses - closed-cell foam rubber. It is necessary to use dielectric grease for the places where the water blocks are installed (a silicone coating can also be used, but then it cannot be removed from the boards).
The actual components of the water cooling system, water blocks and pump. My kit consists of PolarFlo CPU waterblock, Danger Den Z-Chip block, Swiftech MCW50 VGA block and Rio Aqua 1400 pump.
The next question is the choice of refrigerant. In this case, I was guided by two parameters: the liquid should not freeze at low temperatures and have the highest possible thermal conductivity. For low temperatures, antifreeze is suitable (who would doubt it;)), vodka or a mixture of water + methanol. I chose methanol: it is poisonous (attention!), but has the best thermal conductivity. One of the easiest ways to get it is to buy windshield wiper fluid at an auto store.
We calculate the radiator area
Please note that to correctly calculate the radiator area, the parameters of the useful dissipation area, and not the surface area, are taken into account. When calculating the usable area (S), the sum of the areas of the ribs and the substrate in square meters is included
It should be taken into account that each rib has two outlet surfaces. In this case, S of a rectangular heat sink S - 1 cm2 is - 2 cm2
When calculating the usable area (S), the sum of the areas of the ribs and the substrate in square meters is included. It should be taken into account that each rib has two outlet surfaces. In this case, S of a rectangular heat sink S - 1 cm2 is - 2 cm2.
As a result of the experiments, a formula was derived for calculating the required heat sink area:
S = (22 – (M x 1.5)) x W, in which
S – radiator heat sink area; W – power supplied (W); M – LED power. For plate radiators made of aluminum, the following approximate data calculated by experts from Taiwan can be used:
- 1 W: 10 ÷ 15 cm2;
- 3 W: 30 ÷ 50 cm2;
- 10 W: approximately 1000 cm2;
- 60 W: 7000 73000 cm2.
Since the range of the indicated data has a wide range and they were determined in conditions for the climate of a southern country, the values are not absolutely accurate and are suitable for preliminary calculations.
More detailed information on calculating the radiator area can be obtained by watching the video.
Assembly
Here photographs will help more than a lengthy description in words.
I started by insulating the water blocks. The block was filled with foam, after drying, insulation was placed on the tubes and the whole thing was covered with electrical tape.
This way I insulated all three water blocks.
All that remains is to isolate the motherboard. I smeared the entire space around the socket and chipset with dielectric grease, did the same with the blocks, then made gaskets from foam rubber. I treated the back side of the motherboard and video card in the same way, then installed foam rubber and secured it with acrylic plates.
When the blocks were ready, I started working on the air conditioning. I completely disassembled it, being careful not to break anything.
To easily and painlessly bend the tubes in the right places, I recommend using a tool called “pipe bender” (I don’t know the exact Russian name).
The air conditioner evaporator is installed in the tank.
The same foam was used for insulation; I attached the temperature sensor to the pump installed inside.
Then I insulated the pipes near the compressor and installed a fan to cool the condenser.
After that I added methanol. The first check in a couple of hours showed the following results:
The water chiller freezes the refrigerant rather slowly, but the reverse process occurs in a well-insulated tank for quite a long time. After 12 hours of inactivity, the temperature rose to just -12C. And now - the final stage, installation into the system. Be sure to make every effort to insulate both the water blocks and the circuit boards. As you can see, the goal has been achieved - the processor is pleasantly cool at -9C.
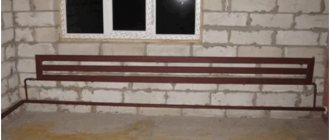
Do-it-yourself homemade chiller for a brewery - step-by-step instructions
If you are brewing homemade beer or want to do it, then you simply cannot do without a cooling system. Today I will show you how to make a very simple but quite effective chiller that can cool your wort from 83 to 25 degrees in just 10 minutes!
To make a chiller we will need:
- Flexible bellows-type gas connection, preferably made of stainless steel, 1/2 inch. In the store I found a maximum of 5 meters, but this is quite enough. To connect water, you will need 2 bronze fittings with external threads.
- Plastic ties and stainless wire, specifically stainless steel, or plain metal should never be used. Otherwise, the wire will instantly oxidize and when cooling you will spoil the wort!
Chiller manufacturing
Armed with plastic ties, we begin to tie the hose every 7-10 centimeters. We twist the hose carefully, loop on loop...
As soon as the hose ends, bend its end as in the photo below. The twist of the hose should lie at the bottom of the pan, and the bend should cling to its upper edge.
The beginning of the hose must be bent in the same way as the end, but the bend must be inside the ring.
Now we take the wire, always made of stainless steel, and repeat the same thing as with the ties. To put it simply, we replace the plastic ties with wire.
After completing the work, we cut off the plastic ties and we have a finished chiller!
All that remains is to screw on the fittings and you can move on to testing!
How to build your own cooler
Take a simple plywood box without a lid, you won't need one. Fill two two-liter plastic bottles with water and place in the refrigerator/freezer for a couple of hours until the water is completely frozen. While the water is cooling, let's return to the box. It will become the basis of a chiller for cooling water in an aquarium.
Place the box horizontally and cut two round holes in the top that match the diameter of the bottle cap. And now the question is: what are these holes for? If your imagination works at an A+, then you will immediately understand everything. Or look for the answer further in the article.
At the next stage of preparing the structural elements, take care of shielding the inside of the “cooler” (box). Use ordinary food foil for this; it can be purchased at any supermarket by visiting the hardware department. Cover all the inner surfaces of the box with it, trim where necessary. As a result, you will receive a thermal box, that is, an improvised chiller for cooling water, which is what is needed for a home aquarium with small fish.
As the final step in preparing your chiller, take the frozen water bottles, insert them into the holes in the box, and push them toward the water reservoir. After just 30 minutes, the water temperature level will noticeably drop.