One of the main tools in the garage is a vice. They are a clamping device that holds various parts and workpieces for further processing. Almost every master has such a tool, but if not, then there is no need to rush to buy it. Any home craftsman can make a homemade vice with his own hands. Where to start and what a clamping tool can be made from is described in detail in the material.
Design of the tool and its main components
Before you start making a vice, you need to take a closer look at the structure of this tool. The vice consists of the following elements:
- Base - the supporting part with which the tool is fixed to the table, workbench or other surfaces
- Fixed jaw - connected to the base, and can be moved in different directions to change the angle of position of the entire tool
- Movable jaw - its movement is carried out by rotating the handle. The handle is connected to a screw, which engages with the nut of the movable jaw. The sponge moves in two directions, while ensuring the fixation of workpieces for subsequent processing
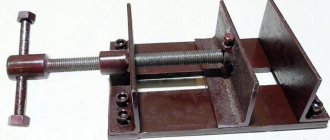
The cross-sectional design of the vice is shown in the photo below.
The types and operating principles of vices can be found in this material. The photo shows the design of a factory-made vice. If you have available tools, you can make a vice with your own hands at home. Moreover, there are many options for their manufacture, which we will look at in more detail.
Next, we will consider different options for making homemade vices from improvised materials. Each master can take into account the manufacturing features of the corresponding options, and based on the instructions, make his own tool.
This is interesting!
Making a vice with your own hands allows you not only to save on the purchase of an expensive tool, but also to get the device that is necessary to perform specific actions.
Improving the mini
Modern mini-vises cannot be improved much, but if you come across or already have old Soviet ones (for example, pos. A in the figure on the right):
Their functionality can be significantly expanded as follows:
Drill out (carefully, not all the way!) the flared shank of the set screw, which holds the set clamp plate. You need to drill with a drill with short “poke” diagonally from different sides. The plate is removed and the mounting clamp screw is unscrewed (do not lose either it or the plate). A hole is drilled in a section of the channel for a bolt with the same thread as on the clamp screw. The vice is mounted on the resulting stand and secured with a lock nut (pos.
B). In the clamp screw, through the remainder of the shank, a blind axial hole is drilled for the M2-M3 thread. This is not difficult to do, because... There is a conical depression left in the peg from the shank. A thread is cut in the axial hole. The plate is put back in place and is kept from falling out by a screw with a conical head (shown by an arrow in position B). The clamp screw is stored in the stash, sorry, stash.
Thus, we get, neither more nor less, a rotary table for small drilling work. True, without an angular divider, but instead of it, a protractor can be attached to the channel base, and a pointer arrow can be attached to the vice bracket. The resulting accuracy of 1 degree is sufficient for amateur home work. And if you remove the vice from the base and return the clamping screw to its place, they can be used for their original purpose.
Instructions for making a bench vice from profile pipes
If you have profile pipes at your disposal, you can use them to make good homemade vices for fixing various parts and workpieces. To make a device from profile pipes you will need:
- Profiled pipe measuring 6x6 cm. The size of the pipe affects the dimensions of the future tool
- Nuts
- Coarse threaded stud
- Tube - the handle will be made from it
When carrying out the work, you will need tools such as a welding machine, angle grinder or grinder, as well as a drilling machine or drill. The process of making a homemade vice from profile pipes is as follows:
- The first step is to make a drawing, on the basis of which parts of the future tool will be cut out from profile pipes
- Initially, the base is cut out from the profile pipe according to preliminary dimensions. The longer the pipe being cut, the higher the distance between the jaws. The recommended length of the profile pipe is 15-20 cm. This pipe will act as the moving part of the tool
- Next, a thrust plate is made, which is connected to the movable jaw of the tool. To do this, you need to connect two nuts, the inner diameter of which must correspond to the size of the stud used. The two nuts are welded together and then welded back to the hole plate. These holes will be used to attach the plate to the workbench.
- At the next stage, it is necessary to cut off future jaws from the profile pipe, and using bolts, attach cheeks to them (plates for direct fixation of parts)
- As a result, you should get two parts that are identical in size - these are the jaws of the tool, which will eventually be used to fix various parts and workpieces
- Next we move on to making the base of the tool. To do this, you will need corners that can be cut from profiled pipes with a grinder. A base is made from the corners, through which the tool will be attached to a table or workbench. The corners also act as guides
- In the corners it is necessary to pre-drill two holes through which the tool will be fixed to the workbench
- Weld a section of profile pipe to the resulting base, placing it perpendicular to the profile. The resulting structure is a stationary sponge
- It is recommended to immediately remove and clean welding seams, otherwise these places will be subject to corrosion and will very quickly become weak points of the tool.
- Next, you should weld the second sponge to the profile pipe, which was cut at the first stage. The pipe together with the sponge will be the moving part of the tool
- In the lower part of the profile pipe, which will play the role of a moving part, a cutout should be made for half the length of the workpiece
- It is necessary to weld a plate with a hole pre-made in it to the back of the profile pipe. This hole is required to install the screw
- Now we proceed to install the pre-fabricated thrust plate, consisting of two nuts. This plate should be attached to a table or workbench by pre-drilling holes
- We drill holes to install the stationary part of the tool, and then secure it
- We begin to manufacture the screw, through which the moving part will be moved. To do this, weld a nut to the stud on one side, making an indentation of 5 cm
- We install the pin in place (in the hole in the moving part of the profile pipe), then screw in the nut and weld it. Don't forget to loosen the nut a little to ensure free movement of the screw
- Another nut is welded to the stud, positioning it perpendicularly. This nut is needed to secure the handle, so its internal diameter must be larger than the outer size of the pipe prepared for the handle
- To enhance the strength of the jaws, it is recommended to weld plates inside the profile, as shown in the photo above. After this, the tool is almost ready for assembly. All that remains is to first degrease its surfaces and paint all parts except the threaded parts
- Install a pipe into the hole in the nut, then put clamps on its ends to prevent the handle from falling out
- After this, the tool can be assembled and tested in action.
At this stage, the process of making a homemade vice with your own hands is completed, and all that remains is to show your creation to friends and family. Using a similar pattern, you can make a vice of any size - small, large or medium. For this purpose, appropriately sized profile pipes are used. Buying profile pipes and making the tool yourself is much cheaper than buying a factory vice.
This is interesting!
The cheeks for the tool can be bought ready-made or made independently from metal plates with a thickness of at least 6-8 mm. On one part of such plates, you need to use a grinder to make shallow grooves in the shape of a diamond.
How to make a carpenter's vice yourself
A bench vice is used to work with metal parts and workpieces. If there is a need for processing wooden workpieces, then a bench vice is least suitable for such purposes, as they have some disadvantages. The parts being fixed may become deformed, so it is recommended to use a bench vice when working with woodworking materials. There is no need to buy them specifically for working with wood. For such cases, you can make a carpenter's vice with your own hands. Let's look at the manufacturing instructions in detail.
Carpenter's vices are made of wood, which is an advantage in their manufacture. When working with wood, the need to use a welding machine is eliminated. A drill is used to drill holes, and to cut off parts of the future tool, a hand saw, jigsaw or grinder with a wood disc is used.
- First of all, let's prepare the screw. To do this, cut off the required length of the pin
- A nut is screwed onto the stud on one side
- Using a plumbing tee, you should put it with the central hole on the stud. Moreover, it is important to ensure that the pin does not protrude beyond the edges of the two parallel holes of the tee. Drill a hole in the center of the tee to install a key bolt at “10”. It is necessary to drill the tee together with the stud
- Install a key bolt at “10” into the resulting hole. This is how a handle for a future tool is made.
- Next we move on to making the jaws of the vice. To do this, from a board at least 6 cm thick, you should cut the required length - 20-30 cm
- The two boards should be the same size in length. It is these boards that will act as fixing sponges.
- In the center of both boards you need to drill central holes through which the pin will pass
- We drill additional holes on the sides of both boards, which are needed for the guides
- In one board, you need to make a groove in the central hole to accommodate the nut
- Now screw the nut and place the washer on the stud from the side where there is a through hole
- Install the pin into the central hole of the board with the groove
- A washer is installed on the other side of the stud, and a tee is installed, secured with a bolt.
- The nut on the back of the board should be tightened, pushing it into the groove. To prevent future rotation of this nut, it must be connected to the stud. You can use welding to do this, but an alternative method is to use a drill. Using a drill, a hole is drilled in the nut mounted on the stud, through which a rigid fixation of the two parts is ensured
- Using a bolt of the appropriate diameter, you need to hammer it into the hole made in the previous paragraph
- We assemble the structure, resulting in a movable vise jaw
- We use two metal rods that need to be installed in the side holes of the board
- A second board is attached to the table or workbench, which will play the role of a stationary jaw of a carpenter's vice. To do this, fix the board to the table with a clamp, and then drill holes in the table structure
- Let's start assembling the structure. To do this, you need to connect the two parts using a wide nut. After screwing the nut onto the stud, you need to circle its edges around the perimeter
- According to the resulting markings, it is necessary to cut out a groove using a chisel. This is necessary in order to fix the nut in the vise jaws.
- We recess the nut into the jaw structure
- The result is an almost ready-made carpenter's vice, which only lacks a handle. It can be made from a wooden tube of the appropriate diameter. After that we assemble the tool
In order for the guides to move freely in the fixed jaw, steel bushings should be made and installed inside the holes. The fixed jaw is fixed to the table surface using self-tapping screws. Moreover, this matter must be approached responsibly. You should first drill holes and also make grooves for the screw heads. After all, the surface of the board is the working part of the carpentry vice, so any protrusions on it and other defects will negatively affect the quality of the workpieces being processed.
In this simple way you can make a carpenter's vice at home. Moreover, you don’t need to buy materials to make them, since every home craftsman probably has everything he needs.
Instructions for making a vice for a drilling machine with photos and descriptions
To work on a drilling machine, it is almost impossible to do without one important part - a special clamping vice. This is especially true when using a homemade drilling machine from a drill. For a drilling machine, a vice is used, which has a design that differs from metalworking and carpentry tools.
For a drilling machine, it is not at all necessary to buy a factory-made vice, since you can make them yourself with your own hands. To do this, you will need a welding machine, a drill or drilling machine, a grinder, as well as metal blanks from which a drilling vice will be created. Let's look at how to make them in detail.
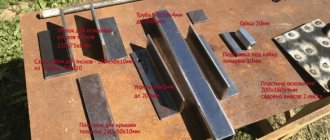
- First you need to take a steel plate, the thickness of which should be at least 8 mm. Markings should be applied to the plate to cut rectangular holes
- Next, you will need to take a channel on which the jaws of the tool will subsequently be located. The channel also needs to be marked, as shown in the photo above
- To make sponges, two steel plates, 10 cm thick, are used. The dimensions of the plates are 40x100 mm. A rod is cut out on the second plate, through which the plate or future jaw will move in the channel groove
- The moving jaw will be moved using a screw, for which it is recommended to use a 16 mm pin
- Let's start making the tool. We cut a rectangular groove on the channel along the previously marked lines. To do this, use a grinder and a drill with a drill bit.
- On the steel plates on one side it is necessary to make a diamond-shaped notch, which will act as cheeks
- A hole with a diameter of 10 mm is drilled in the second jaw. Through this hole the pin will be attached to the sponge. We cut the plate to get a rod for connecting to the channel groove
- One side of the pin needs to be ground down to a size of 10 mm in order to be able to install the part in the pre-drilled hole in the jaw
- It is necessary to drill a hole in the rod and cut a thread in it. Using this threaded hole, the movable jaw will be fixed
- A frame is prepared in which rectangular holes are cut. A square hole in the center is needed in order to have access to tighten and unscrew the bolt on the channel
- To make a drilling vice, you will also need an oblong nut, through which the screw will move
- The channel is welded to the frame, after which the seams are cleaned. A fixed jaw and nut are welded to the channel, after which you can begin assembling the tool
At the final stage, the handle is made from the anchor. To do this, a groove is made in the screw structure and a hole is drilled. The photo above shows how to make a handle for a drill vice with your own hands. A detailed description of the manufacturing process of a vice for a drilling machine is presented in the video material.
How to make a vice from a channel
A channel is the most common type of metal product, which is excellent for making a vice. Let's take a closer look at how you can make your own vice using a channel.
The instructions for making a vice from a channel are as follows:
- Initially, the base of the future vice is prepared. A channel is used as a base, in which a rectangular hole is made
- From the end side, weld a plate to the channel, which will act as a stationary jaw of the tool
- A stop is made, consisting of a nut and a guide fitting. The movable jaw of the tool will be attached to this stop.
- We attach the movable jaw of the tool to the stop
- A screw is installed, to which you need to attach a handle to move it
- The result is a ready-to-use vice, made independently from a channel
The video below shows in detail the process of how a vice is made from a channel. It is important to take into account that it is not at all necessary to subject all parts to processing. The screw can be made from a pin with a diameter of 16 mm or turned on a lathe. Please note that you will also need to make a nut with the appropriate thread.
In order for homemade clamping devices to last a long time, they must be painted. To secure the resulting product, it is necessary to weld a plate in the lower part to the channel, in which holes must first be made. Now the homemade tool is ready for use for clamping various workpieces.
Dimensions
A vice is a standardized equipment that is manufactured in accordance with GOST. There are several standards for them:
- small vice: jaw height – 50 mm, maximum stroke – 80 mm;
- medium: height – 180 mm, working stroke is 120-125 mm;
- large: height – 220 mm, stroke length is 140-160 mm.
Chair models have similar characteristics. In them, the height of the jaws is in the range of 65–75 mm, and the length of the working stroke is 120–150 mm or more.
The protrusion of the linings from the grooves should be 2–3 mm (for large bench vices). In more compact copies it may be smaller.
There are models with other sizes of clamping bars. But if for some reason they are not suitable, then the linings can be made independently.
We make a simple vice with our own hands from corners
What could be simpler than the procedure for making a vice from corners. If you have metal corners lying around in your garage, then it’s time to use them to make a very useful homemade product. You can make a vice from the corners, and this procedure is quite simple and does not require much time and effort.
To make such a tool you will need corners, as well as a stud with nuts. All work will be performed using a welding machine, grinder and drill. The manufacturing principle is quite simple, and every home craftsman will be able to implement the idea at his own discretion. Using the drawing as a standard, it will not be difficult to make a hand vice for your garage based on it.
Below is a video of finished vices made from corners.
How to make a vice from a jack - simple instructions
If you have an old diamond-shaped jack lying around among the old tools in your arsenal, then do not rush to dispose of it. This tool can serve as the basis for making a vice. Even if you don’t have a jack, but you are planning to make your own vice, you can find a lift through advertisements or scrap metal.
The advantage of a homemade vice from a jack is that a person does not need to make much effort to clamp the workpiece. To make a clamping vice from a diamond-shaped jack, the following manipulations are performed:
- Initially, the necessary tools and materials are prepared. The materials you will need are a jack, a 100 mm section of channel, and profile pipes (40x40, 30x30 and 25x25 cm)
- After this, we immediately begin making a homemade tool, cutting 40x40 mm pipes to the required length
- We get four blanks from profile pipes
- A frame is made from the resulting parts by welding steel profile pipes 40x40 mm
- Sponges are made from a channel by cutting out two identical blanks
- The supporting part of the jack is being prepared, which will be connected to the sponge
- Apply notches in the form of inclined lines to the outer surface of the channels. These notches will act as cheeks for more effective fixation of parts.
- We proceed to the manufacture of the moving part of the vice, for which tubes measuring 30x30 and 25x25 mm are used
- Weld a channel to the 30x30 mm tube, which will act as a movable jaw of the tool
- We weld a second channel to the base, which will act as a stationary sponge.
- On the other side of the frame, weld a profile that will serve as a stop for the jack
- Weld the jack to the stop and movable jaw
- Finally, all that remains is to paint the resulting product, having previously cleaned the welding seams. After this, you can test the resulting tool in operation by clamping metal workpieces
As you can see, making a homemade vice requires very little time, effort and materials. As a result, we get a reliable tool that you don’t need to spend money on to purchase. Below is a video on how to make a vice from a jack.
Homemade bench vise: video, photo, drawings
It’s not difficult to make reliable and easy-to-use vices with your own hands. The need for this may be caused not only by the desire to save on the purchase of a serial model, but also by the need to use a clamping device that will allow it to more effectively solve the tasks assigned to it.
Simple homemade vice from corners
Serial models of vices, although they are universal, are not always able to provide high precision in fixing parts; they are quite bulky and have a significant weight.
Homemade vices, used primarily in a home workshop, can be made more suitable for performing certain technological operations, and therefore more efficient and convenient.
Homemade bench vices may differ little from factory ones in both appearance and reliability.
Any person who spends a lot of time in his home workshop will confirm that it is quite difficult to do without such a device as a vice. Without a clamping device, it is difficult to perform various operations with parts made of metal, wood and plastic.
The use of a vice guarantees not only high accuracy and efficiency of drilling, milling, etc. operations, but also the safety of the machine operator.
If there is no desire or opportunity to purchase a serial model of such a device, then it is quite possible to make a vice with your own hands, spending very little time and effort on it.
Do-it-yourself vice - detailed instructions with photos
How to make small vices from boards
To work with small parts you will need a small vice. They can not only be made, but also purchased in the store. Unlike large tools, small ones are not expensive, so you don’t have to go to the trouble of making them. But if you still want to make a small vice yourself, then in the material you will only find detailed instructions describing this process.
To realize your idea, you will only need wooden planks. The dimensions of the bars will affect the future dimensions of the tool. Let's start making small vices from wooden planks:
- First, the base of the tool is made by gluing wide and narrow strips. Narrow ones are glued onto wide strips, resulting in the base of the future instrument. To increase the strength of the base, the planks should be connected to each other with self-tapping screws
- Using two square beams, we connect the two bases of the future tool. The beams are also coated with glue, after which they are attached to the base prepared in the first stage
- After gluing the structure, it is necessary to tighten it with clamps and wait for the glue to dry completely.
- Now let's move on to making sponges. To do this, markings are made in one workpiece along the perimeter of the nut. A hole will be cut based on the markings
- After cutting the hole, you need to install a nut in it
- A hole is drilled in the second workpiece, the diameter of which corresponds to the size of the stud or bolt used
- We use a wide washer in which it is necessary to drill 4 holes around the perimeter
- Cut the washer in half to create 2 holes on each side.
- The blank into which the nut was installed must be glued to the base and secured with self-tapping screws
- A handle is being made for future vices. To do this, screw a nut onto the bolt, in which a hole is made for installing a thin pin
- Glue a piece of block to the movable jaw of the vice, which will act as a guide.
- We connect the jaws of the vice using a screw, which is secured in the movable jaw using a divided washer
- As a result, we get a ready-made tool for fixing various small workpieces
What kind of vice and what available tools to make is a personal matter for everyone. This article will help everyone who does not want to buy a special tool for a lot of money, and will be able to make an alternative option, while saving a significant part of the money. There are craftsmen who are not at all accustomed to buying tools and trust only with their own hands, so based on the examples described above with detailed instructions for making a vice, you can start working immediately.
Homemade bench vise: video, photo, drawings
It’s not difficult to make reliable and easy-to-use vices with your own hands. The need for this may be caused not only by the desire to save on the purchase of a serial model, but also by the need to use a clamping device that will allow it to more effectively solve the tasks assigned to it.
Simple homemade vice from corners
Serial models of vices, although they are universal, are not always able to provide high precision in fixing parts; they are quite bulky and have a significant weight.
Homemade vices, used primarily in a home workshop, can be made more suitable for performing certain technological operations, and therefore more efficient and convenient.
Homemade bench vices may differ little from factory ones in both appearance and reliability.
Any person who spends a lot of time in his home workshop will confirm that it is quite difficult to do without such a device as a vice. Without a clamping device, it is difficult to perform various operations with parts made of metal, wood and plastic.
The use of a vice guarantees not only high accuracy and efficiency of drilling, milling, etc. operations, but also the safety of the machine operator.
If there is no desire or opportunity to purchase a serial model of such a device, then it is quite possible to make a vice with your own hands, spending very little time and effort on it.
Do-it-yourself vice - detailed instructions with photos
Quick-clamping vice - operating principle and do-it-yourself manufacturing features
A vice is used to clamp the workpiece for subsequent processing. This tool is an almost indispensable assistant, but it has a drawback. The disadvantage is that in order to fix workpieces of different sizes, it is necessary to rotate the handle for a long time in one direction and the other. When you don’t use the tool often, this drawback is practically unnoticed. If you have to use a vice often, then fixing workpieces of different sizes takes a lot of time.
It is in order to eliminate the above-described disadvantage of vices that manufacturers produce a special type of device called quick-clamping. They differ from conventional devices in that they do not have the disadvantage of the need for prolonged rotation of the screw handle. This type of tool is appreciated by craftsmen who often use it.
The most common type of quick-clamping vice is eccentric, but there are also screw models. To become the owner of a quick-clamping vice, you don’t need to buy one at all. You can make a quick-clamping vice yourself, and we’ll look at how to do this using the example of eccentric devices.
- To manufacture the devices in question, you will need appropriate materials. These are metal corners, channel, profile, etc., in general, everything that is at hand
- The work will be carried out using a welding machine, angle grinder and drill
- Make a rectangular groove in the channel, and weld a corner to one side, which will act as a fixed jaw
- The second corner, which will be a movable sponge, should also be prepared. To do this, a rectangular groove is made on one side, through which it will be fixed to the channel
- In order for the movable jaw to move only in one direction without distortions, it is necessary to make guides. Metal plates are used as guides, which are welded to the corner on both sides, as shown in the photo below
- On the back side of the channel it is necessary to weld two plates around the perimeter of the rectangular hole. These plates are needed so that when fixing the jaws, the clamping nut does not rotate, and it does not have to be held with a wrench
- It is necessary to drill two holes in the corners, through which the clamping cheeks will be fixed. The cheeks are made of steel plates followed by notches. After this, they are attached to the jaws, recessing the head of the fixing bolts deep into the plate
- After this, all that remains is to make a quick-clamping mechanism that works on the eccentric principle. To manufacture such a mechanism, you will need the help of a turner. The quick-release mechanism is shown in the photo below
- A through hole on a metal blank is not made in the center, but with a slight offset. Through this hole the mechanism will be fixed to the movable jaw and channel. The second hole on the blank (not through) is intended for fixing the bolt head in a stationary position
- Another hole is drilled in the side of the cylindrical blank, followed by threading for screwing in a long bolt. This bolt will act as the handle of the eccentric mechanism
- After assembling all the parts, we get a ready-made quick-clamping vice, which you can make yourself from improvised materials. To be able to attach the vice to a table or workbench, two plates with holes must be welded to the bottom of the channel
The principle of operation of the quick-clamping mechanism is that the cylindrical blank, when moved in one direction, rests against the side surface of the angle (moving jaw). In this case, the nut in the lower part of the channel is tightened, thereby ensuring the immobility of the mechanism. To increase the distance between the jaws to fix large workpieces, it is necessary to move the blank to its original position, thereby loosening the movable jaw, and manually move it to the required amount. Fixing or clamping of workpieces with a movable jaw is carried out with just half a turn of the handle. Below is a video material in which you will find a detailed description of this process.
To think through each subsequent step, it is recommended to make drawings when making a vice with your own hands. First you need to decide on the size of the future tool, and only after that get down to business. Now you know how to make a vice at home from improvised materials, so you can resort to making them.
What it is?
Jaws are the working parts of a vice designed to fix the workpiece. They are the ones that come into contact with the workpiece, and the accuracy of the workpiece location and the quality of its surface layer depend on their properties.
Therefore, certain requirements are imposed on sponges:
- high coefficient of adhesion to the workpiece material;
- the clamping force must correspond to the strength of the workpiece;
- accuracy of workpiece positioning (especially for machine vices);
- reliability and durability.
The workpiece clamping force can be 15–55 kN. And to increase it, notches are made on the sponges. Therefore, if used incorrectly, dents and scratches may remain on the workpiece.
To prevent this from happening, the vice is equipped with a set of replaceable pads designed to work with different part materials. This is especially true for locksmith models, in which both soft aluminum and hard steel workpieces are fixed.
Carpenter's and some other models of vices are usually not equipped with replaceable pads.