Installing a countertop in the kitchen is an important step in organizing the space. The convenience of the entire room depends on competent calculations and proper installation. Cook food quickly and with pleasure, clean up after cooking, dine comfortably - it all depends on the countertop. You can invite professionals to install it, or you can resolve the issue yourself. Having basic repair skills and following the instructions, a DIYer can easily handle the installation of a countertop.
Self-assembly is becoming increasingly popular because it allows you to accurately adjust furniture to the desired size. This is practical and costs much less than paying for the services of an invited furniture maker. Let's consider all the nuances of proper installation of a countertop with your own hands.
Varieties
The kitchen set often already includes furniture bumpers.
They match the texture, size, color and shape of the tabletop. However, if you want to add some zest to the interior, you can purchase original and contrasting borders. When making a custom-made set, furniture manufacturers offer to choose planks from a small assortment of models. Recommended skirting boards do not always meet our preferences. Therefore, sometimes you have to buy them separately.
When installing it yourself, you should learn how to attach the baseboards to the countertop. Let's get acquainted with the types of fittings that differ in different parameters.
By shape, the most popular moldings are:
- triangular;
- square;
- smooth;
- rounded (oval);
- volumetric;
- flat.
Image taken from https://www.youtube.com/watch?v=AzHE6TV3vVY
We take into account that the sides must completely cover the gap between the perpendicular surfaces. With a wide gap, we take volumetric rounded structures. For narrow free spaces, flat, even planks are suitable. We select fittings in accordance with the general idea of the interior.
According to the configuration:
For installation, we will need fastening and connecting parts, which are not always included in the furniture set. For a reliable, attractive fastening, you need:
- corners (external and internal);
- self-tapping screws;
- side plugs.
Image taken from https://www.youtube.com/watch?v=QkZVFax83FY
According to the design solution:
Furniture moldings are cast and universal. Solid wall products are durable, massive, and of increased rigidity. They have an attractive appearance and are used for the widest gaps. The disadvantage is that installation is a little more complicated. Universal sides - elegant, durable. Offered in a wide range of colors.
According to the material:
Furniture upholstery is made from all sorts of materials that differ in cost, durability, strength, and care features. The pros and cons of each type, the selection rules are listed below.
For countertops made of natural or artificial stone or wood, it is better to choose a border made of the same material, since the difference in texture will still be visible, even if the color is identical. There are combined options - aluminum frame, decorative plastic or wooden plank.
If the set has a plastic working surface, close the gap with an aluminum or plastic strip. Such accessories are relatively cheap. However, there is difficulty in selecting designs that match the color and shape of the furniture.
Aluminum curbs are a popular inexpensive product. Its advantages are durability, heat resistance, wear resistance. Thanks to adonation (coating with an oxide film), it is not afraid of the effects of aggressive household chemicals.
Plastic moldings are made from polyvinyl chloride using the co-extrusion method. The material is very plastic. Good flexibility ensures ease of installation. A large palette allows you to choose fittings to suit any interior style. The disadvantage of the products is low resistance to high temperatures. Therefore, this flange is not suitable for decorating surfaces located next to the stove.
Stone plinth looks more noble than wood or plastic. The color of the border is matched to the tabletop. Some manufacturers offer to make the product profile curly. This is much more beautiful than straight, even planks, but quite expensive.
DIY computer desk. Assembly, tools and fasteners.
Date added: 2013-11-08
Category: DIY.
Hello again, in the previous article I began my story about how I made a computer desk from laminated chipboard with my own hands.
But on this page I will tell you how I directly assembled the computer desk, as well as what tools and fasteners are needed for this.
Let's start, perhaps, with the preparatory stage.
Tool for assembling a table made of laminated chipboard
To assemble the computer desk I needed the following tool:
— drill for drilling holes for fasteners;
- naturally, drills of various diameters and purposes. I'm talking about standard wood drill bits and 15mm . and 35 mm . A little lower and in the article fastening semi-overlay hinges there is more detail about the use of Forstner drills.
— levels came in handy: 1 meter long and a small level 40 cm .
- hammer, pliers, Phillips and slotted screwdrivers;
- tape measure, square and metal rulers 15 cm . and 40 cm . for marking;
— a hacksaw for cutting chrome-plated pipes.
In general, nothing special, with the exception of Forstner drills. For those who don't know what they are for, this article may teach you something new.
Fasteners for assembling a table made of laminated chipboard. Screws - ties
In this article, I already wrote about what fasteners are needed to assemble furniture from chipboard. Then I only used furniture dowels and tie screws.
To screw tie screws, hex keys of the appropriate diameter are used, which can have different shapes: L- and S-shaped.
To assemble my first computer desk from used materials, I limited myself to the above fasteners. The table was made from old chipboards and covered with self-adhesive film.
When assembling a table from laminated chipboard, the situation was a little different: I could no longer afford to “punch holes” in the furniture anywhere!
Therefore, to conceal the fastening of the table fragments together, I used furniture eccentrics.
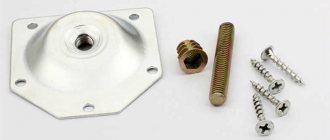
The most common type of eccentric tie is made using two fasteners: the eccentric itself and the dowel. You can see them in the photo on the left.
Below is a drawing illustrating an eccentric coupler.
Let's look at it in more detail.
Eccentric coupler
Marking accuracy is very important. Therefore, when marking, the drilling points are marked with a roll, that is, with a sharp object. Thus, the drilling sites are not only clearly visible, but the drill, which does not have a spike at the end, will not “go away” to the side (will not move).
So, in order to connect two fragments of chipboard to each other you need to:
1. According to the drawing in the detail, 1 drill with a diameter of d5 mm . make a hole 11-12 mm . A dowel is screwed into it.
2. In part 2 at a distance h = 24 or 34 mm . (distance from the edge to the center of the eccentric. As a rule, dowels under 34 mm are used.) Forstner drill with a diameter of d15 mm . make a hole for the eccentric. The depth of the hole is equal to the height of the eccentric.
3. At the end of the part 2 with a drill d8 mm . drill a hole for the protruding part of the dowel.
You can do the opposite: first we drill a hole for the dowel with a depth of 35-40 mm , and then a recess for the eccentric.
4. Now we combine parts 1 and 2 and tighten the eccentric clockwise.
How to connect two tabletops together without a joint
The first step is to prepare the areas for the tension elements. Then you need the following:
- Installing the bar. You should attach it to the cut, then screw it with self-tapping screws;
- The cracks of the tabletop and the ends must be coated with silicone sealant;
- Then you can connect the elements together;
- The clamp is placed directly into the grooves. On the opposite side of the nut, there will be a tightening head, under which washers are placed;
- Next, tighten the nuts with a wrench, pulling the tabletops tightly;
- The clamps must be tightened crosswise.
Euro sawing requires special tools and operating experience.
The process should be done slowly
Whatever method is used, it is important to pay attention to waterproofing, which prevents moisture from getting between the ends. As you can see, the connection of tabletops at an angle of 90 degrees can be done independently
Experts recommend sealing grooves and blind holes with sealant to reduce the risk of moisture getting inside.
Connecting tabletops using functional strips ensures high-quality joining. By performing the screed correctly, the result can be a structure that will last for many years.
Thanks to the use of an aluminum profile, the gap is completely closed.
Another option for connecting tabletop elements is to fix the ends with silicone sealant without using a strip. It is enough to fix the ends with silicone sealant. The planes need to be pressed well, removing excess product.
The only disadvantage of this technology will be the unprotected seams, which may break over time.
When eurosawing, the ends are obtained with an allowance of several millimeters. Because of this, the planes of the countertops will not be completely adjacent. To prevent the resulting gap from being noticeable, you can hide it under a furniture baseboard.
Stages of work
Installation of countertops made of chipboard or MDF is carried out in stages. The work is carried out in a clear sequence. Before you begin, you should carefully read the practical guide.
Required Tools
Before you start installing a countertop in the kitchen, you should purchase all the blanks and prepare a certain set of tools.
- Screwdriver. With its help you can secure all the parts. It is best to give preference to electric models, which come with various attachments.
- Jigsaw with a set of files. It is useful for cutting out holes for sinks, sockets and pipes.
- Construction stapler. This tool will help secure the rear walls of the modules.
- Gun for silicone sealant.
- Measuring instruments. To install the tabletop you will need a ruler and tape measure. Using these devices, it will be possible to accurately take measurements and apply markings.
Preparation
The base is positioned so that the front wall of the floor cabinet is strictly parallel to the edge of the tabletop. Markings for fitting begin with the apron. The edge of the adjacent slab should lie in the same plane as the facade. Next you need:
- Trim the edge taking into account the roughness of the wall.
- Make recesses for the pipes.
- Make cutouts for the sink and hob.
- Fasten and align to the base along the façade so that the tabletop protrudes forward by 35–45 mm.
Pruning must be done carefully, accurate to the millimeter. You can use a power tool. After this, you need to prepare the fasteners for the base of the kitchen table.
Trim edge
Make recesses for pipes
Make cutouts for the sink and hob
Fasten and align to the base along the façade
Joining parts
This stage is needed if the tabletop is prefabricated. Its fragments are combined into a single monolith. Where there are joints, screeds are made. Step by step sequence:
- Glue the ends.
- Connect the parts, lay and secure the ties.
- Polish the joints.
- Strengthen the seams.
For work you will need aluminum strips. They come in corner and connecting types. Self-tapping screws are used for fastening.
Glue the ends
Connect the parts, lay and secure the ties
Polish the joints, strengthen the seams
Installation of the canvas
Before installing the countertop, you should cut holes for the hob and sink. To do this, you can use a ready-made template. It is usually included with the instructions. Step by step guide:
- Place the tabletop on the cabinet.
- Level it up.
- Fix the plate in a stationary position.
- Secure with corner brackets.
To simplify the process, it is recommended that two people perform this step. An assistant should press firmly on the tabletop. This is necessary to make it easier to fasten it with screws.
Place the tabletop and level it
Fix the plate in a stationary position
Pin
Installation of skirting boards
The plinth performs a decorative function, covering the joints on the kitchen table. It also reliably protects them from moisture and mold. This element is glued or screwed using self-tapping screws. Step-by-step instruction:
- Measure the required length of the plinth and cut it.
- Treat the installation area with silicone to protect against moisture penetration.
- Install the profile, securing it with self-tapping screws.
- Cover corners and joints with decorative trims.
If you decide to use glue, the base must first be degreased. After this, the profile is attached. The rest of the steps are exactly the same.
Measure and cut to desired length
Treat the installation area with silicone
Install profile, close corners and joints
Transformable folding table
The previous option is, of course, not the only possible mechanism. The kitchen table can also be extendable. When a small table, through simple manipulations, is expanded to a large size.
To make an extendable kitchen table with your own hands, you will definitely need drawings. They can be found on the Internet or in magazines (for those who are used to paper sources). The ones we offer will allow you to create a table with a tabletop 700x1200 mm when assembled, and 700x1670 mm when disassembled.
DIY table materials and tools:
- laminated chipboard;
- corner 50x50 (aluminum) 4 pcs.;
- guides 2 pcs.;
- legs (made of metal) 4 pcs., strong enough to support a large dining table;
- 6 locks (will be described further);
- screw (10 mm);
- self-tapping screws 20x4 and 16x3.
- a heat gun for gluing edges, but you can also use an iron;
- drill;
- jigsaw;
- milling cutter;
- level, roulette, etc.
Operating procedure:
- Before making a folding table, prepare the necessary parts in accordance with the prepared drawings. The blanks should be cut and edged.
- The next step is to prepare the moving mechanism. To begin, draw a line on the outside of the corner dividing its side exactly in half. This line will be needed in all corners.
- Using a guide, mark the places where the corners and the guide are fastened.
- Drill the required holes.
- We fasten the structure of two corners and a guide with bolts.
- Place the resulting structures in front of you with the moving parts of the guides inward. Now you need to drill 4 holes, in the moving parts of the guide from the outside, and in the fixed parts - from the inside.
- Place the tabletop blanks on the table with the front side facing away from you, carefully aligning the edges. Place the resulting mechanisms on top with the movable part inward and align their centers with the joint of the table tops of the transformer table.
- Screw the mechanism with self-tapping screws as follows: the moving part to one part of the tabletop, and the fixed part to the other.
- Screw the clasps together, connecting the edges of the tabletops.
- Separate the tabletops, place an insert between them and screw the missing parts of the locks to it. It should be possible for the locks to close without the insert and with the insert.
- All that remains is to screw the legs and the transformer table with your own hands is ready.
You might be interested in the question of how to make a round-shaped transformer table. It all depends on the prepared drawings and your wishes. For example, you can make a round sliding table based on the same mechanism as in the previous version.
But there may be other more complex options.
Common causes of breakdowns
The need to repair tables may be due to the use of low-quality fittings, as well as intensive use of furniture. Very often, guides for drawers and pull-out table elements fail, since they are the ones most exposed to dynamic loads. Other common causes of table breakage include damage to wooden frames and their fastenings. In addition, fittings for countertops and supports often fail:
the connections between the legs and the tabletop on standard tables can become loose, break, or even fall off; the fastenings of the folding boards often become loose and easily break off when the table is opened carelessly; for a transforming table, the main problem is breakage and jamming of the retractable mechanisms; a common problem with tables on glued wooden tenons is drying out of the grooves and subsequent weakening of the fastening strength; The scourge of glass tables is the displacement of the thrust bearings, the loss of strength of the adhesive connection with the table parts, and the breaking of the threads on the fittings.
Table repair depends on the cause of the breakdown
The majority of breakdowns are easy to fix on your own. To do this, you need to have a good understanding of the design of the table, which, however, in most cases is primitive. The main part of the tables consists of a table top connected to a frame and horizontal frames connected to the upper part of the supports (legs).
In other cases, the frame may be connected directly to the top while the legs are connected to the frame. For tables of a simpler design, the supports are attached to the bottom of the frame using glue, tenons and dowels. Such tables most often break: adhesive joints lose strength, wooden tenons and dowels break, screws and bolts become loose. Such breakdowns can be easily repaired. To do this, a new layer of glue is applied to the adhesive bonds, new tenons are driven into the grooves, bolts and screws are replaced with angles and fastening plates.
Kitchen countertop installation
So, everything is ready, you can start installing the countertop. Let's start with products made from MDF and chipboard. But let’s immediately make a reservation that there is one installation method - on metal corners. The tabletop must be turned over and the corners attached to the back side. Their location is determined by the location of the sidewalls of the cabinets, because it is to them that the upper plane is attached. Therefore, even during the fitting process, it is necessary to draw on the back side of the tabletop with a pencil the lines where it joins the side walls of the cabinets.
It is on them that the brackets are fastened with self-tapping screws with a diameter of 4.5 mm. The length of the fasteners is selected based on the thickness of the tabletop. They should be 10-12 mm shorter than this size. After which the tabletop surface is turned over and attached to the side walls of the floor cabinets of the kitchen set.
Stone countertops are, in principle, installed and secured in exactly the same way. Only instead of screws, two-component glue is used here, which should remain plastic after drying. For example, these are adhesives from manufacturing companies Hilti or Sika. By the way, all experts note that the adhesive method of fastening is much better than using self-tapping screws.
- The installation sites of the mounting corners must be degreased. This applies to both the fasteners themselves and the back surface of the countertop.
- The glue is not applied to the entire surface of the fastener shelf, but in 3-4 dots in a checkerboard pattern.
- The metal corner is pressed tightly, and should remain in this state for at least a day.
- After which the tabletop itself is installed on the cabinets and secured through corner brackets with self-tapping screws to the sidewalls.
As you can see, attaching the countertop is not the most difficult process. It is more difficult if there is a need to join two elements that form a tabletop plane. For example, if you are assembling a corner kitchen set. Typically, stone products are ready-made corner (shaped) products that cover the entire plane without joints. It is more difficult with products made from MDF and chipboard. Their design will definitely have at least one joint.
The most important thing is to accurately fit the two parts to each other. Therefore, you need to cut very carefully. But before that, you need to accurately draw the joint line. Everything else is simple.
- First, one part of the tabletop is installed and secured to the cabinets.
- Lubricate the two butt ends with silicone sealant.
- An aluminum T-shaped profile is attached to one of the ends, which will cover the joint itself with the top bar.
- Fastening is done with small self-tapping screws.
- The second part is laid and attached to the cabinets, which must be pressed tightly against the aluminum profile.
It should be noted that aluminum profiles are not used to connect countertops coated with acrylic or polyester. They can be connected using the same two-component adhesive composition. To do this, you will have to install two bars in a transverse arrangement on the back side of the tabletop with self-tapping screws. These will be used to pull the two pieces together.
Glue is applied to the ends and tightened with two clamps. The glue that comes out of the joint must be removed immediately. After drying, the joint is sanded until a uniform plane is formed. The clamps are removed, the bars are dismantled. To make the connection reliable, you can attach metal plates across the joint to the bottom of the tabletop, securing them with self-tapping screws. After which you can install the tabletop yourself, as a single element.
Installation of surfaces made of chipboard, MDF, artificial stone
Do-it-yourself installation of countertops made of artificial stone, chipboard, or MDF follows the same principle.
Fastening the tabletop also involves installing additional moisture-insulating elements - jumpers, plugs, corners made of aluminum and plastic. They will be required for surfaces made of both chipboard and artificial stone.
- First, most likely, you will need to take measurements and then cut the sheet based on them. In this case, the length is measured taking into account the strip overlapping the ends. You can cut off the excess from the sheet with your own hands using a wood saw or jigsaw. If there are protrusions on the wall, then all the required recesses are cut out on the tabletop in advance.
- Now we lubricate the ends with silicone sealant, apply an aluminum strip and level it flush. Then you need to secure the bar with small self-tapping screws. Excess silicone can be wiped off with acetone.
- The edge of the surface that remains closed must be decorated with edge tape. In order to attach it with your own hands, you first need to heat the tape, and then glue it and cut off the excess. After gluing, the edges of the tape are sanded.
- According to the building level, you need to adjust the legs of the floor cabinets of the kitchen unit. If the legs are not adjustable, you can place adjusting wedges and plastic spacers under them.
- Now fill the back top edge of the cabinets with caulk as shown in the photo. We also generously lubricate the back end of the tabletop with the same silicone. We attach plastic or metal corners in the cabinet under the sink.
- Now carefully place the tabletop on the cabinets and either press it tightly against the wall, as shown in the photo, or leave a 5 mm gap from the wall, depending on how much you want the tabletop to protrude above the cabinets, taking into account the facades.
- Now we will actually attach the tabletop to the kitchen unit (not to the wall). To do this, screw 30 mm and 16 mm screws under the sink into the existing holes under the countertop.
- Now you can install the plinth between the apron and the countertop and on the sides.
If the tabletop is fastened at a corner, then the joint seam must be hidden with an aluminum profile. For more information about this, watch this video:
In custom-made kitchens, the work surface is most often common to the lower cabinets, but if you buy a factory-assembled kitchen set, then most likely you will need to connect the countertops, since in this case there is a separate “top” for each cabinet. So, all the required cuts are made in the plane, after which the connecting elements are inserted into the grooves and firmly pulled together.
- At the last stage, a hole for the sink is cut out.
Visually about installing an artificial stone surface:
Classification of skirting boards
Often, the kitchen set already includes a baseboard that matches the color scheme of the furniture. But if the set is made to order, then manufacturers offer customers several types of skirting boards to choose from. But such products do not always fit the main furniture or meet the customer’s requirements. In such cases, it is necessary to purchase the strips separately. Before purchasing, it is advisable to familiarize yourself with all types of skirting boards, because they are classified by shape, material of manufacture and design.
There are different types of skirting boards
By shape
There are many different forms in which such products are produced. The most popular of them include:
- triangular skirting boards;
- sketches;
- with rounded sides;
- flat or straight;
- square.
The shape and size of the skirting boards can also be different
By design features
Based on their design features, kitchen skirting boards are classified into cast and universal. Cast moldings have a rigid and more massive design. Such products are attached directly to the seal, since they are not equipped with a silicone profile. Cast skirting boards have a presentable appearance, but due to their increased rigidity they do not last very long.
Various types of skirting boards
The base of the universal plinth is a silicone seal to which special profiles are attached. Skirting boards can be produced in different colors, so if a product of the same color is already installed in the kitchen, then, if desired, replaceable inserts can be replaced by choosing a more suitable shade.
By material
Kitchen baseboards are made from different materials, each of which has its own pros and cons. We are talking about the cost of products, their service life and care features. Below are the most popular materials used in the production of moldings.
Table. Classification of skirting boards according to the material of manufacture.
| Type of plinth, photo | Description |
| Wood | Such skirting boards are mainly installed on countertops, which are also made of wood or chipboard. The material is relatively inexpensive, but it is quite difficult to match wooden skirting boards to the tabletop in order to obtain the desired combination. |
| Aluminum | A popular type of skirting boards. Such products are durable, they are not afraid of heating devices, and the surface is easy to clean. For the manufacture of skirting boards, polished and embossed material is used, covered with decorative finishing. Products may have different shapes and appearance. |
| Plastic | Polyvinyl chloride is used to make plastic moldings. The material is quite easy to modify, so manufacturers offer plastic skirting boards in different colors and shapes. Wood, marble or artificial stones can be used to decorate such products. |
| Stone | The material is more expensive, so skirting boards made of artificial stone are quite rare. Such products are installed vertically, pressing tightly against the wall surface. The baseboards are attached with glue. Their disadvantages include high cost and vulnerability to high temperatures. |
| Metal-plastic | Used to decorate countertops made from almost any material. Metal-plastic skirting boards can have a matte or glossy surface. It is not recommended to install such products near hobs. |
Types of products
Products are made from different materials. The complexity of installation depends on the selected material. Countertops are divided into 4 types:
Wooden crafts. Despite the fact that products made from natural wood have a number of disadvantages, they are especially popular. This is a beautiful and environmentally friendly material that is resistant to moisture. Therefore, the countertop needs to be maintained regularly. In case of damage, protective agents or polish will help restore the surface of the kitchen unit.
Laminated products. The laminate surface comes in a variety of colors and is easy to care for. At the same time, the material is afraid of high temperatures and mechanical damage.
Cutting the tabletop is done carefully, as damage may remain on it that is difficult to repair. Metal surface. Increasingly, consumers began to use products made of metal
This is a cheap and easy-to-use material. The metal surface has a beautiful appearance, is not afraid of humidity and high temperatures, and is resistant to abrasion. But steel has disadvantages: it often develops scratches and small marks. Scratches will disappear if the surface is sanded and rubbed thoroughly. Stone surface. The leading place among all materials is occupied by stone countertops. Such surfaces are resistant to mechanical damage and are not afraid of scratches and cuts. High temperatures are not scary for them. Different types of stone have their own advantages. Common materials are granite and marble.
Stone and acrylic
A DIY stone kitchen countertop is attached with glue. However, it will take experience to properly cut the panel and install the heavy slab. On the positive side, they note that the surface does not scratch, does not absorb dirt and is easy to clean.
“Liquid stone” or acrylic is poured onto the surface while it is hot. The resulting coating is not scratched and can withstand high temperatures and water. However, acrylic is expensive.
Chipboard and MDF
Many people are interested in how to install a countertop based on laminated chipboard or MDF. The material consists of resins and wood shavings, so it is prone to swelling from moisture. The laminated coating does not allow water to penetrate the structure and deteriorate the texture.
However, the sides are often open because the surface needs to be sawed to fit. To prevent the ingress of moisture, be sure to treat all open areas with silicone sealant and install an end strip for the countertop.
Laminated fiberboard (chipboard)
It is a panel whose top layer is covered with a durable laminate consisting of wood chips and resin
It is easy to work with such material; the only thing is that special attention should be paid to cutting, it must be neat. In addition, the laminated surface must be protected from mechanical damage, since traces of scratches and impacts may remain on it.
The slabs are affordable and come in a variety of textures and colors, allowing them to be used in any design. As for the disadvantages, such countertops can absorb moisture and swell, this mainly happens in places where the lamination is damaged.
Tree
It is not uncommon to install a wooden tabletop. How is a wooden tabletop attached? With self-tapping screws, of course
But it is important to treat all parts with water-repellent agents. To maintain the original appearance, constant restoration is necessary, but durability and long service life are guaranteed.
Metal
Among the metals used in kitchens, stainless steel is used. It is durable and resistant to high temperatures. But it is not scratch-resistant, so you need to use it carefully. The metal surface can have a matte or glossy texture.
Glass
It is not recommended to independently attach the tabletop to kitchen floor cabinets made of glass, due to its fragility. Although the glass for them is tempered using a special technology, you cannot hit it too hard to prevent microcracks from appearing. With careful handling, glass will last a long time.
Headset assembly
Experts install kitchen cabinets as desired, some start hanging upper cabinets, while others find it easier to install the base. But this is everyone’s personal preference, so you shouldn’t rely on someone else. The main thing is to start.
Lower (base) cabinets
- Place the legs as close to the corners as possible. The load will be on these parts.
- Hang the doors at the last moment, first assemble all the buildings.
- Fix all the cabinets together and level them.
Upper (top) cabinets
- It is advisable to mount it on special hangers that are attached to a metal strip. Such cabinets are easier to hang and remove.
- Install doors and removable shelves only after the cabinet is securely attached to the wall.
- The minimum distance between the table top and the bottom of the wall cabinets is 550 mm.
However, you can mount it as you wish, it all depends on your height
The only thing worth paying attention to is the cabinet above the hob or stove - very high temperatures will adversely affect its condition
But this only concerns the assembly of the set, but there is another important question: how is the countertop attached to the kitchen?
Installing a bar counter
Often the countertop in the kitchen is used as a bar counter, on which they usually have breakfast and, in fact, lunch.
This requires a special fastening that will allow you to securely fix the product.
- You should purchase a steel pipe with a diameter of 50 mm from a furniture store. It’s better to ask them to cut it right to size for you, then the edges will be smooth, without burrs.
- You will also need fixing elements for the bar counter. One will be attached to the tabletop, the second to the floor.
Note! If the table width is no more than 400 mm, then one leg is enough. If more than 400 mm, then purchase 2 sets.
Attaching a kitchen countertop as a bar counter proceeds as follows:
- First of all, the fasteners are fixed to the tabletop.
Bar legs are attached at the corners to ensure table stability
- Pipes are inserted into them and leveled.
- The lower fastenings are marked on the floor.
- The floor is drilled, if it is not wooden, and the fastenings are fixed using dowel-nails.
Fitting and fitting
It should be noted that there is a certain dimensional ratio between the width of the countertop and cabinets. The first should be 3-5 cm wider than the second. And this allowance should stick out from the front side, forming a kind of visor. This is done with one sole purpose - to protect the furniture facades from water and utensils that may drain or fall from the surface of the tabletop.
Therefore, the tabletop is laid on top of the cabinets and pressed tightly against the wall surface. It’s good if the latter is aligned to the maximum. If not, then you will have to trim the back of the tabletop. This can be done if this element of kitchen furniture is made of MDF or chipboard. It is clear that a stone or polymer product cannot be trimmed.
It is optimal if the trimming is carried out at a slight angle, thus making it possible to adjust the plane to the curved surface of the wall. This operation is best performed with a hand-held circular saw. It is better not to use a jigsaw for this work. They can be used to trim thin products, and the thickness of the table tops is 4-6 cm, so it will be quite difficult to work with this tool.
If the wall, or more precisely, the laid apron, is a flat plane, then you can do without trimming. But it is better to grind the end, thereby removing small differences, no more than 3-5 mm.
Tabletop instead of window sill design options
Undoubtedly, the simplest option for a window sill countertop is a straight product placed along the wall with a window - this is usually done in very small kitchens, and even then not always. As they say, there is no limit to perfection, and often they try to make even such a functional product even more practical. This can be achieved through some modernizations or, more correctly, changes in the shape of a straight tabletop - through such actions you can create the following tabletop design options.
- The table top is a window sill, smoothly flowing into the bar counter. Let's face it - this is not an option for a small kitchen. It allows you to create a U-shaped furniture set that harmoniously and, most importantly, functionally divides the kitchen space into several zones. The advantage of this approach to making a tabletop window sill is that it is opposite the window that creates a comfortable and efficient work area with natural light.
- Tabletop window sill with folding table. If we are talking about a small kitchen, then this option for a window sill countertop is just right for it. A folding table, which when unfolded is part of the tabletop, will allow you to conveniently host family lunches, breakfasts and dinners and at the same time not interfere with the kitchen owner in the process of preparing them.
- The simplest option, which is suitable for both large and small kitchen spaces, is a straight window sill countertop located along the wall with a window. We have already talked about it a little higher, and you can add a little here - this is the simplest countertop in terms of self-production.
So, three options – by and large, this is not so little. With their help, you can achieve enormous variety and make your kitchen truly unique. How to do it? But this is what we will deal with further. But before we get into that, first you should watch a video about the different options for window sill countertops in the kitchen.
Replacing an old countertop
If the surface is worn out or tired, the old countertop can be replaced with a new one. The size of the new one must completely match the old product. When removing the old surface, kitchen cabinets can be damaged, so dismantling work is done carefully:
- Remove the sink and baseboards, unscrew all fasteners.
- Unnecessary parts are cut off.
- The edges are sealed with end strips.
- The kitchen set is leveled.
- Use a jigsaw to cut out all the necessary holes.
To prevent water from getting into the edge and the product from swelling, it is sealed.
Workflow Features
It may seem to you that it is quite easy to install a countertop, but still, you should not take this issue so lightly.
Here are a few more recommendations and features of countertop fasteners:
- If you install the tabletop on furniture corners, you should do it this way: step back 1-2 mm from the top edge of the cabinet and mark the center of the corner. Afterwards, secure the corner with a self-tapping screw. 4 corners are enough for one meter.
- For chipboard, be sure to use kitchen sealant, otherwise, after a few weeks of use, the plastic surface (near the sink) may swell.
- It is advisable to level the kitchen set. Try to avoid sagging of the wooden tabletop.
- When choosing hardware, choose stainless materials, this will help extend the life of the headset as a whole.
The article DIY tile kitchen countertop: step-by-step instructions also contains additional information.
How to screw legs to a table?
There are many ways to attach furniture supports to a table:
- Using surface plates.
- Using driven bushings (T-nuts).
- For screws.
- Through wooden clamps.
- Using Z-shape holders.
- Using 8-shaped clamps.
- On spacers with grooves.
- With zip ties.
You can attach the legs to the table yourself in various ways. Below are some of the most common mounting methods.
Attaching the legs to the tabletop using plates
Surface plates are mounted on each of the four sides on the inside of the tabletop. To attach the leg to the plate, the kit includes a threaded pin and a mating part – a bushing nut. It needs to be screwed into the upper part of the leg.
The legs can be attached using plates. To be safe, it makes sense to apply glue inside the hole before screwing the bushing into the wood. Installation is carried out by sequentially screwing the pin into the nut, and then screwing the support to the plate. Before screwing the bushing into the wood, glue can be applied inside the hole.
Using T-nuts
Another option for a pin connection, only using driven bushings. This method is suitable for tabletops, the surface of which will subsequently have an additional coating, since the sleeve is driven in from the front side, so that the counter part is accessible from the back. Such T-nuts are also used to attach legs to the table. Otherwise, attaching the legs to the tabletop follows the same principle as with the mounting option using plates.
The fastening process is the same as in the case of plates.
Basic fasteners
To install the countertop you will need several types of fasteners. Their number depends on the dimensions and shape of the plate attached to the table. The master must prepare in advance:
- Tongues. These are elongated parts with locks that connect several elements into one monolithic structure.
- Metal or plastic corners with self-tapping screws - two thin plates connected perpendicular to each other. Used to prevent deflections when working with chipboard.
- Eccentrics. These are cylindrical bushings with plugs for screwing the tabletop to the base.
- Eurobolts are long screws used for tightening corners.
Also, fastenings can be combined. To do this, two types of connections are used simultaneously - mechanical and adhesive. In this case, tongues are used together with corners. This method is considered one of the most reliable when working with chipboard. It is what is most often used by professional furniture repair and installation specialists.
Features of installing countertops
When can you install the countertop yourself?
When starting to install new kitchen furniture, we will have to decide whether to install the countertop ourselves, or entrust this work to professionals. There are several factors to consider here:
You can install an inexpensive MDF tabletop yourself
- Self-installation of countertops should only be done if you know exactly the installation technology. Otherwise, if you make the slightest mistake, you will irreversibly damage a fairly expensive countertop - and you will no longer be able to use it in the kitchen.
- If you have the skills, you can independently install countertops made of MDF or chipboard, as well as countertops made of solid wood or veneered wood. These materials are quite easy to process, so you can work with them with the simplest tools.
- If you are planning to install a tiled countertop or a stone-like concrete countertop in your kitchen, and you have the necessary skills for this, feel free to get to work. As a rule, such “handicraft” countertops turn out better and last much longer than custom-made ones.
You will learn what types of kitchen countertops there are in this article.
When you shouldn't install the countertop yourself
And when is it better to turn to the experts for help? Installing countertops in the kitchen with the involvement of professional installers is justified in the following cases:
Glass tabletop: let the professionals install it
- If the countertop is made of expensive and difficult to process material - tempered glass, triplex, cast stone, etc. The price of such countertops is very high, and in this case it’s not worth the risk!
- If the manufacture and installation of the worktop is part of a comprehensive order for the manufacture of all kitchen furniture.
- If you do not have the skills to install a high-quality countertop.
- Well, and finally - if installation of a countertop in the kitchen is included in its price.
After analyzing all the above tips, you can choose the best strategy for you. And if you decide that it is better to do everything yourself, then below we will tell you how to install a countertop in the kitchen.
Selection of materials
Naturally, the selection of material for the countertop is not very diverse, but even 3 simple options can make you think and even puzzle.
Plastic table top
What is plastic? This is paper folded in several layers and glued together. The thickness of such a product will rarely be more than 0.1 cm, since 0.06 cm is most often used for the kitchen.
Note! If you decide to buy a plastic table, then be extremely careful, since there are surfaces with a thickness of 0.03 cm, which is the most “delicate” and fragile.
The base of the plastic tabletop is standard chipboard, which is short-lived and very cheap. But this was the case several years ago, and at the moment buyers are delighted with moisture-resistant MDF and chipboard. They are a little more expensive than the first option, but very reliable and using them in everyday life is a pleasure.
Advantages:
- It is easy to install as it does not require any special or specific tools.
- Suitable for working with an electric jigsaw, because you can easily make a cutout for a bathtub.
- Reasonable price.
Flaws:
- It can be easily damaged, since the surface does not tolerate any cuts, as well as contact with sharp and heavy objects.
- Cracks and chips cannot be repaired.
- No resistance to high temperature.
Now we propose to consider how to attach a countertop in the kitchen in more detail.
Installation
- Before starting installation work, unpack the countertop and inspect it for chips/cracks.
- If everything is fine, then check the level of the cabinets located below. It must be set correctly.
- In special ties, which are located in each of the cabinets at the very top, you need to drill a hole.
- After you place the countertop on the cabinets, mark, if necessary, where the sink and hob should be. There is no need to commit yet.
- Take an electric jigsaw and cut the holes so that neither the cabinets nor the countertop are damaged.
- Treat the ends that were sawed off with sealant, and then let it dry for half an hour.
- Arrange the countertop as planned.
- Screw the screws through the ties in both cabinets.
Self-tapping screws should be screwed in 4 pieces per cabinet - two should be located on the front screed, and two more on the back.
Please note that if the base of your kitchen set is level and the countertop is crooked, you should press it firmly and tighten the screws. Chipboard products are easy to bend due to improper storage or ambient temperature.
Acrylic table top
Advantages:
- Reliability and durability, since any crack or chip can be eliminated using a grinding tool.
- Not afraid of temperature changes and high humidity levels.
- Huge selection of shades for every taste.
Flaws:
- The treatment cannot be done at home, as it requires special tools.
- High price.
Installation
In order to attach the kitchen countertop to the cabinet, you will need to contact a furniture organization and invite a professional measurer, since acrylic cannot be glued with your own hands at home. After this, the master will make a project on which the kitchen set and the location of the sink/electrical appliances will be drawn. It will also be noted in which places the wooden blocks will be located, through which the fasteners will be made.
Please note that if your kitchen is shaped like the letter “L”, then the installation of the countertop should be ordered from the organization. This is due to the fact that the surface will need to be sanded and glued.
To do this you need the following tools:
- Make holes in advance in the places where the wooden blocks of the acrylic tabletop will be located.
- Lay the finished product in the way it should be laid according to the project.
- Screw in the screws.
The third and final species remains.
Quartz countertop
Advantages:
It is impossible to cause harm, since the surface of quartz has the special hardness of natural stone, and for this reason, even if accidentally hit by a pan or knife, not a trace will remain.- The surface of the countertop is not afraid of hot frying pans.
- The color will be identical to the natural material.
The disadvantages include high cost and weight, but all this is more than compensated by the positive aspects.
Installation
This section is similar to what was indicated in the instructions for installing an acrylic tabletop, since the manufacturing technology of the materials is very similar. For this reason, if you have an indirect kitchen, you need to contact craftsmen who are capable of gluing surfaces beautifully and efficiently.
How to install a bar counter
Very often, the countertop in the kitchen is often used in the form of a bar counter, on which you can have breakfast and lunch.
To do this, you need a special type of fastening, which will make it possible to securely fix the rack:
- It is best to buy a steel pipe with a diameter of 5 cm from a furniture store. Ask them to cut it right to size, and then the edge will be smooth, without any burrs.
- You will also need fixing elements for the bar counter, the first one will be attached to the tabletop, and the second one to the floor.
Please note that if the table width is no more than 40 cm, then one stand leg is enough, and if it is more than 40 cm, then it is better to take 2 sets.
Mounting the countertop in the kitchen as a bar counter is done as follows:
- First you need to fix the fasteners to the tabletop.
- Insert pipes into them and set them strictly according to the level.
- Make markings on the floor for the lower fasteners.
- Drill the floor, unless of course it is made of wood, and use dowels and nails to secure the fastenings.
And now it won’t hurt to find out what other features of the work process are.
Process Features
Although you may think that installing a countertop is quite simple, you should take it so lightly.
There are certain recommendations and features of fasteners:
- If the tabletop will be installed on furniture corners, then it is better to do it this way - you should retreat 0.1-0.2 cm from the top edge of the bedside table and mark the center of the corner. After this, it should be secured with a self-tapping screw, and 4 corners will be enough for each meter.
- If you use chipboard, be sure to buy kitchen sealant, as otherwise the plastic surface may begin to swell a few weeks after you start using the sink.
- It is advisable to ensure that the headset is level. Try not to leave the structure in the form where the wooden tabletop sag.
- When selecting hardware, you should choose only stainless elements, as this greatly helps to extend the life of the set.
These main points are worth remembering if you plan to attach the tabletop to the cabinet yourself.
Mounting options
Depending on preferences and goals, you can use legs, a cabinet or a bracket to install the tabletop
Legs
If you have one (round or rectangular cross-section, with a stable base), three or four legs with mounting brackets, there is a reason to install the tabletop on them.
When welcoming guests or having a quick lunch, the new table can be easily moved to the kitchen corner so that there is enough space for everyone.
While preparing dinner, the tabletop with legs can be moved closer to the stove.
Important. Table legs must have brackets or fastenings that are compatible with the material of the new product.
Tools and materials
- electric drill, preferably with a screwdriver function;
- drills: 3 mm in diameter - 2 pcs.;
- a set of screwdrivers (under “+” and under “-“);
- PVA glue or “liquid nails”;
- screws for a screwdriver 1.5 cm - 20 pcs.;
- pencil;
- roulette.
Installation
- On the underside of the tabletop, using a tape measure, mark with a pencil the places where the brackets are attached to the table legs.
- Using a drill with a 3 mm drill to a depth of 1 cm, we drill out holes for attaching the brackets.
- To be safe, pour a few drops of “liquid nails” into the holes.
- Using a screwdriver (or screwdrivers), we screw in the screws and attach the legs to the kitchen table.
Cabinet
The cabinet can serve as the basis for a table - rectangular, round or fabulously enchanting, as much as your imagination allows.
The new product must aesthetically fit into the interior, not block the passage to the sink and gas stove, and the fastenings must be selected individually in each case.
A massive, stable cabinet will add stability and solidity to the kitchen interior.
Important. Choose the place carefully - once you install a tabletop with a cabinet, it will be very problematic to move it to the side.
Tools and materials
- electric drill, preferably with a screwdriver function;
- drills: 3 mm in diameter - 2 pcs.;
- a set of screwdrivers (under “+” and under “-“);
- PVA glue or “liquid nails”;
- screws for a screwdriver 1.5 cm - 20 pcs.;
- pencil;
- roulette.
How to install?
- We combine the axial centers of the cabinet and tabletop.
- Using a tape measure and a pencil, we mark the places where the furniture corners are attached, connecting the cabinet and the lower surface of the tabletop.
- Using a drill with a 3 mm drill to a depth of 1 cm, drill out the marked mounting holes.
- Using a screwdriver (or screwdrivers) and furniture corners and screws, we assemble the product.
Important. When drilling holes, do not exceed the specified depth, so as not to drill through the product.
bracket
Creating a completely new work surface, one side resting on the wall, will save space, which is usually not enough in a standard kitchen. A cutting table or a cozy corner for tea drinking is on top, and below you can place racks for storing vegetables or kitchen utensils, and there is somewhere to remove stools from the aisle. In this case, you need to select the brackets on which the tabletop will be mounted.
Disadvantages: brackets must be prepared in advance.
Advantages: a homemade piece of furniture will allow you to conveniently place many household items in the same space.
Tools and materials
- electric drill, preferably with a screwdriver function;
- drills: 8 mm in diameter, with a Pobedit tip - 1 pc., 3 mm - 2 pcs.;
- anchor bolts for 8 mm - 4 pcs.;
- wrench for anchor bolts;
- screws for a 1.5 cm screwdriver - 10 pcs.;
- hammer drill with an 8 mm drill (will speed up installation);
- pencil;
- roulette;
- building level.
Advice. If you work carefully, one drill with a diameter of 3 mm will be enough, but it is easy to break.
Installation
- On the underside of the tabletop we mark the places for attaching the brackets.
- Using a drill with a 3 mm drill, drill holes 1 cm deep in the marking areas.
- Using a level and tape measure, we mark the mounting locations for the brackets on the wall.
- Using a hammer drill with an 8 mm drill bit or a drill with an 8 mm Pobedit drill bit, we drill mounting holes in the wall for brackets for anchors.
- We fix the brackets to the wall using anchors.
- Having placed the tabletop on the brackets, we assemble the structure from the bottom using a screwdriver (or screwdrivers) using screws.
Advice. If there is a plinth, we decorate the joint between the new surface and the wall using liquid nails.
Preparation for installation, installation tools
Tools needed to install the tabletop: jigsaw, tape measure, square, level, hammer, screwdriver.
Before starting installation, you need to decide on the dimensions of the tabletop. It depends on the length and width of the kitchen unit, the parameters of the sink, and the gas stove. The distance from the front edge of the set to the cutout for the sink, then to the cutout for the gas stove, and the values of the cutout (length, width) are taken into account. To process the tabletop from the front side, it is necessary to install an edge tape, heating it in front of this iron. Place the countertop next to the unit close to the wall and draw with a pencil the cutouts for the sink and gas stove. This procedure is complex and requires care to ensure that the edge fits exactly along the edge of the cut. The holes for the sink and stove are cut out with a jigsaw; the cuts should be treated with sealant. To perform installation, you need the appropriate tools:
- Screwdriver Set;
- jigsaw;
- screwdriver or regular drill;
- hammer;
- chisel;
- ruler, pencil;
- square;
- roulette;
- level;
- self-tapping screws
How to attach the tabletop to drywall or window sill?
It happens that the basis for attaching the tabletop is not a hollow, but a cast structure. This could be a window sill or a specially created plasterboard ledge. It will not be possible to attach a tabletop or shelf from the inside to such a base. There is only one option left - glue it.
For this, the well-known liquid nails are used. Any leftover after renovation will do. Regardless of the composition, almost all options are suitable for gluing chipboard, MDF or solid wood to plasterboard or concrete (in the case of attaching a window sill).
For better adhesion, the base must be carefully leveled, dust-free and degreased. The glue itself is applied to the underside of the tabletop. After the recommended time, the tabletop is pressed to the base in the desired position. It is better to leave the press until it dries completely.
ADVICE! To avoid possible deformations, avoid circular motions when applying adhesive to the countertop. Longitudinal or transverse stripes, as well as spot application, work better.
Mounting on wooden clamps
Using homemade wooden clamps is a simple and reliable way to attach a tabletop to a tabletop without purchasing hardware. Clamps work on the same principle as metal Z-clamps. They are easy to make in series from scraps that can be found in every workshop. Of course, this takes time, but often not much more than it takes to go to the store for accessories.
When making wood clamps, be sure to maintain the correct grain orientation as shown in the diagram to give the bracket proper strength.