BlueWeld Prestige 164 help with repairs
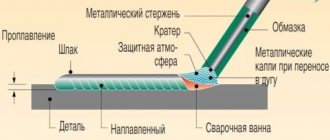
Usually, in case of such breakdowns of the Prestige 164, as described by you, the elements of the control and protection unit remain in good working order. If stabilizer U3 (LM7815A) is intact, then the control unit is most likely working. Start by replacing R4; instead of keys Q5, Q8 (both HGTG30N60-A4 should be there), install 2-watt 220 Ohm resistors (between the gate and emitter), this will be a dynamic load for the drivers. Carefully check all the elements of the driver circuit (they are located between the keys, around the TGR - this is such a brown coffin. Zener diodes D22, D24, D16, D17, D29, D30?, if they are not broken or broken, should be called by the tester directly in the circuit like ordinary diodes. Be sure to check R70 and R71 for open circuits, it happens that they fly out along with the keys. Check the integrity of Q4, it is located between the TRG and the fan, and looks like an optocoupler. In your case, most likely, the keys flew out after repeated replacement, due to the breakdown of diodes D14, or D31 (RURP860, or otherwise - MUR860), be sure to check them. Please note that, unlike diode D14, which is pressed by the cathode directly to the radiator Q5, diode D31 is attached to the radiator Q8 through a Namakom gasket, if placed without it, the release of all power elements is ensured.When checking the driver elements without desoldering from the circuit, pay attention to the fact that Schottky diodes D21 and D35 have very low resistance in the reverse direction, and in the circuit they ring like KZ. If everything is in order, after the above manipulations, supply power to the device as usual. It will work “in spurts”, as the protection system is triggered, but even during the short period when the PWM is operating, periodically appearing pulses can be observed on the gates of the keys. They must be identical on the gates of both keys, and in shape correspond to the service manual (respected Zadov gave you a link to it, I once translated it from the factory original, so the oscillograms there are correct). If the signals correspond to the norm, and all other elements of the circuit are checked and intact, feel free to solder the keys. Don't forget to check the secondary rectifier and the primary rectifier filter capacitors. The bridge of the primary rectifier itself is indestructible, it has been tested in practice. When you turn it on for the first time, supply power voltage through a 220 V, 200 W lamp. It is quite enough to ensure operation at XX, but if something suddenly goes wrong, it will protect the keys. If, after turning on the device, the lamp flashes and then goes out, the fan starts to rotate, and the green diode lights up, you can safely turn on the device directly. Measure the XX voltage at the output terminals, it should be in the range of 68 - 75 volts. Try cooking at the minimum current, with a 2 mm electrode. I advise you to never power the device from a gas generator, never cook with a 4 mm electrode, and never cut metal with a device, even using a two-piece. Good luck with the repair.
INVERTER48
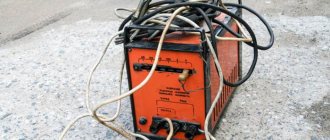
We repair the welding inverter BLUEWELD PRESTIGE 164 . Naturally, the power transistors died; these devices rarely kill anything else. And with them, the TGR - a galvanic isolation transformer, and a bunch of small powder all over the driver, you can’t do without it.
The power block of this inverter uses IGBT transistors - IRGP4068D (GP4068D).
A factory repair kit was used for the repair, the client did not want any alterations, so that everything would be original, well, the owner is a gentleman. The kit includes: two IRGP4068D , a galvanic isolation transformer - TGR, two RURP860 and one heat-conducting pad. Here is the repair kit itself.
First let's take some measurements of the contents. This is not necessary, but for general development, and maybe it will be useful to someone.
ATTENTION! Some of these measurements, for example the junction capacitance of an IGBT transistor, have no relation to the data given in datasheets and other reference books. All measurements were made at home using common available instruments - a digital multimeter or a Chinese transistor tester . These measurements may be useful for comparison. Indeed, if two transistors with the same name have very different measurement readings, it means that at least one of them is definitely a fake (if we are completely sure of the second). And differences in the housings and marking fonts only increase suspicions.
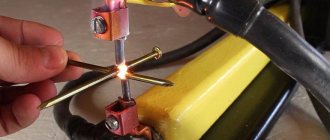
Inductance of galvanic isolation transformer - TGR BLUEWELD PRESTIGE 164
Inductance of the primary winding of the TGR BLUEWELD PRESTIGE 164
Inductance of the secondary winding of the TGR BLUEWELD PRESTIGE 164
Now let's take a look at the IRGP4068D (GP4068D) transistors
IRGP4068D rear full face
IRGP4068D profile
Transition capacitance of IGBT transistor IRGP4068D (GP4068D)
Gate-collector junction capacitance of IGBT transistor IRGP4068D (GP4068D)
Gate-emitter junction capacitance of IGBT transistor IRGP4068D (GP4068D)
Collector-emitter junction capacitance of IGBT transistor IRGP4068D (GP4068D)
Now all this needs to be installed, soldered, screwed and plugged into a socket, “business”, first it is very advisable, I even strongly advise, to check all the elements of the driver, otherwise the consequences will be unpredictable.
By the way, this repair kit can also repair Telwin devices: Tecnica 144 , Tecnica 164 , Force 145, Force 165 .
Diagram of the welding inverter BLUEWELD PRESTIGE 164 Oscillograms of the BLUEWELD PRESTIGE 164 - after installing the repair kit
BLUEWELD PRESTIGE 164
Reviews
— Sergey P.
Pros: The welding quality is high, suitable for beginners, easy to weld with any electrodes, the current approximately corresponds to the adjustment scale.
Cons: Broke. It doesn't produce current, it just sparks. The workshop refused to repair it
Comment: I really liked the device, I welded a fence with it, two sliding gates and two gates, the neighbor scratched his turnip every time he came over, how I can do it so well, I don’t even know how - I just welded it, as I felt after a couple of videos on YouTube. It's a pity that it broke, after that I tried two devices - everything was not the same. Now I’m thinking of buying the same one, but I’m afraid because of the low reliability.
— Max Potainov
Pros: 1) Lightweight; 2) Easy to operate; 3) When the electrode sticks, it limits the current; 4) The design of the handle allows you to carry several electrodes in it; 5) You can hang the belt and carry it on your shoulder, fortunately the weight allows it; 6) Cooks even with 5mm electrodes. True, it doesn’t last long - it quickly overheats; ___upd._____ 7) Cooks equally well with both rutile (type MP-3) and basic electrodes (UONI 13/55). I mastered EA-395/5, TsCh-4, and copper-wrapped MP-3 without any problems. With some skill it can cook in threes at 20 and even 15A.
Cons: 1) Overheats quickly at high current. With a maximum welding current of 150A, long-term work is possible at a current of no more than 120A, and even then with regular breaks. ___upd2.___ Yesterday I welded a new bottom to a water barrel in the village, the wall of the barrel is 8...10mm, the bottom is 12mm, with a small groove. The welding process took half a day because the machine was constantly overheating. It is possible that this can be cured by installing additional fans, or simply opening and cleaning the radiator; 2) Does not display the current welding current value. You can only navigate by the position of the regulator. It's good that it's at least marked. 3) For normal welding through a long extension cord (more than 15m), it must be selected properly. The device does not cook well through extension cords with a small cable cross-section. But this is a problem with absolutely any welding machine; ___upd._____ 4) I would like voltage regulation, a switchable non-stick mode and an adequate arc force mode.
Comment: I bought this device a couple of years ago. Since then, I’ve welded several shelving units, a couple of workbenches, remodeled the garage door, and welded a bunch of small items. There are no complaints about the device. He honestly tried to cook even from a 30m extension cord using a 2x1mm2 cable, but he couldn’t. Then normal electricity appeared in the garage and the problem disappeared. I read mixed reviews about it, someone complained that it breaks down quickly. ___upd._____ Fifth or sixth year in service. I work infrequently, but always in not the best conditions - at most an unheated garage. With careful care, it runs the risk of working for at least as long. There are no serious complaints about the device; it copes with the task of a household tool perfectly. Compact, lightweight, you can easily climb onto the roof or go down into the cellar with it. The original case is still mostly intact, although the hinges leave much to be desired. An indispensable assistant both in the garage and in the country house. He not only welded all the workbenches and racks, but also repeatedly repaired the iron stove, incl. cast iron door, several iron doors for barns and a homemade trailer for a car were made again, etc. It works adequately at a current of no more than 100A, then it will quickly overheat. The non-stick feature sometimes infuriates you and you want to turn it off. A normal arc afterburner would also be helpful. Despite this, I’m happy with the device and don’t want to change to another one yet.
— Max P.
Pros: 1) Lightweight; 2) Easy to operate; 3) When the electrode sticks, it limits the current; 4) The design of the handle allows you to carry several electrodes in it; 5) You can hang the belt and carry it on your shoulder, fortunately the weight allows it; 6) Cooks even with 5mm electrodes. True, it doesn’t last long - it quickly overheats; ___upd._____ 7) Cooks equally well with both rutile (type MP-3) and basic electrodes (UONI 13/55). I mastered EA-395/5, TsCh-4, and copper-wrapped MP-3 without any problems. With some skill it can cook in threes at 20 and even 15A.
Cons: 1) Overheats quickly at high current. With a maximum welding current of 150A, long-term operation is possible with a current of no more than 120A; 2) Does not display the current welding current value. You can only navigate by the position of the regulator. It's good that it's at least marked. 3) For normal welding through a long extension cord (more than 15m), it must be selected properly. The device does not cook well through extension cords with a small cable cross-section. But this is a problem with absolutely any welding machine; ___upd._____ 4) I would like voltage regulation, a switchable non-stick mode and an adequate arc force mode.
Comment: I bought this device a couple of years ago. Since then, I’ve welded several shelving units, a couple of workbenches, remodeled the garage door, and welded a bunch of small items. There are no complaints about the device. He honestly tried to cook even from a 30m extension cord using a 2x1mm2 cable, but he couldn’t. Then normal electricity appeared in the garage and the problem disappeared. I read mixed reviews about it, someone complained that it breaks down quickly. ___upd._____ Fifth or sixth year in service. I work infrequently, but always in not the best conditions - at most an unheated garage. With careful care, it runs the risk of working for at least as long. There are no serious complaints about the device; it copes with the task of a household tool perfectly. Compact, lightweight, you can easily climb onto the roof or go down into the cellar with it. The original case is still mostly intact, although the hinges leave much to be desired. An indispensable assistant both in the garage and in the country house. He not only welded all the workbenches and racks, but also repeatedly repaired the iron stove, incl. cast iron door, several iron doors for barns and a homemade trailer for a car were made again, etc. It works adequately at a current of no more than 100A, then it will quickly overheat. The non-stick feature sometimes infuriates you and you want to turn it off. A normal arc afterburner would also be helpful. Despite this, I’m happy with the device and don’t want to change to another one yet.
Show all reviews of BLUEWELD PRESTIGE 164
Reviews of BLUEWELD PRESTIGE 164 Show all reviews of BLUEWELD PRESTIGE 164