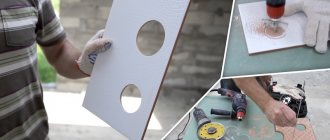
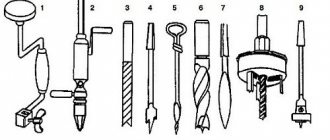
If you follow the recommendations and use the appropriate tool, you will cope with the task quite quickly and efficiently. Recommendations from experienced builders accurately describe the procedure, so it’s not difficult to get confused in the steps. The easiest step would be to buy a special drill for glass or ceramics. It can be feather or tubular. The tip drill bit features a carbide tip that resembles a spear. The advantage of such a drill is its price. A tubular drill uses diamond chips, so it can handle the hardest materials.
How to drill through tiles?
What tasks are most often pursued when drilling ceramic finishes:
- laying water pipes or other communications;
- installation of an electrical outlet;
- hanging shelves, mirrors, hooks and holders;
- heated towel rail insert;
- installation of a clothes dryer.
Before starting drilling, determine the type and quality of the tile. Density, strength, fragility, glaze characteristics and porosity of the tile - all these factors influence the outcome of the drilling process and the choice of tool.
But almost all types of tiles are characterized by one feature - a slippery surface from which the drill will constantly slide. Solving the problem is simple - just cover the working area of the drill with masking tape and get to work.
Another nuance is assessing the density of the tiles. Tap lightly on the facing surface. A dull sound will indicate the absence of voids in the coating - it can be drilled. If the sound is ringing, there are cavities in the tile, which, when drilled, can lead to breaks and chips.
Additional accessories
Beyond simple jigs, construction tool manufacturers have developed more advanced positioning devices.
They provide precise and high-quality drilling. Such devices are equipped with suction cups that allow you to fix a template or stop on the front surface of the tile. They can be mounted on vertical and horizontal surfaces.
What is required for processing?
The best option for working with ceramic tiles would be a corded or cordless screwdriver. Its high rotation speed (800-1000 rpm) allows you to easily handle tile processing. An alternative to a screwdriver is an electric drill, or a manual modification if you have to drill a small hole.
Selecting a drill and auger
When the unit is prepared, all that remains is to choose the type of nozzle aimed at solving certain problems:
- Diamond coated drills. They give the best results for drilling even very hard tiles, but due to their high cost, it makes sense to use them only for a large volume of work.
- Drills with a tip made of pobedit. They work well with soft tiles and medium-hard tiles. It is recommended to drill ceramic tiles on the wall using so-called feather drills - they have a small sharpening angle that does not allow damage to the tile glaze.
- Spear drills. Suitable for laying dowels, they have a low price and an enviable service life.
- Single-sided sharpened carbide drills. These attachments reduce the risk of overheating and make working with very fragile and thin tiles easier.
- Core drills with tungsten carbide coating. Universal components that can easily cope not only with the most durable tiles, but also with marble, brick and porcelain stoneware.
Diamond core drills require periodic cooling with water, and work with them at low speeds - no higher than 500 per minute.
What else can I drill?
If you need to get a hole of a large diameter, a drill with adjustable teeth - the so-called ballerina - will come to the rescue.
The device can drill holes up to 9 cm in diameter, including non-standard shapes for which there are no suitable crowns. But due to the manually moving bracket, the edges of the hole are uneven. Therefore, it is advisable to use a ballerina in cases where the perforation will be covered with something.
Another option for work is a Pobedit concrete drill. Since the tip is not intended for working with tiles, its cutting part is sharpened as sharply as possible, and during the drilling process maximum care is taken so as not to damage the coating.
Possible difficulties
The main difficulty lies in the fragility of the material structure. With a significant point mechanical impact, it is destroyed, chips and cracks form. This is typical for all types of ceramic products. That is why you need to know how to properly drill a hole in ceramic tiles without uncontrolled deformation.
During drilling, a significant increase in temperature occurs in a certain area of the product. This entails a change in operational and technical qualities. One of the problems is the structure of the decor. It consists of a ceramic base and a layer of glaze. The second is much harder and is susceptible to destruction with a sharp increase in external pressure.
Before cutting a round hole in ceramic tiles, it is recommended that you familiarize yourself with the most common mistakes:
- Incorrectly selected tool. This applies to the cutting part, which must gradually destroy the glaze layer, and then the ceramic base;
- The working conditions do not meet the standards. The tile must be on a solid base. It doesn't matter whether it's a horizontal or vertical plane;
- Excessive load. The selected drilling technique should not involve pressure, but rather cutting ceramics. Otherwise, the likelihood of chipping increases.
Taking these nuances into account, you can choose several methods for forming holes of various shapes and sizes. First you need to determine the thickness of the tile and, according to this indicator, select the optimal tool.
Important
If the processing of decorative material is carried out after the final stop, cracks may appear on the inside. In the future, a small blow will be enough, which will lead to the final loss of appearance.
Drilling technique
The purposes of drilling tiles can be very different - from creating a small hole for a screw to drilling an entire circle for a pipe or socket.
Large holes
The best option for creating capacious perforation is to use a ballerina with a tip of the required diameter. It is recommended to first practice on waste tiles in order to “feel” the tool. If a ballerina is not at hand, a hole saw will come to the rescue, which even an owner inexperienced in construction can successfully handle.
Another method of drilling step by step:
- Mark the center of the planned hole and draw a circle of the required diameter.
- Using any tile drill, make several holes along the diameter of the circle, trying to place them close to each other.
- The drilled sectors are carefully pressed, and the remaining pieces are removed with wire cutters.
- The edges are sanded to give the correct shape.
Small holes
Step-by-step instruction:
- Marks are placed on the surface of the ceramic for the hole.
- To prevent the drill from slipping, stick masking tape or lightly chip off the enamel in the center of the future hole.
- Disable the impact mode function on the drill and connect the device to the network.
- Place the drill at an angle of 90° to the tile and start drilling at low speed.
- Gradually the speed is increased, punching the tile to the very base.
- Change the drill to a new one, suitable for the type of wall base (concrete, brick, wood) and continue drilling to the required depth.
The diameter of the second drill should not exceed the size of the first, otherwise the tile will be damaged.
Hole for mirrors and shelves
To drill grooves with a diameter of about 10 mm, only narrow working nozzles are used. However, they can differ significantly in design.
When carrying out such work you will need:
- Household or professional construction drill;
- At least the simplest hammer drill;
- Portable screw driver with variable chuck speed.
How to drill ceramics to install dowels?
A dowel is a fastening device used to create blind holes in surfaces, as well as in cases of hollow walls. On the tile, the dowel will securely hold a mirror, shelf or any other not too bulky accessory.
Distinctive features of drilling
The difficulties in installing dowels are similar to standard drilling into tiles. They consist in increased smoothness of the coating, which can interfere with reliable stop and installation of the drill. In addition to the methods of reducing slip described above (painting tape and removing glaze), you can use a jig.
This device is a wooden or metal plate with holes of different diameters. The size of the hole is selected based on the dimensions of the dowel. They drill very carefully, because at the same time you have to hold both the jig and the screwdriver, and also control the quality of the drilling.
Which drill to choose?
Brick and concrete drills are definitely not suitable for installing dowels - they can destroy and damage the tile cladding. As a result, you will have to re-lay the problem area. Tiers recommend purchasing special drills with a spear-shaped tip for such purposes.
Among the materials, devices made from pobedite remain the most affordable - they are bought more often than others due to their low cost. Ask the seller for a Pobedit drill bit for tiles - it works as accurately as possible.
Operating procedure
Algorithm of actions:
- Secure the tiles from slipping using masking tape or adhesive tape.
- Using a marker or felt-tip pen, mark the center of the hole in the form of a cross.
- Prepare a drill of the selected type and diameter, insert it into a drill or screwdriver.
- Drill the tiles at low speeds, increasing speed as you go.
- When the drill touches the wall, turn off the drill and change the drill to a regular drill (for concrete or brick) of the same diameter.
- Drill the hole to the intended depth, focusing on the length of the dowel.
- Clean the recess from dust and insert the dowel
To prevent the drill from swaying during the drilling process, craftsmen use a special work tripod.
Cutting holes in ceramic tiles with improvised tools
As mentioned above, in the manufacture of tiles, rather soft materials are used that can be processed with most household tools. The process is greatly simplified if you keep the ceramic product in water for some time; you can work on wall ceramics with the following consumables and household tools.
Metal drills. They drill holes in soft tiles using ordinary drills for metal processing, the main thing is to use a drill or hammer drill at very low speeds and cool the drill. During the process, its edge must be regularly sharpened - the dulling of the cutting edge of the blade, unlike Pobedit or diamond drills, will occur much faster.
Rice. 7 How to make a hole in a tile with strings
Pliers. A situation often arises when a hole needs to be made at the edge. For these purposes, it is sufficient to use only pliers or special wire cutters, with the help of which small pieces are broken off from the edge until the desired cut is obtained.
Diamond strings. When using strings for cutting, you will need a household hacksaw for metal, into which the string is fixed; the cut occurs along the contour of the cut fragment through a drilled hole of small radius.
Glass cutter. A glass cutter can successfully make straight cuts when using tiles to seal walls with water pipes located in them in cases where the cut area is located within the contour of the tile. To create a hole, cut the tile in the center of the cut-out area, then use pliers to bite out the desired hole. If desired, you can make the cut from the glass cutter almost invisible - to do this, the tiles are glued on the inside with ceramic glue, and after drying, they are glued to the wall using tile adhesive.
Useful tips
- You cannot press the tool with great force - the application of force should be moderate so as not to break the tile.
- Drilling tile joints is only permitted if the diameter of the hole does not exceed the width of the joint.
- To work with tiles, choose a drill with smooth speed switching.
- If the tiles are very fragile, use a hand drill, which creates minimal vibration.
- It is convenient to mark the point for drilling using a stationery proofreader. The liquid will make the surface rough and improve the adhesion of the tiles.
- Glass drills are suitable for processing ceramic tiles.
Should I use a ballerina?
Many beginners are attracted to this tool because, at its low price, it promises unprecedented versatility in terms of choosing the hole diameter.
However, this impression is deceptive. When rotated, the ballerina's cutter describes a circle, and since a circle is a flat figure, its plane must exactly coincide with the plane of the tile.
This, in turn, means that you need to hold the drill perfectly perpendicular to the plane of the tile, which in practice is simply unrealistic.
No matter how hard you try, the drill will always deviate from the ideal position and, as a result, the cutter will not smoothly remove the ceramics, but will hit it, which often leads to splitting of the tiles. So it's better not to use this method.
How to drill without cracking the material?
You can avoid breaks and cracking of tiles by following several recommendations:
- Do not use an electric drill at speeds above 1000 rpm.
- If you need to drill into ceramics that have not yet been laid on the wall, soak them in a container of water for 60 minutes.
- Before you start drilling, make sure that the hammer function is turned off on the device.
- Practice on an unnecessary piece of tile to choose the optimal operating mode for the screwdriver and the pressure force.
- Do not put the unit in reverse mode.
- When drilling close to the edge, it is better to move the drill bit into the joint, otherwise it will slide off the edge of the tile.
- Start drilling at low speeds and gradually increase speed.
And finally, it is worth mentioning personal protection measures - eye and respiratory safety. During drilling, pieces of glaze and dust fly off the tiles, so do not neglect such basic means as glasses, gloves and a mask.
Using a grinder
A grinder is a universal, multi-purpose tool that is available in the arsenal of every home craftsman. It can be used for cutting tiles instead of a tile cutter, which is considered a special tool, and not every craftsman has it. To work on the grinder, install a metal diamond wheel for dry cutting.
Grinder with a circle and stone discs
The peculiarity of the grinder is that it only makes straight cuts. Therefore, an angle grinder can easily make rectangular holes or make a large cutout with a radius shape if the contour arc has a slight bend. It will not be possible to create a smooth arc or a perfectly round hole right away. First, mark the outline of the radius cutout and draw many chords. An inscribed polygon should appear inside the contour. After marking, several cuts are made along the chord line, after which the contour is finalized with sandpaper.
Important! The tool must be equipped with a protective casing. It is necessary to work with gloves and safety glasses.
In this case, the grinder does not make a progressive cut, but makes a point cut through the tiles from the front side according to the markings. Thus, if you plan to cut a round hole, you need to take a diamond wheel with the smallest diameter possible. The larger the diameter of the hole, the more accurate the cut will be. The chords along the radius contour will be short, and the cut will be as close as possible to the radius and you will have to work less with a round block with sandpaper to refine the edge.
Work as an angle grinder
This method works well with tiles. To make radius holes in porcelain stoneware, it is better to use the special tools described below.
Video of the master at work:
The main differences between spear-shaped attachments
A nozzle with two blades must be sharpened when the working edges wear down to a certain level, which significantly reduces productivity.
Such equipment is quite affordable, since the 6 mm version costs about sixty rubles. The work is progressing at high speed.
- As for the four-blade version, it will no longer be possible to sharpen it as easily and quickly as its two-blade counterpart.
- The cost in this case will be much higher, because a drill with a diameter of 5 millimeters will cost one hundred and seventy rubles.
It is easy to conclude that it is a disposable nozzle, but not cheap at all.
Modifications of tubular drilling attachments
Cylindrical drill bits are divided into the following two types:
- Conventional, which is a tube equipped with a groove for shaking out drilled powder and diamond coating at the end;
- Sector, which is a cylinder in which a sector is cut out, inside of which there is a diamond coating.
An ordinary tubular drill is an analogue of a crown. The destruction of the medium is carried out along the contour of the outer ring, the central part is removed after completion of the working cycle.
The cost of a tubular drill is determined by the method of applying the working diamond layer and ranges from two hundred and fifty to three hundred and fifty rubles.


