Features of drill extensions
- What it is?
- What are they?
- How to do it yourself?
In the process of construction work, the necessary tools are drills and drills. Currently, there are a large number of different models of nozzles depending on the size and type of shank. Some samples may not be suitable for all drills. In such cases, special extension cords are often used to connect to the unit socket. Today we will talk about the features of such additional tools and what types they can be.
What it is?
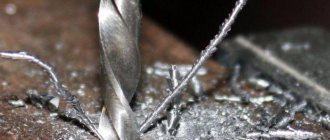
A drill extension is a small, elongated structure that allows you to extend the product and make deeper through holes in various materials. In this case, any extension should be slightly smaller in diameter compared to the drill itself. In addition, when working with such an additional accessory, you should carefully adjust the cutting modes when drilling.
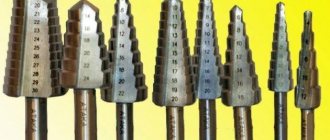
Today, such extensions are produced separately, designed for certain types of drills (feather models, for impact drilling edges). They may differ significantly from each other in some design features, which must be taken into account when choosing the appropriate option. These drill bit accessories are most often made from a quality steel base. But there are also some models made from special types of plastic. On average, the total length of these products can be approximately 140-155 millimeters.
Additional parts for the drill are quite easy to attach. They usually have hex shanks, which can be secured in the socket of the electrical unit with one movement and can be easily removed. Many models provide the ability to quickly replace such equipment.
Types
Currently, there are many manufacturers that produce sets of hex drills of various lengths and diameters.
The modern range of such products consists of a number of models for processing various materials - ceramic surfaces, concrete walls, products and structures made of metals and their alloys, wood, plastic products, tile surfaces and others.
Drills with a hex holder are also classified according to their design - they can be produced with different groove structures and sharpening angles. There are several types.
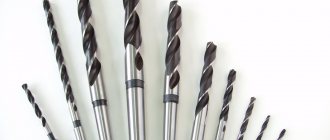
- Twist drills. The simplest and most popular models. They are drills with two cutting edges and two flutes for chip removal.
- Cone models. The tip of this product has the shape of a cone. Such models are rarely used and only for special machines.
- There are also screw, feather, milling models, as well as products with Lewis and Forstner spirals.
Conventionally, drills can be divided depending on the country of origin (China, Europe, and so on). Information about this is contained in the markings on the shank. Quite often, brands produce sets of drills of the same diameter, but of different lengths, as well as sets of drills of the same length, but with different diameters.
All drills are distinguished by color. The color of the product indicates the processing method and material used to make the product.
- Gray. The cheapest and most popular. They are not durable.
- Black. Treated with superheated steam. Suitable for drilling carbon steels and non-ferrous metals.
- Slightly golden. They are hardened and will last a long time.
- Golden. They are coated with titanium nitride and are the highest quality, durable and reliable.
Moving away from the topic, it is worth noting separately that similar drills are produced for screwdrivers. Screwdrivers are most often not designed for a hexagon and require a certain type of shank. In addition to hexagonal, there are triangular, cylindrical, conical, hexagonal (hexagonal) and other types of shanks.
What are they?
Extension cords can be of many different types. The following options for such construction accessories can be distinguished.
- Extension cord for Lewis drill. This model, designed for spiral products, is a thin cylindrical metal tube with a small hex shank at one end. Most often, this type is used to create deep through holes in thick wooden surfaces. Such extension cords sometimes come in one set with a special key. This type with a hex shank may be thicker than all other types of such accessories.
Most often, these extension cords are made of durable carbon steel.
- Extension for Forstner drill. This type looks like a thin metal structure with a hexagonal shank (its length is usually about 10-12 millimeters). At the other end of the product there is a small seal for connection. The total length of the entire part, as a rule, reaches approximately 140 millimeters.
- Models for feather drills. These extension products have a cylindrical elongated shape. The tip is round in shape, it tapers slightly towards the end. Often this extension is used not only to make deeper holes, but also to drill in hard-to-reach places on the surface. The total length of the entire product reaches approximately 140-150 millimeters.
A separate group includes special flexible extensions for drills. Often the main part is made of soft black plastic. Sometimes this material is made with a slight relief. At the ends of the plastic there are metal tips, including a hexagonal shank.
Today you can find entire sets in which, in addition to the plastic extension itself, there is also a set of several different attachments - each of them is designed for a specific type of drill. If necessary, they can be easily replaced.
Such options are considered more practical and easy to use compared to rigid structures that are sold individually.
You can also select the SDS extender separately. It has a cylindrical shape. At one end of the product there is a thin spiral-shaped part, at the other end there is a hexagonal thin shank. This model is only used in conjunction with impact drilling tools with crowns. Such devices can be suitable for drilling brick surfaces, natural or artificial stone, and concrete surfaces. The drilling depth with such a construction accessory can be approximately 300 millimeters.
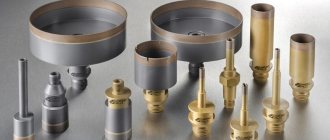
Purpose and characteristics of crowns
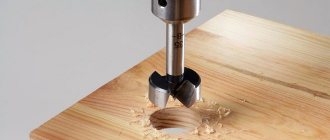
You should start with such a useful product as a ring crown for wood. It is easy to recognize by its appearance: around an ordinary rod there is a metal (or bimetallic, that is, consisting of two layers of different metals or alloys) glass with teeth at the end. The design of the crown also contains a special element designed to remove chips from the working surface.
When the crown rotates, the cutting teeth, interacting with the workpiece, cut out a circle of the required diameter on its surface. Crowns are sold in sets, and one set can contain up to twelve pieces. They are recommended for use when drilling holes of large diameter (up to 15 cm) and depth (up to 11 cm) in wood products.
One of the benefits of using wood saws is that they allow you to make very precise holes. Moreover, you don’t even need to center and drill the surface first. And upon completion of the work, the master is relieved of the need to remove burrs.
By the way, crowns for drilling wood can be used not only on drills, but also on hammer drills and machines (lathes, drills and even milling machines). One of their varieties can be considered a circular saw. This is a saw bent into a ring, or a special drill with brackets on which the knives are fixed. Universal drill bits allow you to drill in almost any material.
How to do it yourself?
If you don't want to buy an extension from a hardware store, you can make a long drill bit yourself. To do this, you first need to take a long nail of a suitable diameter. His hat will need to be carefully riveted. This can be done using a simple hammer. All edges of the nail head are gradually ground down, little by little giving it the pointed shape of a regular drill.
When sharpening the cutting part, do not forget that the cartridge in the machine always rotates clockwise.
If in the future you have to drill in loose wooden surfaces, it is better to rivet the nail head in the form of a pointed tip. During the process of drilling with a homemade part, the walls of this material are compacted, which is an important condition for easy and quick tightening of screws. You can also lengthen the drill yourself by increasing the length of the shank. To do this, you need to create a small hole in it for the internal thread. Then it is cut with a tap. An external thread is made on a rigid metal rod. The resulting parts are twisted together.
To achieve maximum strength and reliability, it is better to weld the resulting joint and thoroughly clean it, but this procedure is not mandatory.
The shank can be extended in another way. To do this, you first need to prepare a strong, thin metal rod. In this case, its diameter should be slightly larger than the diameter of the shank. Its surface must be absolutely smooth, without small scratches or cracks. You will also need turning equipment for the job. The extension begins by slightly reducing the diameter of the shank on a lathe. At the same time, a small depression is made in the metal rod. It will act as a hole for inserting the tool itself. After this, the shank is fixed as tightly and firmly as possible in the rod.
It is recommended to weld and clean the joint. At the final stage, the diameters of the old drill and the new extended shank are equalized. This can also be done using turning equipment. In some cases, the extension is made by welding a new metal rod and drill. But at the same time, the diameters of both components must be the same. At the end, the junction of the parts is welded and cleaned so that there are no unevenness or scratches on the surface.
To learn which drill extension to choose, see the following video.
Ruman › Blog › How to drill spot welding correctly. Tools and accessories
Novice bodybuilders often wonder how to properly remove a part (fender, sill) when replacing it, if this element is not attached with bolts or screws, but with factory spot welding. Here you need to immediately decide why it is needed. If you take it off and throw it away, then you don’t need to think long, but just use an angle grinder or a chisel and chop as you want, but not everywhere...
In places where the repair part is placed under the metal, for example, the threshold slides under the middle pillar and under the wings at the front and rear, this is where you need to carefully drill out the spots for spot welding.
Not knowing about the existence of special devices, I sharpened simple drills evenly so that they cut the metal around the welding point from resistance welding, oh, I had a lot of trouble with them, I’ll tell you. But let’s not talk about sad things, but let’s move on to the procedure of removing the threshold (for replacement) using special drills for drilling out spot welding.
To remove the threshold I use:
- an angle grinder (small) with a speed regulator, a cutting disc (1.2 mm thick - the optimal thickness for working with car metal) and an angle grinder with a cleaning disk (6 mm thick), - pliers, - a finely sharpened chisel, - a crown for drilling spot welding, - a drill, - a core, - a drill with a diameter of 2 mm (3 is possible), this is not essential, - a screwdriver.
Ask why so many things? The answer is quite simple - so as not to rearrange the drills, and not to change the discs on the grinder.
So, let's start removing the threshold. First, you need to drill out those places where a new threshold will subsequently be installed - the middle pillar, the boot of the rear and front (if it is not removable) wing.
For this we need special drills for drilling spot welding. This entire device is called a “crown with a mandrel for drilling spot welding.” The crown is those “teeth” that cut the metal, and the mandrel is the thickening on it to impart rigidity and hold two oppositely located crowns.
It is problematic to buy them in a simple tool store. Therefore, I order such crowns from the online store.
As you can see, you can use both a drill and a crown, but for myself I chose and use a crown, which I’ll tell you about.
Why a crown and not a drill?
How can I tell you? This is an amateur thing, and besides, there is one nuance - the guide tip on the drill does not always cut through the hardened part of the spot weld, and you need to drill it with another drill so that it goes deep enough to cut off the top iron. Chaotic? Well how could I...
The price of a branded crown is more than a thousand rubles, Chinese (Taiwanese) from 130 rubles. I worked with both, and I’ll tell you a secret that I preferred the Chinese ones. Branded ones are sharper and hold an edge longer, but are more fragile and break at the slightest careless movement (misalignment).
The Chinese ones are not so susceptible to crumbling, and they hold an edge quite well. There is one drawback, this is the sticking of the guide rod. But if you had a branded one, like I did, then later you can simply put Chinese crowns on the shank. By the way, they are (it turns out) on sale separately from the shank. In the photo it is 9.5 mm, I also have 8 mm, I have never seen a smaller one. This device itself is dismountable - the crown is removed (unscrewed - the thread is normal) and, as you have already noticed, the cutting edge is on both sides, if one side is damaged, we turn it over and continue working.
In the center in front, there is a guide pin, it is on a spring, and when pressed it sinks. Don’t be alarmed if you suddenly start drilling and the edge doesn’t reach the metal because of the pin - it’s adjustable. There is a bolt in the shank for a flat-head screwdriver (marked with an arrow in the photo below), use it to adjust the pin so that the edge plunges into the metal to the depth of one layer thickness. Drilling technology
You insert this device into a drill, a drill for drilling spot welding, it is better to use one with a speed controller or one that has a lot of power at low speeds.
znak Don't rush to drill right away! First, find all the welding points and mark them. It happens that the guide pin jumps out of the cored point, which often leads to breakage of the crown.
They advised me to drill out the core points, now if the core makes a shallow depression, I use a drill with a diameter of 2-3 mm to deepen it (in order not to rearrange the drills, I use a screwdriver for this purpose).
Now you can drill out the spots from the spot welding.
Set the rotation speed on the drill to low, no more than 800 rpm, the bit should rest against the metal, strictly perpendicular, so that all the teeth are completely pressed against the metal. The crown will cut the iron around the weld point, and the weld will remain on the metal underneath.
Now you can cut off the threshold with a thin chisel (I use an old chisel) and pick out (if necessary, chop) the drilled iron. It is advisable to carry out the process of removing the threshold in the sequence I indicated. I'll explain why. If you first cut off the entire threshold and leave only those places where you need to drill, then you will definitely break the crown, because there will be no stop, and the metal will play and bend even from slight pressure.
Moving a little away from the topic of drilling out spot welds using a crown and drill, I will continue about removing the threshold.
If you are not going to use the threshold in the future as a donor, then you do not need to drill out all the points, but only those that I mentioned above. You can remove the rest as your imagination allows - cut it off with a grinder, chop it off with a chisel or an ax.
I cut everything closely with a grinder or cut it off with a chisel, cut through the fastening points with the remaining (not drilled points) with a grinder (to the depth of the metal sheet), and then use pliers to tear off the welding points. It's faster and more convenient than all the methods I've tried before.
After installing a new threshold, simply boil it through the already prepared holes, clean it and putty. That's all, go for it, you will succeed.
And I also found one useful video, like without special. tools for drilling spot welding can be done with little effort.
Extension cord for feather drill.
There's a problem. It is necessary to drill timber walls at the dacha with a 22mm tip drill (for electrics). The thickness of the wall including the cladding is 17-19cm. A regular feather drill allows you to drill to a depth of approximately 13cm. An extension cord is required. Couldn't find it for sale anywhere in Moscow. Many sellers don’t even know that such things exist. Question: Is it possible to use a bit extension as a drill bit extension? Do they have the same mounting dimensions?
Dmitriy65 wrote: Do they have the same landing dimensions?
There are different feather drills. Others fit perfectly into adapters. Only an adapter like the one in the picture will be inconvenient - it will not hold the drill when removed, and the drill will remain in the wall. Needed with fixation. There are other feather drills, they will generally hang too loosely in the 1/4″ adapter.
Dmitriy65 wrote: Couldn't find it on sale anywhere in Moscow
Leroy-Merlin sells extension adapters for Anchor drill bits. 59 rubles, length - about 20 cm.
Dmitriy65 wrote: The thickness of the wall including the cladding is 17-19cm
.. can’t you just use a spiral one?? without any adapters.. Length up to 450.. yes, there are also short ones like 20 cm. They pass the tree perfectly..
2Dmitriy65 You need to look at the markets. There are 30cm extensions. True, they are from a series of one-offs and mostly in sets. Personally, I welded a piece of a pin. But there f35 had to be chewed 40cm.
Ruslan1111 wrote: Personally, I welded a piece of a stud
Where, to the tail of the drill?
Suever wrote: Where, to the tail of the drill
I also didn’t want to go to the store 20 km away. and here the welding is at hand (I assembled the heating), the drill costs a penny, grab it and go for it.
helmutivan wrote: .. but you can’t just use a spiral one?? without any adapters.. Length up to 450.. yes, there are also short ones like 20cm. They pass the tree perfectly..
Not convenient. You will have to buy too many different sizes. And I don’t know if a screwdriver will pull it. I used Makita to drill with a diameter of 35 in 150 timber. It goes without problems, but the length is not enough.
Suever wrote: Where, to the tail of the drill
Similarly, I bought a twist drill of the required size, the smallest 200 mm and welded it to the 10 mm fittings and got a twist drill 1 meter long. even if you want to find it, you won’t find it.
drilled ties for the formwork. There is 800 mm minimum size
alex_k wrote: even if you want to find it, you won’t find it.
I guess sometimes you have to get out of it.
alex_k wrote: drilled ties for the formwork. There is 800 mm minimum size
I also drilled, but made do with a short (regular) metal drill.
So what's the point? Are the shanks of the drill bit and the bits different or the same?
npn wrote: Leroy-Merlin sells extension adapters for Anchor drill bits. 59 rubles, length - about 20 cm.
Ruslan1111 wrote: you need to look at the markets. There are 30cm extension cords. True, they are from a series of one-time ones and mostly in sets.
I used this Enkor: the drill and extension are misaligned - the beating is crazy! Summary: cal.
Dmitriy65 wrote: Are the shanks of the feather drill and the bits different or the same?
npn wrote: Others fit perfectly into the adapters.
Dmitriy65 wrote: So what's the point?
Anchor extension + Encor drill (as the most budget option). Or another drill that (the tail) will fit into the Anchor extension.
Give it up, for occasional one-time work, no problem. There are options for welding the reinforcement to the tail, and no one complains about the beating. And this is all done on a machine, in the centers.
Drill more than a meter?
Are there such things? The wall is thick, a meter is not enough, I welded a drill onto a rod, it won’t drill a damn thing. It's a brick wall. I don't know what to do.
- View profile
- Private message
120cm stands lonely in the corner at work, I think 1.5m can also be found
- View profile
- Private message
Work on both sides.
- View profile
- Private message
2varera Thanks, I'll look for it. 2tvmaster Have you tried it? Please teach me how to get a hole into a hole at least the tenth time.
- View profile
- Private message
Sukhov wrote: 2tvmaster Have you tried it? Please teach me how to get a hole into a hole at least the tenth time.
Expensive, but real.
- View profile
- Private message
Sukhov wrote: Are there such things? The wall is thick, a meter is not enough
What is the drilling diameter?
- View profile
- Private message
Sukhov wrote: Are there such things? The wall is thick, a meter is not enough
for SDS-MAX, the maximum total length is 1320.
varera wrote: 120cm stands lonely in the corner at work, I think 1.5m can also be found
you'll be exhausted looking for a whole one. Drebo has a system of extension attachments for the SDS-MAX, a coupling connector and the extensions themselves.
- View profile
- Private message
Sukhov wrote: how to get a hole into a hole at least the tenth time.
Of course, I drilled, I have a meter (30 mm) drill, I was laying a LAN in the old foundation, where the walls are up to one and a half meters. The work requires preparation and marking. Much (the magnitude of the error) depends on the room.
- View profile
- Private message
tvmaster wrote: Of course, I drilled, I have a meter (30 mm) drill, I was laying a LAN in the old foundation, where the walls are up to one and a half meters. The work requires preparation and marking. Much (the magnitude of the error) depends on the room.
Deserves respect. With such a thickness of the walls, you can get in from both sides. The slightest deviation of the drill from the perpendicular, even if the markings on both sides coincide along both axes (which in itself is not easy, especially in finished rooms, where it is impossible to understand the distance from the load-bearing wall and the edges of the finish, which is different in different rooms, and even if there are no window type bindings nearby). And the Clients, when finishing, provide for everything except further wiring of the weak current. First, a super repair, and then - make it beautiful for me. And, often, there is no room for error. And you have no mortgages, no hatches, a blank false ceiling and walls and no diagrams of what and where is behind them. We recently drilled such a hole (120 cm). On one side there is a tower H = 6 m, there is no window nearby, and behind the wall there is an archive with papers, where you can’t really turn around, the space is very limited. Previously there was a hole dia. about 22mm, but it already contained two optics. It was possible to drill on a limited area, and in a place where a sandwich was formed from two load-bearing beams, using a max perf. So, already before us, there were about 6 undrilled holes on both sides (the drills were pinched between frequent fittings. But they didn’t let us drill with a diamond from the room (archive, they drilled right above the papers, water cannot be applied to the cutting site. On both sides, somehow It was possible to pass the junction of the beams, but at the entrance to the second one it jammed. We drove three times, rolled it out, drilled alternately with a thick and thin drill
A small device that solves a big problem
Precise drilling. Even without markings. Even with the wrong drill. And even a drill with chuck beating. And all this quickly. I drilled about 200 holes, and not one of them turned out to be a hole. How is this possible? I'll tell you now.
I once bought a cabinet from Ikea. As the Swedes love, it was sold in a cardboard box, in the form of a stack of boards and a bag of accessories. Having quickly assembled it, I decided that these boards were not much different from furniture panels from Leroy Merlin, only they were cut to the required size and holes were drilled for fasteners - and the price was several times higher. At the same time, you can cut sheet material in the same Leroy, almost thank you.
Then we made repairs and for a long time could not decide where to install the washing machine. She didn’t have enough space in the bathroom, she wanted to free up the kitchen for more important things, she didn’t look right in the hallway... Now, if I hid it in a cabinet, that would solve the problem. But where can I get a cabinet with an internal size of 60 cm? It’s not sold ready-made anywhere, so I decided to make it myself. That first experience was not entirely successful. The cabinet was assembled using eccentric ties and confirmats (these are screws for chipboard). For an eccentric coupler, you need to drill two holes in perpendicular planes with intersecting axes. I missed the drilling a couple of times, the holes had to be drilled out so that everything would line up, and therefore there were backlashes. One hole came out completely through, almost drilling through the floor. Of course, I assembled the cabinet, but I realized that not everything is so simple. And when the machine spins, the cabinet bounces and rattles.
And then a new renovation broke out. This time it was necessary to build a mega-cabinet. It should be wide (more than 2 m), deep (76 cm deep), made of 21mm birch plywood, and most importantly, the lower part should not have a base. The idea is to roll cabinets on wheels into the bottom section of the cabinet. This greatly simplifies loading things into such a deep closet. Allows you to quickly roll out, say, a cabinet with tools and roll it to the repair site. Or a cabinet with books for a desk. And don’t run to the closet for every little thing. This is roughly what it should look like:
(doors and drawers/shelves are not drawn, but they will be there)
Of course, such legs will instantly move apart without being attached to a single base, and the cabinet will collapse. To prevent this from happening, the cabinet is mounted on the load-bearing wall of the house, and it bears the entire load. This removes the issue of the back wall. This will allow you to replace the flooring if necessary without removing the cabinet from the room. We simply roll out the cabinets, remove the lower part of the partitions, and the rest of the cabinet continues to hang on the wall.
All these wishes of mine, all together and each separately, scared off potential cabinet manufacturers. There are plenty of companies that make furniture, but almost all of them make cabinets from 16 mm chipboard, 600 deep, all according to more or less standard drawings, and the customer is only allowed to choose the color of the chipboard and the pattern on the door. So it became clear that I had to do all the work myself. But the old injury with the washing machine was making itself felt, and this time I decided not to leave myself any chance of making a mistake. The basic fastening elements of the entire structure are a double eccentric coupler and a screw with a barrel-shaped nut. This means that you will have to drill a lot and you need to drill accurately. Therefore, the hero of my review was purchased: a jig for drilling for an eccentric coupler.
There are many jigs for drilling the end of a board. There is a parallelogram type, there is a slingshot type (it takes a long time to explain, I don’t have my own photo, and they don’t allow someone else to attach it to the review, so you can find it on the Internet if necessary), in general there is a large choice. But I found only this jig that would allow me to drill two holes at once specifically for the screed. Let's see what they sent me:
Hard plastic case, foam lining inside and tools in bags.
Two wood drills for 8 and 10 mm, one forstner drill for 15 mm, limit sleeves for them, several dowels, a wrench for nuts, a hex key for fixing the limit sleeves, and the device itself.
Here he is. The thing is quite weighty, made of cast metal, most likely cast iron. Fixed on the board with a screw clamp. With cheap clamps, the plate is held in place by the flaring of the screw; over time, it falls off or is pressed through, and the screw begins to scratch the board. That won't happen here. The plate is made of thick steel, it is smooth and even, and is fixed with a screw. Time has shown that it can even clamp a painted soft wood board without leaving any marks.
The maximum thickness of the clamped board is about 50 mm.
Two bushings are moved in the slots of the housing and secured with nuts. One for drilling 8 mm, from the end of the board.
The minimum distance between the axis of the drilled hole and the surface of the board is 5 mm.
Maximum - 37 mm.
The scale on the frame is engraved, i.e. will not be erased over time.
The end of the bushings is slightly recessed into the conductor body, literally by a fraction of a millimeter. This makes it possible to move the sleeve even when the clamp is clamping the board. Of course, to do this you need to loosen the fixing nut.
On the other plane of the jig there is exactly the same slot for a bushing for drilling 15 mm.
The minimum distance from the end of the board to the drilling axis is 21 mm. You can do less by simply installing the clamp not close to the edge of the board.
The maximum distance is 39 mm.
Well, let's start testing the device. First of all, let's try installing a double eccentric coupler. It allows you to join plywood almost imperceptibly. In addition, you can use them to make cross-shaped joints of plywood sheets. This is what the screed looks like:
We insert the eccentrics into the holes on the surface of the board, insert the pin into the hole at the end, connect end to end, turn the eccentrics so that they capture the ends of the pins, tighten, done!
Barrel screws - for T-joints. We drill 10 mm on one board, 7 mm from its end and on the surface of the other, insert a barrel into one hole, a screw into the other, connect, tighten, that’s all.
Yes, but how to drill 7mm? The sleeve fits perfectly with the 8mm drill, the 7mm drill hangs in it. I had an adapter for cutters from 1/4 inch to 8 mm on hand. And 1/4 inch is 6.35 mm. Already something. This is the adapter.
Costs 100-something rubles.
It is made of hardened steel, fits tightly into an 8 mm sleeve and a 6.45 mm drill fits into it with virtually no gap. This is a drill bit for drilling holes for M8 threads.
Well, then drilling out 6.45 to 7 is a matter of technique. If you don’t lean on the drill at all, the hole will be drilled exactly along the axis of the previous one.
This is the combination I started using. Of course, it would have been easier to drill at 8. But I didn’t want to add extra play. For the sake of ease of partial disassembly of the cabinet, I had to abandon the dowels, and these pins, which, generally speaking, should only work in tension, will also be loaded with shear.
To get the hang of it, I started with scraps of plywood. I tried to connect three pieces with the letter T.
First, we drill with a forstner drill from the surface, so that later it is easier to remove chips from the deeper end hole.
Then we drill from the end.
We repeat the same thing with the second plank.
Here's what happened:
Finally, we drill through the central plank. We collect:
As you can see, I only succeeded the second time. From the first I made a mistake with the size and drilled the holes for the eccentrics too close. Even when tightened the tightest, they did not provide sufficient compression of the boards.
The edges of all holes are neat. Now I have already made more than 60 holes with this forstner drill.
The drill is worn out, of course, but even now it doesn’t tear the wood fibers.
Here is one of the last holes:
I also drilled into already painted plywood, the edges were smooth.
The holes at the end are also excellent. Here you can see the installed eccentric in the depths.
The most important thing is that the holes are always coaxial. I inserted the drill and attached the GOST corner:
On another plane:
And this is what happened as a result:
I think this is the most critical jig for cabinet making. It will help not only make holes for eccentric fasteners, but also for barrels, confirmations, dowels, i.e. all the work for which, generally speaking, a self-centering jig is intended. But this one has more functionality due to drilling a second hole. So if you are not a professional and do not work in production line, this conductor is for you. Everything else that I need - cutting out holes for hinges and handles - can, in principle, be done without a jig at all.
Now it costs something like 2700, there is a discount there.
Don't throw away your broken hammer drill, there's a great idea for a homemade one
The other day a neighbor came and asked for a drill bit for a hammer drill, 20 minutes later he brought the drill and said with great surprise: “
They’ve completely forgotten how to do it, I just installed the drill, and it immediately broke...
“It happens,” I answer, I myself understand what the reason is, but oh well...
For a long time I wanted to test one method, and “thanks” to my neighbor, I had a great opportunity.
So, we need a broken drill, install it in a hammer drill and oh.
Cut off all excess.
Now take a (spare) bolt from a car wheel.
There is a recess in the head of the bolt.
Let's cut off the part shown in the photo.
We will remove and clean up the uneven areas.
We turn on the welding machine, we need to connect the drill and the bolt.
It’s not easy to weld tool steel, but I think I did it. (I'm still a welder)
We install the “drill bolt” into the hammer drill and turn on the hammer mode without drilling.
Anyone who knows how to hammer nails into a ceiling will definitely appreciate this homemade product.
What can I say, the idea works and will be very useful to me)
- 22 August 2022, 07:35
- author: dzengen
- views: 35549
ultrasound
By the way, here it is. in my opinion - requires a separate comment
I’ll answer with a moment of formalism SP 64.13330.2017
for American standards - idk, everything is too variable, you can see the scale of the problem at pandia.ru/text/78/486/58914.php
How much of this “seasonal” stuff is there if the piece of wood doesn’t lie around in the rain?