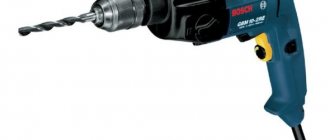
The drill is an irreplaceable thing in construction. Using a drill, holes are made for utility pipes, technological niches and openings for cables are created. An experienced builder cannot be surprised by a stuck drill. And yet: what is the reason for such trouble and how to neutralize the consequences? Let's figure it out together.
What to do if the drill gets stuck in the wall
Surely every man has had to drill a wall in his life.
No repair can do without this, and not just repairs. Even to install a regular towel hook, you may need to use a drill. After all, it is not possible to drive an ordinary nail into every wall. The walls are all different: some give in easily, while others force you to suffer. And sometimes an annoying situation happens - when the drill gets stuck tightly in the wall.
When you press the button, the drill (or hammer drill) roars and hums mercilessly, but nothing happens. Despite all efforts, the piece of iron remains stationary and no rotation is observed.
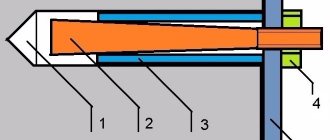
Methods for dismantling an anchor connection
Method No. 1
It consists of loosening the spacer sleeve. This method is effective if the hole is created deeper, i.e. longer than the anchor and debris has been removed from the hole.
With a sharp blow of a hammer, drive the pin deeper into the hole (before doing this, do not forget to unscrew the nut). Clarification: trying to pull the anchor by the pin is useless - the cone will again push the sleeve apart. Therefore, you need to pull on the protruding part of the sleeve. If the sleeve is completely in the wall, you will have to gouge the concrete around it enough to make it possible to firmly grasp the sleeve with pliers.
Let's say we need to unscrew the anchor using this method, but we can't unscrew the nut - it gets stuck and turns along with the stud. The solution is as follows: drill a longitudinal hole in the stud, cut a thread in it with a tap, and screw a bolt into it. Then, holding the head of the bolt with a wrench, try to turn the nut on the stud.
Reasons: why the drill stuck
Experienced experts cite three main reasons why the drill cannot be removed from the drill (regardless of the type of chuck):
- Tool diameter too large. During the process, a drill that is too large grinds in and gets stuck, like a dowel.
- Weak steel and, as a result, deformation (most often, the tail wedges like an anchor) of the drill or drill. For the same reason, equipment breaks, especially in rotary hammers and impact drills.
- Mismatch between the shank and the chuck clamping mechanism. This often leads to the equipment falling apart and a part remaining in the chuck, but it also happens that the drill/drill simply gets stuck.
Another, less common reason is rust. People who often do repairs usually don’t encounter this, but if a drill/hammer with accessories collects dust for a long time on a balcony, in a barn, unheated country house, garage, etc., the tool is eaten up by corrosion. In this case, masters say that the sting has “soured.”
I’m announcing a competition of ideas - how to pull out a 12 or 14 drill bit that was driven in there 20 years ago from a brick wall. The shank sticks out about 4-5 centimeters just from it. flood is welcome))))
cut off the tip with a grinder and don’t suffer) Either rake the wall around the perf, or screw on the chuck from the drill and turn the drill.
hit the drill. then unscrew it with a gas wrench.
Everything that is not done remains broken
So you make an offer here, and I’ll run and experiment with 12-gauge drills (the house isn’t mine anyway).
and for a snack... I broke the table I bought for my child))) damn it, I almost killed myself. how to close it)? well, so it wasn’t boring))))) everyone today because everything has already been invented) just interesting to listen to))))
hit the drill. then unscrew it with a gas wrench.
I've done this a hundred times
mm. off topic.. let’s try now)
But what about crazy hands or how to fix everything with tape? ))) At the same time I’ll buy a table to experiment with)))))
hi))) there is hardened steel there and the grinder will not cut it right away and no. Today's tools include a screwdriver, a jigsaw and a hammer drill) and also a metal file)
Take out the euroscrew, tear it apart, remove what is in the way. put the PVA mosaic back together, grab it with a clamp, and screw the screw back the next day
Everything that is not done remains broken
Removing the fragment using two screwdrivers
A more complex case is when the drill breaks below the surface of the part, inside its body. It is impossible to hook the edge with pliers in such a situation. Therefore, you will need a device consisting of two thin screwdrivers:
- both screwdrivers are alternately inserted into the hole along the screw grooves until they stop, as if grasping the fragment on both sides;
- The screwdriver handles are held tightly by hand;
- Using counterclockwise movements, the fragment is removed from the part.
At its core, this is an imitation of the option of removing a fragment with pliers. It is suitable if the drill bit sits loosely enough in the hole and is not jammed in it or bent.
If the fragment is difficult to give in and there is not enough hand strength to fix it well with screwdrivers, you need to press the rods with pliers or pliers with your other hand.
Use of citric acid
This method is suitable for removing small diameter drill bits from small parts.
- Take a container made of stainless steel.
- Prepare an aqueous solution (20 g of citric acid per 100 g of water).
- Lower the part into the mixture with the hole facing down.
- Place the container on an adjustable heating device.
- Set the temperature to 90 °C.
Removing the drill bit using this method will take several hours.
Removing drill bits using strong electrolytes
This method of pulling out the drill is suitable if the workpiece is made of aluminum. An aqueous solution of nitric acid is used.
Before using this method, you must lubricate the area near the broken drill with wax or paraffin. After this, apply a solution of nitric acid to the fragment, wait until the composition corrodes the cutting edges, and then knock out the stuck piece of the drill using a tool bit.
Note! The ambient temperature must be at least 20 °C.
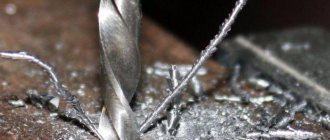
Drilling
To drill out a broken drill bit, use a tool made of a harder material. This method, which requires patience, caution and care, is rarely used for two reasons.
- Drilling out a fragment can lead to deformation of the workpiece and the formation of a bend. In this case, the stuck piece of the drill will penetrate even deeper into the body of the part and at an angle.
- When working with equipment, there is a possibility of chips getting into important components and mechanisms.
If you don’t mind the part, drill a hole of a larger diameter in this place, and then pick up the fragment with any suitable device and pull it out.
Table of contents
Drilling metal is one of the most common metalworking processes. In order to drill metal, you must have a drill, a suitable cutting tool with the appropriate diameter, as well as a special punch with a hammer, with which you mark a hole. In order for the drilling process to be as efficient as possible, it is necessary to take into account the sharpness of the tool, since the drill has the property of becoming dull very quickly. The speed of dulling depends on several parameters: speed, feed force, cooling force. In order to create the best conditions for this process, it is important to dip the tip of the device in oil or drip machine oil into the punching area; this will help the device cool better and also make cutting metal easier. Each material that is drilled has characteristics of this process. It is imperative to select a suitable separate device - a cutting tool - for drilling each material. For example, a device made of carbide material will be able to drill through ductile iron. The devices require careful care and timely sharpening, otherwise they will break. If a breakdown occurs, you need to know how to drill out a broken drill.
Useful tips
The drilling process is simple, but it requires certain dexterity and skills. It is important to keep the tool level so as not to displace the drill and increase the load.
Some tips will help simplify the work and make the hole in the wall neat:
- You can't skimp on drills. Poor quality attachments break and bend easily.
- You can determine the presence of fittings with a metal detector.
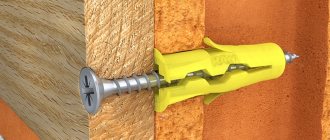
- When installing the dowel, the hole should be several millimeters longer than the fastening. These extra millimeters will be clogged with cement dust when the dowel is inserted.
- If it is necessary to make a through hole, at the end of drilling, when approaching the opposite side, the speed must be reduced. This will help prevent the concrete from chipping.
- When using a low-power drill, it is important to regularly, every 10-15 minutes, stop and cool the motor. This will help prevent damage to the instrument.
- When drilling, it will be dusty, and therefore, before drilling into a concrete wall, it is better to prepare a vacuum cleaner. It is better to use a construction vacuum cleaner, since household models will quickly deteriorate from small crumbs.
Drilling?
Do not try to drill out the drill
others with
a drill of the same brand
.
This will not give results. As a result, you will simply ruin two drills instead of one.
There is one possibility for drilling - with a carbide drill, but there is a high probability that
the hole in the part will deviate from the required parameters.
If the hole is badly damaged during the process of removing the drill, it can be welded
and repeat the drilling process,
preferably with a carbide drill.
If there is nothing to catch on, then most likely you will have to break the drill inside the hole.
5. Break it into pieces.
If all the previous options do not help, then there is only one thing left to do - break the drill
inside the hole
into small pieces.
This can be done with a broken, sharpened tap of a suitable diameter. You can try it with a nail.
Once you have broken the drill into small pieces by periodically blowing air out of them, the extraction operation is almost complete.
Why is the drill stuck?
- The first and most common reason is improper operation of the hammer drill. What does a hammer drill do? Crumbs the thickness of stone or concrete, creating the necessary hole. During the drilling process, stone chips are formed, which stick to the drill, as a result of which it stops moving in the hole. To prevent this from happening, you need to remove the hammer drill from the hole from time to time.
- The second option is contact with reinforcement. Occurs when there is strong pressure on the punch. To avoid such accidents, you need to hold the hammer straight and gently. He will do all the work for you.
- The third option is similar to the second: it involves getting the drill into a solid fraction: stone or pebbles.
Ways to get a drill out of a hammer drill
As soon as the drill jams in a concrete wall, floor or any other similar structure, you must immediately turn off the rotation mode, if enabled, and leave only the impact. After this, you need to pull the tool towards you, while tugging it in the other direction from the surface in which it is stuck. These movements will cause the drill to break part of the concrete layer holding it, after which it should simply and effortlessly come out. This method will help both when the drill gets jammed in a wall structure due to a large fraction, and in case the product gets into the reinforcement.
Another easy way to remove the drill bit from the surface is to use the reverse rotation function. This function is not available on all instruments; in addition, its use leads to the licking of the drum assembly of the mechanism. If the device has a warranty, then you can try to remove the drill using this method.
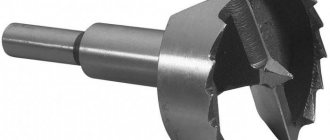
By following the link https://vse-postroim-sami.ru/equipment/tools/9620_samodelnyj-vibrator-dlya-betona-iz-perforatora/, you will learn how to make your own concrete vibrator from a hammer drill. Read about how to choose the right hammer drill in this article. You may also be wondering what types of crowns are available for drilling concrete.
There is also a rather extravagant way of extracting the drill. To do this you will need a gas key. It must be screwed onto the nozzle, and then unscrewed in the opposite direction. This method works because the gas wrench has a fairly long lever that can be used to apply a lot of force. But if this method still doesn’t work, you can try knocking on the handle of the key with a hammer. At the same time, the hammer drill should be loosened from side to side. The combination of these movements will cause the drill to come out fairly quickly.
In some cases, before removing the drill from the hammer drill, you will have to make several additional holes with another tool. As a result, a large hole should form around the drill, the diameter of which should be about 10 centimeters. The drill will come out along with a fragment of the wall; the resulting hole can later be repaired. This method is suitable in cases where it is impossible to either close the drill in the wall or cut it off.
If none of the above methods work, then the nozzle will simply have to be cut off with a grinder, beaten with a sledgehammer, or covered with something.
Now let's talk about what to do if the drill gets stuck in the hammer drill. Most often this occurs due to the fact that the shank material cannot withstand the loads and is deformed. To remove the tool, it must be firmly clamped in a vice. After this, you need to turn on the reverse on the instrument, it is advisable to set it to maximum power. The start button must be pressed with some breaks, since prolonged operation in this mode will lead to damage to the power unit of the device.
Recommendations for preventing such cases
In most cases, the use of drills that are made by well-known manufacturers is a reinforced concrete guarantee that the tool will not get stuck in the hammer drill. Unfortunately, the modern market is flooded with low-quality products, so you should check the purchased product immediately. To do this, you just need to make several holes in the concrete product.
If after these operations the drill can pass through the shank without any extra effort, then this tool is truly of high quality. If deformation has begun, then at this stage the product will simply be removed from the clamping mechanism. It is important not to miss the moment when these changes begin in order to prevent serious jamming of the drill in the hammer drill.
A similar problem can also arise from the decision to use fairly powerful equipment for solid objects, but leave the drills as usual. Even the highest quality products that are not designed to process any material will quickly fail and become deformed. Therefore, special attachments should be used for each type of material.
It is important to remember that it is not always possible to remove the attachment from the hammer drill yourself. Therefore, you simply cannot do without visiting a service center, which will lead to loss of warranty. The fact is that using low-quality or inappropriate equipment is a user error.
Return to content
Removing a stuck drill bit
There are several ways to remove a drill bit from a hammer drill. The nozzle must be secured in a workbench vice, and then, shaking the tool from side to side, pull it towards you. There is a second option to solve the problem. Before removing the drill from the hammer drill using a gas wrench, the tool is secured in a vice. Next, the nozzle clamped with a key must be struck several times with a copper hammer. The direction of the impact must coincide with the vector of the drill exiting the chuck.
Since contamination or lack of lubrication is often the cause, special penetrating fluids can be used. They allow you to establish proper operation of the tool and extend its service life.
The drill can also get stuck because it has turned in the chuck. In this case, the elements of the cartridge must be removed, but you can try simply turning the nozzle in the right direction. However, in this case, replacement of parts of the clamping mechanism will be required.
Originally posted 2018-07-04 07:44:52.
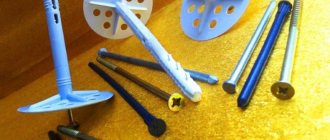
How to remove an old dowel from a wall when it is broken?
In any job, defects happen. During installation, the screws may break, the notches on their heads may wear off, and the plastic of the bushing may crack. If the screw is not completely broken, then you can remove its remains using a little trick. To do this, take a reversible drill, clamp the remnants of the screw sticking out of the wall into the chuck instead of the drill, and turn on the reverse motion. If the fragment does not allow this to be done, then pliers with a large lever or pliers will be needed. These tools have a lot of pressure in the working part, which will allow you to grab the most difficult edge.
The same tool will help you remove the plastic part stuck in the wall. You need to carefully pry up the upper skirt of the liner and pull it, trying not to tear it. Since it can be difficult to remove a broken dowel from a tiled wall without damaging it, you can consider the option of partially dismantling it.