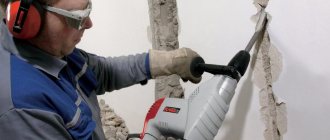
Any equipment needs maintenance and care. Rotary hammers are no exception. These are powerful power tools capable of performing a wide range of work during repairs, construction and more.
In fact, not only beginners, but also experienced people and professional builders can encounter problems with a hammer drill. One of them is the attachment getting stuck in the punch chuck or in the ceiling or wall when processing the surface.
Objectively, pulling out a whole attachment in the form of a drill or auger is much easier than when a piece of debris remains in the chuck or wall. But such tasks can also be overcome. Here you need to navigate the situation, start from the reasons and act based on what tools and devices for extraction are at your disposal.
Why does the hammer drill attachment jam?
It will be useful to know how to remove a replacement drill bit that is stuck inside the hammer drill or in the wall. There are 3 main reasons.
- Large diameter of the equipment used. When the hammer drill is working, due to the excessively large size of the drill, it begins to grind, as a result of which it can become thoroughly stuck.
- Low quality steel. If the steel is of mediocre quality, then during active work the material may become deformed. What most often happens is that the shank becomes wedged, like an anchor. Due to weak steel, attachments also break. This mainly occurs when working in impact drilling mode.
- Mismatch between chuck and attachment. This situation leads to the fact that the drill or drill begins to fall apart. Some element remains in the cartridge, or gets stuck in a hole in the wall, ceiling, or floor.
Separately, we can highlight such a problem as rust. When a power tool is used quite frequently, such problems may not occur.
And it’s a completely different matter if the nozzle was not removed from the problem hammer drill and left for long-term storage. As a result, the sting sours. Rust forms, which blocks the free exit of the element from the cartridge.
If a drill or drill suddenly gets jammed in your hammer drill or in the wall, then you will definitely need to pull it out. It is highly not recommended to leave pieces of metal fittings in the wall. This will cause rust to develop, which can affect the finish.
Hammer chuck: how to remove, disassemble and replace?
The reason for replacing a drill chuck can be both external and internal circumstances. For professionals, it will not be difficult to disassemble, remove and replace the required part, but beginners may have some difficulty with this task.
In this article we will look at how to correctly change the cartridge on a rotary hammer.
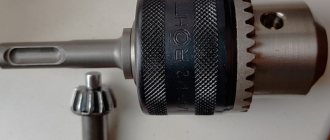
Cam key chucks
If we are talking about simple rust, then the problem is usually solved quite simply. You just need to treat the tool with a rust converter, or spray it with something like WD-40, wait a little and then pull out the drill or drill.
But it also happens that the hammer drill is seriously stuck in the chuck and it is impossible to pull it out with simple force. The element is deformed, which complicates the solution of the problem.
In such a situation, you can resort to the following actions.
- Prepare a gas wrench, a screwdriver or chisel, a hammer no larger than 700 grams, and some kind of lubricant.
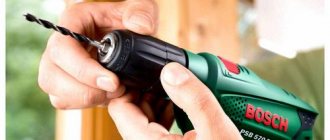
- First, process the chuck with a drill. Here you can get rust converter, WD-40, motor oil or any other similar lubricant.
- Allow the product to penetrate and react properly. Usually it is enough to wait from 5 to 20 minutes. But it's better not to rush.
- Using a gas or plumbing wrench, tighten the chuck so that you are holding the drill with your left hand. For lefties, do the opposite.
- Use your legs to secure the structure. If possible, use clamps or a vice for this. Although usually the efforts of the legs are enough.
- Place the screwdriver on the existing clamping ring, tilting it towards you. The tip should be in the groove between the teeth.
- Use a hammer to hit the handle of the screwdriver with measured force. Thus, the ring should begin to rotate. This will allow you to remove the stuck nozzle.
If you have 2 suitable gas keys at once, then try a different technique. Its essence is to turn two rings simultaneously, but in different directions. This will release the clamp and the drill will come free.
Since the auger or drill bit has become deformed inside the jaw key chuck, be sure to check that the tooling has not damaged the inside of the chuck. If there are dents, grooves or other signs of mechanical damage, then it is better not to use such a cartridge anymore. The correct solution would be to replace it.
Types and scope of application of SDS cartridges
Depending on the diameter of the shank with which the tool or adapter is equipped for fixing it on the hammer drill, SDS chucks are divided into five main types: regular SDS chucks, models of the SDS-top, SDS-quick categories, as well as SDS-plus and SDS-chucks. max. The most popular are the SDS-plus category chucks, which are designed to hold tools with a shank diameter of 10 mm. The shank of the tool, adapted for fixing devices of the SDS-plus category, enters them to a depth of 40 mm. In this case, the diameter of the working part of the tool, which is fixed in SDS-plus chucks, can be in the range of 4–26 mm.
The maximum tool length that can be clamped in SDS-plus chucks is 1 meter, and its most common working diameters are in the range of 6–12 mm. Devices designed to hold SDS-plus shanks and corresponding adapters for rotary hammers in them are used to equip light and medium category equipment, the weight of which, excluding the weight of the tool, ranges from 3 to 5 kg. It is precisely these hammer drills, which are designed for impact loads of up to 5 J, that are most popular among home craftsmen and small repair teams.
Common types of SDS shanks
SDS-max chucks, with a bore diameter of 18 mm, are used to equip heavy professional rotary hammers, whose weight starts from 5 kg. Such hammer drills, which can be used in conjunction with tools with a working diameter of up to 6 mm, are able to create an impact load of up to 30 J. To ensure accurate and reliable fixation of the tool in such serious equipment, an additional guide groove is provided on shanks of the SDS-max category .
Double clutch chuck
Compared to a key jaw chuck, this device does not have teeth or a stop. The rings are quite smooth. In this regard, a removable holder is well suited for removing equipment. Modern drills are increasingly equipped with the appropriate device. That is, the holder is included. Plus, arm yourself with a hammer up to 1 kg.
If the attachment is stuck and firmly held in the hammer drill, which makes it impossible to remove it in the usual way, try the following:
- using the holder, grasp the upper coupling, which is located closer to the drill, and clamp tightly;
- grab the drill itself using your own hands, feet, or a vice or clamps;
- strike the holder handle with force in the direction in which you want the clutch to unwind.
Usually one solid blow is enough to move the ring. After this, the drill is removed from the hammer drill without any problems.
The effect of this method will be even greater if you first add a little grease or oil into the gap between the cams or under the clutch.
This makes it easier to glide. Due to this, the clutch unwinds more easily.
Methods that can help pull out the drill + (Video)
The rotary hammer chuck is designed so that during operation the drilling or drilling equipment moves along the shaft. During riveting, the barrel will not allow the drill to come out easily. You can try to get the drill in the following ways:
- You need to hold the drill in a vice and then slowly loosen the hammer and pull it towards you.
- The hammer drill itself is clamped in large clamps, but in such a way as not to cause damage to the body. Then the drill is clamped with a pipe wrench or in a small vice, and then you need to hit it with a hammer, knocking out the drill.
In any of these cases, a few drops of WD-40 will not be superfluous. Very rarely, a drill jams due to lack of lubrication or a clogged chuck. The fixation ball, in cases where there is a foreign body under it, will prevent the drill from coming out. To avoid this, the shank on the device must always be lubricated.
If the drill is stuck due to the fact that it has turned in the chuck, then you need to remove the chuck itself, while dismantling the cap and rubber ring, or try to turn it back 90°. Because of this, you will most likely have to replace all the clamping parts on the hammer drill.
But do not forget that if the shank is already broken, it will not be possible to free the drill. In this case, you need to completely disassemble the hammer drill and then knock out the stuck device. But again, after such maneuvers it will be necessary to replace the barrel.
Keyless chucks
Sometimes it becomes necessary to pull out a nozzle that is tightly seated in a quick-release chuck. They can be used in the design of not only a rotary hammer, but also a drill and a screwdriver. There is no rotating clutch here. The attachments are held in place by a snap ring.
If we talk about how to get a broken drill out of your hammer drill or other power tool, then there are 2 solutions to solve the problem at home.
- First way. When faced with the fact that the drill bit is stuck and firmly seated in the quick-clamping chuck of your hammer drill, you can try the following. Remove the top o-ring, then pull the chuck back and use a metal wire and a screwdriver to pry the clamp ears off. Then you need to stretch and pull the cartridge in the opposite direction. Next, grab the nozzle using pliers or pliers. Start swinging and turning in different directions, gradually pulling the drill or drill outward
- Second way. Since the nozzle can jam quite tightly, there is another option. Remove the tube that leads to the cartridge (raster). This will give you access to the end of the drill. Using a regular drill with a metal drill bit, drill out the tip. This will allow the drill bit to come out of the keyless chuck easily. This option can be considered almost a non-alternative solution when the tip of the nozzle literally flattens. Otherwise, it is almost impossible to get the nozzle out of the hammer drill.
Tips for avoiding jams
To avoid problems associated with the drill jamming in the hammer drill chuck, it is recommended to use only high-quality attachments that are produced by well-known, popular brands. In addition, when working with different materials, it is necessary to correctly and correctly select the appropriate working attachments. Before long-term use of the attachment for drilling a durable surface, it is recommended to first check its quality.
To do this, using a nozzle, you need to make several holes in the working surface, and then remove it from the chuck. If, after the completed manipulations, it easily passes through the shank and is dismantled, then, most likely, such a nozzle is made of high-quality material and its deformation should not occur during the work.
What to do if the tip of the nozzle in the chuck breaks
It's one thing to clamp a solid cartridge in a chuck. Here you have the opportunity to grab the tip, pull it out with pliers and use other methods of influence.
Another question is if the nozzle breaks and the shank remains inside the chuck. Here you won’t be able to grab the drill or drill with tools. We need to look for another way out of this situation.
As a standard, home craftsmen try to pick out the remains of the drill using an awl or a screwdriver. Some try to get it out using a magnet. Another common solution is to stick it to the drill using superglue and then pull it out. But in practice, all these methods show low efficiency. Of course you can try. But if the fragment is held tightly, then the superglue will not be enough to set. And a powerful magnet won't help.
In fact, if the drill cannot be pulled out of the hammer drill, there are two solutions to what to do: contact a workshop, where experienced specialists will disassemble your cartridge in parts, or install a new one, or still try to solve the problem on your own. Note that the first option is safer, but requires financial costs.
If you decide to take everything into your own hands, then there are 2 ways to solve the problem to choose from. This can be done using a welding machine or by pressing.
When using the welding machine, follow these instructions:
- Using a heavy-duty vice, clamp the hammer drill. The cartridge should face up.
- Remove the seal, retaining ring, washers, and nuts. Depends on the design. Or pull down the cartridge itself.
- When the cartridge is opened to its maximum, insert the insulating sheath into the cartridge. Take a fairly powerful wire, the cross-section of which will be at least 7 mm.
- Connect one terminal from the welding device to the body of the hammer drill. The second terminal should be used to grab a metal rod or welding tip of sufficient length. The cross-section should be smaller than that of the insulation.
- Connect the tip with a fragment of the nozzle. Using the device, give a short, low-power discharge.
- When the welder grabs the fragment, it is enough to pull it along with the rod out of the chuck.
If you have a welding machine and a vice, the procedure takes very little time.
But there are several disadvantages:
- Not everyone has the necessary equipment at home;
- after welding, adhesions may remain inside the cartridge;
- Welding joints form randomly on the chuck and hammer.
The danger of soldering is that they can disrupt the normal operation of the power tool and ultimately permanently damage it. Therefore, there is an alternative solution: extraction with pressure.
The meaning of the idea is as follows:
- remove the boot from the cartridge;
- pull back (down) the cartridge;
- turn on shock mode;
- At the same time, using some suitable device, press on the fragment of the nozzle.
This is a potentially dangerous method, because when pressed, a piece of the drill or auger flies out at high speed and in an unpredictable direction.
To minimize risks, install some kind of shield or panel at a short distance opposite the cartridge that can absorb the force of the impact. It should not be a metal sheet or anything hard. Otherwise, the fragment will ricochet and may hit you. Or something will be damaged in the room. It's not worth the risk.
As a result, you will end up with a broken drill or auger. Check the condition of the cartridge to make sure it can be used again.
Types and causes of drill jamming in a hammer drill
There are two most common variants of this problem:
- the drill jams in the drill chuck or in the buffer element, which is used to install an ordinary attachment in a hammer drill;
- the product gets stuck in the clamp of the hammer drill itself.
In the first case, the problem appears due to the fact that solving the problems requires a drill, which is used for a conventional drill. There is a special product for its installation - an adapter chuck, the same as in a conventional electric drill. It is inserted into the clamping element of the hammer drill, after which you can begin work.
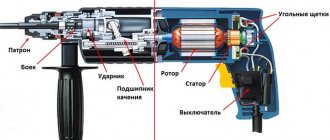
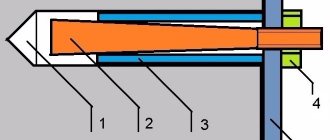
Diagram of a standard hammer drill
After they are completed, in some cases it is not possible to simply remove the drill, since the lips of the clamping device hold it tightly. This problem is quite easy to solve, since its root lies in the incorrect use of the clamping mechanism. Some craftsmen simply forget to lubricate it regularly, which is why the tool jams.
To open the lips of this device, you should treat them with special compounds, for example, WD-40. If such a substance is not at hand, and the hardware store is far away, then kerosene can be used as a working fluid. Then you should wait about a few minutes for the composition to take effect. After this, you should tap the surface of the clamp with a hammer, while simultaneously loosening the product. After such manipulations, the lips of the device will give in and the drill can be removed. Finally, you need to dismantle the cartridge, clean it and lubricate it.
To remove the drill bit from the hammer drill, you can use WD-40 fluid
In the second case, the drill got stuck in the hammer drill. This trouble appears for completely different reasons than getting stuck in a transition node. The nozzle in an electric drill moves around its axis, in some cases making weak reciprocating movements. This is due to the transfer of energy into the tool body through the jaws of the clamping mechanism and the bottom of the chuck.
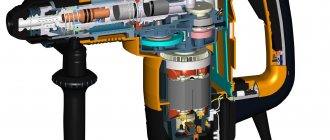
The hammer drill uses a different technology for transmitting energy, and accordingly, the nozzle in the clamp moves differently. Since the hammer drill provides rotational-impact and simply impact vectors of tool movement. Energy is transmitted to it through a special striker, which is driven by a power unit powered by electricity. This striker exerts a mechanical effect on the shanks of tools installed in the chuck, such as a drill, a drill, a crown or a chisel.
Sometimes a vice is used to remove the drill from the hammer drill.
These elements are equipped with special grooves, with the help of which they are securely fixed in the clamping device. These grooves also serve to provide the tool with energy to perform rotation. Low quality tools are made from soft alloys that are not heat treated. The shanks of such products cannot withstand high and prolonged mechanical loads, and therefore become unusable. In this case, before removing the drill from the hammer drill, you may have to disassemble the tool.
Return to content
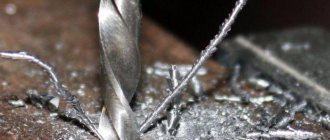
Drill or auger stuck in surface
It also happens that during the drilling process the nozzle breaks off and a fragment remains inside the wall, ceiling or floor, or gets stuck entirely, falling out of the chuck.
In this case, you can apply several different solutions.
- Reverse mode. The simplest situation is when the nozzle remains clamped in the socket, does not break, but does not want to come out of the wall. Turn on the reverse mode and begin to gradually pull the hammer drill back.
- Metal chain. This is relevant if part of the drill or auger was outside and you were drilling the ceiling. In this case, you can wrap a chain around the shank, tie on a heavy weight, and let gravity do the work. Just don't stand under the weights so they don't fall on your head.
- Vise. Using a portable vice, you can clamp the protruding part of the drill, and then use a lever to start swinging and turning the attachment. The help of a partner will not hurt here.
- Impact mode. You need to turn off the rotation and leave only the impact mode. At the same time, the hammer drill should be pulled in different directions. This will break up the concrete around the area where the bit is stuck. The drill will then come out easily.
- Gas key. You need to screw the nozzle onto it, and then turn it in the opposite direction with the key. Due to the long lever, you don’t have to put in much effort.
- Additional holes. If there is nothing to grab onto, you should try to drill or gouge the wall from above, below or on the sides of the stuck drill or auger. Although you end up with a large hole, it can easily be filled with mortar.
- Magnet. When a piece of a hammer drill attachment remains in the wall, but dangles freely in the hole, and you cannot grab the edge manually or with tools, try using a magnet. It will attract the metal and the drill will come out.
As a last resort, if the nozzle cannot be removed, you should use a grinder to cut it flush with the wall, and then cover it with mortar. It is also advisable to fill the hole with an anti-corrosion agent for metal so that a rusting drill does not lead to damage to the finish coating.
Have you ever had to pull a drill bit out of a wall or a hammer drill? What method did you use? Have nozzles been left in the walls?
How to Remove the Shank from a Hammer Drill
How to remove a stuck drill bit
from a hammer drill
At the time of construction work, the introduction of a hammer drill becomes very necessary. When using it, various holes are made, in other words, old cement-stone coverings are dismantled.
A situation often arises when drilling accessories cannot be removed from the hammer drill chuck.
How to remove a drill without the help of others and with minimal risk of damage to the tool? For this purpose, you need to understand certain features of the appearance of similar problems when using the tool.
If the drill is stuck in the chuck, you need to drop a few drops of oil into the joint area.
Types and reasons for drill jamming in a hammer drill
There are 4 options for this problem:
- the drill is jammed in the drill chuck or in the adapter chuck for using a regular drill in a hammer drill;
- bit is stuck
in the hammer chuck.
The first option appears due to the need to use an ordinary drill while working with a hammer drill. For this purpose, you have an adapter chuck, like in an ordinary drill, it is inserted into the clamping device of a hammer drill, and the drilling process is carried out.
At the end of the work, from time to time it is not possible to remove the drill freely, since it is impossible to unscrew or unclench the lips of the chuck. This problem does not cause any difficulties in resolving it.
Usually, the drill jams because the clamping device is not lubricated or is very dirty.
Drill chuck diagram.
To release the clamping mechanism, you need to drop a special penetrating liquid there, for example, WD-40; there is an option to use kerosene. After 5-10 minutes, you need to carefully tap the chuck with a copper hammer, and immediately try to loosen the drill with your other hand. After these manipulations, the mechanism can be unscrewed. When the cartridge is free, it needs to be cleaned and lubricated.
In the 2nd option, the drill got stuck in the hammer chuck. This happens for reasons other than when the drill jams in the chuck. A drill or drill in a drill experiences rotational and weak shock loads, which are transmitted to their body only through the clamping lips and a constant stop at the bottom of the chuck.
The hammer drill has a completely different force transmission mechanism and different kinematics of the drill in its chuck.
Because the hammer drill
predicts a rotational-impact, as it is also called an impact vector of force transmission, drills and drills receive energy with a special striker, which is driven by the electric motor of the tool and hits the shank of the inserted devices (drills, augers, bits, chisels).
The inserted equipment has special grooves in its own body, when used, they are fixed within the calculated boundaries and torque is transmitted. Bad tools have very soft steel that has not undergone heat treatment; during the course of the hammer drill, the shank becomes riveted, especially during long-term operation.
How to remove a broken sds drill from a hammer drill barrel
How to remove a broken SDS drill from a hammer drill
. It is impossible to hook from the top without disassembling the cartridge as well.
How to remove a jammed drill bit from a hammer drill
We pull out the jammed drill.
Methods to help remove the drill
Remove stuck drill
of course, with the help of a vice, if you hold the drill there and pull out the drill using the loosening method.
The design of the hammer drill chuck involves moving the drilling (boring) equipment along the shaft. When riveting occurs (increasing the diameter of the back side of the drill), the barrel does not allow the drill to come out freely. This is a more common prerequisite for the task. Try to remove the equipment using the following methods:
- Clamp the stuck drill in a vice on the workbench, and after completion, shaking the tool from side to side, pull it towards you personally.
- The hammer drill is clamped into a huge bench vise in such a way as not to destroy its body (rubber gaskets are used). Then the drill is clamped with a gas wrench (number 1) or a small vice and struck with a copper hammer. The direction vector of the impacts must coincide with the direction in which the equipment exits the chuck.
In both methods, of course, use penetrating water. That the prerequisite for jamming is working without lubrication and getting clogged. The fixing ball, if scale or hard stones have gotten under it, may not disentangle the drill. To prevent this from happening, it is imperative to lubricate the shank
drill.
If the drill gets stuck
due to rotation in the cartridge itself, you need to dismantle the parts of the cartridge by removing the rubber cap and locking ring for this purpose. Or try turning the drill back 90° (the direction of rotation can be seen from the notches on the drill and the cheeks of the chuck). Rotating the drill usually leads to the next replacement of parts of the clamping device.
It should be taken into account that during long-term operation with poor equipment, severe deformation of the shank occurs, therefore the proposed methods cannot be used to rescue the drill.
Diagram of the hammer drill device.
In this case, you will need to completely disassemble the hammer drill, then use a drift to knock out the stuck drill
.
Due to a similar operation, it will be necessary to change the tool barrel. The disassembly diagram for many devices is personal, so it is better to find an installation drawing of all components.
However, without plumbing skills, there is no need to disassemble and repair the stem assembly. In this case, it is better to contact a workshop.
You can remove the drill using the proposed methods after the first 2-3 blows of adequate force. If there is no noticeable progress, then subsequent attempts to knock out the drill lead to damage to the hammer drill itself.
Tips for avoiding similar cases
The introduction of branded drills is a guarantee that the drill in the hammer drill will not get stuck. Alas, in modern points of sale of construction equipment, of course, counterfeit products are sold. To avoid emergency situations, it is necessary to carry out trial work with the purchased drills.
If, after making several holes, the drill moves quietly through the shank
, then the equipment is high quality.
On the contrary, riveting will occur, then with a high probability it will be possible to remove the drill without disassembling the hammer drill , because the deformation will not be severe.
It is important not to miss the moment when movement along the trunk becomes difficult. From time to time, very massive equipment is used to make holes in materials not intended for these drills. Drills, even if they are high-quality, cannot withstand heavy loads and become deformed.
If it was not possible to remove the drill from the hammer drill without the help of others, then you need to prepare for the fact that calling the service center with such a problem will lead to the loss of the warranty on the tool, because the use of poor equipment is the fault of the buyer and user.
Source: https://ctln.ru/kak-vytashhit-hvostovik-iz-perforatora/
Replacement
Before disassembling the drill chuck, you need to find out the type of fastening on the shaft: conical or threaded connection. If the thread is left-handed, then manufacturers prudently install a locking screw. It can also be metric or inch.
The conical connection method is formed by using a Morse cone (popularly called instrumental). Installation of the cartridge on such a shaft is carried out with little effort for tightness. This option is often found in the case of screwdrivers.
The table shows a step-by-step algorithm for dismantling drill cartridges.
| Action | Details |
| Threaded connection | |
| Locking screw | Twisting. |
| Cartridge | The way to unscrew the chuck on a drill is counterclockwise using a gas wrench. If necessary, the shaft can be clamped with a vice. Additionally, the device is inspected for serviceability. |
| Jammed drill | You will need a hammer to remove the nozzle. You need to apply several gentle blows from above to the fists. |
| Cone connection | |
| Technically | In order to disassemble the drill chuck, the tool includes a special device. |
| According to folk | The drill is secured with the drill pointing down. The back of the tool is struck evenly with a hammer. In this way, the cartridge is knocked out of the shaft. |
In the case of threads, installation of the cartridge is performed in the reverse order with the same actions as those carried out during dismantling. In the second case, you first need to put the cone in order. Here you will need sandpaper (can be used on fabric) and a file for burrs. After this, the clamping device is also installed using percussive movements, only with a mallet.