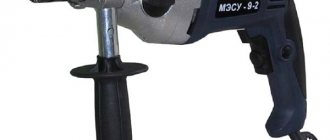
A screwdriver is a great helper for repairs inside and outside the house. Often when purchasing a domestic or imported screwdriver, we want to get a reliable and durable tool.
However, we do not think about it, but also often forget that the reliability and durability of equipment directly depends on storage conditions and operating rules.
Long-term use and constant loads, sometimes exceeding those set by the manufacturer, almost always lead to temporary or complete malfunctions of the equipment or device. In the case of a screwdriver, this may be turning the chuck.
You can encounter such a problem even if you have just bought a screwdriver, but often such a breakdown occurs later in life.
If this happens, don’t panic, it’s better to start looking for the manufacturer’s service centers, because you can’t fix all the breakdowns yourself.
If the screwdriver spins, then there are reasons for this. Let's look at the most common reasons for this phenomenon.
Reasons for screwdriver failure
- Insufficient lubrication of the gearbox. In this case, disassembling and good lubrication of the latter will help you out.
- Gearbox shaft distortion. Here you will most likely be helped by replacing it rather than straightening it. It's better to replace the part than to use the old one, otherwise you'll end up having to buy a new clutch anyway.
- Damage or breakage of the satellite, or the pin to which the satellite itself is attached.
- Wear of bearings or the gearbox shaft itself.
When checking for malfunctions, it is important to understand and see the very first signs of malfunctions in the device.
What can I do to prevent the drill from spinning in the chuck?
So, before us is an old drill with a licked off tail. If necessary, the drill can be restored and made so that it will not turn in the chuck.
For these purposes, we take a grinder or use a sharpening machine to sharpen the drill a little and make straight edges. When a drill modified in this way is clamped in a chuck, it will not rotate.
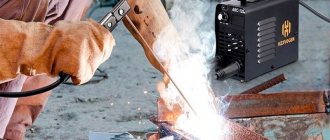
The second method is to weld a small metal bead to the drill shank. After cooling, the roller on both sides also grinds itself off on a sharpening machine. As a result, even an old and worn drill will not turn in the chuck.
To prevent turning, you can try wrapping blue electrical tape or tape around the tip of the drill. This way, you will be able to slightly increase the diameter of the drill and avoid turning it in the chuck.
You can also wrap sandpaper on the tail of the drill, which will prevent it from turning. However, there is one small nuance here - the sandpaper needs to be rolled up, only with the rough surface facing the drill.
Typically, a few turns of sandpaper around the drill is enough to resolve the problem. The sandpaper strips should be small in width, about 1-2 cm.
Signs of tool failure
- Sounds that are not typical for the instrument during operation, that is, during normal operation, the instrument produces sounds that are normal for it, and when it breaks down, extraneous sounds are added, for example, a knocking or crackling sound that was not there before.
- Vibration and/or chatter in the chuck. In this case, you may feel uncharacteristic vibration of the tool or the striking of the chuck during the tool.
- The screwdriver constantly or periodically jams during operation.
- When the screwdriver is turned on, the motor begins to rotate the chuck using idle speed. In this case, the rotation can be easily stopped using your hand, even if the device is operating at second speed.
- Scrolling the screwdriver under load during operation. This may be a signal of a breakdown of the breakdown itself or a common cause of breakdown.
Such breakdowns should be looked for in the gearbox, clutch or speed switch. Long uninterrupted operation of a screwdriver under load can cause damage such as shaft bending. Therefore, you should strictly follow the instructions from the manufacturer.
This failure leads to strong beating and vibration of the screwdriver. Well, the most common failure among screwdrivers is wear of the bearing shaft support sleeve.
If, while working with a screwdriver, you hear a sudden crack and notice a twist in the switch position, then most likely there is a problem with the gearbox.
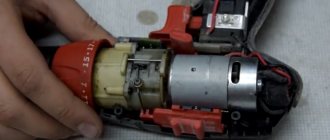
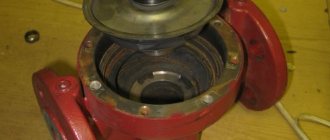
MAKITA screwdriver gearbox repair
Switching the direction of rotation of the electric motor shaft is done by changing the polarity on the electronic input. The regulator itself is usually presented in the form of a lever; for this purpose, the contacts on the terminals are switched. The electric motor is reversed.
The mechanical part consists of a gearbox and a mechanical force regulator. The gearbox is designed to reduce the rotation speed transmitted from the electric motor shaft to the main shaft of the screwdriver. Usually a planetary type gearbox is used. Such a gearbox consists of a ring and sun gear, satellites and a carrier. The number of satellites and carriers depends on the number of steps, in other words, the smoothness of the speed configuration. Screwdrivers use gearboxes with 2 or 3 stages. The principle of operation of planetary gearboxes is simple - the sun gear is placed on the electric motor shaft and transmits the rotation of the satellite, which then transmits rotation through the carrier to the ring gear located along the main shaft. When transmitting rotation from a small gear to a large one, the rotation speed is reduced.
A mechanical force regulator ensures a change in the load transmitted to the self-tapping screw during operation with a screwdriver. The regulator operates in a range of up to 16 positions, which allows it to be used perfectly when screwing screws into materials of very different hardness and fragility. In the mechanical part, it is especially necessary to emphasize the system of bearings on which the rotating shafts are pressed, which remains to be done by our client.
Electronic components of a screwdriver.
The main manifestations of electronic defects in screwdrivers include:
- When you press the start button, the tool does not turn on.
- There is no power adjustment; the direction of rotation does not change.
- The tool works, but there is sparking, or in other words, crackling and clicking noises are heard.
If the screwdriver does not engage when you press the start button, you should check the serviceability of the electronic parts. You should start by checking the batteries if you have a tester (multimeter). The voltage measured at the output terminals must correspond to the rated voltage indicated on the housing. If there is no voltage or the batteries are not charged enough. For which the design is intended, if even after using the charger the voltage does not appear, the case is opened and the quality of the soldering and the integrity of the wiring are checked. The voltage on each element is checked, which is less than 0.9-1 V. If any element does not produce the required voltage, then it should be replaced.
The next step should be to check the serviceability of the start button. The tester checks the operation of the button contacts. If voltage is not supplied after pressing the button, then you should first try to clean the contacts with emery cloth; if this does not help, then change the button.
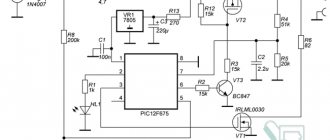
Screwdriver electronic connection diagram.
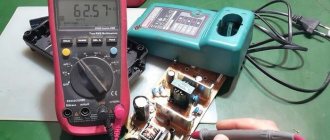
After checking all the parts responsible for supplying electricity, the electric motor is checked. First of all, the condition of the contact brushes is visually assessed, because their wear is a fairly common phenomenon. If there is wear on the brushes, they should be replaced. The next step is to check the functionality of the starting capacitor. If its actual capacitance does not correspond to the nominal value indicated on the case, it is replaced with a similar capacitor with the same capacitance.
If all contact and starting parts are intact, as well as the reliability of soldering and supply wires, the electric motor itself is checked. For this purpose, the anchor is removed and visually inspected. Damage or an electronic short circuit between the turns of the winding will be immediately visible. If there are no obvious signs, the integrity of each winding is checked separately. If the integrity of the winding is damaged, then the armature needs to be changed or the winding must be rewound by a specialist using special equipment. Repairing an electric motor armature is not done at home.
If the passage occurs when the screwdriver is turned on, but the rotation speed does not change whenever the button is pressed, faults should be found in the speed control system. The reason for such a malfunction may be: a malfunction of the start button, a breakdown of the transistor, partial wear of the contact brushes of the electric motor. The operation of all contacts of the start button is checked by a tester. Once it is ready to fail, it will be difficult to repair and it would be more expedient to replace it.
The quality of the transistor on the control panel is checked visually (by color change) or by measuring the magnitude of the input and output signals. The integrity of the entire circuit in the speed controller system is checked.
The lever regulator or the contact brushes of the electric motor are responsible for the impossibility of configuring the direction of rotation of the electric motor. The regulator is checked using a tester with different lever positions.
The prerequisite for sparking, crackling as it is also called clicks, is usually partial abrasion, or combustion of the contact brushes of the electric motor.
It is recommended to change brushes if their length decreases by 40% or more from the original length.
Diagram of the internal structure of a screwdriver.
The corresponding signs of defects in the mechanical part of the screwdriver are:
- the occurrence of third-party sounds such as grinding, rumble, etc.;
- noticeable vibration of the main shaft with the chuck;
- Complete otherwise repeated stop of the screwdriver (jamming).
To repair a screwdriver, you should pay special attention to the bearings on which the motor armature and the main shaft are located. Breakage of the armature bearings causes noise to appear, and jamming is usually caused by the destruction of the main shaft bearing.
Repairing a screwdriver step by step
- We take out the engine and carefully disconnect the motor and gearbox.
- Let's disassemble the gearbox itself. To assemble it exactly as it was, you need to photograph it or schematically sketch the location of the gearbox.
- If the teeth of the coupling are worn out, then replace it with a new one. It must be firmly fixed.
We carry out repairs using a bench vice, drill and drill of the required size. You will also need wire cutters and some screws.
The repair process will not take much of your time and attention. If you still decide to repair the worn teeth of the old coupling rather than buy a new one, then you will need a drill and a drill bit. To do this, you just need to drill several holes in the places where the teeth were and screw the required number of screws into these holes.
If parts of the screws protrude, then shorten them using wire cutters and turn on the screwdriver to check the functionality of the tool.
Below in the video you can visually watch the repair process itself.
How to remove and change the cartridge
For the safety of the work being carried out and to maintain the mechanical and electrical parts of the device in good working order, the cartridge should be repaired or replaced. To do this you will have to perform a small dismantling operation:
- It is necessary to move the jaws to the side by unscrewing the outer rotating part of the chuck until it stops.
- Then use a Phillips screwdriver to remove the screw (clockwise) that secures the head to the spindle.
- The next stage is more convenient to carry out armed with an auxiliary tool. You can use a gas wrench of the appropriate size. The electrical appliance must be placed on the table. The cartridge is rigidly fixed in the jaws of the key, and the lever is turned counterclockwise with a sharp movement.
- Now all that remains is to install the replacement, not forgetting to secure it with a screw on the spindle.
How to repair a SkiL screwdriver \ The speed in the screwdriver skips \ Repairing the gearbox
Vibration and noise are usually caused by defects in the screwdriver gearbox.
Their more common prerequisites:
- deformation of the gearbox shaft;
- damage to gear teeth;
- destruction of the satellite mounting pin and some others.
To clarify the circumstances, you should disassemble the gearbox, which is housed in a plastic case of the type of two halves. From time to time, malfunctions are caused by misalignment of the satellite axes. Here you can repair the screwdriver by installing these axes into the driver sockets without changing them. In most cases, malfunctions are caused by the destruction of gearbox parts, in other words, their irreversible deformation. Such parts require replacement.
To repair a screwdriver with your own staff, you need to prepare the following tools:
- pliers;
- screwdriver;
- hammer;
- tester or multimeter;
- electronic probe;
- wrenches;
- sandpaper or sanding block;
- chisel;
- knife;
- scissors;
- soldering iron
A screwdriver is a very necessary tool needed in the household. You can't despair if it fails. You need to find out the cause of the malfunction and carry out repairs in artisanal conditions. Repairing a screwdriver at home is possible.
Source
Classification of cartridges
The following types of cartridges exist:
- quick-release or self-clamping device;
- collet-type sds devices;
- cam
On a drill with a quick-release chuck, you can change a drill or other attachment quite quickly, without the need to use any additional devices. The cartridges of the first option are divided into single- and double-coupling devices.
Single-coupling devices have a shaft locking system that is activated during tool replacement. They have a significant negative point - very low strength of the fixation elements; the external parts of the cartridge are made of plastic, which greatly increases their damage and breakdown of the entire device.
Repair of this type of cartridge is not provided - only replacement.
Manufacturers use cam-type products on impact models and hammer drills because their design is stronger - they mainly use key-type chucks to securely fasten the drill.
The collet-type chuck was created back in the 70s of the last century; its design differs in that there are two grooves in the tail part, and the drill must be deepened by screwing movements by 40 mm. There are 4 grooves: 2 fixing, 2 for guiding the wedges, the cutting tool is fixed with locking balls.
With a classic gear device, the tightening is adjusted using a chuck key that comes with the drill. To properly unscrew the cartridge, you must follow the recommendations of an experienced technician; to do this, watch this video:
Features of repairing a screwdriver if it does not turn or turns poorly
Before starting repairs, you need to prepare everything. There are several rules and recommendations that should be followed when repairing:
- if parts need to be replaced, you must purchase only original components produced by the tool manufacturer;
- after disassembling the instrument, it is worth checking everything, since there may be several breakdowns;
- After repair, it is necessary to check the fixation of all parts.
Important! If you independently begin to repair equipment that is still under warranty, after disassembly you will lose your rights to free service at a service center.
If the device turns poorly or works slowly, you can identify the fault and repair it without involving a specialist. First, you need to diagnose the causes by checking all the parts of the device, and then begin to fix the problem. If the device is under warranty, it is recommended to contact a service center with the breakdown.
Subscribe to TechnoCouncil on social networks so you don’t miss anything:
Characteristics of the drill keyless chuck
The standard keyless chuck does not have a very complicated design. Tightening and loosening will require the use of a special metal sleeve that is knurled or grooved. Quite often, a plastic sleeve with ribs is used for this purpose.
The main difference of this element is the absence of a clamping key and the use of an outer shell that allows clamping of the drill lips. Most often, the use of BZP is accompanied by the following problems and difficulties:
- insufficient quality of drill clamping;
- lack of sufficient resistance to dust;
- breakdown of the clamping mechanism.
Design and features of the toothed chuck
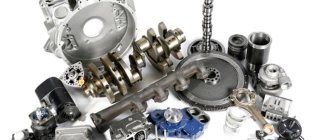
The classic drill chuck is a collet or cam type clamping device. They can hold not only various tools with a round shank, but also cylindrical workpieces for further processing. The main design elements of jaw chucks are:
- cylindrical body;
- an adjusting ring or sleeve rotating on the outer surface of the housing;
- a cam mechanism or collet installed in the inside of the device body.
Design of a jaw (gear-ring) chuck with a key
In turn, the collet mechanism, the elements of which are made of hardened steel, consists of three absolutely identical cams, which, when rotating the adjusting ring or sleeve, simultaneously approach each other, thereby ensuring reliable clamping of the tool shank. In the first models of chucks for mechanical drills, the collet jaws converged due to the rotation of the adjusting wheel; now an adjusting sleeve is used for this.
On one side, the drill chucks are installed on the shaft of the equipment used, and on the other, the tool with which the processing will be performed is inserted into them. Jaw chucks are primarily used to hold the following tools:
- drill;
- cutters;
- taps with small diameter shanks.
The drill chuck is designed to clamp bits with a cylindrical or hex shank