How to insert staples into a stapler
Before answering this question, let's briefly look at the features of the tool and consumables. In particular, staplers come in 3 types:
- mechanical (manual);
- pneumatic;
- electric – mains and battery.
It should be noted that this is the main classification, but there are others. For example, this tool is divided into 2 groups – professional and household. In addition, depending on the purpose, there are stationery, construction and furniture. Each type is designed to perform specific tasks. For homework, a household tool is quite enough, because you will only use it from time to time. Accordingly, buying a professional stapler will only be an unjustified waste of money. There is nothing to say about stationery staplers - these are very simple devices, probably familiar to everyone.
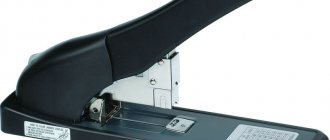
It should be emphasized that the charging principle for all staplers is approximately the same. Of course, there are some differences here, of course, but they are by and large insignificant. Let's look at the simplest example of how to correctly insert staples into a small stapler (also called a stationery stapler). Today, probably every family has such a device, so many people know very well how to prepare the instrument for use.
First of all, you need to pull up the back or front of the top cover. A clip will open in front of you. Now you should push the spring back until it stops, and then insert the plate with staples. Then all that remains is to return the lid to the reverse position, making sure that you hear a click. That's all - the stapler is ready for use. All that remains is to check it on some unnecessary sheet of paper, shooting off one or two staples.
A furniture stapler is charged using approximately the same principle. Only here, first of all, you must put the safety device on. This precaution will come in handy if you load staples into a large stapler, regardless of its type. The fuse is a good protection against accidental shooting, and therefore we do not recommend neglecting basic safety rules. Do not forget that a professional tool is quite powerful, and the staple may well fit tightly into soft tissue.
However, let's return to the main question. So, with the tool on safety, we need to gain access to the staple holder. There may be different options here. In some models you just need to pull the box towards you, in others you need to press a special button or release the latch. The instruction manual included with the tool will tell you how to do this. However, if there is none, it’s okay. Even a person who has never held such a model in his hands before can figure out what’s what. Everything is really very simple here. Having gained access to the cage, we put the plate with staples there and return the box to its original position. In many models, a characteristic click will indicate the correct action.
When inserting staples into an electric or pneumatic stapler, it is recommended to disconnect the tool from the mains or compressor. For a cordless tool, you just need to put it on the fuse. However, to be on the safe side, you can disconnect the battery. Well, the sequence of actions here will be the same. That is, we first gain access to the box, then fill it with consumables, and then return the clip to its place. Of course, there are minor differences here, depending on the model. However, they can hardly be called critical.
Separately, I would like to note the filling of printer or copier with staples. Here you will need to act somewhat differently. The main difference is that in this office equipment the entire cartridge with consumables is replaced at once. Accordingly, first of all you will need to buy a new one. When purchasing, be sure to check whether this type fits your printer or copier. After all, there may be different options here. Next, find the finisher and remove the empty cartridge from it. You can find out where exactly this compartment is located from the operating instructions or ask the corresponding request in an Internet search engine. Typically, you must press the release latches to remove the cartridge from the finisher. Now all that remains is to install a new cartridge.
And in conclusion, I would like to say a few words about staples for the stapler. They are different - primarily in size. Staples are also distinguished by the material they are made of. Therefore, before purchasing, it is better to consult with the seller which consumables are suitable, for example, for furniture. After all, the wrong choice may well have a negative impact on the quality of work. Additionally, many staplers do not work with small staples. Therefore, for each model you need to select consumables taking into account the size of the latter.
The material from which the staples are made is also important. For example, aluminum ones are the cheapest, but they are not reliable. Therefore, such staples can be used only if there will be no physical impact on the fixation site or for fastening thin materials. Copper staples are quite expensive, as are stainless steel consumables. They are used only in a fairly limited manner - mass use is simply unprofitable. The most popular option is regular steel staples. This is probably the best ratio between price and quality. By the way, you can simply take one of the staples, or the paper box itself, to the store - in this case, it will be simply impossible to make a mistake with your choice.
Source: specinstrumenta.ru
general information
If you have long been interested in the question of which stapler is better to choose, then it will not hurt you to first find out how this tool for fastening papers works.
Principle of operation
Its design includes a metal groove for inserting staples. To move them forward, a special spring or plate is provided. The latter option is considered more practical, since the spring begins to stretch over time and at one point may come off the hooks on which it is attached.
Thanks to the plate, the staple-moving tongue will operate smoothly. Its main task is to ensure that the clip of staples is constantly located at the edge. The push rod is usually made of metal or plastic. And it’s best if this is the first option, which is characterized by increased reliability.
Loading the stapler
Before work, the staples must be placed in the internal mechanism, after which, when you sharply press the device, staples will shoot out of it and fasten the sheets. When all the clips are used up, you just need to insert a new one to continue working.
Typically, full-load stapler models require one new plate of clamped staples to be inserted. However, there are models in which half the clip is enough to replace the spent staples. It's easy to understand how pocket and office staplers work and how many staples they require. You can easily figure out how to change the plates, for which you don’t even need to look for a diagram of the stationery stapler. You just need to lift the top cover and insert a new clip into the groove.
Office supply stores also offer front-loading staplers. These models have a special button on the body, when pressed, the spring of the mechanism is released and the chute moves forward.
We invite you to familiarize yourself with Floor installation in a country bath
Owners of professional devices may experience certain difficulties in replacing staples. Among them there are models that allow you to load 7 types of staples. But they have one feature - they allow users to choose the bonding depth at their discretion.
How to insert staples into the receiver
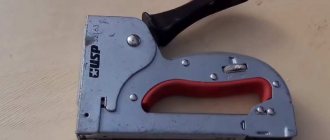
The design of all mechanical hammers is almost the same. There is a handle-lever, due to which pressing occurs, and at the bottom of the stapler there is a metal plate that opens the receiver. This is where we have to load the staples.
Before you buy brackets at a hardware store, you need to find out what size will fit your device. As a rule, the size and type of suitable staples are indicated on its body.
For example, the body of our stapler indicates a width of 12 mm and a depth of 6-14 mm. This means that you will only be able to charge staples in this range.
Smaller or larger brackets will not fit into the receiver. The size of the staples in millimeters is also indicated on their packaging.
To insert projectiles into the stapler, you need to open the metal plate on the back surface.
To do this, you need to take it with your thumb and forefinger on both sides, then pull it towards you and slightly down. Thus, we press the metal tab on the back surface of the plate, and pull out a metal spring, similar to the one found in a regular office stapler.
If there are any staples left in your stapler, they will fall out once the spring is pulled out. If they are not there, then it’s time to install new ones for further work.
The staples are inserted into the receiver (the hole is in the “P” position). Next, insert the spring back, closing the metal tab. That's all, the tool is loaded and ready to go!
Many people forget
Before work, adjust the adjusting screw according to the material of the surface you are going to work with.
If it is hard plywood, strong penetration of the material will be required, therefore, it is worth setting a high force. If it is a loose surface, the force must be reduced so as not to break through the fabric, or for example the PVC panel that you are shooting.
During operation, it is recommended to press the lever with one hand and press the adjusting screw with the thumb of the other hand. Then the recoil will be minimal and the load will be distributed evenly in the stapler. You will be able to nail the brackets much better.
What to do if a bracket gets stuck
It is worth noting another very important point that will help you in your work. It happens that the staples become bent and get stuck in the exit hole. They cannot be hammered into the surface and cannot be pulled out by hand.
In this case, we will need to pull out the feed magazine completely.
This option exists for almost all professional staplers.
First you will have to repeat the opening of the metal plate and pull out the spring.
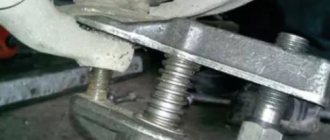
Next, in the middle of the lower part of the stapler you need to find an iron part, slightly protruding from both sides. Grasp it tightly with your thumb and forefinger on both sides and pull down forcefully.
This will remove the entire feed magazine that was in the tool.
You will see a jammed staple that can now be easily pulled out by hand.
Putting the stapler back together is not difficult: the entire pulled out block returns to its place with a press. You should hear a click when you do this. Afterwards, do not forget to replace the spring.
Not just parentheses
Some staplers can work not only with staples, but also with studs of various shapes. The designations of what the stapler works with are indicated on its body or in the instructions.
I tuck the nails into the stapler in the same way as with staples, but you need to be careful after pulling out the spring. A row of nails must be loaded along one of the outer edges of the letter “P”, and not inside this very letter!
If you want it to produce two nails side by side when working with a stapler, load the second row along the second outer edge. Next, the spring is inserted and the stapler is closed.
Source: narodnyeokna.ru
Important nuances
When purchasing a paper stapler, it is important to consider how actively you will use it. If you plan to use it often, then pay attention to metal options. They are considered more reliable and will last longer. In other cases, ordinary plastic devices will do.
Their operating principle is absolutely the same. It is also important to take into account that staplers differ in power. This indicator determines how many sheets your device can fasten at a time. By the way, it is also important to choose the right staples for a stationery stapler. It is advisable to know not only their size, but also the manufacturer.
Transformable furniture: choice for a small apartment
In addition, you need to know that there are devices that only work when resting on a table or other flat surface. If you try to fasten papers by weight with such a stapler, the staples will fall out or become deformed.
How to insert staples into a stapler
To understand the specifics of refilling a stapler, it is necessary to determine the principle of its operation and the type of driving force. The following types of staplers are offered on the market:
They are also divided into 3 groups depending on the moving mechanism:
- Mechanical.
- Electrical.
- Pneumatic.
Representatives of the first group work using arm strength and demonstrate weak power. They hold a small number of staples and are not capable of nailing thick or hard structures.
At the same time, mechanical models are characterized by compact size and lightness, so they are convenient to use in hard-to-reach places. Such devices are also in demand due to their low cost and availability.
In electric staplers, the staple flies out only after pressing the corresponding button. However, the device is brought into operating mode only after electrical power is supplied. Models with battery or network connection are available for sale.
Electric staplers are much more expensive than mechanical ones. They are also distinguished by their increased dimensions.
When working with network models, you may encounter discomfort due to the specific placement of the cord. Cordless staplers have a bulky handle and weigh quite a lot.
Representatives of the pneumatic group operate by supplying compressed air, which helps the staples or nails fly out of the magazine. The devices have increased performance and a spacious magazine, so they can be used for a long time without charging.
A negative aspect of pneumatic staplers is considered to be noise during operation. This is due to the presence of a compressor. Moving with such a device is quite problematic, so it is better to use it for professional purposes.
When doing home finishing work or gluing simple materials, it is better to choose mechanical and electric staplers.
How to refill a construction stapler
Novice builders do not fully understand how to use a construction stapler, so they often wonder about refilling it. The process itself does not require much effort, provided that the employee follows all the rules and recommendations. To thread a construction stapler, you need to follow this guide:
- Before disassembling the spring, you must lock the device using the appropriate lever or button. The type of blocker is determined by the features of the model.
- There is a groove on the reverse side. Sometimes you need to apply mechanical force or press a button.
- Next you will need to remove the inner rod by displacing the spring and place it on the staple rod. The tip of the device is directed towards the handle.
- At the next stage, the rod returns to its original place, and the magazine closes.
- Finally, all that remains is to remove the tool from the safety lock and perform test shots to check its functionality.
How many shells will fit into a stapler?
There is a wide range of staplers with different working holder sizes. Staples can be purchased in small rows that are separated into sections by hand. 1 stapler can freely accommodate 1-1.5 rows, which contain more than 20 staples.
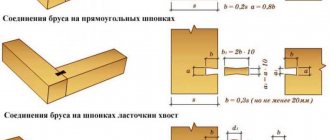
When choosing brackets, builders and furniture makers are guided by their depth. This figure varies from 4 to 14 mm depending on the type of work being performed.
So, to upholster furniture items with fabric surfaces, you need to purchase a bracket with a depth of 8 mm. Fixing thicker structures requires choosing staples with greater depth.
The following types of staples are available in the market:
- 53 - is in greatest demand and has a width of 11.4 mm and a thickness of 0.7 mm. The fastening depth is 4-14 mm.
- 140 - characterized by a width of 10.6 mm and a thickness of 1.2 mm. The depth indicator is equal to the previous variety.
- 36 - the marking indicates brackets with a semicircular shape; they are in demand when laying cables.
- 300 - are a special type of stapler nails.
At the selection stage, you should also pay attention to the material of manufacture of fasteners.
Simple steel products are in demand for processing wooden structures. But if you are working with particle board or plywood, it is better to choose models made of hardened steel. They have an extended service life and cannot be bent.
Stapling Types
Not everyone knows that office staplers differ depending on how they fasten sheets.
Most office workers are familiar with the common closed-type stitching options. This type of stationery stapler bends the edges of the staples inward. This is considered the most reliable way to bind paper. It is also the most common. There is also an open type. In this case, the staples are bent outward. This method is preferable to use in cases where only temporary stitching of sheets is necessary. Papers fastened in this way can be easily separated, and the marks are practically invisible. Sometimes in offices they use a special stationery stapler with straight staples. It is necessary in situations where it is necessary to attach paper (some kind of announcement or document) to a special board with a soft surface. It can be made, for example, from cork.
What to do if a bracket gets stuck
When using a construction stapler, a problem such as breakage of the staple inside the receiver often arises. Fasteners often become bent or stuck in the outlet, causing many problems. To restore functionality, you will need to completely remove the magazine with staples. Professional models have a removable receiver, so repairs will not take much time.
First of all, you should open the metal plate and take out the spring. Next, in the middle of the stapler you need to find an iron part and tightly clasp it with your fingers. This will allow you to remove the entire magazine and remove the jammed bracket.
Reassembling the tool does not require much effort: the removed magazine is put back in its original place, after which a characteristic click should sound. Next, all that remains is to return the spring to the groove.
If you are using a power tool, be sure to adjust the special screw when using the rough material to check. During this stage you need to rotate it from minimum to maximum. If the bracket is well secured from the first shot, proceed to work on the “finishing” part. In other cases, the procedure will need to be repeated.
A furniture stapler is a universal construction device that is suitable not only for upholstery activities, but also for more complex work. If you use this tool correctly, it will serve you for a long time and with high quality.
Possible mistakes
There are several of the most common, frequently encountered errors and problems that accompany the operation of a furniture stapler. The tool may fire multiple staples at once, or not at all, and may damage upholstery material. Errors are due to the following reasons:
- incorrect pre-adjustment of the adjusting screw when performing work with traditional mechanical models of the device;
- neglect of the rule of advance marking of places for installing staples, which allows for high-quality and uniform tension of upholstery material;
- lack of fixation of the upholstery with a free hand in order to prevent the material from moving during operation with a stapler.
It is important to control the number of staples inside the “magazine” of the tool, and also be sure to secure the handle with a safety lock immediately after finishing work. This will prevent spontaneous or accidental shooting.
It is strictly forbidden to work with a faulty tool. If necessary, the problem is diagnosed, and the firing pin that has exhausted its life is also periodically replaced.
How to insert paper clips into a stapler?
Today, no office is complete without a stapler. Note that this device can also be used at home. After all, a stapler is an ideal way to staple paper sheets. Note that the stapler can staple paper, both permanently and temporarily. Different types of matrices allow you to solve both problems for specific needs.
Naturally, from time to time staplers need a new batch of staples. And here it is important to choose a model that has the most comfortable mechanism for performing this action. The market offers a wide variety of options. To choose the right one, try inserting a block with paper clips directly in the store (exclusively yourself).
Special mechanism for installing new blocks with staples
This approach to organizing the device design is the most attractive:
- no effort is required to reach the staple compartment;
- Injuries when installing new staple blocks are eliminated.
The idea is to press the button on the back of the stapler. It has specially selected colors and has a rubberized surface. At the same time, it is located in such a way that it is impossible to press it accidentally.
A tray pops out from the front end of the stationery, where you will need to insert a new block of paper clips.
As far as can be noted, the procedure for inserting new paper clips takes a matter of seconds. However, most stapler models have a less advanced mechanism.
To get to the tray you have to open the top of the stapler. If closing (already with paper clips inside) is not done carefully, you can accidentally puncture your finger.
Additional options
It seems to many that a stationery stapler is a fairly simple device that cannot be improved in any way. But manufacturers are making it more convenient to use. So, when purchasing, pay attention to the fact that there is a plastic footrest or rubberized inserts at the bottom. They will protect your table from scratches.
Another important and convenient addition is the presence of a built-in destapler. This is a special device with which you can quickly straighten the staples. It will come in handy in situations where you need to separate previously fastened sheets. It is inconvenient to pick out staples with scissors, much less with fingernails, and it looks unsightly.
Replacing the matrix for compact storage of stapled sheets of paper
The matrix is often a stapler where the ends of the staples rest and bend under force. Moreover, they can bend in various ways. The most common is when the ends of the paper clips form semicircular parts.
In view of this, when storing stitched sheets in folders, there is an irrational use of space. Things are different when the ends of the paper clips are bent flat.
Often the matrix is rotating. It is enough to turn it to the opposite side to enter the stapler into temporary stapling mode. In this modification, a bent paperclip can be removed using two fingers and nothing more (unbending the paperclip is not required to separate the stitched sheets again).
In the video you can see all aspects of using a stapler in practice:
Source: postroyka.org
How to insert staples into a furniture stapler?
Today, the variety of specialized staplers for various types of work is numerous. You can buy them in stores for a variety of purposes; in a stationery store you can buy products intended for papers. But in a hardware store you can see what you need for repairs.
The favorite type remains the furniture option. After all, it is used to carry out restoration and insert other furniture elements during construction and repair work. It can be used for cosmetic and major repairs of an apartment.
To use a furniture stapler, let’s explain some points. Namely, what types of staples are there and how they are used. An important issue will be the use and change of brackets in the operation of the device, since the issue of changing brackets worries users.
Characteristics of furniture stapler staples
There are a variety of staplers on sale, but most work on so-called standard staples. And only type 53 belongs to them. There are 104 and many others. But the main difference is in characteristics and thickness. After all, the higher the number in the indicator, the thicker the staple increases. Application differs on different materials.
But the 53rd model has average width and thickness of 11.4 and 0.7 mm, respectively. These numbers are not so important, but to find out what type of brackets your model runs on. It is worth carefully studying the operating and replacement instructions. Everything will be spelled out in detail there.
When purchasing, you should ask your consultant about the types of staples. After all, there are models that are difficult to find on sale or the cost will be much more expensive.
Depth will be a factor when choosing staples. The depth indicator affects how deep the bracket itself will go. This indicator has different values, as it will depend on the material of manufacture and the purpose of use.
Simple ones are 4–8 mm. They are made mainly of plastic and are designed to attach and insert small materials. It is used infrequently, and the cost is low - 100 rubles.
- From 4 to 10 mm is the best option, but still not suitable. True, they are made of metal and correspond to 53 types of staples. But there is no adjustment screw.
- Staples 4–14 mm are a suitable option both in terms of cost and frequency of choice. Yes, and there is also a blow control screw. With its help, you can increase the force of the required blow, otherwise the staple may not fit well into the material.
There are types of hardened and simple staples. Tempered ones are intended more for materials such as particle board, since they can be held in place for a longer time using a furniture stapler gun.
Simple staples do not have such characteristics. They are simpler and not very reliable. True, this does not stop people from purchasing them.
see also
Comments 9
Sometimes I also lubricate the stapler. Stayer companies. Still alive. I probably hit 10,000 staples with them at most.
I would throw it away if the new one works like that)) I have the same type, but I’ve never had any problems, I haven’t smeared anything, I haven’t taken it apart
It is advisable to lubricate. Works easier
again dust sticks to the lubricant, here you also need moderate lubrication and not static lubrication))
Yes, there are few places where dust can get in. And there are not such small parts that dust can cause harm. I think so. And everything doesn’t last forever. After lubrication it is more convenient to work. And the reach force is greater) Please lubricate the entire tool. As an option, Runway silicone lubricant dries leaving a slippery layer. But not so durable...
Yes, the gates too, only lubricating with silicone and VD is allowed, but as for the dust, as long as I’ve been living, I don’t understand where the money goes and where the dust comes from)) I don’t use it often for periods, until I had enough strength without lubrication)) maybe I’ll try the thread when
It's not for long. It’s easier to buy a normal stapler, with a leaf spring. They last quite a long time, and these cheap ones are designed for 500 staples.
I’ve been using it for about 5 years now, if not 7. Everything is fine, but like the whole instrument I have to lubricate it periodically
It's not for long. It’s easier to buy a normal stapler, with a leaf spring. They last quite a long time, and these cheap ones are designed for 500 staples.
Come on