In carpentry, there are quite a large number of connections between parts. One of them is the dovetail. This type of connection can be seen on drawers, chairs and other structures. It is one of the reliable connections. The grooves are made in such a way that if you try to break the connection, they will rest against each other. In order to make a dovetail with your own hands, you will need a minimum of tools and a little experience in carpentry.
Application of dovetail joint
As a rule, this method of fastening is used if there is a need to obtain securely interlocked parts or a solid product at the output.
Here are the most common applications:
- Mechanical engineering production. Dovetails are used to connect elements of compressor devices together. It can also be found in metal cutting equipment and optical instruments.
- Construction works. This method is used to join timber during the construction of wooden cottages. It is also used in carpentry to create window and door blocks, arched structures, partitions and niches.
- Furniture industry. This type of tenon joint is often chosen for fastening frame parts, doors, and drawers. For greater reliability, the joints are additionally glued.
When installing various wooden containers, dovetails are also often used.
Features of the butt joint
The “butt” design is simple; the timber is placed tightly against each other and spliced together. But such a connection can only be used for outbuildings or country houses, since the airflow will be high. An example of such a connection can be seen in the figure above.
Butt fastenings are the simplest type of connection; the workpieces are fastened at right angles using construction staples or standardized fasteners; the building material is not processed. The technology is used in the construction of temporary buildings, field storage facilities and sheds, and arrangement of work sites. The structures are easy to disassemble, and the lumber can be reused many times.
With the advent of new generation woodworking equipment and laminated lumber, the technology has received innovative development. To strengthen the fastening, a hidden tongue-and-groove lock and a trapezoidal key are used. The castle was called the root thorn; the shape and dimensions of the castle were standardized. The groove and tenon are made on modern milling machines, the reliability of fastening is ensured by high precision processing of workpieces. In such a lock, the tenon is securely fixed inside the workpiece.
Special requirements are imposed on the quality of the material; this method of installing timber is used when working with kiln-dried laminated wood. The corners of cottages and luxury housing are fastened to a secret tenon; the technology is used in the design of facades, interiors, furniture manufacturing, the main advantages of fastening:
- The structures are easy to assemble and disassemble; you can purchase an industrial house disassembled and assemble it yourself;
- The corners of buildings are durable and airtight; this method of assembling corners is called a “warm corner”;
- The front side is not processed, the uniformity of the wood texture and the absence of cuts make the façade of the building attractive;
- The fastening can be strengthened with construction adhesive.
Types of dovetail joints
Today, many different types of fastenings have been developed. To determine the variety of swallowtail, a view from above is necessary. Possible options will be discussed below.
- A rough connection is distinguished by good visibility of the connecting parts. In the hidden version, the body of one part masks the teeth of the second. The through type of fastening involves the tenon covering the entire width of the second element. When choosing a one-sided tenon, only part of it is removed, and the other side is not touched.
- Dovetails can vary not only in appearance, but also in the size of the grooves and teeth. The technical documentation contains information on a scale that combines key dimensions of individual coupling parts.
For the rough variety, a scale of 1 to 5 is used. It is recommended for soft wood and allows you to reliably connect even large parts. If hard wood is used, then it is better to choose the 1 to 8 option. In this case, the joints will look more attractive.
State standards
The main standard that establishes the rules for the manufacture of fastening elements for wooden parts is GOST 9330-2016. It specifies the sizes of teeth, grooves, dowels of various types of assembly. The standard provides diagrams with examples of such fastenings. The rounding rules and symbols used in the drawings are indicated.
The rules for gear connections are specified by GOST 19414-90. It shows the sizes of the teeth, the order of their arrangement and methods of connecting them.
When constructing wooden houses, GOST 30974-2002 is used. It defines the rules for preparing dovetail cuts for logs in low-rise construction. It details the types of structures, classification and dimensions of each element.
If you find an error, please select a piece of text and press Ctrl+Enter.
Technical characteristics: Overall dimensions: 300x370x138mm.
Template thickness 8 mm. Weight: groove template - 6 kg, tenon template - 5 kg. Coating: galvanic zinc plating. Set cost: 17,000 rub.
Non-galvanized: 15,500 rubles
Equipment:
- Template “Spike” with bottom stop for timber
- Pattern "Groove"
- Expansion platform*
- Copy ring for Arunda cutter, cutter must be ordered separately
- Copy ring for cutter d 38mm
- Cutter D38.1, h30 mm angle 14.3°, shank 12 mm.
* For the ZUBR and Interskol fm-32/1900e router, the template is equipped with a ready-made expansion platform
for all other routers:
*holes in the expansion platform are drilled individually for each router by the customer
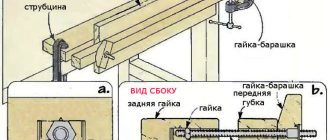
The template for the “Dovetail” connection (SHLH-1) is intended for the manufacture of “dovetail” beam connections using a manual router with a power of at least 1900 W with a dovetail cutter and a copy ring. The size of the processed timber can be a cross-section from 100mm to 200mm in width and up to 200mm in height. The support platforms of this conductor are adjustable in both height and angle of inclination, which allows you to make a connection at any angle
This is especially important for the manufacture of rafter systems and in the construction of frame houses. The jig for making a dovetail joint on a beam consists of two templates: the first for the tenon, the second for the groove
The copying bushings supplied in the kit are designed for two standard sizes of cutters. To use other cutters, the sleeve size must be changed. The Arunda system is designed for joining parts manually using special templates. It is used for assembling wooden frames using the dovetail technology, which allows you to fasten all structural parts efficiently, quickly and reliably.
Algorithm for making a connection
A dovetail is quite easy to create if you do all the necessary preparatory work in advance. Mechanical experience will also not be superfluous, because the product must be strong and beautiful.
Tools
To make a corner connection, you should prepare:
- board;
- Beam;
- Wood glue.
If you need to join the outer corners of the house, then experts advise purchasing also a sealant for additional processing of the gaps.
To make tenons and grooves, you need:
- Square;
- Knife;
- Set of chisels;
- Crafting table;
- A saw suitable for the desired type of fastening;
- Hammer;
- Sander.
If you plan to use a connection on large elements, for example, when constructing a building, then it is recommended to make a series of calculations, select the appropriate type, determine the number of tenons, the angle of inclination, etc.
Entry areas of different types
Let's consider what points you need to pay attention to when arranging the area in front of the garage in different cases
A private house. Here you have freedom of action. The most important thing is to ensure that the passage is always free. You should not be disturbed by other buildings. You also need to meet one more requirement: the road must be clearly visible to you when you leave the garage. Basement. Here you need to maintain a slope: approximately 20 degrees
It is important to make the platform safe so that it does not slip. A good solution is to additionally protect it from precipitation with a canopy. Ramp in a garage cooperative
Here it is advisable for you to enter together. It should be level, with a slight slope and drainage system. The base can be made approximately 15 cm deep.
The design of the blind area is discussed in detail here. It is quite possible to cope with such work on your own, to do everything as efficiently as possible. The main thing is to remember all the important points and act carefully.
Be careful: if you manage to make the right entrance to the garage, it will provide additional comfort and safety.
Work progress (step by step)
Before you begin, you need to mark all the blanks with a pencil.
The order of steps to create a dovetail is:
- Mark the tenons using a square. It is recommended to mark the parts that will need to be removed with a saw in color.
- Carefully cut out the thorns.
- Remove waste. You can use a jigsaw or a chisel.
- Mark the dovetails. It is recommended to place the element with tenons on a prepared piece of wood so that its end part coincides with the line of the shoulders. Only then can you begin to apply markings.
- Carry out sawing work. Remove waste, trim allowances and clean up.
- Join the parts to check the tightness of the fit. If necessary, remove excess with a chisel.
- Glue the connected elements together and clamp them with a clamp, having previously placed wooden strips so that the load is distributed evenly.
It is more convenient to make a dovetail using a manually driven framer. In this case, the quality of the finished product will be much higher, and it will take much less time to manufacture.
DIY accessories for a wood router
The machine itself is a very ancient invention of mankind, descriptions of the principles of milling appeared in the 16th century, and the prototype of the machine was the invention of Leonardo da Vinci, who proposed rotating a round file to increase the processing of the product, which can be considered the first analogue of a milling cutter.
And already the American inventor Eli Whitney, over the years of his life from 1765 to 1825, brought to fruition all the scattered attempts to create a full-fledged machine, for which he is rightfully considered the creator of the first milling machine, although not all scientists agree with this statement. And since the machine has such ancient roots, there are a great many adaptations for the manufacture of various parts, it is not possible to describe them all in the light of this material, and therefore we will consider only some of them, in my opinion, the most important and useful.
Pros and cons of dovetail joints
pros
This joining method for cladding and thermal insulation of the walls of a wooden building has the following advantages:
- Less wood waste;
- Significant expansion of the interior space of the house;
- The evenness of the corners makes it possible to cover the walls with siding, clapboard or gypsum board;
- Maximum adhesion reliability among all types of connections;
- No need to use hardware products;
- Low cost of construction work.
In addition, the dovetail serves as an excellent protection against moisture penetration into the home. It is also worth noting a number of other advantages:
- Preservation of wood structure;
- No natural deformation of the material;
- Possibility of adjusting the fastening power;
- Increasing the strength properties of the product.
Minuses
The connection has only two disadvantages:
- Closed corners negatively affect resistance to temperature changes, which means there is a high probability that mold will grow on the surface of the wood. The solution is to lay waterproofing or treat it with special compounds.
- Making fastenings requires the master to have skills, which makes it impossible for a beginner to build a house with his own hands.
Dovetail is practically the most effective way of attaching wooden elements to each other. The spikes and teeth cannot be separated from each other even without glue. In addition, such a connection looks very decorative.
Thanks to these advantages, this joining method is used in many areas, from construction to mechanical engineering. It is also used in applied arts.
How to properly make a ramp in an underground garage
Attaching the cable to the wall
The structure of the garage ramp is a small platform that is adjacent to the entrance to the garage. It is placed at a slight angle. You can make a ramp with your own hands, both temporary and permanent.
In the first case, the entrance is made of boards - any lumber will do. The advantage of this production is:
- rapidity;
- low price;
- speed of commissioning.
Minuses:
- fragility;
- light loads;
- destruction from moisture.
The best option for making a ramp is concrete. We will tell you further how to make or fill a garage entrance.
ramp parameters
Concrete ramp
To build a garage driveway you will need:
- cement mixture (M400);
- boards for wooden formwork;
- sand and crushed stone;
- fittings
Before you start work, prepare the area:
- Clear away any debris. Set boundaries. Compact the soil using a vibrator. Fill the resulting area with water, this will help shrink the soil.
- The next stage is the formation of formwork. Install a structure made of boards or any lumber into which the concrete will be poured.
- Weld a frame of reinforcement in the form of a mesh and install it on the bottom of the formwork. It will add strength to the concrete and help it last a long time.
- Mix all ingredients in the following proportions: cement 1 part + crushed stone 5 parts + sand 3 parts. Fill the formwork with the resulting solution immediately after production.
- The ramp is poured in several layers. You can roughly measure 10-15 cm and stretch a thread or fishing line along the formwork. The poured layer is leveled with a spatula and carefully compacted to avoid voids and internal bubbles.
- The formed layers are given time to dry, not forgetting to monitor their condition.
- A drainage ditch must be formed in front of the finished ramp for entering the garage. To do this, a trench is dug with a slope to a depth of 40-50 cm. The resulting drainage will discharge water into a specially installed reservoir or simply to a remote area.
- The ditch is concreted and grates are installed on top to prevent dirt, leaves and other debris from entering.
concrete ramp
How to make a blind area
This design is also of great importance not only for entering the garage, but also for household needs. The blind area helps to drain wastewater from the foundation. The material for production can be concrete or paving or curb slabs. Equipping a garage entrance with your own hands with these materials not only looks beautiful and neat, but also ensures safe maneuvers when entering a car.
Basic rules for arranging equipment:
- width – up to 0.5-0.7 meters;
- the height is set depending on the characteristics of the material that will be used (crushed stone or gravel up to 50 cm; concrete or tiles up to 40-60 cm);
- entrance slope - up to 10-15 mm for every half meter (if the blind area is built in an underground garage).
Arrangement of the site for the blind area:
- Prepare the area in front of the garage. Remove debris and compact the surface until it is level.
- The next step is laying crushed stone or gravel on the ground. Instead of formwork, we install a border and begin laying tiles or paving stones.
- When laying out the material, we adjust the installation using a mallet (lightly tapping).
- Fill the gaps between the laid tiles or paving stones with sand.
blind area near the garage
Correct screed
Installing the screed is similar to the above methods. The first step is to calculate the future area of the screed, as well as the necessary materials. After clearing the area and installing the formwork with reinforcement, a sand cushion made of sand, cement and crushed stone or gravel (10-15 cm high) is laid on the bottom and then filled with concrete. If the entrance is intended for trucks, it is best to use concrete M 500, 600 and higher as the base of the cushion.
The final stage consists of aesthetic design. Various polymer coatings will decorate your site, give it a neat appearance, and also help maintain the long service life of the concrete base.
screed in front of garage