Anyone can build a stove for a cauldron with their own hands if they have the desire and skills to work with tools. Oriental dishes cannot be prepared without national utensils, i.e. without a cauldron. Products languish in it for a long time. Cooking on a tripod is not an option because temperature control is important. In the stove, the cauldron is closed on all sides - this is exactly what is required. It will take a lot of time and effort to build a brick oven, but portable devices are easier to make. We will teach you how to make a stove for a cauldron with your own hands in order to pamper your family and guests with aromatic, nutritious and unusual dishes.
Peculiarities
What kind of stove should be for a cauldron? It is immediately worth noting that it is not distinguished by the complexity of its design and you can build it with your own efforts, if you have the desire and some skills in working with the tool.
Externally, the stove resembles a barbecue, but it is made round, because the cauldron has a similar shape. Traditionally, a cauldron is used for cooking over an open fire. That is why when designing a stove it is necessary to take this feature into account.
The best option would be a design that has removable legs. It is very important that the structure is mobile, because in this case you can take it with you when going out into nature or move it around the site, put it in a garage or shed for storage.
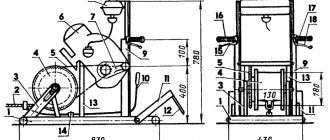
The oven, designed for preparing culinary delights in a cauldron, resembles a cylinder from the side. The base should be supported by massive legs so that they can support the weight of the cauldron with food in it.
The bottom is made at the bottom of the cylinder, while the top always remains open. After all, as already noted, culinary masterpieces in a cauldron are prepared only over an open flame. Some people decide to complete the stove design with a chimney, but this is not a prerequisite.
When cooking food on such a stove, thermal energy is used economically, because the flame is reliably protected from the wind. In such a stove, the boiler warms up much faster than on an open fire.
Cook-steam-simmer
Archaeologists have long been surprised by the incongruously small size of the fireboxes of ancient Roman culinary ovens compared to the size of the cooking utensils built into them. It was clear that the design was generated by economy; Italy had never been rich in fuel. But how did the Romans boil water using a small bundle of firewood with a heat release of barely 3000 kcal/kg in a cauldron in which a small person could bathe? There is no doubt that they were boiling: many sources indicate that water was continuously boiling in a large cauldron.
Ancient Roman cooking oven with cauldrons
Over time, the secrets of the Roman cauldron oven were revealed. Firstly, smoke tooth 3 (on the left in the figure) in combination with the rise of the semi-circular arch of the woodshed 8 behind it formed the so-called. draft (emphasis on the first syllable) 4 – gas channel of variable cross-section without shut-off valves. The boiler for cooking and stewing 5 in it is simply a cooking vessel built into a cast iron or stone stove 2; There was a burner above the firebox. But the role of hot water boiler 6 is twofold.
Firstly, it represents an aerodynamic obstacle to the flow of gases, and their turbulence behind it creates an invisible gas smoke tooth before lowering into the chimney 7, which further traps the gases in the draft. Then, remember: the water in Roman boilers boiled all the time. The Romans used boiling water sparingly and, having scooped it up, immediately added fresh water.
Boiling requires a large consumption of so-called. latent heat of evaporation, so the gases near the boiler 6, lingering, cool further and their flow rate drops even more. Two clearly demarcated regions are formed: in the draft the thermodynamic process is closer to isothermal, and in the furnace to adiabatic. As a result, the zone of sharp cooling of the flue gases, along the length of the draft, remains above the tooth. In a smooth draft, she would have the opportunity to jump forward, but in this scheme it is excluded by the rise of the arch of the woodshed behind the tooth, immediately behind the tooth there is a visibly distinguishable potential hole.
As a final result, the firebox of Roman kitchen stoves turned out to be exactly the same as a bell-type stove in terms of gas dynamics, with high efficiency and self-regulating: the flue gases circulated in the firebox until they burned out completely. Only part of them passed over the tooth into the draft, carrying exactly as much heat as was needed to support the culinary process.
Nowadays, hot water in jugs is not carried around the rooms, but the Roman cauldron can easily be modified to meet the requirements of modern times, on the right in Fig. An aerodynamic barrier will be created by an oven in place of the hot water boiler, and heat extraction can be assigned to a hot water supply heat exchanger with a storage tank in the chimney lower. By the way, its best design in this case is 2-3 sections of an old cast-iron heating radiator.
Types of furnaces
Before you start making a stand for a cauldron with your own hands, you should familiarize yourself with the possible options. They vary depending on different characteristics.
Depending on the appropriate option, it will be possible to decide which stove is needed and then it will be possible to begin its manufacture.
What are they made of?
Depending on what material is used in the manufacture of the structure, the following options can be distinguished:
- Metal. They can be either factory-made or home-made.
- Stationary brick structures. They come in different types depending on the method of installing the cauldron; these are the classic and modified versions.
For some, the first option is the best, but for others, the brick options are ideal.
Possible difficulties
During manufacturing there is a risk of encountering the following troubles:
- poor quality of seam welding;
- the grate gets stuck when lowered into the cylinder;
- lack of structural stability;
- release of an unpleasant odor during cooking.
A common cause of poor weld welding is the incorrect choice of welding electrodes. To avoid this, choosing their markings according to the thickness of the metal being welded will help.
Important! Iron, steel and stainless steel sheets require different electrodes, and the angles must be made of the same metal as the furnace cylinder. To prevent the grate from getting stuck in the middle of the cylinder, its dimensions are selected 5-10 mm smaller than the internal diameter of the body. To prevent the grate from getting stuck in the middle of the cylinder, its dimensions are selected 5-10 mm smaller than the internal diameter of the body
To prevent the grate from getting stuck in the middle of the cylinder, its dimensions are selected 5-10 mm smaller than the internal diameter of the body.
The instability of the structure results from the incorrect choice of the angle of inclination of the supports. The taller and narrower the cylinder, the straighter the oven legs should be.
An unpleasant odor inside often appears if iron with poorly cleaned paint is used for the structure, so before folding the sheet for the body, it is burned with a blowtorch.
Classification by cooking method
There is a certain classification of ovens depending on the available options for cooking food on them:
- Specialized. They are only suitable for using a cauldron.
- Universal. They are multifunctional and can be used when preparing food in cauldrons and when using other devices, for example, grates, portable smokehouses, etc.
The choice of a specific design is determined not only by personal preferences, but also by the intended cooking features.
How to use it correctly?
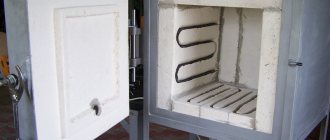
You should not immediately start cooking pilaf on a new device. First you need to burn off the remaining oil from the steel. If an old water pipe was used, all internal surfaces are cleaned with a metal brush to bare metal. Then the oven is washed with water.
Now you can lay the first stack of firewood and heat the stove. During the first “start-up”, firewood can be loaded through the top. Subsequently, they are placed through the door. After thoroughly calcining the pipe, remove the slag and remaining wood from the stove.
Now you can start cooking pilaf on a homemade stove. Firewood is placed along the upper edge of the door and ignited. Now they should burn out a little and only then put the cauldron on the stove.
Expert opinion
Pavel Kruglov
Stove maker with 25 years of experience
It is better to cook food over coals, periodically adding firewood when the temperature drops. In this case, the food will not burn, and the meat will be juicy. Do not move a hot oven. It's best to wait until it cools down before cleaning and moving it. Ashes are removed from the oven after each cooking.
Car disassembly for the stove
A stove for a cauldron can be assembled with your own hands from disks from a car. This is a very interesting option, made from what you have in the garage.
To create a small stove, old wheels from passenger cars are used. It is necessary to understand that such a stove with a cauldron is massive and heavy, but, despite all of the above, the metal does not burn out for a long time.
With a table
This device, which provides ease of use of the unit and improves its functionality, requires a larger amount of welding work. The table can be made retractable, folding or detachable. It is attached to high legs made of steel profiles or reinforcing bars.
The table is mounted directly under the lower plane of the grill or taken to the side. For a retractable structure you will need profiled guides. The folding or removable version is installed on door hinges similar to those used to secure the lid.
Sunny option
If possible, you can make a fireplace for a solar cauldron with your own hands. This model is very convenient and efficient to use.
To make it, it is enough to find cardboard, which should be covered with aluminum foil, it can be ordinary baking foil. Please note that metallized plastic is not suitable in this case, since this material is not dense enough.
Note!
- DIY garden paths - varieties of materials. Step-by-step instructions for DIY installation and decoration
- Do-it-yourself sauna stove: types of structures and manufacturing materials, technology and stages of work + do-it-yourself construction instructions
- Do-it-yourself shower stall: types of structures, choice of manufacturing and finishing materials, step-by-step instructions for DIY construction
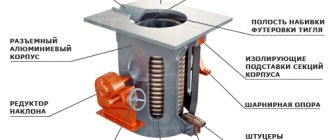
To assemble a stove for a cauldron with your own hands, you will need to transfer the drawings to the material from which it will be made. Assembling the model is extremely simple, the main thing is to find a good drawing.
Kazan paired with tandoor
By deciding to combine a cauldron with a tandoor, you can get a very good stove. Such stoves are even available for sale. When purchasing a tandoor, you can equip it with a boiler, as well as stands for it.
If you have a tandoor, but you can’t buy stands for the boiler, you can build them yourself.
To do this, you will need strong iron reinforcement, from which you will first need to build a base; for this, the material bends around the tandoor and is firmly fixed. Next, the legs for the cauldron are made.
Tools
What you can't do without:
- Welding machine and accessories for it;
- Grinder (angle grinder);
- Drill.
It is better to buy all the iron not at a metal warehouse, but to find scraps or used ones. You will definitely not find a piece of large diameter pipe at a metal warehouse. You can search at scrap metal collection points or on online sites.
We will need:
- 0.45-0.5 m of pipe with a diameter of 300 mm and a wall of at least 4 mm;
- 0.7-0.8 m of pipe (profile or regular) for each leg, for all – 2.1-2.4 m;
- Sheet 4 mm 300*300 mm, for the grate (you can weld the grate from 6-8 mm reinforcement, but this will take longer).
Stationary oven option
It is quite possible to make a stationary model of the furnace on your site. Brick is used in its manufacture. In this case, there is no need to rush; it is very important to calculate all the stages, because the oven is done once and for a long time.
The first step is to determine the dimensions of the future structure. The location should be near the house; it would be excellent to place such a stove near the gazebo, if there is one on the site. It is worth considering the availability of space for storing firewood.
Stationary version
In order to assemble the structure, you will certainly need to do the following:
- Firebox, firewood is loaded into it.
- Bulgarian.
- Combustion chamber, which is made of refractory brick.
- Grate. It is through this element that air is supplied to the lower part of the firebox.
- Ash pit. This is a retractable baking tray that is placed under the grate, where the largest accumulation of ash is.
- Doors.
- A chimney through which carbon monoxide will be discharged.
- You will also need to make special holes for the free passage of the flame. These are called burnouts and are performed on the side of the oven.
- Metal corners for framing.
- To cover the upper part, a special steel plate with a thickness of at least two centimeters is used.
- Fireproof bricks, cement mixture.
Once all the necessary materials have been prepared and the stages of work have been thought out, you can safely begin assembling the stove.
Furnace assembly algorithm
Usually the height of the furnace does not exceed eighty centimeters, so the foundation need not be made. The site should be leveled and metal formwork made. For these purposes, ten-centimeter reinforcement can be used. When the formwork is prepared, everything needs to be filled with concrete.
It is important that the base is level; it should be checked using a building level; there should be no distortions.
The height of the platform is usually up to ten centimeters. The assembly of the stove itself is often entrusted to specialists; as a rule, this work is not expensive. But if you wish, you can assemble the oven yourself.
Brickwork can be done in some variations. Here you will need to study the features of its implementation, you can consult with a specialist.
If you are not confident in your abilities, it is better to enlist the help of a stove laying specialist. After all, the materials used are not cheap, and it will not be possible to re-arrange the structure without financial losses in case of incorrect actions.
It is also worth making a support, it can be a stand for a cauldron with your own hands, thanks to which the preparation of culinary masterpieces will be much more convenient.
Process of creation
A gas burner for a cauldron can also be purchased in stores, but a homemade modification is more convenient. She will become an excellent assistant on hikes and while relaxing in the country.
The main advantages of this burner:
- Ease of use.
- During operation, it does not produce smoke or unpleasant odor.
- There is less soot on the dishes.
To create a cauldron burner yourself you will need:
- Special regulator. Its functions are to supply fuel to the created burner.
- Set of nozzles.
- Heads.
- Unit for mounting a cylinder with fuel (gas).
The DIY working stages are as follows:
- A supply tube is created. A steel tube is used. Its maximum permissible diameter is 1 cm. Required wall density: 2 – 2.5 mm.
- Creating a case for your device. A strong steel rod is used. Its width is 2 cm. There are 2-4 holes in it. They will ensure oxygen gets in. Without them, the fire will not be stable or the device will not start at all. Each hole in diameter reaches 1 mm. Similar holes are required in the cutting rod. A couple of holes are also placed in the body. Their diameter is 5 mm.
- The divider is placed into the housing using pressure. It needs to be pressed very carefully.
- A flange is installed inside the device. The required gap here is at least 0.6 mm. Such a reserve will somewhat slow down the flow of fuel at the outlet section of the igniter.
- Creating an injector. Here you need to use a steel rod and a drill. There should be a blind hole. Drill number – 2. The required distance to the exit section is approximately 1.5 mm. Anything less is not acceptable.
- Creating a jumper. A number 4 drill is used. The created hole must be caulked and the end sharpened. Emery will help with this. You need to sharpen it so that the tip of the pipe sits quietly on the nozzle.
- A hose made from a mixture of rubber and fabric is threaded onto the end of the pipe. The other end is mounted to the cylinder. Fastening is done using a clamp. A screwdriver is used to tighten.
- The body, into which the divider is already embedded, is threaded onto the nozzle thread.
After these stages, the homemade burner can be considered ready. Signs of its correct assembly:
- In operation, it produces an even flame.
- No black smoke appears.
If soot has formed somewhere in the burner structure, slowly turn its body on the threaded section of the nozzle. Examine the connecting points. If the fastening here turns out to be weak, strengthen it: the FUM tape will be used. It perfectly compacts the desired areas. You can regulate the fire by using a valve to introduce gas.
Before using the burner, be sure to examine all its connecting areas for strength and tightness.
After all the indicated steps, the product can be mounted on the stand. The cauldron should easily fit on top. Such a stand can be created from good metal that is not subject to deformation under heavy weight and high temperatures.
It is also very important to protect the flame. This defense will not allow the wind to knock down the fire
And then all the heat will be directed under the cauldron. This type of protection consists of a funnel arranged around the nozzle. When hiking, you can use stones instead of a funnel. But this causes some inconvenience.
A portable gas burner for a cauldron is a device that allows you to quickly and efficiently prepare pilaf during tourist travels. The device has a fairly simple design, so it is not difficult to make it yourself. What burners are suitable for a cauldron and how to build them with your own hands?