Spotter is the common name for a single-sided spot welding machine designed for repairing car body parts. Its design is quite simple, so any home craftsman with experience working with electrical devices can make a spotter with his own hands.
The only thing that cannot be mistaken is the choice of power, calculation of the current strength and the number of windings. Craftsmen use various devices as power sources, but not all of them are capable of providing optimal operating conditions.
For example, a homemade microwave spotter, even when using several transformers from this household appliance, is generally suitable for warming up. If there is no sufficiently powerful electrical network at the repair site, devices with an autonomous source are used, consisting of a battery and a voltage interruption circuit.
Such devices have one significant drawback - limited operating time. When assembling a homemade spotter, you can use various control systems: from a simple button with a relay to an inverter source. In the latter case, the current supplied from the inverter to the welding site is regulated with high accuracy both in duration and in pulse amplitude.
Is it possible to make a spotter with factory specifications?
If you correctly calculate the parameters, select the appropriate components and make high-quality not only the power supply, but also the tool accessories, then a homemade spotter in its functionality will be no different from its factory counterpart.
If you have some amateur radio skills, it is easy to make the power supply and the necessary wires yourself. As a welding gun, you can use any product of a suitable shape, the design of which would allow you to strengthen the threaded contacts at its ends and would be convenient to use.
The gun and reverse hammer will require several parts, which are best turned on a lathe. Some electrode tips can be made with your own hands using ordinary plumbing tools, but some are still better to order or purchase ready-made.
In order to operate a home-made device, additional devices may be required (pullers, combs, rods), which can also be made independently. Consumables for a spotter (welding washers, studs, corrugated wire, carbon electrodes, etc.) are inexpensive and are freely sold in specialized stores.
VIEW Spoter on AliExpress →
What to make washers for a spotter from
A spotter is a popular device among auto body repairmen that allows you to straighten dents on car body parts that are difficult or impossible to get to from the back side without serious disassembly. Using a spotter, a fastening element is welded to the damaged area using the spot welding method, using which the dent is pulled out. Industrially manufactured spotters are widely represented on the market. A fairly experienced craftsman can easily make a spotter with his own hands.
Spotter and its device
A spotter is a machine for spot welding. Its action is based on the phenomenon of current resistance. When electric current is passed through the welding point, a large amount of heat is released, the metal of the workpieces is heated to the plasticity temperature and the workpieces are welded to each other at this point. In this case, the use of welding materials - consumable electrodes, welding wire, fluxes and shielding gases is not required. Heating (and cooling) occurs so quickly that the heated metal does not have time to react with atmospheric oxygen and oxidize.
The spotter consists of the following main parts:
- a housing that houses the electrical components;
- ground cable;
- welding gun with cable;
- sharpened electrode.
Two main designs of spotters are used: transformer and inverter.
The transformer version can be made with your own hands. The inverter includes high-tech electronic components that are difficult to manufacture in a home workshop.
Features of using a spotter
The main areas of application of the device are:
- welding of thin-walled parts;
- straightening of body parts without disassembling the body or upholstery.
The spotter is extremely convenient where access to the element with a dent is impossible or very difficult. A special fastener is welded to the element, for which the dent is corrected using a reverse hammer, hoists or hydraulic jacks. The spotter also has a mode for heating the element to increase its ductility, as a result of which the dented metal returns to its original shape.
How does a spotter work?
A fastening element is spot welded to the damaged area, in the center of the dent. The rod of the reverse hammer is attached to it, resting on the body outside the dent. The device pulls the rod, simulating the impact of a mallet on the back side of the metal, where there is no access, and the dent is straightened.
A do-it-yourself spotter should have two main operating modes:
- short-term, serving to attach the repair washer to the damaged area;
- permanent - used for conventional spot welding with a carbon electrode.
The advantages of this method of fixing dents:
- Minimal collateral damage to the body and the vehicle as a whole.
- Quicker repair of damage compared to partial disassembly of the car.
To fully benefit from these benefits, it is important to strictly follow the technology requirements when repairing damage yourself.
Functionality of serial model spotters
Before designing and making a spotter with your own hands, it will be useful to study the functionality of industrial models. They do:
- welding of repair washers;
- welding of a rod that straightens dents with a rod;
- heating the metal for its precipitation using graphite electrodes;
- ventilation and overheating protection system with activation after cooling.
- switching between continuous operation for heating and short-term operation for welding
The devices from the store are reliable and easy to use and maintain. Special training for the operator of such a device is not required; general welding and plumbing skills are sufficient.
Characteristics of commercially produced spotters
The main characteristics are as follows:
- Power supply parameters - 220 V 50 Hz.
- Power consumption - up to 10 kilowatts.
- Peak welding current - 1300 A.
- The voltage in the operating circuit is from 7 to 10 V.
- The pulse duration set by the timer is from 0 to 1.2 seconds.
- Switching between welding and heating modes.
- Traction force using a metal electrode is up to 100 kg.
- The same for the mounting washer - more than 100 kg.
Main components for assembly
To assemble and test a homemade spotter, you need the following components and consumables:
- Frame. Sheet metal box structure with front and back panels. Ventilation holes and a ground terminal are required.
- Power supply. In its simplest form, it is a do-it-yourself transformer with a circuit breaker in the primary circuit.
- Power cables. The welding cable must have a terminal for connection to power and a threaded contact for connection to the gun, and the ground cable must have a terminal and contact pad for welding connection to the body part.
- Control circuit. The minimum version includes a switch button on the gun, an input voltage cut-off relay, control wires and a control circuit power supply.
- Welding gun. At one end there is a contact threaded connection for connecting electrodes and adapters, and at the other there is a socket for connecting a welding cable.
- Equipment. The basic version includes electrodes for washers and pins, a return hammer and an adapter for connecting a carbon electrode.
Provided that all components are made without deviations and nothing has to be adjusted or altered, for DIY assembly you will need ordinary plumbing and power tools. Measuring instruments you may need are a tape measure, a caliper and a multimeter.
VIEW Spoter on AliExpress →
Assembling a reverse hammer (inopuller) with your own hands
In order to assemble a reverse hammer with your own hands, you need the following parts:
- steel rod 60 cm long, 17 mm in diameter, with threads on both ends;
- steel bushing with a through hole with a diameter of 15 mm, a length of 15 cm and a diameter of 40 mm;
- return spring;
- travel stop nuts and washers;
- adapters for attaching electrodes.
First, a washer is put on the end of the rod intended for fastening into the gun and the nut is tightened tightly. The rod is then passed through the bushing and return spring. The final step is to attach a washer and nut to the bottom threads, and then screw on the electrode adapter.
During operation, the massive bushing will be repelled by the spring and perform reciprocating movements between the two washers.
Making a working pistol
Branded spotter pistols are usually produced in the form of devices with a pistol grip.
Much of what folk craftsmen make with their own hands can only conditionally be called a “pistol.” Often it is just a cylinder with a button and a terminal for connecting a cable at the end. This is because the spotter gun consists of only three parts: the body, the contact rod and the switch. The contact rod is usually made of brass. At one end there is a thread for attaching a reverse hammer, and at the other there is a clamp for connecting power.
For those who make such devices with their own hands, whether to place it in a pistol case or use it as is is a matter of personal preference. At the same time, despite the low welding voltage, it must be insulated: these are the requirements of safety regulations.
VIEW Spoter on AliExpress →
Transformer for spotter
Any transformer is suitable for making a power source for a spotter.
Videos of the manufacture of spot welding machines based on transformers for microwaves and other household appliances are distributed on the Internet. At the same time, the authors of these crafts do not report what current their devices are designed for, and this is very important, since the penetration of the metal surface during the operation of the spotter should occur in a fraction of seconds, without appearing in any way on the back side of the part. Factory devices have a power of 3÷5 kW with an open circuit voltage of 7÷8 V (welding voltage - 1.5÷2 V).
For a spotter assembled by yourself and intended only for body repairs, a power of 1.5÷2 kW is sufficient. It is not difficult to calculate how many turns there should be in the secondary winding of a transformer.
To do this, the number of turns of the primary winding (new) must be divided by the quotient of 220 divided by 7 ÷ 8. Usually it turns out just a few turns.
If the number of turns in the network winding is unknown, then the secondary voltage can be selected experimentally by unwinding or adding turns. It should be noted that for the ground and the gun, cables with the same cross-section should be used, corresponding to the maximum current of the secondary winding.
Control unit diagram
There are quite a lot of electronic circuits on the Internet that are labeled as spotter control units.
Some of them refer to industrial designs of spot welding installations (including old ones), others are replete with electronic components and have redundant parameters, and a number of circuits are not at all related to our topic. Many of the proposed devices implement adjustments to the open circuit current and voltage, as well as control of the duration of the welding pulse. Their manufacture requires a certain skill, and the parts used are not that cheap.
Choosing one of these schemes is advisable if you plan to make a spotter for commercial use in a small auto repair shop. And for devices that are made by hand and used at home, there are simpler solutions.
Diagram of a spotter based on a welding machine
For a craftsman who has minimal skills in electrical engineering and uses a self-assembled device to repair his own vehicles and the cars of friends, a device based on an old medium-power welding transformer with a simple control unit is quite sufficient.
In this case, the best option is a spotter control system made from simple and accessible parts, the diagram of which was published in the “Modeler-Constructor” magazine (see below).
Spotter circuit
The author uses a serial welding transformer with a power of 1 kW with a primary winding of 200 turns (any other one with similar characteristics can be used). He replaced the secondary with two parallel windings of 3 turns with a total cross-section of 100 mm².
The calculated open circuit voltage according to this circuit is approximately 6.5 V. S1 is the input circuit breaker of the device. S2 is a shutdown button, when closed, voltage is supplied to contactor K1 and its contacts K1.1 and K1.2 open. Control over the duration of the welding process is visual.
In principle, it is easy to supplement this scheme for controlling a spotter from a welding machine with a time relay (including electronic) and a current control system.
In the video (see below), the author of the homemade device used exactly this circuit, only instead of a contactor he uses a low-voltage relay powered from a rectifier. For a spotter, this is the only correct solution, because in this case, a safe voltage is supplied to the button located on the working gun.
Advantages of a spotter
The process of drawing metal can be done very quickly; there is no need to drill technological holes for straightening the metal, and there is also no need to semi-automatically weld additional elements onto the body metal for the reverse hammer.
If you have a car repair shop and there is a large flow of customers, then you need to either buy it or make it yourself from a transformer. But there are times when it is not needed often, but its necessity is still obvious. In this case, an old, powerful battery can help out. Let's consider the design of a battery spotter.
Spotter housing and final assembly
In general, the assembly of a homemade spotter is completed by placing its main elements in the housing and bringing the terminals and controls to the front panel.
The housing can be ordered according to a drawing or simply a sketch, or (if possible) manufactured locally. Sometimes craftsmen begin to operate a spotter, the parts and wires of which are simply laid out on a workbench or even on the floor. This option is only suitable for debugging and selecting parameters; such an electrical installation cannot be used in constant mode.
Since there are various options for making spotters with your own hands, their body layouts can also be different. For example, if a welding transformer is intended for use outdoors, then in this case the device may take the form of a stable base with a transformer, a terminal block and a separate control system housing.
In other cases, housing options may be different, but the control system elements must always be reliably protected from external influences.
VIEW Spoter on AliExpress →
Battery based
A battery powered spotter is suitable for applications where mains power is insufficient, unstable or non-existent and where body work is limited.
Typically, this situation arises during body repair of a personal car in a garage cooperative or at a summer cottage. The body of such a homemade spotter may consist of a small support frame for installing the battery, to which a terminal block and a relay that controls shutdown are attached. If this is a one-time job, then you can do without a housing at all by attaching the relay to the battery with a clamp.
Based on a household microwave
To make a spotter with your own hands, a transformer from a microwave is also suitable. In this case, the only limitation is its power, since most microwave ovens are designed to consume less than 1 kW.
To solve this problem, you can use two or three transformers connected in parallel. The advantage of such a power source is the small size of the transformers used, which can be placed in a row inside a small-sized housing.
The result is a fairly compact and mobile spotter. The only thing you have to worry about is cooling the internal space of such a device.
DIY spotter washers
If you are repairing car bodies and you often need to draw out the geometry of the external parts of the car, then the spotter will be of great help to you. With its help, it is easy to pull out doors, rear fenders and sills in those places that are difficult to reach from the back of the damage.
A spotter is a spot welding machine with a reverse hammer. Using spot welding, a back hammer is welded to the metal and the metal is pulled out using it.
Advantages of a spotter
The process of drawing metal can be done very quickly; there is no need to drill technological holes for straightening the metal, and there is also no need to semi-automatically weld additional elements onto the body metal for the reverse hammer.
If you have a car repair shop and there is a large flow of customers, then you need to either buy it or make it yourself from a transformer. But there are times when it is not needed often, but its necessity is still obvious. In this case, an old, powerful battery can help out. Let's consider the design of a battery spotter.
Battery spotter
Why is it necessary to take an old battery? Yes, because you don’t mind it, since it will work at currents close to the short-circuit current. And this is its inevitable failure sooner or later. But such a battery is not difficult to find in a garage, or you can go broke and buy it; anyway, it will work for more than one repair, and its price is several orders of magnitude lower than a ready-made spotter and will cover the total cost of car repairs.
What you need for a homemade battery spotter:
- battery 75 A/h and higher;
- solenoid relay from the car starter;
- battery charger;
- copper wire with a cross-section of at least 100 mm 2;
- reverse hammer or gun for welding washers.
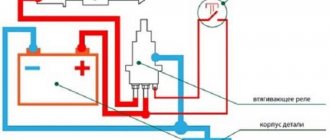
The figure shows a diagram of the connection of elements. The housing of the pull-out relay and a cable no more than 1.5 m long and a cross-section of at least 100 mm 2, which ends with a contact for the housing of the part to be pulled, are connected to the battery with a negative terminal. It is better to use a threaded contact made of copper material (for the least resistance at the contact point).
From the battery, the positive mark is connected to the solenoid relay on the bolt, and from the second bolt of the solenoid relay there is a wire to the return hammer; in most cases, instead of a return hammer, it is better to use a gun to weld the washers. The total length of the positive cable with a cross-section of 100 mm 2 should not exceed 2.5 m from the battery to the gun or reverse hammer, the shorter the better. To reduce voltage drop (losses) in power cables. Also from the battery positive there is a wire to the control contact of the retractor relay through a button.
Which is controlled by the spotter. The thickness of the wires for the button can be in the range from 1 to 2.5 mm 2, and the length should be such that it is convenient to work with it. They serve only for control and there are no strict requirements for their length.
How to make an electrode for a spotter
Spotter electrodes and adapters are small cylindrical attachments made of brass, each of which is used to work with certain types of welding fasteners: washers, nails, studs, crimped wire rivets. In stores, each of these elements can cost from 500 to 1000 rubles or more, and for ordinary body work you need at least five or six types of electrodes:
- for rings;
- for spot welding;
- for corrugated wire;
- for welding with carbon electrode;
- for triangular washers;
- for pins and nails.
Making them yourself is not so difficult, but it requires certain skills and the availability of appropriate equipment. Alternatively, you can make only the simplest attachments with your own hands, and order more complex ones in a workshop with turning and drilling equipment.
In battery spotters, batteries with a capacity of 40÷60 Ah are usually used as a power source. If anyone has had to work with such devices, please write in the comments: how quickly the battery discharges and how the quality of welding changes as it discharges.