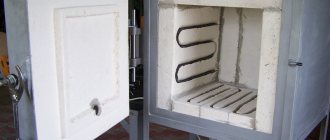
When looking for alternative solutions for heating rooms, many people pay attention to a car rim stove. Proper arrangement of such a design allows you to heat about 15-16 square meters of area, so it can be called a good solution for a home bath or a good cooking appliance .
The main advantage of the product is the availability of the main material used for creation. We are talking about thick, resistant steel with increased strength. It is no secret that boiler steel of sheet and profile type is highly expensive, and ordinary structural steel in a furnace structure quickly deforms and burns out.
Making a stove from car rims with your own hands is quite simple. To do this, you should use two pieces of metal of the same size and weight: one simple steel, and the second from a wheel rim , and then heat these elements to the appropriate temperature. You can do this in the kitchen on gas. The first part will immediately begin to smell like hot iron, and the second part can be heated to an orange color (this happens at a temperature of about 900 degrees).
At the same time, there will be no unpleasant burning smell in the air. Stoves made from car wheels are popular due to the fact that they practically do not dry out the air and do not release dangerous toxins into the environment. This is explained by the fact that the rims are made of special steels that have a corrosion-resistant surface. The heat resistance of such products, of course, is not standardized, however, the permissible margin of resistance is quite enough for arranging a wood-coal stove.
Important Disc Features
To successfully build a stove from car wheels at home, it is not enough to simply learn the benefits of such products . It is also important to pay attention to the shortcomings of the feedstock, as well as a number of design features of the furnaces. One of the disadvantages of special steel is the lack of standardization for welding properties. Today there are several different technologies for the production of wheel rims , but in most cases welding activities are limited to subsequent thermal tempering (annealing), as well as flaw detection of the seam. Therefore, none of the disc manufacturers even realizes that in the future their products will be weldable.
Based on this feature, you cannot neglect safety rules and make a long-burning furnace using waste from disks. The same applies to pyrolysis furnaces, which can crack at one moment and cause dangerous, boiling substances to enter the room. But localizing the source of fire will not be easy , because it must burn out completely. Only solid fuel stoves can be created on the basis of such wheel rims.
Important feature: Welding seams for special operating conditions that have not passed the appropriate quality certification are considered an unreliable solution .
Making a slipway
The frame is assembled by welding. That is, skills in working with a welding machine are required.
Stages of work:
- First of all, a rectangle is assembled from a metal profile of the estimated length and width; exactly in the middle it needs to be reinforced with an additional profile. The frame is assembled as the future owner of the slipway deems necessary. He may want to further strengthen the longitudinal sides of the frame, perhaps the transverse ones. There is no definite principled position on this issue.
- To increase the stability of the car on the slipway, it is necessary to weld heights in its corners that will prevent the car from possibly sliding off.
- The next stage is installing fasteners on the longitudinal sides of the frame. Fasteners are clamps with jaws that are required to securely fix the vehicle frame when loads are applied to it. There cannot be a strict location for fixing the fasteners; they must be able to move along the entire length of the frame. Making clamps with your own hands is also possible, but if they are on sale, then there is little point in this, since a homemade clamp will cost about the same as a factory one.
Creation Rules
In any case, if you follow some important rules, creating a solid fuel stove from car disks will be possible and successful. You can use this design in small non-residential premises , such as a country house, workshop, etc. It is important to carefully study the following features:
- It is important that the weld remains of high quality from a visual point of view. Avoid the appearance of visible defects in the form of cracks, splashes, shells, bubbles and other irregularities.
- Two mating workpieces are welded at a time. Cooking the entire structure is strictly prohibited.
- After successful completion of each seam, the welded parts are left for some time to resolve residual internal stresses. For every kilogram of mass it takes three minutes.
- After leaving the finished stove for a day to absorb the same stresses, it is additionally run through (if we are talking about a stationary stove, then this action takes about three hours. Portable outdoor ones need an hour run).
During this period, the furnace is also annealed. If minor welding defects, no more than two seams, appear during processing, they can be eliminated after a day, after which the run is repeated.
What if the room is small?
In fact, there is simply no other option but to place the anvil in the corner, since, being right in the middle of the workshop, it will interfere with movement. There is so little space.
However, there is a simple solution to this problem. You can make a mobile stand on wheels.
When the anvil is not in use, the stand can be placed somewhere in the corner so that it is out of the way. And if you need to work, the anvil can easily be rolled out to any suitable place.
What you need to know about ovens
If you intend to make a stove from wheel disks for a cauldron or heating a non-residential premises, be prepared to pay attention to one more feature. Based on the rules for the construction of solid fuel combustion furnaces, there should be about 40-50 centimeters from the floor of the firebox or grate, i.e., the place where the fuel product is placed, to the first vertical obstacle to the flow of flue gases. This option is necessary when using conditioned fuel . If it is damp or waste, the distance is increased to 60-80 centimeters. In this case, the heating time of the furnace increases rapidly. Therefore, it is not advisable to use such fuel for disk furnaces.
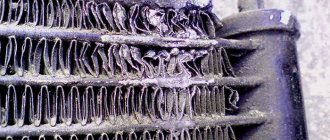
It is no secret that hot pyrolysis gases can be released from solid fuel products, which significantly affect heat generation. If they come into contact with a less heated surface, they will most likely not be able to burn out, causing soot to fall out. Further use of such a stove leads to its coking , and dense carbon deposits appear on the roof of the firebox and in the chimney. It significantly reduces thermal efficiency, but is a fire hazard.
A stove made from disks is often filled with waste fuel, including:
- rotten dry wood;
- damp trimmings;
- and other products.
True, there may simply not be enough unsuitable disks for a stove with a decent height, or the optimal design scheme will prevent the possibility of creating a high firebox . In this case, to prepare the furnace, you will have to use a non-standard grate made of durable steel sheet with a diameter of 6 millimeters and reinforcing rods of 10 millimeters. There is no need to worry that the allowable air will not be enough for combustion: through a hole with a diameter of 10 centimeters, with a chimney 1.5 meters high, there will be enough air for 18 kW of power for wood and 30 kW for coal.
Do-it-yourself walk-behind winch
The idea of creating a plow-cultivator on a motorized winch for cultivating a vegetable garden originated with me a long time ago. I looked at the relevant “Modelist-Constructor” magazines with descriptions of tillage implements and came to the conclusion that it would be better to make a motorized winch based on the power unit and control levers of the Electron scooter that I had.
The ignition of the 5.5 kW (7.5 hp) engine was changed: instead of the generator, I installed a magneto, securing it to the cooling fan casing. Drive - from the impeller. I knew that such an ignition system was both more reliable in operation and easier to maintain. The torque from the power unit is transmitted to a drum with a winding cable, to the end of which a plow .
The transmission is chain; I took parts for it from decommissioned agricultural machines. The driving sprocket (z, on the output shaft of the power unit) has 14, and the driven sprocket (z2, on the drum) has 45 teeth, the drive roller chain is PR-15.875. The diameter of the cable drum is 180 mm. The design turned out to be small in size and weighing only 60 kg.
I drive her from the city to her summer cottage in a Moskvich car. I put the winch in the back seat, and the plow-cultivator, along with the disconnected steering wheel, in the trunk. I am satisfied with my motorized assistant: it allows me not only to plow, but also to plant, hill up potatoes, and cultivate beds. The winch is secured in place by a rotary anchor with two welded bayonets. During operation, the winch easily pulls the plow -cultivator attached to the cable.
The speed of movement of the tillage implement is approximately the same as that of a calmly walking person. True, for each new pass the plow has to be rolled manually to the beginning of the furrow, and the motorized winch has to be moved across the field. However, the work is progressing quickly, because we are working together.
While one is operating the winch, the assistant manages to drag the plow to the beginning of the next furrow. Now about the design features. The base of the motorized winch is welded from a steel pipe with an outer diameter of 33.5 mm. A motor frame made of steel angle 35×35 mm with a scooter power unit is attached to the base. And in order to eliminate the occurrence of an unwanted bending moment (from the tensioning action of the chain drive), stops have been added to the supporting structure of the motorized winch.
The drum stands are also attached to the base, each having a bearing unit and an adjustable jib, the additional purpose of which is to be an integral part of the chain tensioning mechanism (together with a special device in the rear suspension of the power unit). The rotary anchor, buried in the ground, is a U-shaped frame made of a 45x45 mm steel angle with two welded bayonets. The anchor is pivotally connected to the base of the motorized winch with bolts.
The bayonets are made from ordinary steel shovels. When installing the winch in the required place on the site, the assistant steps on the crossbar of the U-shaped frame, pressing the bayonets into the ground, which creates reliable adhesion of the motorized winch to the soil. To ensure smooth winding of the cable onto the drum, a cable laying machine is used. It also plays the role of a limiter, preventing the winding from slipping off the drum. A crossbar is attached to the base of the winch.
The cable handler lever with a cable fork and a handle is hinged to it. The length of the arms of the cable guide is selected so that the lever handle “walks” between the racks of the motor frame, and the fork with the cable moves between the cheeks of the drum. The winch control levers are located on handles on both sides of the motor frame. On the left is the clutch lever and the dyno starter button, on the right is the gas handle, the fuel mixture enricher shifter and the gear shift lever.
The design of the towed tillage implement is universal: the plow can be supplemented with a plow body, working parts of a cultivator and hiller. The most critical stage in the work is the first pass. The rest, as they say, is a matter of technique: the plow will copy the line of the first furrow, following the furrow wheel rolling along it. This design is based on a row from a decommissioned cultivator for continuous tillage.
It is shortened, and two guides are welded in front: one is made of a square pipe with a retractable axis of the furrow wheel, fixed with two M18 screws, the other is made of a round pipe with a retractable axis of the furrow wheel. Wheels with a diameter of 270 mm from a decommissioned cultivator for inter-row cultivation are rubberized, self-cleaning.
When converting a towed plow into a cultivator version, a pointed paw is installed instead of the plow body, and razor paws are installed under the clamp on both sides. To achieve a large clearance under the frame, you have to attach a stand. But by moving the wheel axles out of the frame, you can set any distance between the wheels.
During cultivation, the cable clings to the central eye, and during plowing - to the side one. In addition to the described method, the plowing depth can be adjusted by fastening the housing. The body is copied from a well-proven horse-drawn plow. The blade is made of steel sheet 3 mm thick; The ploughshare is carved from a blade, and the stand is carved from the blade of a razor cultivator. The material for the manufacture of the field board and spacer strip was a 5-mm steel sheet.
Read also: Color temperature 3000k what color is it
Ready-made handles from the same single-hull horse-drawn plow were used as the steering wheel. But you can be content with a homemade welded structure, say, from a steel water and gas pipe. Fastening - in the rear part of the beam with M14 bolts. Like previously published analogs (see, for example, “Model Designer” No. 9'81, 3'89, 6'90, 4'94, 2'95, 8'95 and 1'97), my winch has advantages in front of the usual walk-behind tractors. It is simpler, more reliable and more versatile.
And most importantly, it makes it possible to cultivate the garden directly from the fence, without leaving any turning lanes. And it doesn’t compact the soil. In an hour, such a motor winch can plow five hundred square meters, using less than one liter of gasoline.
(Author: A.NEGREEV, Alekseevka, Belgorod region)
Motorized winch : 1 – base (steel water and gas pipe 33.5×3.25); 2— cable; 3 — racks with adjustable jibs; 4 — drum (assembled on an axis with two radial bearings 80204); 5 — chain drive (z, = 14, z2 = 45, chain PR-15.875); 6 — power unit of the “Electron” scooter (not shown in the front view); 7— suspension; 8 — fuel tank; 9 — motor frame (steel angle 35×35); 10 — cable laying lever; 11 — anchor (steel angle 50×32); 12 — anchor bayonet (shovel, 2 pcs.); 13 — stop (steel angle 45×45, 2 pcs.); 14 — hinge of the cable guide; 15 — gear shift lever; 16 — rotary knob for controlling the carburetor throttle; 17— control knob; 18 — clutch lever
Cable laying machine: 1 - base of the motorized winch; 2— fork; 3 — lever (steel water and gas pipe 21.25×2.75; the length of the lever arms is specified locally); 4 - hinge; 5 — crossbar (steel water and gas pipe 33.5×3.25); 6— handle
Towed plow-cultivator: 1 - beam (from a decommissioned cultivator, shortened); 2— guide for the retractable axle of the support wheel (square steel pipe); 3 — guide of the field wheel axis (steel water and gas pipe); 4—field wheel; 5—central eye (2 pcs.); 6 — furrow wheel; 7—wheel stand; 8 — depth regulator; 9—fixing screw M18 (4 pcs.); 10 - clamp; 11 — field board; 12 - ploughshare; 13 — spacer bar; 14 - blade; 15 — stand; 16 — fixing screw M16 (3 pcs.); 17 — steering wheel (steel water and gas pipe 26.75×3.5); 18 — M12 bolt (2 pcs.); 19 — nut M16; 20 — M14 bolt; 21 — retractable axis of the furrow wheel (tool hot-rolled square steel)
The winch acts as a traction horse pulling a cultivator, plow, hiller, harrow, potato digger or something else. And the first advantage over a motor cultivator is its versatility. The winch is installed on the edge of the cultivated area, the cultivator or plow attached to the winch is moved to the opposite side of the area, unwinding the winch, then the winch is turned on, pulling the cultivator or plow, which does its job. When the cultivator or plow reaches the winch, it turns off, moves to the side and the process repeats. And in this way the entire area is processed.
In such a homemade electric cultivator (or electric plow, depending on what the winch is pulling), the most complex element is the winch. There are a lot of options for making a winch, but they all have three main components: a motor, a gearbox and a drum (reel) with a cable.
Approximate engine power is 1.5-2.5 kW (preferably more than 2 kW), speed is 1500 rpm. If the engine power is not sufficient, it will be impossible to cut deeply into the ground with the plow, or the plow will have to move at a low speed. If the engine has more power, then in addition to the unjustified energy consumption, the winch will be heavier, and it will have to be constantly moved. Of course, you don’t have to limit yourself to electric motors; you can also use a gasoline engine, for example from the same motor cultivator.
The gearbox is the most problematic component of the entire electric cultivator (electric plough). The ideal option is when there is a gearmotor with an optimal output shaft speed. It’s good if you at least have a factory gearbox. And it’s really bad if there is neither the first nor the second, then you will have to hiccup and select gears, while the simplest option is a worm gear, one worm (screw) and one gear (screw wheel) will suffice, in cases where the gear ratio is not large enough, it can be further increased by a belt drive between the motor and the worm. It may be necessary to make an additional belt drive if the factory gearbox does not have the optimal gear ratio, or to connect the engine to the gearbox. The optimal gear ratio is calculated using a simple formula:
where i is the gear ratio; D – diameter of the drum on which the cable is wound (m); n – engine speed (rpm); V – speed of movement of the cultivator or plow (m/min).
It is better to focus on the speed of movement of the cultivator (plough) equal to 4 km/h - a slow step. Let the diameter of the drum be 15 cm, more about it below. We convert the numbers into the required dimension (4 km/h = 67 m/min, 15 cm = 0.15 m) and substitute them into the formula:
i= (3.14 • 0.15 • 1500)/67 = 10.5
Read also: How is the wire cross-section indicated?
It turns out that with an engine having a rotation speed of 1500 rpm, a not very large gear ratio is required. To obtain it, it is not necessary to use only gear or worm gears.
The reel that winds the cable with a cultivator or plow is the simplest element of the winch, but a lot depends on its size. The smaller the diameter of the coil, the slower the cultivator (plough) will move, therefore, when it is not possible to achieve the optimal gear ratio and the speed of the cultivator (plough) is too high, you can reduce the diameter of the coil. Reducing the diameter by half will lead to a decrease in the speed of the cultivator (plough) also by half. Reducing the diameter of the coil can also be used when there is not enough engine power, for example, when plowing virgin soil. However, with a small diameter of the coil, the cable becomes more entangled. In addition, with a small diameter of the coil as a result of winding the cable, the diameter of the coil increases faster, which leads, on the one hand, to the acceleration of the cultivator (plough), and on the other, to an increase in the load on the engine. Therefore, a reel with a small diameter must be made longer so that there is more space for the cable. But lengthening the reel makes it difficult to lay the cable evenly when winding it; the simplest solution to this problem is demonstrated in the video below. Just as a decrease in the diameter of the reel leads to a decrease in the speed of the cultivator (plough), with an increase in the diameter the speed increases. This can be used if the gearbox has too high a gear ratio, causing the reel to spin very slowly. There are options with a reel diameter of 30 cm. To prevent the winch from tipping over, the entire structure should be as close to the ground as possible, and the cable, especially with a large reel diameter, should be wound onto the reel from below.
To unwind the winch, you can use various methods, for example, running the engine in the opposite direction or a disconnecting coupling between the gearbox and the reel.
To make the winch stable, stops are made that cut into the ground, and if it turns out to be heavy, wheels are installed. It is fashionable to make a seat on the winch for an assistant, who with his weight will give it greater stability.
It is better for two people to work with such an electric cultivator (electric plow): one walks with the plow or cultivator, and the other turns the engine on and off and controls the winch unwinding mechanism. It will be easy for two people to move the winch. The winch should be positioned so that the axis of rotation of the reel is oriented strictly perpendicular to the direction of movement of the cultivator (plough), thanks to this the cable will be wound more evenly. When working with a plow, it is important to change the location of the winch every year, placing it on the opposite end of the cultivated area, this will prevent the gradual movement of the earth due to its dumping by the plow and being dragged to the winch.
If you have any doubts regarding the effectiveness of such an electric cultivator (electric plow), after watching the video they will probably be dispelled. And let us remind you once again that not only a plow or cultivator is attached to the winch, but also a hiller, harrow, potato digger, etc.
Electric plow
Motor plow
Electric plow
Motorized plow and hiller from motorized winch Burlak
In the future, we need a walk-behind tractor equipped with a winch installed between the engine and the wheel axle.
That is, so that this unit can, if necessary, be used both as a walk-behind tractor and as a winch.
Moreover, the winch should have traction performance no worse than in this video:
In the future, we need a walk-behind tractor equipped with a winch installed between the engine and the wheel axle.
That is, so that this unit can, if necessary, be used both as a walk-behind tractor and as a winch.
Moreover, the winch should have traction performance no worse than in this video:
Why do you need such an aggregate?
For plowing and hilling potatoes using a winch, plus for working with a potato digger
Why are you splitting hairs - the walk-behind tractor can handle plowing and hilling without a winch - that’s what it’s designed for.. Have you even seen it in person??
Private pheasant nursery I hope for mutually beneficial cooperation
Vladislav Vladi . I have seen walk-behind tractors in person many times. The conclusion is clear - they cope with plowing a little better than nothing.
Show me a video in which they plow with a walk-behind tractor at the same speed, to the same depth and width as in the above video about a winch. And so that both wheels go across the field (you can’t go along the furrow - the planted potatoes will be crushed). It seems to me that you won’t show it. Because this is impossible - it will no longer be a walk-behind tractor, but a mini-tractor whose weight exceeds 500 kilograms.
Once upon a time, I saw a homemade walk-behind tractor with an engine from a Vyatka scooter, whose winch drum was located below the engine. Both the wheels and the winch were driven by a chain drive from the output shaft of the scooter engine. Using a claw clutch, it was possible to turn on the drive to the wheels or to the winch.
For plowing and hilling potatoes using a winch, plus for working with a potato digger
Read also: DIY wheel gearbox
I think that you should use a winch if your garden is small (or located on a slope, when when plowing a walk-behind tractor or walk-behind tractor pulls across the slope when plowing. And when plowing along the slope, it doesn’t go up and skids. We have a winch that is used 2 times per year for cutting furrows and for hilling. I don’t want to plow with it - it’s a waste. We tried to dig it, it’s not convenient. The rest of the time it stands idle.
anatoliy.54.ekb , why did I post a link to the video? There you can clearly see why I need a winch, what the size of the area is and what the slope is. Planting potatoes under the plow is the most convenient way to apply manure (if you don’t apply manure, then there is no point in planting potatoes; nothing will grow at all).
Diesel heavy walk-behind tractors plow just fine! I’m not a walk-behind tractor myself, but a tractor driver, but I like how such walk-behind tractors plow. This spring I saw a Chinese walk-behind tractor plowing an abandoned garden of 30 acres, walking easily and without force!
Tractors: T-25 and KUBOTA L-2402.
Roman kubota , nothing like that. See for yourself: 1. the T-25 tractor works with a double-hull plow (the dimensions of the body are approximately the same as those of a winch plow), and has a dead weight of 1700. 2000 kg; 2. the DT-75MV tractor operates with a five-furrow plow, and has a dead weight of 6000.7000 kg; 3. The K-700 tractor operates with a nine-furrow plow and has a dead weight of about 12,000 kg.
Conclusion: to confidently work with a single-body plow, a single-axle wheeled tractor must have a dead weight of at least 800 kilograms. Otherwise it will not be plowing, but pornography.
A good plowing winch should tear a steel cable with a diameter of 4 millimeters like a thread. Otherwise, wet and trampled ground cannot be plowed with it. To plow virgin soil, the winch must have a rated pulling force of at least 300 kilograms.
PP , maybe so, but my garden can only be plowed with a winch. 100% guarantee.
The distance between the rows of potatoes is 50 centimeters. This is no longer possible - otherwise the tops will be sparse and all the potatoes will dry out. Hilling video:
So I always plant potatoes from May 1 to May 9 (it’s impossible earlier, because the snow completely melts only in mid-April). And always sprouted, with eyes.
Here's another photo:
Here's another photo:
About potatoes growing in 1.5. 2 months, hearing for the first time. I usually dig between August 25 and September 5.
One cow, one calf and about 10 chickens “fertilize” the garden all year round. Previously, in the summer they were helped by 2.3 more piglets. But this is still not enough, soil fertility is low.
Here's another photo:
In my archive I found a winch on a walk-behind tractor.
PP , I have a lot of goat owners around me, but for some reason none of them have super harvests of potatoes.
anatoliy.54.ekb , type, winch driven from the rear PTO of the walk-behind tractor. And it seems like even with a cable laying machine. But it’s not clear how to fix the front part of the walk-behind tractor from shifting when operating such a winch. That walk-behind tractor with the Vyatka engine that I wrote about had a special folding apron in the front part, which, when the winch was working, crashed into the ground and securely held the walk-behind tractor.
On my winch I made an apron of a similar design (only non-reclining):
That walk-behind tractor was similar in appearance and size to the Neva and Cascade walk-behind tractors. The wheels were from a motor scooter (like on my winch). To use the winch, it was necessary to lower and fix the apron, turn off the wheel drive with a lever and turn on the drive to the winch. To transfer to the transport position, do everything in reverse order.
Roman kubota , nothing like that. See for yourself: 1. the T-25 tractor works with a double-hull plow (the dimensions of the body are approximately the same as those of a winch plow), and has a dead weight of 1700. 2000 kg; 2. the DT-75MV tractor operates with a five-furrow plow, and has a dead weight of 6000.7000 kg; 3. The K-700 tractor operates with a nine-furrow plow and has a dead weight of about 12,000 kg.
Conclusion: to confidently work with a single-body plow, a single-axle wheeled tractor must have a dead weight of at least 800 kilograms. Otherwise it will not be plowing, but pornography.
A good plowing winch should tear a steel cable with a diameter of 4 millimeters like a thread. Otherwise, wet and trampled ground cannot be plowed with it. To plow virgin soil, the winch must have a rated pulling force of at least 300 kilograms.
Yes? and she will drag the walk-behind tractor like a darling. What are you planning to nail it to the ground with? Plow walk-behind tractors are fine – if you think it’s bad, buy a more powerful one. Of course, you can also pose. but these are toys
Private pheasant nursery I hope for mutually beneficial cooperation
Which type to choose for yourself
Taking into account the above-mentioned features, it is necessary to correctly select the appropriate type of disk furnace. The need to independently construct a furnace from car rims occurs in the following cases:
- If you need to heat small non-residential premises, for example, a country house or a workshop. The use of high-quality rims will allow you to achieve maximum quality of the furnace, and will also significantly simplify production.
- If you need to equip the main “fire” part of the furnace structure without using expensive heat-resistant steel.
- If you are going to use the stove for cooking. In this case, you will have to make a stove for the cauldron from car wheels.
Most often, car wheels are used to create mobile (portable) outdoor and garden cooking stoves, as well as for arranging fire pits. The simplest version of a disk hearth stove involves the use of a large mass and side height, which significantly improves heat transfer rates and provides reliable protection from the effects of wind.
Materials that were useful to me
To make a sustainable stove, I used the following list of equipment and materials:
- car wheels with a diameter of 13 inches;
- metal plates and pipes (chose sufficient thickness so that they do not quickly collapse at high temperatures);
- Bulgarian;
- welding machine;
- electrodes.
Source livemaster.ru
Stove for cauldron
It's no secret that the best way to use car wheels is for cauldron stoves. In this case, it is customary to place the structure on a special stand. Due to its round shape, the container heats up evenly, which cannot be achieved in conventional brick ovens. In addition, in the latter case there is a risk of soot settling. Disc structures distribute heat evenly and prevent unnecessary consumption of firewood, which is very important when using waste fuel.
Wood chips collected on site are not able to provide the required amount of heat for cooking pilaf or beshbarmak, and damp and rotten solutions in a massive firebox simply cannot cope with the task of heating the cooking utensils to a certain temperature level. A stove under a cauldron made from car wheels eliminates this phenomenon only if it is made exactly in accordance with the established rules .
Flue gases move along the path of least resistance. If you need to weld two separate disks and cut a combustion hole in the side, then hot gases will flow through the technological holes in the disk hub, since their total area is much larger than the mounting and axial holes.
If you reach the maximum heating temperature, then perhaps a tongue of flame will form in the axial hole, but a cauldron placed on the burner will cause the heat to go sideways.
This version of a disk stove is especially in demand for cooking various types of food by simmering over coals , however, few people use this method these days.
To properly manufacture a stove for a cauldron, it is necessary to equip it with a tightly closing door on the loading opening. Also, the cauldron should fit tightly to the cutout of the burner, periodically closing the technological holes.
To successfully achieve such results, it is enough to cut out the middle of the hub using a screwdriver. The remaining elements will not be thrown away, because they can be used as a good grate.
Types of slipways
All types of slipways have an identical principle of operation. To eliminate body deformation, it is fixed to one or more areas that need straightening and straightening. Next, the master, using an exhaust device, applies force and straightens the damaged parts of the body.
Simple stocks intended for body repairs are equipped with one exhaust device. Complex devices have several exhaust mechanisms.
There are 4 types of devices: floor, rolling, frame and platform.
Rolling tackles
The rolling berth is used for body repairs of various types of cars. It is equipped with devices that allow you to secure the car without flanging the sills. Rolling stocks are convenient to use in confined spaces. Thanks to this, the device is used in garage conditions.
Rolling equipment cannot be used if distortions occur and the body geometry changes.
Floor-standing
A do-it-yourself floor stand for body repair is a compact and effective equipment for restoring a car body in a garage or workshop. If there is no need to use an exhaust mechanism, then the rails are used for other purposes.
Frame
The frame slipway belongs to the professional variety of exhaust mechanisms. The main difference from other types is that frame devices have a complex design.
The extraction mechanism allows you to repair different car models. The machine is fixed on a frame, which is highly durable. With the help of force directed in different directions, body deformations of mild and moderate severity are pulled out.
To save space in a workshop or garage, as well as to facilitate the process of restoring the car body, purchase stands for body repair, equipped with a lift.
Platform
The platform slipway for body repair is a full-fledged professional equipment. Devices of this type are used to repair damage to the body of any car, including frame SUVs.
The design of the pulling mechanism consists of special rails and an entry bridge-base. The car drives into it on its own, or it is pulled there if the car is not moving. The platform is equipped with various devices and fastening mechanisms that securely secure the vehicle to the slipway.
Platform devices have hydraulic metal stands, a winch, power and retractable blocks. The beams of the device allow you to effortlessly move heavy structures in any direction. The platform straightening stand has a telescopic scale, with the help of which precise calculations and measurements are carried out.
The disadvantages of the platform exhaust mechanism include large dimensions and high cost of the equipment. It is used in large car maintenance services.
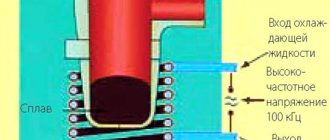
Closed/Open Ring Forming Machine
Description of Closed/Open Ring Forming Machine This machine is specially designed to produce various closed rings or small hole rings.
Open rings have a smooth surface. Main Specifications of Closed/Open Key Ring Forming Machine
| Options | Specifications |
| Model | QZ-5 |
| Suitable wire | Plain steel wire, galvanized steel wire |
| Diameter of suitable wire | 1.6-6.0mm |
| Finished ring diameter | 20-76mm |
| Production speed | 50-70pcs/min |
| Main drive motor power | 1.1kW |
| Machine size | About 1180×760×1200mm |
| Machine weight | About 500kg |
How to make a mobile stand
Basic materials you will need:
- wooden beams;
- metal corners;
- steel plates;
- pieces of channel;
- metal strips;
- swivel wheels.
First of all, the author prepares the wooden beams by leveling their plane on a surface planer. Then the beams must be glued together into a deck.
For greater aesthetics, the author decided to burn the surface of the wood with a gas torch, and then clean it with a grinder and a metal disk brush.
After this, the master cuts blanks from a metal corner to size, and welds square frames from them, which will need to be installed in the lower and upper parts of the deck.
Next, we weld four more pieces of corner at the corners of the deck, connecting the two frames together.
Homemade brick crusher
There are also shaft crushers: two cylindrical shafts rotate at equal speed towards each other.
Finally, they get down to business with a grinder with a hammer mechanism - the brick is destroyed with a hammer.
Let us list the design nuances of a homemade brick crusher.
Taking these fundamental points into account, you can make a crusher yourself. This is a container with a shaft on bearings, on legs. An alternative can be a cone crusher: these are two large cones located opposite each other.
The crusher starts up, and the cones begin to sequentially destroy the material.