There can be many reasons.
Does not develop speed, or speed drops due to a breakdown of the speed control unit,
The problems with the grinder brushes are that they spark, there is a drop in speed and it does not develop power, the brushes can be replaced, sometimes you can do without replacement, just clean the brush assembly of the angle grinder (grinder grinder) from dust and dirt.
And you may have to replace the brush holder springs.
There are also more “banal” reasons, my angle grinder lost momentum due to the fact that the wire of the grinder was damaged, or from constant kinks, or somewhere it was touched by a cutting wheel.
The contact was not of good quality, it warmed up under load, and the speed dropped.
Turn off the angle grinder, “feel” the wire with your hands, and find the problem area.
Next, we cut the wire, strip the ends, twist it and insulate it with electrical tape.
But in any case, before you start looking for a problem and methods for eliminating it, you need to remember where the problems started, what preceded it.
The grinder, being the most popular tool in the house, is subjected to considerable loads and intensive use. Because of this, after some time it happens that when starting the engine, jerks, a burning smell and other malfunctions appear, suggesting that the angle grinder (angle grinder) has broken down. But you shouldn’t immediately take the device for repairs or buy a new one. Most malfunctions of this device can be resolved independently.
Design and electrical circuit of the grinder
Over the many years of existence of such a tool as an angle grinder, its appearance, as well as its internal structure, have remained virtually unchanged. To repair an angle grinder with your own hands, you need to know the structure of its mechanical part, as well as its electrical part.
If you look at the figure below, you can see what parts the angle grinder consists of.
- Wheel for adjusting the spindle speed of the unit.
- An electric motor consisting of a rotor and a stator.
- Start button. Sometimes a soft start system is connected to it.
- Housing made of impact-resistant plastic.
- Button for fixing the spindle (used when changing tools).
- Safety coupling. Protects the engine from overload when the tool jams.
- Protective cover. Covers the tool and protects the user from flying particles of the material being processed, and also prevents injury to a person when the tool, for example, an abrasive disc, is destroyed.
- Nut that clamps the tool. It is unscrewed using a special key that comes with the power tool. There are also quick-release nuts that can be unscrewed without a key.
- The gearbox housing and the gearbox itself. It consists of a block of gears that transmit rotational movements from the rotor to the spindle with the tool.
The figure below shows the electrical circuit of the angle grinder.
The electrical part of the angle grinder has the following elements:
- electrical cable with plug for connecting to the mains;
- start button;
- stator;
- electric brushes (carbon or graphite);
- collector;
- armature (rotor).
The following figure shows the connection diagram for the angle grinder, namely its engine.
All components of an electric motor perform specific functions.
- The rotor is the shaft on which the coils and commutator are located. The rotor, rotating in the magnetic field of the stator, transmits rotational motion to the angle grinder gearbox.
- Collector. It is the part of the rotor to which all control cables are connected. Electrical signals from the control unit to the engine pass through the collector. It is to the collector that the electric brushes are connected.
- Electric brushes. Their main task is to transmit electric current from the power cable to the collector.
- Stator. It is a coil with a certain number of turns. The task of the stator is to create a magnetic field, which, interacting with the armature, sets the latter in motion.
The parts that make up the grinder
Let's try to understand what elements the tool consists of:
- Gear housing;
- Carbon brushes;
- lever;
- Soft start system;
- Ball bearings;
- Electric motor;
- grinder switch.
grinder does NOT gain speed, grinder Bort, Bort bws 905, How to repair an angle grinder, Tool repair
Now we will try to identify the most common tool malfunctions and causes of breakdowns. The cause of premature wear of spare parts is careless and incorrect operation of the product.
- NOT following safety precautions;
- Violation of operating recommendations;
- Storing the instrument in an inappropriate form or place;
- Use of non-original consumables.
The main malfunctions of an angle grinder and their causes
According to statistics, most cases of angle grinder failure are associated with the electrical part of the device. Some damage may be minor, which allows you to repair the angle grinder yourself. But, for example, if the motor windings burn out, only a specialist can repair an angle grinder.
Grinder won't turn on
The reasons that the angle grinder does not turn on may be the following:
- the electrical plug is faulty;
- the electrical cable is faulty;
- the start button is broken;
- the contact between the power cable and the button is broken;
- break in the contact wire of the electric brush;
- severe wear of electric brushes;
- failure of the rotor or stator windings.
The angle grinder does not develop speed
The reasons why the angle grinder does not gain momentum can be different.
- Damage to the speed control unit. To check this version, you need to connect the device’s motor directly, bypassing the regulator, and check the operation of the device.
- Failure of the electrical cable due to constant kinks or mechanical damage. Because of this, the damaged wire begins to heat up under load, and engine speed drops.
- Collector contamination with dust. Contaminants must be removed with alcohol.
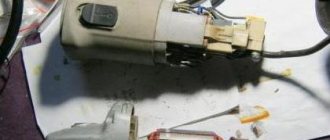
- Problems with brushes. They may be worn out or have a short contact wire as shown in the following photo.
Do-it-yourself repair of grinder gearboxes
There are
two options to fix an angle grinder malfunction : use the services of a special service center or carry out the repair yourself. When making repairs yourself, you can save money , since the services of professionals are not cheap. If you have the funds and lack of skills, you should take a responsible approach to choosing a company that performs these repairs. It is important that the funds spent do not go to waste. Here, the section of the site “Ulch Grinder Repair” can help, where you can find information about companies repairing angle grinders in different cities of Russia. If the gearbox breaks down, you should think about repairing it yourself. For such repairs, no special tools or equipment are required . To press out the bearings, might you need pullers, which are usually available to a home craftsman? Spare parts can be easily found in specialized stores.
How to disassemble an angle grinder for diagnostics
In order to diagnose the electrical part of the angle grinder, as well as eliminate mechanical breakdowns of the device, you will need to disassemble it. Disassembly is carried out according to the following algorithm.
- Using a wrench, remove the disk or other attachment from the spindle of the unit.
- Unscrew the handle.
- Remove the protective cover.
- Open the special windows located on the sides of the angle grinder casing and remove the electric brushes, having first disconnected the terminals.
- Unscrew the gear housing from the angle grinder motor housing.
- Pull the gear housing lightly and remove it from the housing. In this case, the gear unit will be removed along with the rotor.
- After removing the armature, the motor stator will remain in the casing, which can also be easily removed for diagnostics after unscrewing the fasteners.
- To disassemble the gearbox, unscrew the screws holding the cover. After removing the cover, you will see the gears of the gearbox.
- To remove the anchor from the angle grinder, you will need to unscrew the nut located inside the gearbox.
- In order to remove the bearing from the armature, it is recommended to use a special puller. Otherwise, the shaft may be damaged.
Step-by-step analysis of the grinder
- Remove the nut located on the working disk;
- To remove the outer shell, unscrew the bolts securing it;
- Separate the gearbox from the grinder body;
- Separating the top and back of the body;
- We pull out the electrical cord after unscrewing the bolts. In some models, you may encounter that the back of the case cannot be disassembled in parts, in which case it must be removed completely;
- Remove the wires coming from the engine;
- Next you need to remove the brushes;
- Disconnect the upper part of the gearbox from the tool body. Also try to carefully remove the anchor;
- It is necessary to remove the air intake from the tool;
- Notice that there are two large bolts inside the housing that secure the stator. You need to Unscrew them;
- Next to the bolts you will find two rings, they are securely fastened to the stator. You will have to move them a little;
- Next you will have to remove the stator. I took a wooden mallet very carefully, you need to knock on the sides of the body, thereby you will ensure that the part comes out calmly;
- The next step is to disconnect the gearbox bolts, they are located next to the casing;
- Remove the gearbox from the tool.
Following this diagram, in order to assemble the tool you need to assemble the parts in reverse order. Step by step, you can assemble the grinder on your own, without outside help, quickly enough. How to remove such a part as an anchor from an angle grinder? To do this, you need to unscrew the nut from the existing housing.
Diagnostics of the electrical part of an angle grinder
As mentioned above, most often an angle grinder refuses to work due to breakdowns of the electrical part of the unit. To correctly diagnose the electrical circuits of a tool, electrical equipment repair technicians use a special device - a tester.
If you press the start button of the unit and it does not work, then in 90% of cases the cause of the breakdown is not so serious that you cannot repair the angle grinder yourself.
Experts advise adhering to the basic rule of repairing power tools: moving from simple to complex.
The first step is to check the electrical cable and the plug at its end. If it is collapsible, then unscrew it and check the reliability of the contacts. Otherwise, you will have to disassemble the angle grinder (remove the casing of the device) and “ring” the cable with a tester, and also make sure that the current is suitable for the contacts of the “Start” button. If the device shows a break, the cable should be replaced with a new one.
The most common breakdowns
The most common part of a grinder that breaks is the electric one. These breakdowns can occur from overheating of the tool, from water getting on the angle grinder, or from unstable voltage.
The mechanical part becomes unusable due to frequent falls of the instrument and poor care for it. Bearings and gear elements suffer from this first of all.
The reason why the grinder does NOT pick up speed may be due to wear on the brushes. In this case, you will see that it “sparks” when starting, this may be damage to the armature insulation. If you have knowledge and experience, you can replace it yourself by purchasing spare parts for grinders at ToolParts, but you should remember that the anchor is an expensive spare part, so there is no reason to always change it. Sometimes it is more cost effective to purchase a new sander.
the angle grinder when plugged into the outlet , then there may be a problem with the mechanical part. Try it by unplugging the tool cord from the network and returning the disk by hand. If it turns slightly, the culprit of the breakdown is the brushes of the electric motor of the angle grinder, since they are not supplied with electricity. This may require replacing the cord or trigger button.
Remember, if you have the skills to work with power tools, you can always turn to specialists for help.
Sources:
https://www.interskol.ru/wiki/Wiki_51.html https://aparthome.org/sovety-stroitelju/pochemu-bolgarka-ne-nabiraet-oboroty-prichiny-i-metody-remonta.html https:// teplica-parnik.net/prichiny-po-kotorym-shlifmashina-ne-nabiraet-oboroty.html
Mechanical breakdowns and their elimination
Mechanical failures of angle grinders include the following.
- Worn motor armature bearings. Typically, when the bearings wear out, you may experience strong vibration while the machine is operating. In addition, grinding and other noises may be heard. Sooner or later, the bearing will collapse, and the spilled balls will fall on the gears of the gearbox. If this happens, then in addition to the bearing, the gears will also have to be replaced. Of course, it is better not to wait for this problem, but to replace it at the first sign of bearing failure. How to get to this part of the angle grinder was described above.
- Worn ball bearing or plain bearing of the gearbox. As in the previous case, when you turn on the device, vibration will be felt and noise will be heard that is unusual for the normal operation of an angle grinder. To prevent further damage to the gearbox, it is necessary to replace the faulty part.
- Reducer gear wear. Gears wear out quickly due to insufficient lubrication. For the same reason, the gearbox heats up. It is necessary to monitor the condition of the lubricant inside the gearbox and change it if necessary. How to disassemble the gearbox was described above. You need to use lubricant specially designed for angle grinder gearboxes, and you can buy it at points where this tool is sold. If for any reason the teeth of at least one gear are broken, then the entire set of gears (a pair) needs to be replaced.
Tools and materials for grinder repair
In order to repair a tool, you need to prepare materials that may be needed during repairs:
- screwdriver;
- wrench;
- rags;
- alcohol
- knife;
- grease;
- insulating tape;
- sandpaper.
Before starting repairs, remember how the breakdown occurred, what kind of work was performed and, depending on this, you can draw a conclusion - this is a violation of operation or simply the process of long-term use led to this result. After all, even if you follow all the operating rules, grinders still break down very often. This is due to the fact that the work performed by this tool is carried out in dirty rooms with a large amount of dust, which penetrates literally everywhere.
Why won't the grinder turn on?
Most angle grinder problems are related to the electrical part. The tool may not turn on for the following reasons:
It is advisable to solve problems with an electric motor in a specialized workshop that employs qualified specialists and has modern diagnostic equipment and repair tools.
we repair it ourselves
The first thing to do is disassemble the tool. The tool does NOT contain a suspension from models:
- Armature - responsible for the rotating part of the engine.
- The commutator is part of the armature. The windings are connected to the collector. A collector is a collection of insulated copper plates that are insulated from each other.
- The stator is the part of the engine that is NOT moving.
- Brushes - used to supply current to the commutator. There are carbon or graphite brushes.
- A gearbox is a device that transmits rotation from an armature to a wheel (the wheel can be cutting or grinding).
Why does the grinder heat up?
The electric motor overheats in the following cases:
- Incorrect operating mode. As a result of too high loads, the motor windings burn out.
- Destruction of armature bearings. The result is difficulty in operating the engine and, as a result, overheating.
- Clogged ventilation ducts through which air flows to the electric motor, acting as a cooler.
- Closing the turns of the stator and rotor windings.
The angle grinder gearbox overheats due to lack of lubrication or its poor quality.
Do-it-yourself repair of grinder gearboxes
There are two options to fix an angle grinder malfunction : use the services of a special service center or carry out the repair yourself. When making repairs yourself, you can save money , since the services of professionals are not cheap. If you have the funds and lack of skills, you should take a responsible approach to choosing a company that performs these repairs. It is important that the funds spent do not go to waste. Here, the section of the site “Ulch Grinder Repair” can help, where you can find information about companies repairing angle grinders in different cities of Russia. If the gearbox breaks down, you should think about repairing it yourself. For such repairs, no special tools or equipment are required . To press out bearings, might you need pullers, which are usually available to a home craftsman? Spare parts can be easily found in specialized stores.
Why does the grinder spark strongly in the area of the brushes?
During normal operation, a small, uniform spark is observed inside the housing. If it is too strong, the brushes must be replaced. The problem occurs in the following situations:
- Damage to the armature winding - an interturn short circuit has occurred or a section of the winding has broken.
- Loss of contact between the winding and the collector plates.
- Violation of insulation between the collector lamellas.
- Severely worn “grinder” bearings , which provoke the beating of the angle grinder’s armature, causing the brushes to spark and burn strongly.
- Using brushes whose characteristics do not correspond to the speed and voltage in the network.
- Motor overheating due to continuous operation for too long.
Prevention, maintenance, diagnostics
Carrying out preventive maintenance for angle grinders significantly reduces the likelihood of sudden failure of a power tool . Ultimately, the costs of repair work are reduced, and the grinder’s resource indicators increase. to carry out the following maintenance work regularly, approximately once a year (depending on the intensity of use of the grinder)
1.Perform disassembly.
2. Clean all internal and external surfaces.
3. Check the wear of the graphite brushes . If necessary, replace them following the following procedure:
The brush assembly located on the body of the Makita GA9020 angle grinder provides convenient replacement of brushes. Photo VseInstruments.ru
4. Determination of gearbox defects.
5. Inspection of rotor parts.
6. Inspect the wiring for insulation damage. Check the status of the contacts.
7. Reassemble in reverse order.
8. Check for a few minutes at idle speed.
Maintenance work on the angle grinder will not take much time; timely preventative maintenance will delay costly repairs.
Reasons for strong vibrations of the grinder
The source of this problem may be:
- Poor quality of the cutting or grinding wheel, their uneven wear.
- Contamination of mechanisms or severe wear of the mechanical part - bearings, shaft seat.
- Brushes are dirty.
If your grinder stops working, if it makes noise, vibrates a lot or overheats, it is recommended to contact a service center, which will not only fix the current problem, but also diagnose all components of the tool.
Types of breakdowns in grinders
Typical minor damage
In the event of a malfunction, it is first necessary to eliminate elementary breakdowns:
Major faults
Having ruled out all minor damage, you need to figure out why the tool does not want to turn on and how to repair it. Most likely, the malfunctions are serious and require additional knowledge. This happens if:
If it is determined that the malfunction has occurred in the mechanical part of the angle grinder, then you need to pay attention to the condition of the large gear located on the shaft and the bushings. If the teeth are partially worn out or the shafts become wobbly, they must be replaced immediately.
The most common breakdowns
Grinder malfunctions happen quite often. Everyone who works with this tool knows about this. What goes wrong most often?
The spindle lock button is broken.
Just one awkward press on the spindle lock button while the disk is rotating leads to its breakdown. Sometimes it can be broken if it is used to remove a jammed disk. To prevent this from happening, you need to use an open-end wrench inserted into special holes near the place where the disk is attached.
Broken gear teeth
It mainly occurs when jamming occurs. If you hear a rumble in the gearbox, this is a sign of just such a malfunction. When more than one tooth of a gear is broken, the grinder will not be able to cut the required material.
In order for the tool to continue working, it is necessary to change the gears, all of them, and even the bevel wheel. Before going to the store for spare parts, remember the manufacturer, model and power of the product.
The electric motor does not work.
This type of breakdown occurs with angle grinders that work in places where there is a lot of dust, and when they are given a rest, they are left on the ground. Dust that gets inside spoils the winding. Large loads, especially for a small power angle grinder, result in motor failure.
If the grinder is used for cutting materials that create a lot of dust, then it is recommended to cover the ventilation holes with something.
Bearing fell out
The weakest link, and not only among grinders, are the bearings. High rotation speeds quickly wear out the mechanism. The good news is that changing the bearing is easy. Replacing a worn out bearing on an angle grinder must be done on time to avoid a breakdown that cannot be fixed.
Angle grinder device
The design of the angle grinder consists of an electric drive, the torque of which is transmitted through a gearbox to the spindle with the working tool. On professional-grade grinders, additional soft starters, regulators and speed stabilizers are installed.
Grinder device DIOLD MSHU-1.5-01 with speed control (6). Photo 220Volt
Soft start creates comfortable and safe working conditions with the angle grinder, reduces the possibility of failure of the main working elements of the angle grinder (see angle grinders with soft start). The presence of a speed control option expands the possibilities of using an angle grinder (see about angle grinder speed), creates conditions for the absence of work with overloads, which increases the duration of its continuous operation (angle grinders with speed control here).
Speed controller
A speed (speed) regulator is present in angle grinders, where the quality of the material being processed depends on the rotational speed of the tool. For example, when processed at high speeds, plastic may begin to melt due to heating. For cleaning and grinding surfaces, a working tool is used that works effectively at certain spindle speeds.
The adjustment is made manually by changing the value of the variable resistance built into the device circuit. In addition to the variable resistor, the circuit includes an electronic unit that controls the amount of current. Electronic control of this electrical parameter when the speed, and therefore power, decreases, will maintain the amount of torque on the working spindle and ensure the functioning of the angle grinder.
A typical electrical circuit of the angle grinder speed controller is shown in the photo:
Typical electrical circuit diagram of the speed controller. Photo source here
Here the main element is a triac (VT12). This scheme is used to adjust the speed of high-power angle grinders. The opening/closing of the triac is additionally controlled using thyristors (D83). Therefore, the triac has three working terminals: 1,2 - ensure the passage of current from the network to the load, 3 - controls its opening/closing.
The circuit for adjusting the speed of low-power angle grinders can only be performed using thyristors. They simultaneously act both as organs that lock the chain and as controls. There is no need for a third conclusion here. The schematic diagram is shown in the photo:
Scheme of a thyristor power regulator. Photo source here
The diode bridge (VD1) makes it possible to regulate the voltage on both half-cycles of alternating current using only one thyristor.
With soft start
Some specialized ICs can have current feedback, overload protection and soft start at the same time. These qualities are possessed by the U2010B chip, which forms the basic component of the circuit presented below:
Regulator circuit on the U2010B chip. Photo source here
A special feature of the device is the absence of a tachometer, which allows you to avoid complicating the design of the angle grinder. The block is included in the circuit as an intermediate device between the electrical connector and the electric drive.
No power loss
The simplest and cheapest method of adjusting the speed of an angle grinder is based on changing the voltage. However, at low speeds the torque decreases significantly, and the angle grinder cannot perform its functions. Another method, more expensive and complex, is based on the use of microprocessor control. Information for the operation of the circuit with a microprocessor is provided by a tachometer mounted on the rotor shaft. Feedback through the tachometer provides almost 100% retention of torque when engine speed drops.
General safety rules
To reduce the likelihood of injury when working with a power tool, the angle grinder should be handled correctly.
The following rules of use must be observed:
- First, you should buy personal protective equipment. The user's health must be in good condition.
- Before starting work, it is necessary to check the reliability and correctness of the casing so that it does not fall off during the process, and sparks do not start flying at the operator.
- Use only intact discs that do not have defects (chips, cracks or breaks) and only for their intended purpose - in order to process specific materials.
- A protective shield must be placed between the circle and the operator so that you have protection if the circle is destroyed.
- Before starting work, you should check the functionality of the tool idle for about 1 minute - uniform rotation at maximum speed, absence of vibrations, etc.
- Please inspect any attachments prior to use to determine their suitability for use.
- An interesting life hack for an angle grinder, or rather its use - use an asbestos or regular damp rag to protect objects from sparks so that oily rags, paper, flammable and lubricating materials, ropes and solvents do not ignite.
- You will need to securely fix the working attachments so that they do not fly off.
- If it is possible to regulate the rotation speed, set the speed that is recommended for cutting or grinding the working material.
- Be very careful when sawing wood, as hitting a branch can cause the angle grinder to jerk out of your hands.
- It is prohibited to install attachments from a circular saw onto the tool, as they are designed for different spindle speeds.
- The tool must be held with both hands.
- When you start working, you should remove all unnecessary things and make sure that there are no foreign objects on the cutting plane other than the part you are processing.
- Take regular breaks from work.
- If the working attachment jams, you must immediately turn off the tools.
- Be sure to maintain a balanced (i.e. stable) body position.
- The power cord must be located away from the rotating part so that it is not cut or a short circuit occurs.
- Only after the circle has completely stopped can you release the tool from your hands.
- When moving around the workplace, you should turn off the electric tool, and the same should be done when turning off the power supply.
- Cutting should only be done at full speed.
The life hacks and safety measures outlined were developed by tool manufacturers, and also with the help of special services that deal with labor protection activities.
Use of protective equipment
Users should wear the following personal protective equipment when operating an angle grinder:
- Safety glasses or a mask that will cover your eyes on all sides.
- Gloves made of leather or at least thick fabric.
- Specialized shoes (resistant, intact) and work uniform.
- A respirator that will provide you with respiratory protection from small particles when cutting concrete, ceramic or glass slabs, porcelain stoneware, brick, stone, foam block and other dusty materials.
When working with an angle grinder, be sure to use personal protective equipment. This will give you the opportunity to work, but safely. Let's look at life hacks for an angle grinder, or more precisely, how not to use this electric multifunctional tool.
No hammer blow. What to do in such cases?
When drilling holes with a hammer drill, the main factor is not the rotation of the drill, but the impact. Its strength determines both the drilling speed and the ability of the tool to handle particularly tough materials (concrete, granite, etc.).
Dust and constant stress on the tool have a negative impact on its effectiveness. During operation, the impact force may noticeably decrease or completely disappear.
How does an impact drill work and why does it refuse to hammer?
Repairing a rotary hammer
If the shock does not engage, you can start the test with the start button. First, turn off the hammer drill. We remove the protective casing to get to the switch contacts and make calls throughout the circuit. On the way, we check the wires for breaks (in most cases at the plug and specifically at the junction with the equipment). If the button contacts are fine, the problem is most likely in the engine.
If there is no burning smell, the windings are not affected, and the rotor rotates freely, then the brushes will wear out. There are always two brushes, they are made of metalgraphite. They are pressed against the collector by springs, and during operation they wear out and become shorter. Their pressure on the manifold is reduced, the contact worsens and the engine stops working normally.
Take out the brushes and inspect them. Check how they fit in the holder; if they are very skewed, they are worn out. From time to time, special paint is applied to them to make it clear that it is time to change the brush. Purchase the latest brush that is suitable only for this model of electric motor.
If the brushes are fine, things are bad. The stator or armature is damaged. Their winding can be destroyed in the following way: breakdown, breakdown of electronic failure, breakdown “to the point”. At this step, it is better to entrust the repair to specialists. A drop in power is usually also associated first with wear of the brushes. If they're ok. The anchor is out of order. If the drill-hammer began to vibrate very much, being removed from the hands or making a louder noise than it would normally be in the box. Perhaps the bearings are worn out, the balance of the parts is imbalanced, the gears are skewed, or free play appears. You will need to independently change the bearings or balance or change the gears.
A strong sparking and burning smell indicates a broken fitting, which will lead to costly repairs.
The attacker pushes the drill, rotating between the piston and shank. The more you press the hammer into the wall, the more often the impact occurs. Due to the decrease in stroke, the impact force becomes less. This disables the attacker. It can be replaced with a new one.
What most often breaks on angle grinders of different brands?
It makes virtually no difference whether your tool is DeWalt or Intertool. Sooner or later there will be a need to start repairing the angle grinder, which can be done easily and quickly if the breakdown is correctly identified. The main reason why angle grinders break down is not the quality of this tool, but the fact that most craftsmen use them incorrectly. How can you use an angle grinder incorrectly?
According to their purpose, there are two types of angle grinders:
- Household - a category of power tools, the main purpose of which is to use them around the house. They are not suitable for constant and prolonged loads, since the parts are made of low-strength materials. You can operate household angle grinders for no more than 10 minutes continuously, after which you need to pause for a similar period of time to allow the engine and other components to cool. Naturally, no one records the time how long he works with the unit. When the need arises, we pick up a tool and carry out the task to the end. The duration of operation of the unit can range from 10 minutes to 1 hour, which results in breakdowns of the angle grinder. Household grinders can last much longer than professional ones, provided they are used correctly. If you need to repair a household grinder yourself, then experts recommend it’s better to immediately buy a new tool
- Professional - a special type of power tool, the main purpose of which is the duration of operation of the device. Their components are made from durable and high-quality materials, so they are durable and resistant to prolonged loads. You can work with professional angle grinders continuously for 40-50 minutes, and not worry about the engine overheating. They are designed for this, so if you are faced with a situation where your household unit often breaks down, then you need to switch to professional models. This is especially true for craftsmen who, in order to save money, buy household models, but at the same time work with them on construction sites, using them for 8-10 hours a day
Knowing the difference between household and professional models makes it easier to choose a power tool. The choice of power tool and its use determines how often you will need to repair grinders yourself.
Let’s look at the question of what most often breaks on grinders. The most common symptoms of malfunctions are:
- The device does not turn on - the next time you need to use an angle grinder, it turns out that it does not work. The causes of such a malfunction may be the following factors: lack of power in the outlet, damaged power cord, loose contacts, broken button or worn out brushes. Often, as practice shows, on angle grinders the place where the power cable enters the housing structure wears out. This is where you need to look for the place where the contact is damaged
- Current flows into the device, but the motor does not work - this means that the button is most likely faulty. The buttons on grinders cannot be repaired, so after a short check, you should simply replace them
- Sparking of the unit during operation and the appearance of a burning smell means that it is time to replace the graphite brushes. They have an appropriate resource, so signs of sparking in the area where the brushes are located means that they are worn out and the quality of contact is low
- The appearance of extraneous sounds after starting the engine - crackling and ringing sounds are signs of wear on the bearings or gears. To find out the exact cause of the instrument's hum, you will need to disassemble it and inspect the mechanical parts.
These are the main types of faults that even a beginner can identify. Bearings and brushes belong to the category of consumable parts, so do not be surprised if after six months of operation of the unit there is a need to replace them. With simple types of breakdowns on angle grinders, everything is clear, but it often happens that everything seems to be checked, but the tool does not work. What to do in such a difficult situation? To do this, you need to delve into the topic of repairing angle grinders and try to understand what is the reason. Often in such cases the “poke method” helps, but we will not rely on it so as not to get hurt. Let's consider all types of defects and breakdowns on grinders, as well as the features of their identification and elimination.
Checking the serviceability of the angle grinder motor stator
It should immediately be noted that similar manipulations to check the serviceability of the two main parts of the electric motors of electric tools can be carried out for drills, rotary hammers, jigsaws and other units. Battery-type grinders also have motors, but only DC. The difference between alternating and direct electric motors on power tools is stators.
If on variable motors the stator consists of a winding, and the current flowing through it creates polarity, then on “constant” motors this function is performed by a pair of magnets, which push the rotor, setting it in motion.
The algorithm for checking the stator of an electric motor for angle grinders is as follows:
- The presence of resistance between the stator winding and the core is measured. The presence of resistance indicates that the insulation of the copper wire is broken, and therefore a breakdown occurs. To change the presence of a breakdown on the housing, you need to touch the winding terminal with one probe, and the core with the second. There should be no resistance, since in normal mode the copper wire is not connected to the core
- Now we check for the presence of resistance in the winding. To do this, we touch the output contacts with probes. The resistance value in both windings should be approximately the same. If the device does not show anything during measurement, it means that the copper winding is damaged. If the resistance is high, it means that insulation failure is appropriate.
- Carry out a visual inspection of the stator. The presence of carbon deposits on the wire is the main sign that the device needs repair. The stator, like the rotor, can be rewound, but provided that the integrity of the steel plates is not compromised. Rewinding the stator is cheaper than the rotor, however, in any case, if the motor already has a long service life, then it is better to replace it or the component parts that have failed - the armature or the stator
If you decide to replace the engine, then instead of the old motor you need to install a new one with similar power parameters and torque. After replacement, you can begin further use of the tool.
Characteristic symptoms of malfunctions
Before it completely breaks down, the angle grinder gives signals about the beginning of problems.
Pay attention to the work of your own assistant: it should give you pause if:
- the brushes began to spark ;
- The grinder heats up during operation ;
- the motor hums inside the case when the tool is turned on;
- body vibration has become significantly greater during work;
- the grinder's gearbox is cracking inside;
- you can hear the sound of bearings squeaking when spinning up or periodic jamming when the rotor shaft rotates;
- The angle grinder starts smoking, or an unusual burning smell emanates from it.
Gearbox
Angler grinders with power less than 1100 W are usually equipped with spur gears. They are located on the stator. Grinders with higher power have helical gears. Any of the options has a cone-shaped shape; the gearbox rod of the angle grinder intersects with the stator shaft at an angle.
Repairing an angle grinder gearbox mainly involves replacing gears. If a disc gear breaks, it is difficult to replace it, since it is very firmly fixed. It is not difficult to disassemble the gearbox:
- it is necessary to unscrew the nut on its side;
- Carefully take the rotor housing in a vice and knock out the gearbox housing with light blows;
- change the position of the clamped rotor and knock out the bearing through a wooden board;
- Unscrew the gear from the shaft.
READ How to Correctly Place a Cutting Disc on a Grinder
That's it - the gearbox is disassembled.
Prevention, maintenance, diagnostics
Carrying out preventive maintenance for angle grinders significantly reduces the likelihood of sudden failure of a power tool . Ultimately, the costs of repair work are reduced, and the grinder’s resource indicators increase. to carry out the following maintenance work regularly, approximately once a year (depending on the intensity of use of the grinder)
1.Perform disassembly.
2. Clean all internal and external surfaces.
3. Check the wear of the graphite brushes . If necessary, replace them following the following procedure:
The brush assembly located on the body of the Makita GA9020 angle grinder provides convenient replacement of brushes. Photo VseInstruments.ru
4. Determination of gearbox defects.
5. Inspection of rotor parts.
6. Inspect the wiring for insulation damage. Check the status of the contacts.
7. Reassemble in reverse order.
8. Check for a few minutes at idle speed.
Maintenance work on the angle grinder will not take much time; timely preventative maintenance will delay costly repairs.