Types of adjustable machines
To carry out one-way or two-way wiring, separate types of wiring devices are produced.
Also, adjustable machines are designed to work in semi-automatic or step-by-step mode.
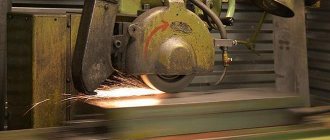
- Automatic adjusting machine for band saws - this machine eliminates the need to install each saw tooth under the device. Automatic routing machines allow you to obtain perfectly accurate routing, while significantly saving time. This will be evidenced by the smooth mark left by the sawmill on the surface of the product.
- Semi-automatic adjustable machine
- Double-sided adjustable machine
An adjusting machine for band saws is necessary for every woodworking industry.
buy an adjusting machine for band saws at a factory price in our online store.
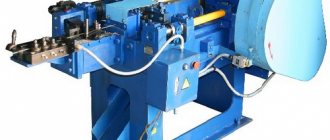
The SAWS UNITED catalog contains adjustable machines for wood band saws. Such equipment ensures quick setting of saw teeth to guarantee long, trouble-free operation. If the setting is done incorrectly, this will lead to rapid wear of the teeth, after which the saw will completely fail. Our company offers to order semi-automatic and automatic adjusting machines for band saws to prevent premature wear of the equipment.
Is it possible to do without a machine?
Wiring a band saw can also be done using the proven “old-fashioned” method, however, this will require dexterity, skill and patience from you.
The saw is clamped in a vice between two plates of durable oak wood. As a tool for directly spreading the teeth, you can use a metal plate on which cuts of different widths are made. This width corresponds to the thickness of the canvas. The kerf should be placed on the saw tooth and moved in the desired direction. Care must be taken to ensure that each tooth being set has the same angle of deviation from the blade as the others.
Thus, band saws can be cut in different ways depending on your needs and capabilities, as well as on the requirements that the sawn elements must meet. The modern market offers many options for manual, automatic and semi-automatic units, on which the gap meter controls the gap. Everyone can choose exactly the option that suits them best.
Basic selection options
The online store offers a wide selection of equipment, all models are offered at affordable prices. The adjusting machine for band saws is selected taking into account the following operating parameters:
- Manufacturing company. Our catalog presents products of the popular brands Taiga, Altai-3, Divors, as well as products from foreign manufacturers. Such equipment has proven itself well in woodworking enterprises.
- Maximum saw width. Familiarize yourself with the characteristics of each model: the larger the permissible range, the wider the operating capabilities of the equipment.
- Operating mode. Manual and automatic equipment differ in design, operating speed and cost.
- Design features. Some models are suitable for simultaneously moving two teeth apart, this significantly speeds up the work.
An automatic adjusting machine for band saws will work flawlessly for a long time and will allow you to keep your tools in excellent condition. Such equipment is easy to use and easy to configure; it will be easy to work with.
Six rules for sawing
1. Tension Your Band Saws Correctly To ensure that your band saw is properly tensioned, perform a vibration test. Hakansson Sawblades band saws are low tension saws, i.e. operate with 35-50% less tension than competing carbon saws. A slight tension of the belts, ensuring sufficient stability, reduces the effect of fatigue during constant bending by 70% or more, therefore, significantly extending their service life. Energy consumption is reduced by 20%. The tension force for Silco saws should be about 100-150 kg/cm2, in particular, saws with a width of 32-51 mm for band saws should be tensioned with a force of about 130-150 kg/cm2. To measure the tension of the band saw, your machine must have some kind of device (dynamometer, pressure gauge, etc.). If you don't have one, use our strain gauge. The tension force used also largely depends on the design of your machine or sawmill. To get the most out of your band saws, whenever possible, always try to follow the guidelines below. A. For machines with mechanical tension. Remove the guide rollers - you cannot perform this test if the band saw blade has limited horizontal movement. Make sure the saw wheel surfaces are in good condition. If equipped with straps, the straps must not be hard, twisted, splintered or broken. On machines with loose V-belt fits, replace them with a smaller size to ensure a tight fit. This will reduce vibrations on your machine or sawmill by more than 80%. Place the blade on the machine and tension it with the tension recommended by other manufacturers for saws made of other steels. Close the cover for safety reasons. Start the machine by setting the switch to high speed cutting mode. Stand in front of the machine, hand on the tension mechanism, eyes on the band saw. Very slowly begin to loosen the canvas without taking your eyes off it. You must reach a position where the canvas begins to vibrate. When you see that the blade begins to vibrate, you have reached the zero position. Now start adding tension by turning the tension screw a quarter turn. Slowly until the saw stops vibrating and starts to function smoothly again. At this point, add another full turn of the tension screw. Your canvas is now properly tensioned. Turn off the machine and put your guides back in place. You are ready to go. Always release the belt tension between jobs. When you loosen the tension, remember that to completely relax the saw, it is enough to turn the screw 8-10 full turns. To tighten it, you just need to turn the screw in the opposite direction the same number of revolutions. If you follow these procedures as above, you will only need to perform the vibration test once. B. For machines with hydraulic tension. Perform the above operations. At the same time, reduce and increase the pressure in steps of 10-12 kg. Once you have eliminated the vibration, add another 25 kg. Note the pressure on the pressure gauge scale. ALWAYS REMOVE THE TENSION ON THE BLADE BETWEEN USE The next time you use the blade again, use the settings you remember so you don't have to repeat the vibration test. B. For machines with pneumatic tension. Perform the above operations. At the same time, reduce and increase the pressure in steps of 5 kg. After you have eliminated the vibration, add another 5 kg. Note the pressure on the pressure gauge scale. ALWAYS REMOVE THE TENSION ON THE BLADE BETWEEN USE The next time you use the blade again, use the settings you remember so you don't have to repeat the vibration test. WARNING: IF YOU DO NOT PERFORM A VIBRATION TEST ON OUR SPECIAL SILICON STEEL SAWSAWS, YOU WILL BE OVERTIGHTENING THEM AND WILL NOT ACHIEVE THE WEAR RESISTANCE AND DURABILITY OF WHICH OUR HIGHLY DUTY STEEL SAWS ARE CAPABLE OF. 2. Selecting the correct lubricant for the band saw blade. Never use water as a lubricant for band saws. Water is not a lubricant and should not be used for many reasons. Not only is water unacceptable as a lubricant, but it also causes the blade to rust, causing corrosion, and inappropriate chip blowing. This prematurely destroys the body of the band, and the grooves between the saw teeth. Water is also wet tires or V-belts. There is no need to lubricate the blade unless the resin sticks to the saw blade. If sticking does occur, we can suggest the following: For proper lubrication, mix high-adhesive chainsaw oil with half and half kerosene or diesel fuel. Apply the mixture using a spray bottle to both sides of the blade every four minutes while the machine is running. After lubrication, sawing noise is reduced by more than 50%. Do not apply lubricant until the noise begins to increase. You should lubricate both sides of the saw. Belt lubrication increases belt life by more than 30%. By using lubricant sparingly, you will be able to saw high-grade wood without getting it dirty; We also believe that this extends the life of the rubber gaskets. 3. Always loosen the band saw tension. When you are finished, release the tension from the saw. As bandsaw blades operate, they always heat up and lengthen, then shorten as they cool down during each cooling period. Therefore, saws left on the pulleys in a tense state overload themselves, and an imprint from the two pulleys forms on them, which causes cracks to appear in the spaces between the teeth. When you leave the belt on the machine under tension, you not only distort the rim and surface of the belts (making them very rough), but you also apply excessive stress to the bearings and shafts. Believe it or not, you can sooner or later damage the geometry of the pulleys and significantly reduce their service life. You also destroy your rubber gaskets and V-belts. 4. Selecting the correct tooth set. The spread is correct if in the space between the saw blade and the wood being processed you have a mixture of 65-70% sawdust and 30-35% air. A sign that you have chosen the right cut is the removal of 80-85% of sawdust from the cut. If your teeth set is too wide for the thickness of the wood available, then you will have too much air and not enough sawdust in the cut. You will have excessive sawdust loss, and this may be accompanied by tooth marks on the surface of the board. If you don't have enough clearance, you won't get a strong enough air flow to remove sawdust from the cut. A sign of this is hot sawdust. This can cause the most devastating damage to the bandsaw: operating intervals will be short and the saw will fail prematurely. The sawdust should be cool to the touch, not warm or hot. And finally, if the cut is insufficient and the sharpening angle is incorrect, the saw will cut a wave on the board. Typical example: If you are sawing a 35 cm log, the sawdust is warm to the touch, the feed speed is normal, long working intervals are maintained, and at least 85% of the wood dust is sucked out - the saw teeth are set correctly. Then you take on a 60-centimeter log. It would be logical for the widow to increase the spread of teeth when the mass of the tree increases by 100%. In fact, in this case you should increase the tooth set by approximately 20%. From our point of view, you cannot work with logs of different diameters, timber and beams using the same tooth set. You must sort the timber. For every 20-25 cm increase in size, you should increase the setting by approximately 18% depending on whether the wood is hard or soft, wet or dry. The only way to achieve the desired layout is to carry out test cuts on a specific log. Increase the setting by 0.05-0.10 mm on each side until tooth marks become visible. This means that you are working with a 50/50 mixture of air and sawdust. After this, reduce the tooth set by 0.75 mm on each side and you will achieve the desired result. VERY IMPORTANT: YOU MUST ONLY BREAK THE UPPER THIRD OF THE TOOTH, NOT THE MIDDLE OR LOWER. YOU DO NOT WANT THE GAP BETWEEN THE TEETH TO BE COMPLETELY FILLED WHEN YOU SAW. When you work with softwood, whether wet or dry, the chips expand in volume to 4-7 times their cellular state. Hard wood, wet or dry, increases in size only 0.5-3 times when freed from its cellular structure. This means that if you are sawing 45cm pine logs, you will need to set the teeth 20% further apart than when cutting the same oak logs. Always spread the teeth before sharpening. It is necessary that the end of the tooth is perpendicular to the tape. Set the teeth 0.02-0.03 mm more than required, and after sharpening the set will be what you need. It is important to know that there is a real formula for correct tooth set. For sawing logs on Avangard-LP band sawmills, we offer a series of “Silco” saws with a width of 31, 38, and 51 mm and a tooth pitch of 19, 22, 25 mm, respectively. The thickness of the canvas is 1.07 mm. The saw teeth are hardened and set by the company with an accuracy of 0.04 mm. There are four types of wiring (on both sides): - for dry hardwood (oak, beech, ...) - 2.03 mm; — for wet hardwoods -2.18 mm; — for dry coniferous and soft-leaved species -2.29 mm; — for wet coniferous and soft-leaved species -2.53 mm. Saw 32 mm, pitch 19 mm Soft wood Soft wood with a lot of knots Medium Hard wood Hard wood Very hard, frozen wood Recommended sharpening angle 10° 8° 10° 10° 8° Cutting width, mm Set to side, mm Set to side , mm 0-150 0.53 0.48 150-300 0.60 0.53 300-560 0.74 0.60 560-760 0.86 0.74 more than 760 0.96 0.86 Saw 38 mm, pitch 22 mm Soft wood Soft wood with a lot of knots Medium T hard wood hard wood very hard, frozen wood Recommended sharpening angle 10° 8° 10° 10° 8° Cutting width, mm Setting per side, mm Setting per side, mm 0-150 0.48 0.43 150-300 0.53 0.48 300-560 0.60 0.53 560-760 0.68 0.60 more than 7 60 0.78 0.68 Saw 51 mm, pitch 25 mm Soft wood Soft wood with a lot of knots Medium Hard wood Hard wood Very hard, frozen wood Recommended sharpening angle 10° 8° 10° 10° 8° Cutting width, mm Set to side, mm Set per side, mm 0-150 0.48 0.43 300-560 0.53 0.48 560-760 0.60 0.53 more than 760 0.68 0.60 5. Sharpening procedure There is only one way to sharpen band saws. The stone should travel down the surface of the tooth, around the base of the cavity between the teeth, and up along the back of the tooth in one continuous motion. There is no need to touch the cavity itself. The space between the teeth (gallette) is not a sawdust bin. In fact, it is the second hardest part of the saw. A good gallet is like an upside-down airplane wing. The power flow of air, cooling of steel and removal of sawdust depend on it. If you have the correct tooth set, air is forced along the log at the same speed as the saw, causing sawdust to be sucked into the gullet. The sawdust cools it significantly as it passes around the inside and outside of the next tooth. You need to ensure that the space between the teeth is filled to 40%, which will provide the desired degree of cooling and increase the operating time of the saw. If you only sharpen the front and back of the tooth, you will compromise the integrity of the tooth, which will cause the saw to break. So, you have checked your indicator and the accuracy of the teeth set, which are actually set 0.02-0.03 more than what you need. You've double-checked the angle of the sharpening device and it's exactly what you want. Now you can start sharpening your saw. 6. Correct sharpening angle. Thanks to deep gallets, we can use reduced sharpening angles, which transfer less heat to the tip of the tooth. The Silco series of tapes use a 10 degree tooth angle that is capable of penetrating most medium hard to medium soft wood surfaces. If you are working with very hard wood (such as oak, walnut, ash, or frozen wood), the saw may lift as it cuts. This is called repulsion. The tooth angle must be reduced again to 8°. You will notice that as the angle goes from 10° to 8°, the tooth becomes more perpendicular, thus increasing the penetration factor. If the tip angle increases from 10° to 12°, this results in decreased penetration into hard rock. If you use an 8° bevel angle on soft wood, the saw may vibrate from overexertion if the wood is not knotty. If there are hard knots, the angle of inclination should be 8°. On the other hand, when working with very hard wood, if the angle of inclination is 12°, the tooth will break off the hard surface because the end of the tooth is pointing too far forward. The 12° hook angle causes a pushing effect, which causes the saw to lift upward. The saw band is clamped in its movement, cuts straight across and lowers at the end of the process. This also leads to overheating of the tape and its overvoltage. By making sure that you have set the correct angle of inclination of the tooth, and the gallet mathematically exactly matches this inclination, you will achieve a straight cut. You must understand that tooth set and tooth angle are interconnected, they work together. We produce band saws with four types of tooth set with a tooth angle of 10°. Whatever you cut, 70% of the time this bevel angle is perfect for the job. Caution: You trust the templates and gauges on your sharpening machine. But they are hardly accurate. Cars wear out. The pins and guides that run the back of the belt on the sharpening machine wear out. The belt begins to slide at an angle, just an angle of a few degrees, and you are not able to notice it, but you feel that something is wrong as soon as you start working on the sharpened belt. To get an idea of the wear and tear on your sharpening machine, consider the following. A saw blade with a length of 4000 mm will pass along the sharpening device at least twice during each sharpening. Six sawing rules. Tooth angleYou have sharpened 50 bands. In total, this will be 400 m of length of the tapes, which rub their back side against the alignment pins, loosening them. How do you know if the tooth angle is set correctly? Using a protractor. Without it, you can assume that the inclination angle is set correctly. We have analyzed over 4,000 saws since 1992. And more than half of all problems stemmed from the incorrect assumption that the sharpening angle was set correctly.
Order equipment via the Internet
The SAWS UNITED company offers to buy an inexpensive adjusting machine for band saws; all models of equipment are offered at a low cost. Check the performance specifications in the descriptions to find the solution that suits you.
The price of an adjusting machine for band saws depends on the design features and possibilities of use; our consultants will suggest a suitable solution. Provide your production facility with reliable equipment to keep your saws in working order. Call and place your order on favorable terms!
Setting up band saws
The process of setting is considered to be an operation associated with bending the saw teeth in different directions in order to reduce the friction of the saw band on the side surfaces of the cut and prevent it from being pinched.
For free movement of the blade in wood, it is necessary to ensure a cutting width that exceeds the thickness of the blade by at least 30-60%. Wiring is divided into several types, and they do not yet have established names, since saw manufacturers call them differently.
The standard setting is characterized by alternating bending of the teeth on different sides.
Standard wiring diagram
When stripping, the teeth of the saw blade are divided into three, two of which are bent in different directions, and the third remains in place.
Stripping wiring diagram
It is mainly used when working with hard wood. The trapezoidal shape of every third tooth remaining in the center of the saw sets the direction of the entire saw blade.
The most difficult to perform is the wavy setting, since each subsequent tooth in a half-wave is bent by an increasingly increasing amount.
Wavy wiring diagram
With any type of setting, the tooth is not bent from the base, but with an indentation from it by 33-67% of the height of the tooth. Despite the fact that each manufacturer dictates its own requirements regarding indicators related to divorce, all of them do not go beyond 0.3-0.7 mm.
It is generally accepted to cut trees with soft wood with band saws that have a large gap, and with hard wood - a small gap. But in any case, the spread should be such that sawing occurs without the formation of a cut wedge in the center.
When set, all teeth must be bent by the same amount with a permissible error of up to 0.1 mm. If the setting is not the same, the saw will be pulled in the direction of the larger setting.
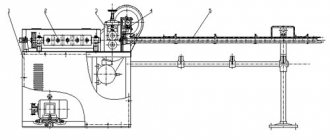
Device for setting teeth
To cut teeth with a pitch of 0.5 mm, the ratchet wheel is replaced. The replaceable matrix 11 is attached to the body 1 with screws 12 and installed using a stop 13. When installing a new tape, the upper roller is moved away from the lower one using a special lever. With 116 strokes/min of the slider and a tooth pitch of 6 mm, the device cuts teeth on a 41.76 m long strip in 1 hour. Correct tooth spacing is of great importance for the productive operation of band saws. To set the teeth of band saws, a device is used, the operating diagram of which is presented in Fig. 14 [8]. The device is driven by the rotation of the flywheel 1, mounted on the crankshaft 2. On the latter, ring-bearings are freely located, in which curved levers 3 and 4 are attached to the threads. When the flywheel rotates, they receive a reciprocating motion. At the end of lever 3 there is a square with a freely hanging pawl 5. When lever 3 moves to the right, the pawl rests on the tooth of the saw blade 6. With one turn of the flywheel, the saw moves two teeth. The pawl and the square are hinged, so when the lever moves back, the pawl rises and slides along the teeth of the saw. Levers 4 are elements of the gear setting mechanism (the second lever is located on the back side of the housing). Levers 4 are pivotally connected to the crank axis of the cam 7. The levers return to their original position by springs 8. When the flywheel rotates, the levers 4 rotate the cams 7, which push the punches 9 towards each other. Two adjacent saw teeth bend in different directions (move apart). Springs 8 return cams 7 and punches 9 to their original position. The angle of the teeth is adjusted with nuts 10 and by deepening the threaded end of the levers into the rings on the crankshaft. The tooth set angle is 15° in both directions. The amount of feed of the pawl 5 is adjusted by nut 11. The mechanism for installing and securing the band saw has two plates that make up the body of the device, and a wedge 12 located between them. The wedge moves in the body, and the teeth of the set saw always protrude above the body by a certain amount. At the Volgograd Tractor Plant they use a device for setting the teeth of band saws. The device operates by hand drive and consists of two disks with shoulders on which a band saw is mounted. One of the disks is movable to tension the saw. The adjustment is carried out by two cams using a pawl, a lever with a roller, copiers, a handle and levers. An automatic machine is used for cutting and setting the teeth of band saws [54]. Teeth cutting is done on a steel strip of any length, which is then cut into measuring tapes. When refurbishment of band saws, the teeth are cut again. The machine can be installed on a separate frame, table or workbench; its overall dimensions are 380x320x250 mm, weight 16 kg; it is equipped with an electric motor with a power of 0.37 kW, with a shaft rotation speed of 1400 rpm. On the plate 1 of the machine (15) two brackets 2 and a support bar 3 are installed. Supports 4 are attached to one bracket, in which a worm 5 carrying ball bearings and a driven flywheel pulley 6 are installed. On the other bracket is mounted the eccentric 7 of the pusher 8 of the feed mechanism and gear wheel 9. The feeding mechanism consists of three supports 10-12, on which are placed a worm pair 13 and 14, a drive roller 15 for feeding the tape blank, a pressure roller 16, a pressure roller lever 17 and a screw 18 that regulates the degree of pressing of the pressure roller. To move the workpiece per saw step, a replaceable ratchet 19 is mounted on the worm 5. A drive gear 21 is installed on the shaft 20, which meshes with the eccentric gear of the feed mechanism pusher, cam disks 22-25, intermediate bushings 26 and 27, and a worm wheel 28. A combination stamp (16) is installed on the support bar 3; one of the stamps is used for cutting out teeth, and the other for setting teeth; the stamps are mounted on plate 1 between two posts 2 and 3. On the base of plate 1, together with the die-cutting die matrix, two strips 4 and 5 are installed. Between the die-cutting die matrix and the guide strip 6 there is a clamping device strip 7. The device is kinematically connected to the punch of the cutting die using two rollers 8 and 9 of guide bars 10 and 11, between which a spring 12 and a pushing head are inserted. A rubber ring 14 and a metal ring 15 are put on the bar 11, with which the tape is pressed while cutting the teeth. For lateral clamping of the tape, a clamping device is mounted in the hole of the strip 4. It consists of a retainer 16, a clamping bar 17 and a spring 18. The pushing head serves as a guide sleeve into which the spring 19 is inserted. The tape is secured with a nut 13. The nut 20 of the pushing head rests on the metal ring 15 of the rubber ring 14. To release the tape after cutting and moving It is placed on the new section by spring 12, which returns the clamping device to its original position. During operation, the pushing head of the punch slides along a bronze bushing 21, pressed into the bar of posts 2 and 3. Depending on the clamping force of the tape, it protrudes above the bar by one or another amount. The die for setting the teeth does not have a clamping device. Punch 22 is inserted at one end into the pushing head 23, and at the other into the bar 24. Its position is adjusted by a nut 25. A spring 27 is installed between the nut 25 and the guide sleeve 26. The pushing head of the punch slides along the guide sleeve 28, pressed into the bar 29. Combined die installed on the stove and covered with a casing. To thicken the teeth of band saws, the DIXA device (PNR) is used. The distance between the teeth undergoing thickening is 17 mm, the minimum tooth height is 9 mm, the maximum saw thickness is 3 mm. For lateral profiling, leveling and grinding of flattened teeth of band saws, the DHCA-20 machine (PNR) is used.