First, let's start with some definitions to make it clearer what we are talking about. What is it and what is it used for?
Winch
- This is a technical device with the help of which lifting and some kind of movement of cargo is carried out. Serves as a lifting element on cranes and elevators.
The area of use is very wide and varied. They are useful in installation work, construction, repairs and so on. During construction, for example, a winch is simply an irreplaceable thing for installing and assembling building elements and structures when moving heavy loads on construction sites; for lifting various machines and mechanisms at industrial enterprises.
Winches significantly simplify the work performed and help complete the task within the stated time frame.
Scope of winches
The scope of effective use of a lift in this category can hardly be overestimated, since its use can reduce time costs and reduce the labor intensity of cargo operations several times.
The manual model has found wide application both in everyday life and in the professional field. It is used by builders, transportation companies, installers, riggers, and repair crews. The electric winch is used more often. It is included in the set of required tools:
- mobile mobile teams carrying out rigging;
- carriers (moving, cargo transportation);
- emergency technical assistance teams;
- builders and repairmen;
- installers (building structures).
Manufacturing, mining, and industrial enterprises equip workshops and sites with an electric winch for transferring materials, delivering machines to the site of operation, efficiently organizing processes, etc.
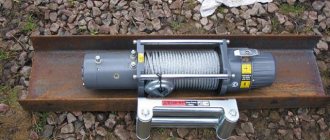
Motor winch Dacha
The Dacha motor winch is designed for moving loads. Complete with a plow and hiller, it can be used for plowing the soil and hilling in subsidiary and gardening farms.
The most important advantage that will determine the choice of many summer residents is the ability to transport the winch in the trunk of a car.
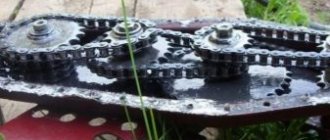
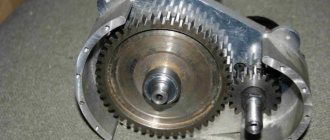
The device of the motor winch "Dacha"
Fig1
frame 1, handrail 2, backup ignition switch 3, engine 4, engine start handle 5, spark plug 6, oil dipstick 7, muffler 8, air filter 9, carburetor 10, gas tank 11, drive pulley 12, driven pulley 13, tension roller 14 , V-belt 15, protective cover 16, final drive chain 17, drum 18, cable 19, pressure roller lever 20, drum pedal 21, step with lug 22.
You can fully familiarize yourself with the operating manual for the Dacha motor winch by downloading it here
Technical characteristics of the Dacha motor winch.
| Characteristics | Meaning | |
| Dry weight, kg | 45 | |
| Overall dimensions in working condition, mm: length width height | 850 400 840 | |
| Rope | diameter, mm | 5,1 |
| length | 40 | |
| GOST | 2288-80 | |
| Engine | type | Gasoline, four-stroke, 1 cylinder |
| Power, hp | 6,5 | |
| Weight, kg | 17 | |
| Fuel tank capacity, l | 5 | |
| Fuel | AI-92 | |
| Chain PR 12.7-18.2-1 | number of links, pcs | 64 |
| GOST | 13568-97 | |
| V-belt | profile | A |
| length, mm | 1280 | |
| GOST | 1284.2-99 | |
Exploitation. When working to move cargo, plowing and hilling, the motorized winch must be serviced by two people: a mechanic and an assistant. The motor operator controls the winch and moves it, the auxiliary attaches the load being moved, and moves the tool during plowing, hilling and other work.
Operations for working with a motorized winch must be carried out in compliance with the rules specified below, in the following sequence: 1. install the motorized winch opposite the object or plow being moved. 2. The mechanic must press the step so that the lugs are completely inserted into the ground, the motorized winch takes a stable position and continue to stand on the step while performing all other actions. 3. unwind and hook the rope. To do this, the mechanic presses the drum pedal, and the assistant unwinds the rope. Moreover, the end of the drum should be pressed against the brake shoe located on the right side. Thus, the mechanic slows down the rotation of the drum a little so that the rope does not get tangled. 4. if the rope is attached, then the assistant signals to the mechanic that he is ready to move, and he himself leaves the zone of movement of the rope in order to remain safe in the event of its breakage. 5. Having received a signal of readiness from the assistant, the mechanic releases the drum pedal and checks the position of the pressure roller lever in the farthest position from the handrail.
Then, the mechanic switches the main and backup ignition toggle switches to the “ON” position and starts the engine (see page 3 “RD”). A duplicate toggle switch is installed for convenient operation of the motorized winch. Therefore, in the future it is enough to switch only the backup toggle switch, and the main one can remain on. 6. After warming up the engine at idle speed for 3-5 minutes, the mechanic switches the pressure roller lever towards himself so that the rope is wound onto the drum, moving the fixed object or plow. 7. The rotation is stopped by switching the pressure roller lever to the farthest position from the handrail simultaneously with pressing the drum pedal or switching the backup ignition toggle switch to the “OFF” position.
CAUTION: when moving a load or plow, do not allow it to come into contact with the motor winch frame to prevent the rope from breaking. 8. To move the motor winch, you need to turn off the engine, switch the backup ignition switch to the “OFF” position, remove your feet from the step, remove the lugs from the ground and move the motor winch to a new position. 9. upon completion of work, disconnect the rope from the load or plow, wind it on the drum (see paragraphs 5-7) and secure it to the hook on the frame, drain the fuel from the gas tank, lower the handrail all the way, raise the step.
Possible malfunctions and repairs of the Dacha motor winch
| Malfunction | Causes | Determination method | Elimination methods |
| Chain slippage | Chain stretching, chain wear, bearing wear, sprocket tooth wear | Visually | Shorten chain, replace bearings, replace chain, replace sprockets |
| Motorized winch cannot move load | Chain or V-belt slippage | Visually | Replace V-belt |
| Spontaneous drum shutdown | The drum spring is weakened, the edges of the drum segments are worn | Visually | Replace the drum spring, correct the edges of the drum segments with a file |
Photo of the motor winch “Dacha”
Types of winches
of gearbox for the winch largely depends on the type of product ). The first of them is the operating principle; here a distinction is made between manual and electric winches.
- The manual model is inferior to its analogue in terms of performance and maximum lifting weight. But it wins in price and ease of use.
- The electric model is more convenient, more productive and works faster. At the same time, it is distinguished by a simple design - the assembly includes a frame on which a motor, a brake, a winding drum and a winch drive gearbox , which drives the drum.
Another classification feature divides structures into traction and lifting. The former are designed to move loads horizontally (crane trolleys, pipes), the latter are designed to lift materials to a given height. The transfer distance and the height of lifting loads also largely determine the requirements for the design of the gearbox for the winch .
Design is another sign of division into classes. Depending on it, electric winches are divided:
- single-speed and multi-speed;
- with 1 reel or several.
Do-it-yourself winch - price
If you have your own garage or shed with rubbish accumulated over several years of home plumbing, the cost of the product is determined by the price of a can of spray paint for final finishing.
Basically, the components are as follows:
- Starter from a VAZ 2101 car without a planetary gearbox (working, lying in the garage);
- A gearbox in a housing from a domestically produced electric drill (purchased at a flea market for the equivalent of 0.5 vodka);
- A piece of water pipe found in a barn;
- Metal for the frame, body walls, drum. Also found in a barn;
- Drum axle - purchased at a scrap metal collection point for pennies;
- The rope and hook were purchased at a tourism supply store.
Taking into account the cost of a new winch, the cost of the issue can be considered zero. At the same time, the owner can vouch for the safety of the device. Every detail and weld is personally checked by the manufacturer.
Source: obinstrumente.ru
Which gear mechanism is suitable?
The gear motor is responsible for traction power, reliability (stability) of operation and safety of use of the winch structure. Depending on the type of lift itself, it can be (in descending order of popularity):
- planetary gear motor with brake (rarely used);
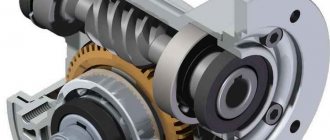
- helical gearbox (2 gear stages);
- worm gearbox for a winch with an electric motor (the most common option).
Read also: How to autostart a generator during a power outage
The most widely used winch is a worm gear . This is the most balanced option in terms of price and power. True, the cylindrical alternative allows you to increase the characteristics of the lift (along with noise).
Equipment selection
One of the key conditions for the correct choice of a spur or worm gearbox is the power of the electric motor. This is a calculated value, which is determined on the basis of the nominal (passport) characteristics of the connected devices, namely:
- ascent speed;
- Efficiency of a worm or helical gearbox ;
- drum size, etc.
When calculating the gearbox, 4 indicators are taken as a basis:
- mode;
- gear ratios (actual, nominal);
- distance between axles;
- level of load (cantilever) on the output (low-speed) shaft of the worm gearbox .
Manufacturing process
Assembling the gearbox begins with a cast iron or aluminum housing. It needs to be selected from the factory, since you cannot make the case yourself. The housing houses gears and axles that can withstand the necessary loads. As a basis for assembling a reversible gearbox, you can take a gearbox from an old VAZ-2107. The sprockets, rod, bushings and fork will have to be machined from metal. All parts undergo a hardening process.
To assemble a good gearbox, it is important to consider how the circuit for switching the direction of movement of the walk-behind tractor works:
- On the main shaft there is a drive sprocket, which transmits torque to the drive bevel gear.
- There are two driven gears, they are located on a splined shank. One of them begins to rotate. It engages with a spline on the main shaft and transmits movement to the wheels of the car or differential.
- There is a fork on the reverse rod. It is used to flip the bushing to the right, left or neutral. In this way, commands are given to change the direction of movement.
- The gearbox is controlled by a rod lever.
For a high-quality design of a reverse gearbox, you need to consider:
- Rotational speed;
- Rated power;
- Permissible heating temperature;
- Maximum loads on axles and parts;
- The angle at which the gearbox is located;
- The amount of torque;
- Option for lubrication of contacting parts;
- Frequency of work.
It is also important to operate the gearbox assembled in this way correctly, otherwise it may quickly break. The main reasons are too much load, leading to overheating of the shaft and parts, and breakage of teeth. An incorrectly selected gear ratio can also lead to breakdowns. Regular maintenance of the main components and mechanisms of the walk-behind tractor cannot be neglected.
A properly designed homemade reverse gearbox should ensure an increase in the power of the walk-behind tractor during a sharp drop in speed,
Source: izdoski.com
Helical gearbox for winch
| Applicability of spur gearboxes in winches | |
| Winches TL-8B | Two-stage horizontal cylindrical gearboxes, types 1Ts2U-160 |
| Winches LEM-10, LEM-15, LEM-20 | Single-stage narrow horizontal cylindrical gearboxes, types 1TSU-160 |
| Winches TL-12A, TL-12B | Single-stage narrow horizontal cylindrical gearboxes, types 1TSU-100 |
| Shunting winches TL-8B | Two-stage horizontal cylindrical gearboxes with Novikov gearing, types Ts2U-315N |
| Winches LEM-8 | Two-stage horizontal cylindrical gearboxes with Novikov gearing, types Ts2N-450 |
| Winches LEM-10, LEM-15, LEM-20 | Two-stage horizontal cylindrical gearboxes with Novikov gearing, types Ts2N-500 |
Angular gearbox made of satellites
Moderator: User buggy
Angular gearbox made of satellites
Weather report » Sat Mar 28, 2015 6:19 am
Re: Angle gear made from satellites
Post by ed24ru » Sat Mar 28, 2015 7:01 am
Re: Angle gear made from satellites
Weather report » Sat Mar 28, 2015 7:29 am
Re: Angle gear made from satellites
Weather report » Sat Mar 28, 2015 7:31 am
Re: Angle gear made from satellites
Post by RusWin » Sat Mar 28, 2015 9:53 am
Re: Angle gear made from satellites
Weather report » Sat Mar 28, 2015 7:04 pm
Re: Angle gear made from satellites
Post by mmcl200 » Mon Mar 30, 2015 3:30 pm
Re: Angle gear made from satellites
Post by Ivan66 » Mon Mar 30, 2015 8:38 pm
Re: Angle gear made from satellites
Post by Black_Arrow » Fri Apr 03, 2015 11:13 am
Maintenance of winch gear motors
The longevity of any device - a spur gearbox or a worm gear mechanism - directly depends on the quality of equipment maintenance. One of the key points of this program is lubrication.
For uninterrupted service, you need to periodically add oil to the winch gearbox . In most cases, grease is used for such purposes, but graphite (graphite) lubricant can also be used as an alternative.
The most effective way to avoid early repair of a winch gearbox is to choose the equipment wisely, carefully study the operating rules and follow the maintenance requirements prescribed by the manufacturer. If these conditions are met, not only the gear motor will last longer, but also the electric winch.
Making a homemade gearbox for a walk-behind tractor
To make a homemade gearbox for a walk-behind tractor, parts were taken from the V-150 M engine: crankcase, gears, chain sprockets, as well as an additional gearbox shaft. The crankcase must be cut into two halves and the kickstarter, gearshift mechanism and crank chamber removed from it. You need to install a plug at the kickstarter exit point and weld it using argon welding.
We install the bearing axle box of the right running wheel of the walk-behind tractor into the left half of the crankcase. A spare crankcase of the same engine is used as an axle box.
A part of the V-150 M engine crankcase is also used as the left cover, which is supplemented with one part - a duralumin bushing. The bushing is pressed into the crank chamber and has a hole corresponding to the diameter of the engine output shaft shank.
Walk-behind tractor chassis
- 1 – right wheel;
- 2 – left wheel;
- 3 – first gear gear;
- 4 – drive shaft;
- 5- gearbox;
- 6 – drive gear;
- 7 – bushing;
- 8 – locking screw;
- 9 – drive shaft housing;
- 10 – axle box flange;
- 11 – nut and bolt M8;
- 12 – splined bushing;
- 13 – shaft;
- 14 – M14 nuts;
- 15 – washer;
- 16 – oil seal;
- 17,18 – bearings;
- 19 – engine.
Walk-behind tractor drive shaft
- 1,2 – cantilever parts of the shaft (from the secondary shafts of the V-150 M gears);
- 3 – gear (from the first gear gear V-150M);
- 4 – front part of the shaft (bar d22 mm);
- 5 – cut-off collar.
The motor and gearbox are fixed relative to each other using an M10 screw.
Buy a winch gear motor
PTC Privod LLC, a manufacturer of gearboxes for cargo winches , offers a series of equipment to equip lifts of this type. In our catalog you can order:
- worm gearbox series 2Ch-63, Ch-160 and imported analogue NMRV;
- helical gearbox type 1Ts2U-100, Ts2N-450.
What we guarantee: reliability, functionality, compliance of the equipment with the declared characteristics and a favorable price without intermediary surcharges. From us you can buy a winch gearbox with delivery throughout Russia, receive detailed advice on choosing a mechanism and professional assistance in calculating the required parameters. Applications and questions are accepted by phone 8–800–2000–220 or by email This email address is being protected from spambots. You must have JavaScript enabled to view it. .
One of the popular ways to make a homemade electric winch is to use a car starter. This device is equipped with a powerful high-torque electric motor with a supply voltage of 12 volts, which allows the winch to be used on an SUV.
When manufacturing, you should remember the limitations:
- The starter is designed for short-term operation. This does not mean that it will immediately burn out under prolonged load, but the motor housing does not provide sufficient winding cooling. If you plan to use the winch regularly and the work periods will be long, you should take care of additional cooling. For example, weld aluminum corners onto the body as cooling fins;
- The car starter is started using a retractor relay with a bendix. You don't need a solenoid for the winch, but a contact starter wouldn't hurt. The current at the contacts will be large, and it is better to leave the standard switching circuit. Depending on the gearbox used, the bendix should be fixed by welding in the position of maximum engagement or removed from the solenoid relay;
Read also: Rating of wood splitting axes
Homemade gearboxes, gearboxes, etc.
Questions can only be asked after registration. Please login or register.
I propose to collect homemade gearboxes, gearboxes, drive axles and the like in one place. Discuss methods for manufacturing parts and housings for them. TO THE EDITOR - if there is already a similar topic - please tell me.
here is my bevel gear. gears from the differential from the gear, the axle gear was tucked under the 25 mm shaft and the bushing was welded, the pinion gear was simply welded to the 20 mm shaft, everything else can be seen from the photographs, if you ask for a photo of cutting the splines post-on, I just wanted to show how I cut it with alignment, I didn’t bother
Remember: it’s better to lose a day, then fly to my channel in five minutes https://www.youtube.com/channel/UC1vTkviCAeiA9Z4yTOHM7uQ
Finally the Internet is working. I assembled it 2 years ago to connect the GAZ-51 gearbox and the M-412 bridge. The body is channel 14, gears are from the 51st gearbox (3rd gear, splines are welded into the drive gearbox for the output shaft of the GAZ-51 gearbox), and at the output of the gearbox there is a cut-off secondary shaft of the GAZ-51 gearbox.
Built a boring head.
I'll try to bore it for a homemade transfer case.
Built a boring head.
and what is the cutter itself made of? I thought for a long time about what I could make a reduction gear out of, and today it dawned on me, I found the crown of the launcher and the bendex starter, the gear ratio should be about 7.5 and the chain drive 2.3 in total 17.25, maybe it will be useful for someone, for example, for making a meat grinder.
Remember: it’s better to lose a day, then fly to my channel in five minutes https://www.youtube.com/channel/UC1vTkviCAeiA9Z4yTOHM7uQ
and what is the cutter itself made of?
A sharpened tap. Today I tried to sharpen it a little - it takes cleanly, now I just have time to choose a free time.
A cutter made from a tap is for small holes (up to 30 mm), for “larger” ones – soldered.
I put the transfer case aside for now - I don’t have much time, I’m making the same gearbox as before. The GAZ gears couldn’t withstand the uprooting of cherries in the fall. These should withstand it (the gearbox is from KPI, it feeds the mass into the chopper).
The computer did not send photos and then refused to turn on. It can’t work from the phone either. I'll try to install the gearbox tomorrow.
Not in order, but you can understand.
The gearbox is assembled, tested and working. Now a reverse gearbox suggests itself. If anyone has done this, tell me which gears it is made of.
The topic has died down, probably no one is interested in it. Winter has passed, but there was not enough time for the gearbox, now we have to hurry. In general terms: I used gears from the gearbox - Gas 52 and the oil pump drive gear from engine A - 41, the drive shaft from the primary ZAZ gearbox and the secondary gearbox Gas 52, housing - sheet 10 mm. Photo of preliminary assembly, the body is not finished yet.
The topic has died down, probably no one is interested in it. Z
Why isn’t it interesting, very much so, but I don’t understand where the reverse is?
I made one for myself, later I’ll make another one, but this time with access to the front, and I need to think about something with the reverse
The topic has died down, probably no one is interested in it. Z
Why isn’t it interesting, very much so, but I don’t understand where the reverse is?
The drive gear moves on splines, connecting to the driven gear directly or through a gap (double).
Explain, I don’t know how you set the diameter for the bearing on the head?
Explain, I don’t know how you set the diameter for the bearing on the head?
First I go through with a small drill (5-10 mm), then a few mm less than the required diameter (I couldn’t find more than 50 mm, so it took me a long time to bore to the required 80), and after the drill, 0.25 - 0.5 mm per pass with measurement after each pass. The head is homemade, it “plays” a little, you have to play it safe.
after the drill 0.25 - 0.5 mm per pass
Can I have a drawing (schematic) of the head, I’m interested in the cutter feed mechanism itself
, I’m interested in the cutter feed mechanism itself
so he even has a video here, a regular drilling machine and a cutter with an offset
I'm interested in the cutting mechanism itself
Yes, everything is quite primitive, the thread is m8x1, loosened the dovetail clamp, turned the screw, for example, 1/4 turn - the hole diameter changed by 0.5 mm. The accuracy is not high, but it is enough to seat the bearing.
thread m8x1, loosened the dovetail clamp, turned the screw, for example, 1/4 turn - the hole diameter changed by 0.5 mm.
wow primitive! I can't do this.
We also need a gearbox, from the engine to the clutch. The gears from the ZID gearbox (2nd gear) and the gear from the guitar lathe to the parasite came in handy. Still in the process.
Here is the result. The reduction is 2.91, the input is from the engine crankshaft through the “donut” from the VAZ, the output is the ZAZ flywheel.
Noting in this thread .. I’m also thinking about a gearbox .. a little history: having installed a diesel engine on a Zila, the speed of 60-65 at 2300 rpm was not enough. so that's what I'm getting at. I have thoughts about making a divider like on a Kamaz and putting it in front of a Zilov gearbox. train of thought: take the input shaft from the ZiL high-speed gearbox (there are such... but a large gap between 3rd and 4th gear is very difficult for the engine). I repeat: the input shaft is the secondary shaft from the same gearbox. an intermediate shaft with a constant mesh gear (high-speed) and a 5th gear driven and driven (the gear ratio is 0.85, I don’t remember exactly) using the method of welding, etc., connect the secondary shaft of my gearbox with the primary shaft of the original ZIL gearbox and hide it all in a 20mm metal housing, trick up the fork included and get something like this. https://www.sychaolida.com/upload/201301/1357828666.jpg
Cool stuff. Where did it come from, where can I see the details?
About 30 years ago, calculating a gearbox was my course project, but now I don’t remember anything. The plans are to build an all-wheel drive mini tractor with a classic layout; a gearbox is needed between the transfer case and the rear axle.
Has anyone dealt with homemade blocking? I want to do chemical research on the T-150.
To liven up the topic a little, I want to tell you about my gearbox, it was made to remove the PTO from the VAZ-21093 gearbox with a smooth decrease in speed, since I work at a large machine tool plant, there were no special problems with manufacturing, the body is made of sheet metal 6 mm thick , with two stages of reduction, the gears were taken from gear grinding machines, replacement gears for them come with a difference of one tooth, so I could choose absolutely any gear ratio, I settled on a general gear ratio of 1: 4.05, the holes for the bearings were made with a larger diameter than the bearings themselves, then the rings were machined and welded into the holes, then the bearings were pressed into both holes for alignment, holes were drilled for the studs connecting the two parts of the housing, two gears with the 5th gear shift fork were removed from the gearbox, a small gear was put on the gearbox input shaft gearbox, the intermediate shaft is made from the secondary shaft of the ZAZ gearbox, and the engagement synchronizer is also from it, the secondary (driven) shaft of the gearbox is made from the gear shaft from the UAZ transfer case, the original gear was cut off from it and the required one was welded,
Source: fermer.ru
How to make a winch from a starter
Let's take the Zhiguli starter as the initial donor. It is quite reliable and at the same time has a compact size. Another advantage of this choice is that a VAZ starter can be found almost for free at any dismantling of domestic cars.
The drawing shows the device and components of the starter. In the upper part there is a retractor relay with power contacts. They can be used if large loads on the winch are expected. On the left is the bendix mechanism, which must be removed along with the cone housing.
Since we are talking about a compact, low-power mechanism, it makes no sense to make a gearbox for a winch from a flywheel gear. It is enough to pick up a unit from a large drill. Finding one will also not be difficult, since there are more tools with a burnt out motor at flea markets than with a broken gearbox.
There are no special requirements for the gearbox, the main thing is that the diameters are more or less suitable.
For our adaptation, of course, we need to reduce the speed.
We separate the Bendix housing from the winch, and we are left with only an electric motor with a rotor shaft. The coupling of the gearbox shaft with the mating part of the starter motor is done locally. There are many ways - from banal electric welding to making a transition coupling with cotter pins.
If it is necessary to increase the gear ratio, you can use a starter with a planetary gearbox. Adapting it to your design is not much more difficult than connecting the shafts directly, and the useful power of the winch will increase significantly.
To protect the operator from rotating parts, the space between the gearbox and the engine is closed with a pipe of a suitable size, possibly made of plastic. The casing does not carry a power load, so the gearbox housing must be firmly connected to the motor housing.
Simple threaded studs will not work here; you need to work on the design. In this case, the housing must be dismountable for periodic inspection and maintenance (cleaning, lubrication) of the motor bearings and gearbox mechanism.
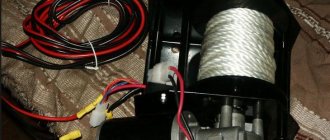
Next we make the drum. You can make it at home from a piece of steel pipe with a diameter of 120-180 mm and sheet iron 2-3 mm thick.
We cut out round cheeks and weld them to the pipe. In the center of each sidewall we drill a hole for the power shaft.
The power shaft with the working gear in this design is borrowed from a decommissioned electrified valve mechanism, which is used on gas and oil pipelines. Be sure to use a standard pair of gears, otherwise it will be difficult to pair the main sprocket with the gearbox output.
All elements must be securely welded together; any weakness will sooner or later crack, and the structure will fall apart at the most crucial moment.
Read also: What is a diode measured in?
A channel or steel strip with a thickness of at least 5 mm is used as a frame. The winch elements should not have any play relative to each other.
The side walls are made of sheet iron 3-5 mm. Thinner sheets may become deformed when the cable is pulled under load.
The most important part is attaching the drum axis. For this, powerful bearings with podiums from some mechanism from the times of the USSR were used. You can find such spare parts at scrap metal collection points or in the workshops of abandoned factories.
The podiums are welded to the side walls. If you managed to find only bearings, weld the outer race. Nothing will happen to the rolling mechanism; the bearings simply cannot be replaced.
We attach the gearbox to the frame so that its gear meshes with the power gear on the drum shaft. We remind you that initially we had a set of a shaft and a set of gears. We install an eyelet between the walls - a leash for the cable.
We connect the gearbox with the electric motor from the starter, put the winch in good shape: we clean the welds with a grinder, remove rust, and cover the tool with paint.
The design has been tested to lift weights up to 200 kg. In this version, two gearboxes are used - from an electric drill and a homemade one from a gas electric valve. It feels like there will be enough traction for another 100-150kg.
If you install a starter with its own planetary gearbox, the gear ratio of which will be added to the two existing ones, the capabilities of the device will double.
The video shows an example of a winch using a starter.
How to use the device?
Be sure to provide for the possibility of reversing the power supply to the winch. Reverse is necessary in such devices. Since this is a regular car electric motor, changing “+” to “-” will change the direction of rotation of the shaft.
Let the power starter be the old one, from the solenoid relay. And the start buttons come from ancient electromechanical devices. The button block can provide for polarity reversal.
If the winch is used in a car, do not connect it to the standard battery with the engine turned off. With a good load, you will drain the battery in 10-15 minutes.
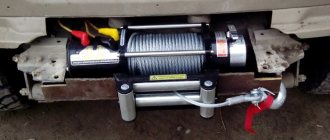
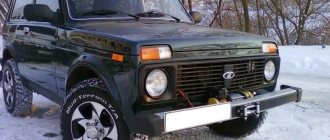
The dimensions allow the winch to be placed on the bumper of an SUV prepared for off-road use.
Rules for receiving online orders
Upon receipt of the goods you must:
- Check the appearance of the order packaging (integrity)
- Open the package and check the presence of all ordered items
- Check the appearance of the order (it must not be broken or wrinkled)
- Check the completeness of the order (delivery set, accompanying documents)
Attention! If you find any defects or damage, you must, in the presence of employees of the transport company or courier, draw up a report (claim) indicating the corresponding defect.
We ask you to also take a photograph of the detected defect. Photos along with a document signed by the transport company employees or the courier must be sent to our email address within 3 days from the date of receipt of the order.
Please note: if you have not checked your order in the presence of the courier or transport company employee and have not drawn up the appropriate report, claims regarding appearance and configuration will NOT be ACCEPTED!