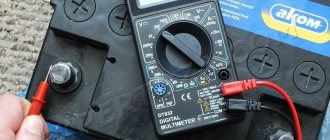
A screwdriver can break at any time. If a malfunction occurs, the first thing you need to do is check the screwdriver battery. More than 70% of problems occur with it, and its cost is comparable to half the device. You can check the electrical system yourself and even replace the batteries, also known as “banks.”
Screwdriver battery device
The battery consists of several elements:
- Rows of batteries.
- Thermal sensor.
- 4 contacts - 2 power, control, service.
Batteries connected in series with the same size and voltage accumulate and then release energy through two power contacts. The final voltage is obtained by summing the voltage of the individual “cans”. The temperature sensor, together with the control contact, protects the drive from overheating, and the service monitors the uniform filling of the “cans”.
Battery device
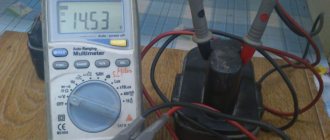
Measuring battery bank voltage
The battery consists of 10 or 12 cells, 1.2 volts each. First they look at the quality of their connection to each other. Sometimes some of them come off, causing problems in the operation of the tool.
Screwdriver battery diagram
If there are no problems with the contacts, measure the voltage of each part of the drive, which should not be less than 1.2. Solder the contacts with a soldering iron. Batteries must not be connected to the sensors. Connect the probes to the poles. If the voltage is less than normal, replace them with new ones.
It happens that the test does not find faulty components. Then repeat the process under load. Connect a 12 volt light bulb through a 10 ohm resistor with a power of 25 watts. The internal resistance level is calculated by dividing the voltage by the current, subtracting the load resistance. Turn on the light bulb for 2 minutes. The brightness should not change. If it goes out quickly, the storage capacity is insufficient.
Related video: How to check the battery of a screwdriver
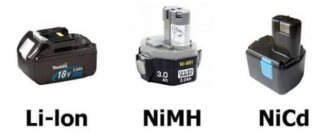
Types of batteries
The batteries in the battery operate on the basis of electrolysis - the process of breakdown and restoration of molecules, during which energy is generated. The anode and cathode initiate the process.
Lithium-ion
They can be recognized by the Li-lon marking. Expensive, reliable and high-quality batteries are used by leading manufacturers of repair equipment, including Makita or Bosch. During operation, lithium breaks down into ions, which explains the name. Lithium batteries do not create a “memory effect” and can withstand more charge-discharge cycles.
Lithium-ion batteries
Nickel
Nickel in combination with cadmium is designated Ni-cd (nickel-cadmium) or Ni-mh (metal hydride). They are used not only in screwdrivers, but also in mobile phones and household appliances. They have a large capacity, but quickly accumulate the ability to self-discharge. But they are not afraid of cold weather and are suitable for storage when discharged.
Nickel-cadmium batteries
Lead
They are the least popular because they have a small capacity and can be harmful to health. The main element is PbO2. However, for now they are used, most often in uninterruptible power supply systems and cars. Lead models are famous for their ability to withstand heavy loads and durability.
Batteries
Checking performance under load
This means that we will check how long it will take for the screwdriver battery to be completely discharged if an additional load is connected to it - for example, a light bulb.
The load level must be selected based on the power of the battery. If it is not indicated in the operating instructions, it should be calculated independently. It will be equal to half the current supplied by the battery during operation, multiplied by U of the current source. Typically this figure is from 35 to 40 Watts, which means that the load can be a headlight from a 35 Watt car, or a 12-volt light bulb.
To take readings, the battery must be connected to the lamp via an ammeter, and the readings themselves must be taken with a voltmeter. The connection time is two to three minutes, after which we measure U. If it is less than 12.4 volts, some “can” is definitely out of order. A significant decrease in the brightness of the light bulb may also indicate a battery malfunction. If it goes out quickly within two to three minutes, the battery is clearly not in order and its capacity is very low.
Getting ready to check the screwdriver battery with a multimeter
If charging is incorrect and the drive tends to self-discharge, it may create a “memory effect.” This is a buildup of crystals that prevents full charging. As a result, the batteries self-discharge: Ni-cd up to 20%, Ni-mh - 30%, Li-lon - 8%. Before starting the test, you need to get rid of this effect.
It is enough to apply the load through a 12V incandescent lamp and carry out several charging and discharging cycles. After three or four repetitions, the battery’s properties will be completely restored, and may not even require further repairs. To ring the battery of a non-working screwdriver, you need to prepare:
- pliers and screwdriver;
- knife and soldering iron;
- tester and multimeter;
- DC voltmeter (15V);
- DC voltmeter and ammeter.
Although the tester and multimeter have overlapping functions, it is worth stocking up on both. The tester gives more accurate readings on the main parameters, which is important when searching for a problem point.
Verification Tools
A multimeter is an indispensable tool that is often used when testing batteries.
Every person who is going to check the performance of a battery should familiarize themselves with the list of necessary documents. To carry out the work you will need the following:
- voltmeter with a constant voltage of 15 V;
- tester;
- multimeter;
- ammeter.
In some cases, the following tools may be needed:
- soldering iron;
- knife;
- straight or Phillips screwdriver;
- pliers.
It is better to prepare all this in advance so that everything you need is at hand.
Testing the battery with a multimeter
First you need to check the screwdriver battery with a prepared multimeter while charging. This will help determine overall performance and whether a more detailed check is needed. The voltage must be measured every hour until the maximum reaches 17V. After half an hour of charging, the indicator should be 13 Volts. On average, it should increase by 0.5V per hour, this indicates the performance of the battery. Towards the end, the rate of increase in voltage drops, this is normal. To check, set the multimeter to DC (voltage) and 20V (voltage will not exceed 20V). At the same time, it is necessary to measure the current with the same regularity (once an hour). For a functioning device, the sensor will show a steady increase in current. Ideally, it should cross the 1 Ampere mark.
Checking the battery with a multimeter
Next you need to check the battery by installing it in a screwdriver or connecting a light bulb with a resistor to it. “Banks” of each type have a standard voltage:
- Li-Ion—3.7 V;
- Ni-MH - 1.2 V;
- Ni-Cd —1.2 V;
- PbO2 - 2.1 V.
To determine the operating voltage of the battery, you need to multiply this indicator by the number of batteries. When the battery is simply inserted into the tool, it operates at idle speed. In this case, the voltage must exceed the operating voltage.
For example, lithium-ion batteries should show 3.7Vx6 = 22.2V, and in idle mode, accordingly, no less than 25V. This check must be carried out after the cell is fully charged. The light bulb is connected to the battery and the voltage and current are measured with a multimeter. If the indicator is lower than the value obtained by the formula, then there are malfunctions. Any discrepancy during one of the initial checks indicates a malfunction of one of the cans or an incorrect procedure.
Multimeter settings for testing
How to check the battery capacity of a screwdriver?
Once we know the voltage, we can check the battery capacity of any screwdriver. This is the amount of energy that a battery delivers over a period of time at a certain voltage. It is measured in Amperes (miles Amperes) per hour - Am*h.
To check, you will need a fully charged battery, a resistor and a light bulb that is disconnected from the screwdriver. You need to connect the light bulb to the battery for it to light up. Then, using a multimeter, we measure the output voltage and note the time after which the light goes out.
Next we apply the formula:
E=M/N*t
E – battery capacity.
M is the power of the light bulb in Watts, indicated on the packaging.
N – measured voltage (must match the value from the previous test).
t is the burning time of the light bulb, which we measured.
We compare the obtained result with the indicators from the instructions for the screwdriver. If the working capacity is much lower than that indicated in the description, then repair is necessary.
How to check the “banks” in the battery
If, based on the test results, it was possible to determine a faulty battery in a good screwdriver, you need to find the non-functioning batteries and replace them. One or more of them may be faulty, so to resume operation of the circuit it is enough to replace the non-working elements. You can also notice problems by the amount of self-discharge of batteries stored without operation per month:
- nickel-cadmium - by 20%;
- nickel metal hydride - 30%;
- lithium-ion storage – up to 8%.
To control self-discharge, voltage measurements must be taken every day for a month.
First you need to disassemble the case; depending on the brand, the process may vary. Then we visually check the connections for integrity. It is quite possible that the batteries themselves are working, you just need to solder the contacts.
If everything is in order, you need to sequentially unsolder each of the “cans” and check in turn. To check, you need to connect the red probe to the positive pole, and the black one to the negative pole. The multimeter will show the voltage in Volts. It should be compared with the standard voltage for this type of battery. In this case, a deviation of 0.1-0.2V is considered within normal limits.
Checking the battery
If general checks show problems, and no faults are found in each of the cans, then you need to check in another way - using a light bulb and a resistor. If the brightness of the glow changes (blinking, gradually decreasing or increasing), then the problem is here.
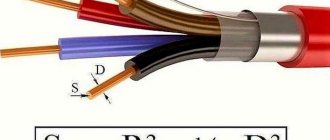
Structure of a battery
A resistor will be needed to check the resistance. The battery resistance is calculated using the formula:
N:AS
N is voltage.
A is the current strength.
S is the resistance of the resistor. The internal resistance of the battery should be as low as possible. For example, if you check the nickel-cadmium battery of any screwdriver, it will be 0.60 Ohm. The fact is that the battery capacity depends on the internal resistance and decreases in inverse proportion. It should be borne in mind that over a year of operation, the internal resistance increases by approximately 6-7%, however, if the value exceeds 1 ohm, the “can” is no longer suitable for use.
Battery in the process of being disassembled
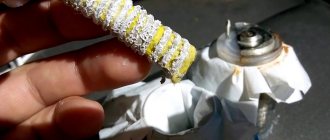
Replacing cans
Batteries are replaced in the usual way - a new one is soldered in place of the old one, repeating the soldering steps in reverse order. In the process you need to follow some rules:
- Solder quickly to prevent overheating.
- The plates must be original or copper of the same size.
- Maintain serial connection.
- The minus of the previous “bank” goes to the plus of the next one.
Before the final voltage check, it is necessary to carry out a discharge-charge cycle.
In nickel-cadmium batteries, you can try to replenish the lack of electrolyte by pouring 1 ml of distilled water into the battery with a syringe. To do this, you need to use an awl to make a hole in the minus area and then seal it with epoxy resin. Other types cannot be restored.
“Memory effect” and what to do about it? + (Video)
If we are talking about ni cd batteries, then for them there is such a thing as the “memory effect”. This “painful symptom” is defined quite simply. When the battery, after going through a full charge cycle, quickly discharges, and after a short pause continues to function again, then this is a correct diagnosis, which, with proper skill, can be cured.
What needs to be done to cure the “memory effect”?
First, the battery is fully charged (preferably at low currents). A small load is then applied to it in order to achieve complete discharge. This simple technique allows you to activate the internal plates of the battery as fully as possible. As an example of a successful load, you can use a regular 220 V incandescent lamp with a power of 60 W. The process of slow charging and discharging should be repeated at least 4-5 times. The result of these measures will be the return of the original battery capacity to 80%.
By the way, if you carry out work on a disassembled battery, where “weak” batteries are already known, then shocking them with a large current can return them to service. If there is electrolyte in the battery, then you can always restore the battery using this method.
How to properly charge your battery
In order for the battery to last longer, you need to carefully follow the charging rules, especially immediately after purchase. Violations of the rules most often result in the “memory effect” and other problems. Here are the main requirements:
- Different models have separate requirements.
- The battery must be disconnected immediately after being fully charged.
- Leave Ni-Cd discharged for long-term storage.
- Leave Ni-MH fully charged.
- Li-Ion should not be completely discharged.
For the first time or after long-term storage, carry out several full charge-discharge cycles. Before long-term use, it is worth carrying out at least an initial check of the battery, because even one faulty “bank” will disrupt the operation of the entire device.
Express testing method: measure U at the battery poles
This method is even simpler, but with its help you can get an initial idea of whether the battery is ok. If we measure U without connecting a load, we get an indicator equal to the “idle speed” of the tool.
For example, if we have 12 cells in the battery with a voltage of 1.2 volts each, and the operating U is 14.4 volts, the “idle” U will increase to 17 volts. If the “idle” voltage is less than specified, this means that there are “banks” in the combination that have failed and need to be replaced. Also, a decrease in idle voltage may mean that the battery is not fully charged.
Guide to action
Before declaring a battery unsuitable for use, it must be tested for functionality.
Verification Tools
To check the battery, you will need to have a voltmeter, ammeter, connecting wires and devices for gripping contacts: alligator clips or clamps. Sometimes the design of the battery pack contacts does not allow connecting devices without disassembling the case. It is very possible that you will have to do some soldering. Here is a list of what you need:
- Charger (original or compatible);
- Multimeter (or better yet two);
- Resistance 4.7 ... 10 Ohms for power from 5 W and more;
- Car lamps 12 V, several pieces;
- Installation wires, cross-section 0.5 mm.kv, 1.5-2 m;
- Screwdriver;
- Sharp knife;
- Scotch;
- Soldering iron with solder and flux.
Instead of a native charger, a laboratory power supply would be very suitable, with a voltmeter and an ammeter for a current of several amperes and a voltage several volts higher than the rating of the battery being tested. For example, an electrical switchgear from a car, if it has good built-in instruments for measuring current and voltage.
To check the battery of a screwdriver, a multimeter is most often used; it is also suitable for measuring the battery capacity.
In addition to everything else, you need to prepare a comfortable workplace with good lighting, and remove flammable liquids and objects away.
First stage
First you need to set the battery type. It is written on its body. The rated voltage and capacity in Ampere-hours or sometimes Watt-hours should also be indicated there. The voltages used can be from the following range: 9.6, 10.8, 12, 14.4, 18, 24, 36 V. The type of batteries and voltage rating make it possible to determine the number of cans inside the block:
| Electrochemical system | Maximum voltage, V | Rated voltage, V | Minimum voltage, V |
| Ni–Cd | 1,37 | 1,2 | 1,0 |
| Ni–MH | 1,25 | 1,2 | 1,1 |
| Li-ion | 4,2 | 3,7 | 2,7 |
A typical battery discharge graph will also be helpful:
A serviceable battery after charging shows the maximum voltage Umax. After some time it drops to the nominal Unom. Then the battery supplies current for a long time, over the interval t ... t1. During this period, as a rule, the rated voltage is slowly reduced to a minimum Umin. At the end of the discharge, the battery begins to deliver current poorly, and the voltage quickly begins to drop.
A voltmeter without load on a normal battery should show a voltage close to the nominal value. If the voltage is less than a multiple of the nominal value of the cans used, it means that one or more have shorted. This can mean a deep discharge, or even an open circuit. Therefore, the real test will be a test under load. Before such a test, you should first fully charge the battery in normal mode, as this is done before using the battery for a long time.
Screwdriver design
Appearance
The first visible difference in the design of cordless and corded screwdrivers is the power source. Corded tools are powered from an outlet using a cable connected to the base of the screwdriver. Battery analogues have contacts on the sole to which the battery is attached.
The body of each screwdriver is plastic. Most appliances have holes to provide ventilation in the motor area. A torque adjustment clutch is attached to the front of the body, followed by a chuck (usually a quick-release clutch).
Under the gearbox area there are 2 or 3 buttons: a through slider (reverse), a start key lock and the key itself. On some units, the reverse slider and trigger lock are combined. At the top of the housing there is a gear switch. Usually it has 2, in rare cases - 3 modes, differing in spindle rotation speed.
Internal structure
The gearbox is located behind the ratchet, which regulates the torque of the screwdriver. There are 2 types of gearboxes: classic (1-speed) and planetary (2-speed). The second mode provides a higher rotation speed of the chuck, therefore it is suitable for using the unit as a drill. The cartridge is threaded onto a spindle located in front of the gearbox.
Behind the gearbox there is an electric motor. The latter consists of a stator, on which there is a winding, and a rotor (armature). Motors are divided into brushed and brushless. The former work using carbon brushes and a commutator, and are common in corded and most cordless screwdrivers. Secondly, the collector contacts have been replaced with an amplifier, which increases service life by eliminating friction and sparking.
Screwdriver device
In the area of the handle there is a structure with an electronic board, due to which the buttons associated with it function:
- the trigger is responsible for turning the engine on/off;
- the reverse slider is responsible for changing the direction of rotation of the cartridge;
- some models have a round button that locks the switch in the required position.
The electrical board is connected by wires to the motor.
Battery device
The battery has recesses for screwdriver contacts, through which energy is subsequently transferred from the battery to the tool. Inside the battery there are lithium, nickel-cadmium or nickel-metal hydride cylindrical cans. They are all connected to each other. The voltage of one element is from 1.5 to 4 volts.
It should be noted that nickel-cadmium banks have a memory effect, as a result of which it is recommended to charge such a battery only when deeply discharged and at full power.
Disassembled battery
Prices in online stores
Finding the cause of the breakdown and eliminating it
Typical signs indicating a breakdown:
- vibration;
- rapid battery drain;
- sparking and burning smell.
If one of the signs occurs, urgent action is required.
Is the battery not fully charging? The problem can be solved by purchasing a new battery or repairing the old one. Regarding nickel-cadmium batteries, it was written above, but lithium and nickel-metal hydride batteries cannot be repaired. The reason for battery failure lies in the decomposition of lithium.
To disassemble the battery, you need to remove the latches from the grooves. The voltage of each bank is measured separately by the tester. If its value is below normal, the battery is removed by disconnecting it from the contact board using wire cutters. In place of faulty batteries, new ones are installed using a soldering iron. Upon completion of assembly, the battery is checked for functionality.
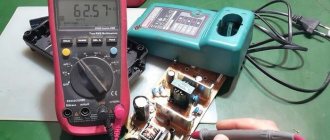
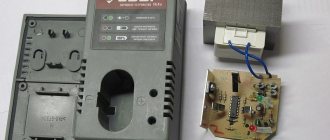
The charger may be damaged. Then first you need to ring the rectifier bridge and the mains fuse. If one of the listed elements or the textolite has turned black, the part needs to be replaced.
Prices in online stores
Mechanical problems
Is your screwdriver making strange noises or is it jammed? The reason lies in the wear of the armature bushings or bearings, and shaft deformation.
If the tightening of the cartridge is loose, the reason is the wear of the clutch teeth. To check the latter, it is necessary to disassemble the screwdriver. Algorithm of actions for repairing or replacing a cartridge:
- Move the chuck jaws to the side by unscrewing the outer rotating part of the chuck.
- The chuck head is attached to the spindle using a special screw. It must be unscrewed using a Phillips screwdriver, rotating it clockwise.
- Next, insert the gas key into the socket and turn it sharply counterclockwise.
- Now you can unscrew the faulty cartridge.
Disassembling a screwdriver
To avoid damage to the gearbox, you should lubricate the mechanical parts that are most often subject to friction. Before doing this, it is strongly recommended to remove the old grease. It is also recommended to lubricate the anchor with machine oil. Algorithm for parsing the gearbox:
- The electrical “filling” of the screwdriver is separated from the lower part of the body.
- Next, the screws connecting the engine to the gearbox are unscrewed.
- You will see a spacer washer covering the gears of the gearbox. Take it off. If some gears are plastic, they may need to be replaced.
Prices in online stores
If the engine is a commutator, a common cause of problems in its functioning is brush wear. In this case, they need to be replaced. Manufacturers of corded screwdrivers include an additional pair of carbon brushes with some models. If a break is detected in the armature windings, it should be replaced with a new one.
Electrical damage
The performance of the screwdriver as a whole depends on the electronics. The electrical board controls the motor, electric speed controller and reversing mechanism.
The battery may be working fine, but the voltage at its terminals is dropping. Most likely, the reason lies in engine defects. Check the trigger. To do this, turn on the multimeter and activate the ringing mode, then install the probes parallel to the button. Next, press the trigger. If the tester does not make a sound, this means the trigger has failed.
Disassembling the button
A common cause of breakage of the start key is oxidation of the contacts or the presence of dust. Disassemble and clean the screwdriver to fix the problem. Algorithm of actions:
- Carefully remove the button push mechanism from its seat.
- Next, you should remove the cover of the “box” with the electrical board. You will need a knife and a screwdriver to push out the latches.
- You will then need a soldering iron to detach the metal plate. Then remove the cover covering the compartment with the device’s activation mechanism.
- Remove the mechanism from the housing, holding the return spring.
- If you see worn contact pads, soak a cotton pad in alcohol and gently wipe them, removing metal dust, or scrape it off with a knife.
The rotation speed of the chuck is not adjustable? The reason is that the transistor is broken, so it will need to be replaced.
Reverse button not working? There may be no electrical resistance, which can be indicated by checking with a tester. The reason for the lack of resistance is damage to the wiring.
Also among the typical damages is a break or short circuit of the stator winding. In this case, it is rewound, and if repair is impossible, the electric motor is replaced with a new one.
Engine sparking during tool operation is due to a blockage in the manifold. The solution to the problem lies in disassembling and cleaning the engine or replacing it. Algorithm of actions:
- At the end of the body there are “antennae”. Move them aside.
- Next, you should knock the rotor out of the housing by hitting the motor shaft with a hammer.
- After you knock out the rotor, the cover will open, where the carbon brushes are located.